用 10 分钟了解 Go 语言 context 包使用场景
点击上方蓝色“Go语言中文网”关注我们,领全套Go资料,每天学习 Go 语言
context 是在 Go 语言 1.7 版才正式被公认的官方标准库内,为什么今天要介绍 context 使用方式呢?原因很简单,在初学 Go 时,写 API 时,常常不时就会看到在 http handler 的第一个参数就会是ctx context.Context,而这个 context 在这边使用的目的和含义到底是什么呢,本篇就是带大家了解什么是 context,以及使用的场景及方式,内容不会提及 context 的原码,而是用几个实际例子来了解。
使用 WaitGroup
学 Go 时肯定要学习如何使用并发(goroutine),而开发者该如何控制并发呢?其实有两种方式,一种是WaitGroup,另一种就是 context,而什么时候需要用到 WaitGroup 呢?很简单,就是当您需要将同一件事情拆成不同的 Job 进行执行,最后需要等到全部的 Job 都执行完成才继续执行主程序,这时候就需要用到 WaitGroup,看个实际例子
package main

import (
    "fmt"
    "sync"
    "time"
)

func main() {
    var wg sync.WaitGroup

    wg.Add(2)
    go func() {
        time.Sleep(2 * time.Second)
        fmt.Println("job 1 done.")
        wg.Done()
    }()
    go func() {
        time.Sleep(1 * time.Second)
        fmt.Println("job 2 done.")
        wg.Done()
    }()
    wg.Wait()
    fmt.Println("All Done.")
}
上面范例可以看到主程序穿透wg.Wait()来等待全部工作都执行完成,才印出最后的消息。这边会遇到一个情境就是,虽然把工作拆成多个,并且丢到背景去跑,可是使用者该如何透过其他方式来终止相关的 goroutine 工作呢(像是开发者都会写背景程式监控,需要连续执行)?例如 UI 上方有停止的按钮,点继续后,如何主动通知并且停止正在运行的 Job,这边很简单,可以使用 channel + select 方式。
使用 channel + select
package main

import (
    "fmt"
    "time"
)

func main() {
    stop := make(chan bool)

    go func() {
        for {
            select {
            case <-stop:
                fmt.Println("got the stop channel")
                return
            default:
                fmt.Println("still working")
                time.Sleep(1 * time.Second)
            }
        }
    }()

    time.Sleep(5 * time.Second)
    fmt.Println("stop the gorutine")
    stop <- true
    time.Sleep(5 * time.Second)
}
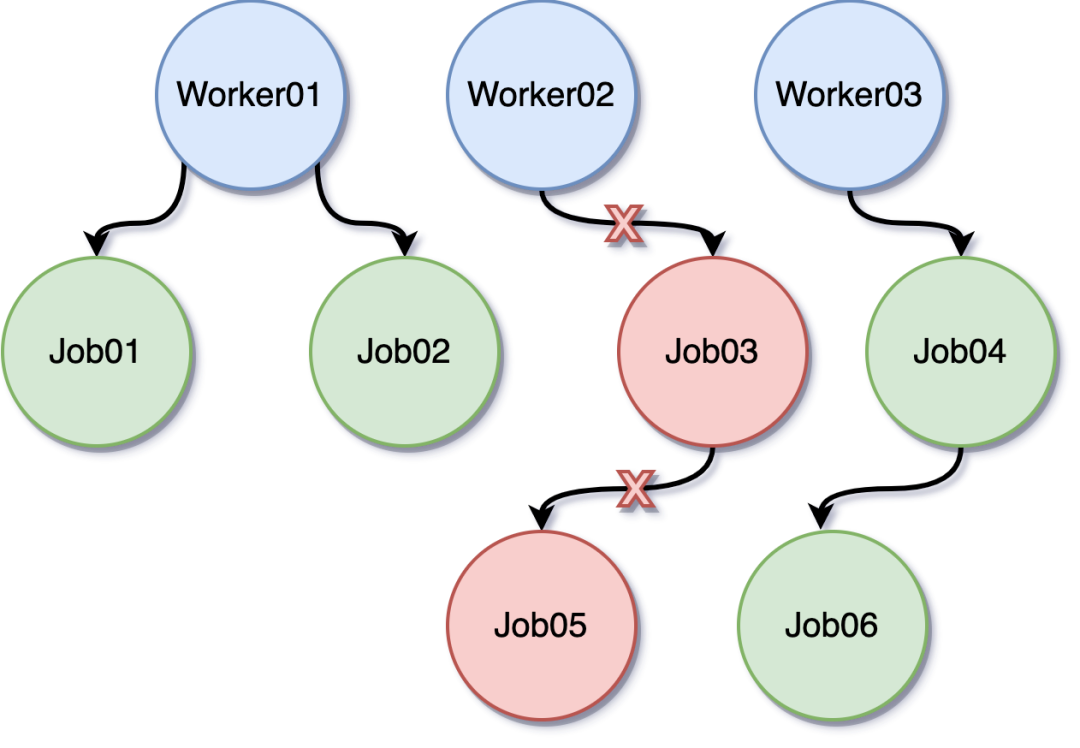
上面可以看到,透过 select + channel 可以快速解决这个问题,只要在任何地方将 bool 值丢入 stop channel 就可以停止背景正在处理的 Job。上述用 channel 来解决此问题,但是现在有个问题,假设背景有跑了无数个 goroutine,或者是 goroutine 内又有跑 goroutine 呢,变得相当复杂,例如底下的状况

这边就没办法用 channel 方式来进行处理了,而需要用到今天的重点 context。
认识 context
从上图可以看到我们建立了三个 worker 节点来处理不同的 Job,所以会在主程序最上面的宣告一个主context.Background(),然后在每个 worker 节点分别在单独建立子上下文中,其最主要目的就是当关闭其中一个上下文就可以直接取消该 worker 内在跑的 Job。拿上面的例子进行改写
package main

import (
    "context"
    "fmt"
    "time"
)

func main() {
    ctx, cancel := context.WithCancel(context.Background())

    go func() {
        for {
            select {
            case <-ctx.Done():
                fmt.Println("got the stop channel")
                return
            default:
                fmt.Println("still working")
                time.Sleep(1 * time.Second)
            }
        }
    }()

    time.Sleep(5 * time.Second)
    fmt.Println("stop the gorutine")
    cancel()
    time.Sleep(5 * time.Second)
}
其实可以看到只是把原本的频道换成使用 context 来处理,其他完全不变,这边提到使用了context.WithCancel,使用底下方式可以扩展 context
ctx, cancel := context.WithCancel(context.Background())
这用意在于每个 worknode 都有独立的cancel func开发者可以透过其他地方呼叫 cancel()来决定哪一个工人需要被停止,这时候可以做到使用 context 来停止多个 goroutine 的效果,底下看看实际例子
package main

import (
    "context"
    "fmt"
    "time"
)

func main() {
    ctx, cancel := context.WithCancel(context.Background())

    go worker(ctx, "node01")
    go worker(ctx, "node02")
    go worker(ctx, "node03")

    time.Sleep(5 * time.Second)
    fmt.Println("stop the gorutine")
    cancel()
    time.Sleep(5 * time.Second)
}

func worker(ctx context.Context, name string) {
    for {
        select {
        case <-ctx.Done():
            fmt.Println(name, "got the stop channel")
            return
        default:
            fmt.Println(name, "still working")
            time.Sleep(1 * time.Second)
        }
    }
}
上面透过一个 context 可以一次停止多个 worker,看逻辑如何宣告 context 以及什么时机去执行 cancel(),通常我个人都是搭配 graceful shutdown 进行取消运转的工作,或者是停止资料库连线等等。。
心得
初学 Go 时,如果还不常使用 goroutine,其实也不会理解到 context 的使用方式及时机,等到需要有背景处理,以及该如何停止 Job,这时候才渐进了解到使用方式,当然 context 不只有这个使用方式,未来将会介绍其他使用方式。
作者:ApplyBoy
原文链接:https://blog.wu-boy.com/2020/05/understant-golang-context-in-10-minutes/
推荐阅读
喜欢本文的朋友,欢迎关注“Go语言中文网”:
Go语言中文网启用微信学习交流群,欢迎加微信:274768166,投稿亦欢迎
