【保姆级解析】我是如何从工作的视角看 Koa 源码的?
1 原生实现
1.1 启动一个服务
node起一个服务有多简单,相信只要会上网,都能搜到类似下面的代码快速启动一个服务。
const http = require('http')
const handler = ((req, res) => {
  res.end('Hello World!')
})
http
  .createServer(handler)
  .listen(
    8888,
    () => {
      console.log('listening 127.0.0.1:8888')
    }
  )
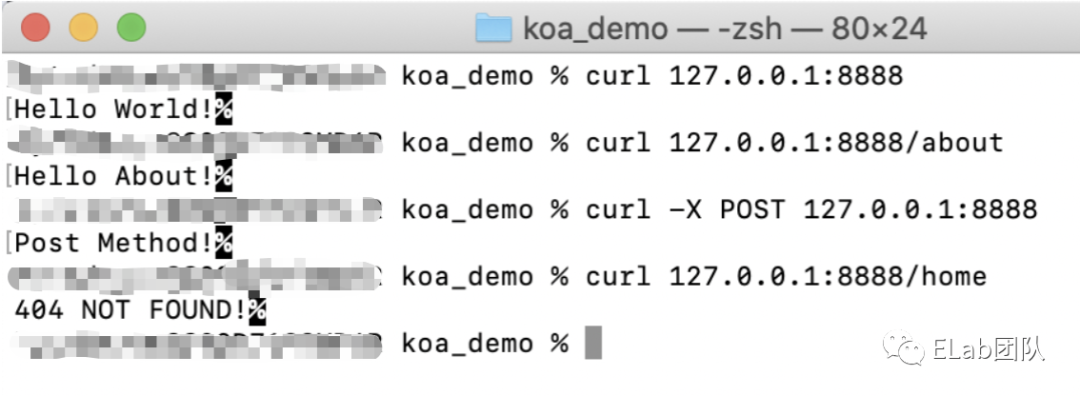
访问127.0.0.1:8888就可以看到页面上出现了'hello world!。随后就会发现修改路由还是请求方式,都只能拿到这样一个字符串。
curl 127.0.0.1:8888
curl curl -X POST http://127.0.0.1:8888
curl 127.0.0.1:8888/about

这个时候肯定就会去找相关文档[1],然后发现刚刚回调函数的 req 居然内有乾坤。我们可以使用 method 属性和 url 属性针对不同的方法和路由返回不同的结果。于是很容易就想到类似下面的写法:
const http = require('http')
const handler = ((req, res) => {
  let resData = '404 NOT FOUND!'
  const { method, path } = req
  switch (path) {
    case '/':
      if (method === 'get') {
        resData = 'Hello World!'
      } else if (method === 'post') {
        resData = 'Post Method!'
      }
      break
    case '/about':
      resData = 'Hello About!'
  }
  res.end = resData
})
http
  .createServer(handler)
  .listen(
    8888,
    () => {
      console.log('listening 127.0.0.1:8888')
    }
  )
但是一个服务不可能只有这么几个接口跟方法啊,总不能每加一个就增加一个分支吧,这样 handler 得变得多长多冗余,于是又很容易想到抽离 handler ,将 path 和 method 解耦。
1.2 策略模式解耦
如何解耦呢?从在新手村的代码中可以发现策略模式[2]刚好可以拿来解决这个问题:
const http = require('http')
class Application {
  constructor () {
    // 收集route和method对应的回调函数
    this.$handlers = new Map()
  }
  // 注册handler
  register (method, path, handler) {
    let pathInfo = null
    if (this.$handlers.has(path)) {
      pathInfo = this.$handlers.get(path)
    } else {
      pathInfo = new Map()
      this.$handlers.set(path, pathInfo)
    }
    // 注册回调函数
    pathInfo.set(method, handler)
  }
  use () {
    return (request, response) => {
      const { url: path, method } = request
      this.$handlers.has(path) && this.$handlers.get(path).has(method)
        ? this.$handlers.get(path).get(method)(request, response)
        : response.end('404 NOT FOUND!')
    }
  }
}
const app = new Application()
app.register('GET', '/', (req, res) => {
  res.end('Hello World!')
})
app.register('GET', '/about', (req, res) => {
  res.end('Hello About!')
})
app.register('POST', '/', (req, res) => {
  res.end('Post Method!')
})
http
  .createServer(app.use())
  .listen(
    8888,
    () => {
      console.log('listening 127.0.0.1:8888')
    }
  )

1.3 符合DRY原则
但是这个时候就会发现:
如果手抖把 method方法写成了小写,因为Http.Request.method都是大写,无法匹配到正确的handler,于是返回'404 NOT FOUND'。如果我想在响应数据前增加一些操作,比如为每个请求增加一个时间戳,表示请求的时间,就必须修改每个 register中的handler函数,不符合DRY原则
此时再修改一下上面的代码,利用 Promise 实现按顺序执行 handler。
const http = require('http')
class Application {
  constructor() {
    // 收集route和method对应的回调函数
    this.$handlers = new Map()
    // 暴露get和post方法
    this.get = this.register.bind(this, 'GET')
    this.post = this.register.bind(this, 'POST')
  }
  // 注册handler
  register(method, path, ...handlers) {
    let pathInfo = null
    if (this.$handlers.has(path)) {
      pathInfo = this.$handlers.get(path)
    } else {
      pathInfo = new Map()
      this.$handlers.set(path, pathInfo)
    }
    // 注册回调函数
    pathInfo.set(method, handlers)
  }
  use() {
    return (request, response) => {
      const { url: path, method } = request
      if (
        this.$handlers.has(path) &&
        this.$handlers.get(path).has(method)
      ) {
        const _handlers = this.$handlers.get(path).get(method)
        _handlers.reduce((pre, _handler) => {
          return pre.then(() => {
            return new Promise((resolve, reject) => {
              _handler.call({}, request, response, () => {
                resolve()
              })
            })
          })
        }, Promise.resolve())
      } else {
        response.end('404 NOT FOUND!')
      }
    }
  }
}
const app = new Application()
const addTimestamp = (req, res, next) => {
  setTimeout(() => {
    this.timestamp = Date.now()
    next()
  }, 3000)
}
app.get('/', addTimestamp, (req, res) => {
  res.end('Hello World!' + this.timestamp)
})
app.get('/about', addTimestamp, (req, res) => {
  res.end('Hello About!' + this.timestamp)
})
app.post('/', addTimestamp, (req, res) => {
  res.end('Post Method!' + this.timestamp)
})
http
  .createServer(app.use())
  .listen(
    8888,
    () => {
      console.log('listening 127.0.0.1:8888')
    }
  )

1.4 降低用户心智
但是这样依旧有点小瑕疵,用户总是在重复创建 Promise,用户可能更希望无脑一点,那我们给用户暴露一个 next 方法,无论在哪里执行 next 就会进入下一个 handler,岂不美哉!!!
class Application {
// ...
  use() {
    return (request, response) => {
      const { url: path, method } = request
      if (
        this.$handlers.has(path) &&
        this.$handlers.get(path).has(method)
      ) {
        const _handlers = this.$handlers.get(path).get(method)
        _handlers.reduce((pre, _handler) => {
          return pre.then(() => {
            return new Promise(resolve => {
             // 向外暴露next方法,由用户决定什么时候进入下一个handler
              _handler.call({}, request, response, () => {
                resolve()
              })
            })
          })
        }, Promise.resolve())
      } else {
        response.end('404 NOT FOUND!')
      }
    }
  }
}
// ...
const addTimestamp = (req, res, next) => {
  setTimeout(() => {
    this.timestamp = new Date()
    next()
  }, 3000)
}
2 Koa核心源码解析
上面的代码一路下来,基本上已经实现了一个简单中间件框架,用户可以在自定义中间件,然后在业务逻辑中通过 next() 进入下一个 handler,使得整合业务流程更加清晰。但是它只能推进中间件的执行,没有办法跳出中间件优先执行其他中间件。比如在koa中,一个中间件是类似这样的:
const Koa = require('koa');
let app = new Koa();
const middleware1 = async (ctx, next) => {
  console.log(1);
  await next();
  console.log(2);
}
const middleware2 = async (ctx, next) => {
  console.log(3);
  await next();
  console.log(4);
}
const middleware3 = async (ctx, next) => {
  console.log(5);
  await next();
  console.log(6);
}
app.use(middleware1);
app.use(middleware2);
app.use(middleware3);
app.use(async(ctx, next) => {
  ctx.body = 'hello world'
})
app.listen(8888)
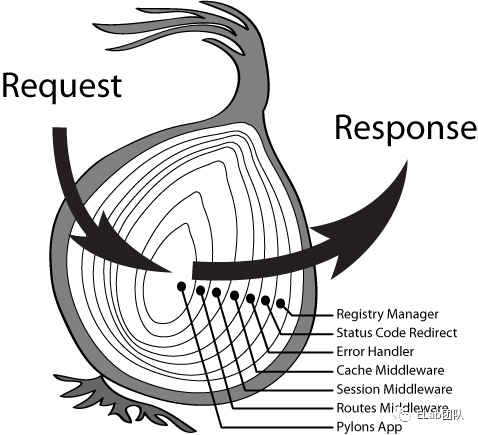
可以看到控制台输出的顺序是1, 3, 5, 6, 4, 2,这就是koa经典的洋葱模型。

接下来我们一步步解析koa的源码[3],可以看到总共只有4个文件,如果去掉注释,合起来代码也就1000多行。
| 文件 | 功能 |
|---|---|
| applicaiton.js | koa程序的入口,管理和调用中间件,处理http.createServer的回调,将请求的request和response代理至context上 |
| request.js | 对http.createServer回调函数中的request的封装,各种getter、setter以及额外属性 |
| response.js | 对http.createServer回调函数中的response的封装,各种getter、setter以及额外属性 |
| context.js | 代理request和response,并向外暴露一些功能 |
创建Koa实例的时候,Koa做的事情其实并不多,设置实例的一些配置,初始化中间件的队列,使用 Object.create 继承 context、request 和 response。
2.1 constructor
constructor(options) {
super();
// 实例的各种配置,不用太关注
  options = options || {};
  this.proxy = options.proxy || false;
  this.subdomainOffset = options.subdomainOffset || 2;
  this.proxyIpHeader = options.proxyIpHeader || 'X-Forwarded-For';
  this.maxIpsCount = options.maxIpsCount || 0;
  this.env = options.env || process.env.NODE_ENV || 'development';
  if (options.keys) this.keys = options.keys;
// 最重要的实例属性,用于存放中间
  this.middleware = [];
// 继承其他三个文件中的对象
  this.context = Object.create(context);
  this.request = Object.create(request);
  this.response = Object.create(response);
}
因为Koa仅用于中间件的整合以及请求响应的监听,所以我们最关注的Koa的两个实例方法就是 use 和 listen。一个用来注册中间件,一个用来启动服务并监听端口。
2.2 use
功能非常简单,注册中间件,往实例属性middleware列表中推入中间件。
use(fn) {
  if (typeof fn !== 'function') throw new TypeError('middleware must be a function!');
// 利用co库转换generator函数,v3版本会移除,直接使用promise以及async...await
  if (isGeneratorFunction(fn)) {
    deprecate('Support for generators will be removed in v3. ' +
              'See the documentation for examples of how to convert old middleware ' +
              'https://github.com/koajs/koa/blob/master/docs/migration.md');
    fn = convert(fn);
  }
  debug('use %s', fn._name || fn.name || '-');
  this.middleware.push(fn);
// 用于链式注册中间件 app.use(xxx).use(xxx)...
  return this;
}
2.3 listen
它的实现非常简单,就是直接调用 http.createServer 创建服务,并直接执行server.listen[4]的一些操作。稍微特殊一点地方是 createServer 传入的参数是调用实例方法 callback 的返回值。
listen(...args) {
  debug('listen');
// 创建服务
  const server = http.createServer(this.callback());
// 透传参数,执行http模块的server.listen
  return server.listen(...args);
}
2.4 callback
调用 compose方法,将所有中间件转换成Promise执行,并返回一个执行函数。调用父类 Emitter中的listenerCount方法判断是否注册了error事件的监听器,若没有则为error事件注册onerror方法。定义传入 createServer中的处理函数,这个处理函数有2个入参,分别是request和response,通过调用createContext方法把request和response封装成ctx对象,然后把ctx和第一步的执行函数fn传入handleRequest方法中。
callback() {
// 后面会讲解koa-compose,洋葱模型的核心,转换中间件的执行时机。
  const fn = compose(this.middleware);
// 继承自Emitter,如果没有error事件的监听器,为error事件注册默认的事件监听方法onerror
  if (!this.listenerCount('error')) this.on('error', this.onerror);
//
  const handleRequest = (req, res) => {
// 调用createContext方法把req和res封装成ctx对象
    const ctx = this.createContext(req, res);
    return this.handleRequest(ctx, fn);
  };
  return handleRequest;
}
2.5 createContext
createContext 的作用是将前面讲到的 context ,request,response 三个文件暴露出来的对象封装在一起,并额外增加app、req、res等,方便在ctx中获取各类信息。
createContext(req, res) {
  const context = Object.create(this.context);
  const request = context.request = Object.create(this.request);
  const response = context.response = Object.create(this.response);
  context.app = request.app = response.app = this;
  context.req = request.req = response.req = req;
  context.res = request.res = response.res = res;
  request.ctx = response.ctx = context;
  request.response = response;
  response.request = request;
  context.originalUrl = request.originalUrl = req.url;
  context.state = {};
  return context;
}
2.6 handleRequest
获得res,将状态默认置为404 定义失败的回调函数和中间件执行成功的回调函数,其中失败回调函数调用 context中的onerror函数,不过最终还是触发app中注册的onerror函数;成功回调函数调用respond方法,读取ctx信息,把数据写入res中并响应请求。使用 on-finished模块确保一个流在关闭、完成和报错时都会执行相应的回调函数。执行中间件函数 fnMiddleware,类似于Promise.all,当全部中间件处理成功后,执行handleResponse,否则捕获异常。
handleRequest(ctx, fnMiddleware) {
  const res = ctx.res;
  res.statusCode = 404;
  const onerror = err => ctx.onerror(err);
  const handleResponse = () => respond(ctx);
  onFinished(res, onerror);
  return fnMiddleware(ctx).then(handleResponse).catch(onerror);
}
3 Koa-compose
koa-compose源码[5]非常简略:
首先校验一下入参的合法性,最终返回一个函数。 该函数内部使用 index作为标识记录当前执行的中间,并返回从第一个中间件执行dispatch的结果。如果一个中间件内部多次执行next()方法,就会出现i的值等于index,于是会报错reject掉。根据 index取出中间件列表中的中间件,将context和dispatch(i + 1)中间件的入参ctx和next传入,当中间件执行next()方法时,就会按顺序执行下一个中间件,且将当前中间件放入执行栈中,最后当i等于中间件数组长度时候,即没有其他中间件了,就将入参next(在Koa源码里是undefined)赋值给fn,此时fn未定义,于是返回空的resolved状态的promise。当最核心的中间件执行完成后,自然会触发 await向下执行,开始执行上一个中间件,最终就形成了从外向里,再从里向外的洋葱模型。
// 入参是一个中间件列表,返回值是一个函数
function compose (middleware) {
// 检查中间的合法性
  if (!Array.isArray(middleware)) throw new TypeError('Middleware stack must be an array!')
  for (const fn of middleware) {
    if (typeof fn !== 'function') throw new TypeError('Middleware must be composed of functions!')
  }
// 核心
  return function (context, next) {
// 设置初始索引值
    let index = -1
// 立即执行dispatch,传入0,并返回结果
    return dispatch(0)
    function dispatch (i) {
// 防止在一个中间件中多次调用next
      if (i <= index) return Promise.reject(new Error('next() called multiple times'))
      index = i
// 拿出中间件列表中的第i个中间件,赋值给fn
      let fn = middleware[i]
// 中间件全部执行完成,将next赋值给fn,不过针对Koa源码而言,next一直为undefined(其他地方不一定)
      if (i === middleware.length) fn = next
// 没有可执行的中间件,之间resolve掉promise
      if (!fn) return Promise.resolve()
      try {
// 相当于实现Promise.all,通过对外暴露next回调函数递归执行promise,保证中间件执行的顺序满足栈的特性
        return Promise.resolve(fn(context, dispatch.bind(null, i + 1)));
      } catch (err) {
        return Promise.reject(err)
      }
    }
  }
}
4 Koa-router
上面解决了中间件的执行顺序问题,但是路由这一块就比较尴尬,因为我们可能使用带有参数的路由,比如 app.get('/:userName', (res, req) => {/* xxxx */}) ,原先处理路由的方法就不适用了,此时可以引入koa-router中间件,像下面一样使用。
const Koa = require('koa')
const Router = require('koa-router')
const app = new Koa()
const router = new Router()
router.get('/', async ctx => {
  ctx.body = 'Hello World!'
})
router.get('/:userName', async ctx => {
  ctx.body = `Hello ${ctx.params.userName}!`
})
app
  .use(router.routes())
  .use(router.allowedMethods())
  .listen(8888)
koa-router源码[6]都放在lib文件夹下面,就两个文件:
| 文件 | 功能 |
|---|---|
| layer.js | 内部使用各种正则表达式从入参当中获取相应数据,存放请求的路由、method、路由对应的正则匹配、路由中的参数、路由对应的中间件等 |
| router.js | Router的具体实现,提供对外暴露的注册方法get、post等,处理路由的中间件等 |
// 注册路由,绑定中间件
Router.prototype.register = function (path, methods, middleware, opts) {
  opts = opts || {};
  const router = this;
  const stack = this.stack;
// 支持多个path绑定中间件
  if (Array.isArray(path)) {
    for (let i = 0; i < path.length; i++) {
      const curPath = path[i];
      router.register.call(router, curPath, methods, middleware, opts);
    }
    return this;
  }
// 创建路由
  const route = new Layer(path, methods, middleware, {
    end: opts.end === false ? opts.end : true,
    name: opts.name,
    sensitive: opts.sensitive || this.opts.sensitive || false,
    strict: opts.strict || this.opts.strict || false,
    prefix: opts.prefix || this.opts.prefix || "",
    ignoreCaptures: opts.ignoreCaptures
  });
  if (this.opts.prefix) {
    route.setPrefix(this.opts.prefix);
  }
// 增加中间件参数
  for (let i = 0; i < Object.keys(this.params).length; i++) {
    const param = Object.keys(this.params)[i];
    route.param(param, this.params[param]);
  }
  stack.push(route);
  debug('defined route %s %s', route.methods, route.path);
  return route;
};
// 对外暴露get、post等方法
for (let i = 0; i < methods.length; i++) {
  function setMethodVerb(method) {
    Router.prototype[method] = function(name, path, middleware) {
      if (typeof path === "string" || path instanceof RegExp) {
        middleware = Array.prototype.slice.call(arguments, 2);
      } else {
        middleware = Array.prototype.slice.call(arguments, 1);
        path = name;
        name = null;
      }
      this.register(path, [method], middleware, {
        name: name
      });
      return this;
    };
  }
  setMethodVerb(methods[i]);
}
5 相关文档
koa onion model[7] https://en.wikipedia.org/wiki/Strategy_pattern[8] https://robdodson.me/posts/javascript-design-patterns-strategy/[9]
参考资料
相关文档: https://nodejs.org/api/http.html
[2]策略模式: https://en.wikipedia.org/wiki/Strategy_pattern
[3]koa的源码: https://github.com/koajs/koa
[4]server.listen: http://nodejs.cn/api/net.html#net_class_net_server
[5]koa-compose源码: https://github.com/koajs/compose/blob/master/index.js
[6]koa-router源码: https://github.com/koajs/router
[7]koa onion model: https://programmer.group/koa-onion-model.html
[8]https://en.wikipedia.org/wiki/Strategy_pattern: https://en.wikipedia.org/wiki/Strategy_pattern
[9]https://robdodson.me/posts/javascript-design-patterns-strategy/: https://robdodson.me/posts/javascript-design-patterns-strategy/
