带你轻松入门Nginx
点击关注公众号,Java干货及时送达

Java技术迷 | 出品
何为Nginx
Nginx是一款轻量级的Web 服务器/反向代理服务器及电子邮件(IMAP/POP3)代理服务器,在BSD-like 协议下发行。其特点是占有内存少,并发能力强,事实上Nginx的并发能力在同类型的网页服务器中表现较好。以上内容来自百度百科,由百度百科给出的介绍我们不难发现,Nginx其实是一个反向代理服务器,作用其实有很多,最突出的是其负载均衡能力,Nginx的并发能力在同类型的网页服务器中是较为出色的。
安装Nginx
首先到官网 http://nginx.org/en/download.html 下载Nginx的解压包:

下载完成后将其上传至Linux,并进行解压:
tar -zxvf nginx-1.21.6.tar.gz解压完成后进入解压后的目录:
[root@localhost opt]# cd nginx-1.21.6/
[root@localhost nginx-1.21.6]# ls
auto CHANGES CHANGES.ru conf configure contrib html LICENSE man README src在该目录下有一个名为configure的脚本,通过执行该脚本即可安装Nginx:
./configure正常情况下终端会提示缺少一些环境:
[root@localhost nginx-1.21.6]# ./configure
checking for OS
 + Linux 3.10.0-1127.el7.x86_64 x86_64
checking for C compiler ... not found

./configure: error: C compiler cc is not found
它提示缺少什么,我们就安装什么就行。这里的提示信息说的是找不到C语言编译器,所以来安装一下C语言的编译器:
yum install -y gcc安装完成后,重新执行configure脚本,该脚本还可以携带参数,比如指定Nginx的安装路径:
./configure --prefix=/usr/local/nginx通过指定prefix参数即可将Nginx安装在指定的目录下。不出意外,此时终端会再一次提醒你缺少相应的依赖:
./configure: error: the HTTP rewrite module requires the PCRE library.同样的,安装上就好了:
yum install -y pcre pcre-devel安装完成后再次执行configure脚本,终端还是提示缺少相应的依赖:
./configure: error: the HTTP gzip module requires the zlib library.把它也安装上:
yum install -y zlib zlib-devel再一次来执行configure脚本,这应该是我们第四次执行该脚本了,此时应该是能够安装成功了。
接下来执行make指令:
make该指令是Linux提供的一个编译指令,通过make指令即可对安装后的Nginx进行编译操作,编译完成后进行安装操作:
make install此时我们可以来到/usr/local目录下查看nginx是否安装成功:
[root@localhost nginx-1.21.6]# cd /usr/local/
[root@localhost local]# ls
bin etc games include lib lib64 libexec nginx sbin share src可以看到在该目录下多出了一个nginx的目录,这就是安装好的nginx了,我们进入到nginx的sbin目录下,通过执行nginx脚本即可启动nginx:
cd nginx
cd sbin
./nginx
此时在浏览器上访问 http://192.168.33.10/ :

说明nginx启动成功!如果你访问不到,可以先看看防火墙是不是关闭状态,如果不是,那就把防火墙关闭再访问试试:
# 查看防火墙状态
systemctl status firewalld
# 关闭防火墙
systemctl stop firewalld 若是想停止nginx,则执行nginx -s stop指令,事实上,nginx提供了两种方式来停止,分别如下:
1. nginx -s stop
2. nginx -s quit
这两种方式的结果都是一样的,都会停止nginx,但过程不同,nginx -s stop是直接停止nginx,而nginx -s quit与之相比要柔和一些,它会等待已经接收的连接请求处理完毕后再结束。
一般情况下,我们都会制作一个nginx脚本服务,然后使用脚本来启动它,这样的好处是不用来到nginx的sbin目录执行nginx脚本了,当我们需要启动nginx时,在任何位置都可以启动。首先创建脚本服务:
touch /usr/lib/systemd/system/nginx.service在该文件中填入如下内容(需要注意的是如果你的nginx不是安装在/usr/local/nginx下,则需要相应地修改下面的路径):
[Unit]
Description=nginx - web server
After=network.target remote-fs.target nss-lookup.target

[Service]
Type=forking
PIDFile=/usr/local/nginx/logs/nginx.pid
ExecStartPre=/usr/local/nginx/sbin/nginx -t -c /usr/local/nginx/conf/nginx.conf
ExecStart=/usr/local/nginx/sbin/nginx -c /usr/local/nginx/conf/nginx.conf
ExecReload=/usr/local/nginx/sbin/nginx -s reload
ExecStop=/usr/local/nginx/sbin/nginx -s stop
ExecQuit=/usr/local/nginx/sbin/nginx -s quit
PrivateTmp=true

[Install]
wantedBy=multi-user.target
将其写入文件后,需要重新加载一下系统服务:
systemctl daemon-reload现在尝试使用系统服务启动nginx:
systemctl start nginx.service
# 也可以简写成
systemctl start nginx
查看服务是否启动:
systemctl status nginx也可以通过查看进程的方式验证:
ps -ef | grep nginx目录结构
nginx的目录结构比较简单,分别如下:
1. conf
2. html
3. logs
4. sbin
其中conf为配置文件目录,里面存放的都是nginx的配置信息:
-rw-r--r--. 1 root root 1077 Apr 22 07:34 fastcgi.conf
-rw-r--r--. 1 root root 1077 Apr 22 07:34 fastcgi.conf.default
-rw-r--r--. 1 root root 1007 Apr 22 07:34 fastcgi_params
-rw-r--r--. 1 root root 1007 Apr 22 07:34 fastcgi_params.default
-rw-r--r--. 1 root root 2837 Apr 22 07:34 koi-utf
-rw-r--r--. 1 root root 2223 Apr 22 07:34 koi-win
-rw-r--r--. 1 root root 5349 Apr 22 07:34 mime.types
-rw-r--r--. 1 root root 5349 Apr 22 07:34 mime.types.default
-rw-r--r--. 1 root root 2656 Apr 22 07:34 nginx.conf
-rw-r--r--. 1 root root 2656 Apr 22 07:34 nginx.conf.default
-rw-r--r--. 1 root root  636 Apr 22 07:34 scgi_params
-rw-r--r--. 1 root root  636 Apr 22 07:34 scgi_params.default
-rw-r--r--. 1 root root  664 Apr 22 07:34 uwsgi_params
-rw-r--r--. 1 root root  664 Apr 22 07:34 uwsgi_params.default
-rw-r--r--. 1 root root 3610 Apr 22 07:34 win-utf
nginx.conf为nginx的主要配置文件,其它配置文件都是被该文件引用的。而html目录存放的是静态文件:
-rw-r--r--. 1 root root 497 Apr 22 07:34 50x.html
-rw-r--r--. 1 root root 615 Apr 22 07:34 index.html比如访问nginx时出现的Welcome to nginx!页面就是该目录下的index.html文件。logs目录存放的是日志文件:
-rw-r--r--. 1 root root 415 Apr 22 07:49 access.log
-rw-r--r--. 1 root root 441 Apr 22 09:39 error.log
access.log是访问日志,当通过nginx访问某个资源时就会在该文件中被记录;error.log是错误日志,当然就是用来记录一些错误操作了,比如404。最后是sbin目录,该目录下只有一个nginx主进程文件,用来启动nginx。
Nginx基础配置
在nginx中,最为关键的就属conf目录下的nginx.conf配置文件了,nginx的所有功能都需要在该配置文件中进行配置,nginx.conf文件中的内容较多,其中大部门配置都被注释了,我们将这些被注释的内容先删掉,看看nginx究竟配置了些什么:
worker_processes  1;

events {
    worker_connections  1024;
}

http {
    include       mime.types;
    default_type  application/octet-stream;

    sendfile        on;
    keepalive_timeout  65;

    server {
        listen       80;
        server_name  localhost;

        location / {
            root   html;
            index  index.html index.htm;
        }

        error_page   500 502 503 504  /50x.html;
        location = /50x.html {
            root   html;
        }

    }
}其中位于第一行的配置worker_processes 1表示开始一个业务进程,在nginx中的工作模式是这样的,nginx会开启一个master进程和多个worker进程,这里的worker进程就是业务进程,master进程并不处理业务,而是负责调度worker进程,业务由worker进程负责处理。所以这里配置的就是worker进程数了,通过ps -ef命令可以查看到nginx的详细进程:
[root@localhost sbin]# ps -ef | grep nginx
root      1074     1  0 09:49 ?        00:00:00 nginx: master process ./nginx
nobody    1075  1074  0 09:49 ?        00:00:00 nginx: worker process
root 1077 932 0 09:49 pts/0 00:00:00 grep --color=auto nginx第二个配置worker_connections 1024表示每个worker进程可以创建的连接数。
include mime.types表示引入了一个名为mime.types的外部配置文件。这里又需要介绍一下mime.types的作用了,来看看这个文件里都是些什么内容:
types {
    text/html                                        html htm shtml;
    text/css                                         css;
    text/xml                                         xml;
    image/gif                                        gif;
    image/jpeg                                       jpeg jpg;
    application/javascript                           js;
    application/atom+xml                             atom;
    application/rss+xml                              rss;
    ......
}
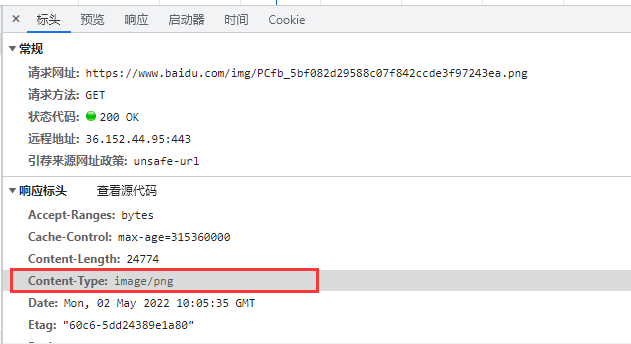
这里截取了一部分,但能够看出这似乎是一个映射表,其实它是用来告诉浏览器返回的资源类型的,不知道大家有没有注意过,当你在浏览器上访问一张图片时,浏览器会直接显示图片,而当你访问的是一个.exe可执行文件时,浏览器又会进行下载。那么浏览器是如何知道什么资源需要显示,而什么资源又需要下载呢?其实,浏览器靠的是请求头中的资源类型来辨别的,我们来访问一张百度的logo图片:

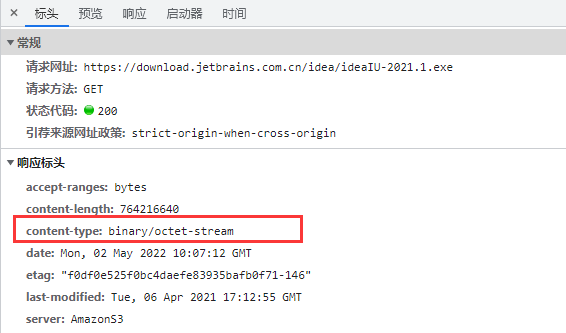
再来访问一个可执行文件:

发现区别了吗,它们的Content-Type值是不同的,浏览器正是通过这些值才能够对不同的资源做出不同的处理。回到nginx中的mime.types文件,它是用来对资源做一个对应的,举个例子,如果文件是html、htm、shtml,那么nginx会统一返回Content-Type:text/html给浏览器;而如果文件是jpeg、jpg,那么nginx会统一返回Content-Type:image/jpeg给浏览器,这个告知资源类型的过程是由该文件完成的。事实上,互联网中的文件类型非常多,这个文件不可能全部都能例举到,如果有没映射的类型,你当然可以手动将映射添加到mime.types中,比如:
type{
  ......
  video/mp4    mp4 mp7 mp8;
  ......
}通过这段配置,如果文件类型为mp4、mp7、mp8,nginx将统一返回给浏览器video/mp4类型。
default_type application/octet-stream表示的是如果在mime.types文件中没有找到对应的映射,则统一返回给浏览器application/octet-stream类型,这是一个兜底的方案。
sendfile on指的是数据零拷贝,当你通过nginx下载一个资源时,因为nginx始终还是个运行在操作系统中的软件,所以网络请求一定是先由操作系统接收,操作系统再将请求交给nginx,nginx再从磁盘上获取到用户请求的资源,先将其读取到nginx的缓存中,再将其复制到操作系统的缓存,最后由操作系统交给客户端。以上是不开启数据零拷贝的情况,如果开启了数据零拷贝,则nginx将资源赋值给操作系统的这一步骤会被省略,操作系统将直接从磁盘上读取资源并交给客户端,这就是该项配置的作用。
keepalive_timeout 65指的是保持连接的超时时间。
接下来是整个配置文件中较为重要的一段配置:
server {
        listen       80;
        server_name  localhost;

        location / {
            root   html;
            index  index.html index.htm;
        }

        error_page   500 502 503 504  /50x.html;
        location = /50x.html {
            root   html;
        }
}server表示nginx中的一个主机,在nginx中可以配置多个主机,每个主机相当于是一个独立的站点,主机之间相互并不影响。其中listen 80表示监听80端口,server_name localhost表示当前主机的主机名,而location /{}表示匹配请求的URI资源,当匹配上了资源后,就会进入location配置块,在该配置块中,root html指的是资源目录,此时的资源将从nginx中的html目录中寻找。 error_page 500 502 503 504 /50x.html表示当产生这几个状态码的错误时,将访问/50x.html资源,而下面的location = /50x.html{}刚好配置的是这个资源,它将从nginx的html目录下寻找这个资源。
server_name
在前面我们就介绍到了server_name,它表示的是当前主机的主机名,也就是说,只有当请求匹配到了该主机名,对应的主机配置才会生效,举一个例子,在nginx.conf中配置两个主机:
http {
    include       mime.types;
    default_type  application/octet-stream;

    sendfile        on;
    keepalive_timeout  65;

    server {
        listen       80;
        server_name  www.test1.com;

        location / {
            root   /mysite/test1;
            index  index.html index.htm;
        }
        error_page   500 502 503 504  /50x.html;
        location = /50x.html {
            root   html;
        }
    }
    server {
        listen       80;
        server_name  www.test2.com;

        location / {
            root   /mysite/test2;
            index  index.html index.htm;
        }
        error_page   500 502 503 504  /50x.html;
        location = /50x.html {
            root   html;
        }

    }
}在这段配置中一共配置了两个主机,这两个主机分别指向/mysite目录下的两个资源,所以先来创建这两个资源,在Linux根目录/下创建mysite目录,并在mysite目录下分别创建test1和test2目录,这两个目录下分别有一个index.html文件。
[root@localhost mysite]# pwd
/mysite
[root@localhost mysite]# ll
total 0
drwxr-xr-x. 2 root root 24 May  3 11:51 test1
drwxr-xr-x. 2 root root 24 May  3 11:51 test2
接着在Windows的hosts文件中配置一下域名映射:
192.168.33.10 www.test1.com
192.168.33.10 www.test2.com现在试着访问一下这两个站点,首先是www.test1.com:

其次是www.test2.com:

而事实上,对于监听相同端口的不同域名,如果它们获取的资源需要是一样的,那么它们可以配置在一个server块中:
server {
        listen       80;
        server_name  www.test1.com;
        server_name  www.test2.com;

        location / {
            root   /mysite/test1;
            index  index.html index.htm;
        }

        error_page   500 502 503 504  /50x.html;
        location = /50x.html {
            root   html;
        }
}
也可以将域名配置写在一个server_name上:
server {
        listen       80;
        server_name  www.test1.com; www.test2.com;
}此时访问www.test1.com和www.test2.com都将显示的是test1 page! server_name还支持通配符配置,比如我想配置一个以任何前缀开始的域名都能访问到test1 page!,那么就需要这样配置:
server {
        listen       80;
        server_name  *.test1.com;

        location / {
            root   /mysite/test1; # 指向test1资源
            index  index.html index.htm;
        }

        error_page   500 502 503 504  /50x.html;
        location = /50x.html {
            root   html;
        }
}比如访问abc.test1.com:

而如果将通配符写在后面,将会匹配以任何后缀结尾的域名:
server {
        listen       80;
        server_name  www.test1.com.*;

        location / {
            root   /mysite/test2; # 指向test2资源
            index  index.html index.htm;
        }

        error_page   500 502 503 504  /50x.html;
        location = /50x.html {
            root   html;
        }
}此时访问诸如www.test1.com.net、www.test1.com.org,都将访问到test2 page!页面:

server_name还支持正则匹配域名,这里也举一个例子:
server {
        listen       80;
        server_name  ~^[0-9]+\.test1\.com$;

        location / {
            root   /mysite/test1; # 指向test1资源
            index  index.html index.htm;
        }

        error_page   500 502 503 504  /50x.html;
        location = /50x.html {
            root   html;
        }
}此时所有以数字开头,以.test1.com结尾的域名都将匹配到test1资源。
本文作者:汪伟俊 为Java技术迷专栏作者 投稿,未经允许请勿转载
往 期 推 荐
点分享
点收藏
点点赞
点在看


