(三)C# Winform自定义控件-有图标的按钮

准备工作
该控件将继承控件UCBtnExt,如果你还对UCBtnExt不了解的下,
请移步 (二)c#Winform自定义控件-按钮 查看
首先我们了解下要做的是什么,我们需要做一个可以自定义填充颜色,有圆角边框,有角标的,有图标的按钮
开始
添加一个用户控件UCBtnImg 继承UCBtnExt
添加属性
private string _btnText = "自定义按钮";
///
/// 按钮文字
///
[Description("按钮文字"), Category("自定义")]
public new string BtnText
{
    get { return _btnText; }
    set
    {
        _btnText = value;
        lbl.Text = "    " + value;
        lbl.Refresh();
    }
}
///
/// 图片
///
[Description("图片"), Category("自定义")]
public Image Image
{
    get
    {
        return this.imageList1.Images[0];
    }
    set
    {
        this.imageList1.Images.Clear();
        this.imageList1.Images.Add(value);
        this.lbl.ImageIndex = 0;
    }
}
下面看一下完整代码
// 版权所有  黄正辉  交流群:568015492   QQ:623128629
// 文件名称:UCBtnImg.cs
// 创建日期:2019-08-15 15:58:07
// 功能描述:按钮
// 项目地址:https://gitee.com/kwwwvagaa/net_winform_custom_control
using System;
using System.Collections.Generic;
using System.ComponentModel;
using System.Drawing;
using System.Data;
using System.Linq;
using System.Text;
using System.Windows.Forms;

namespace HZH_Controls.Controls
{
    ///
    ///
    ///
    public partial class UCBtnImg : UCBtnExt
    {
        private string _btnText = "自定义按钮";
        ///
        /// 按钮文字
        ///
        [Description("按钮文字"), Category("自定义")]
        public new string BtnText
        {
            get { return _btnText; }
            set
            {
                _btnText = value;
                lbl.Text = "    " + value;
                lbl.Refresh();
            }
        }
        ///
        /// 图片
        ///
        [Description("图片"), Category("自定义")]
        public Image Image
        {
            get
            {
                return this.imageList1.Images[0];
            }
            set
            {
                this.imageList1.Images.Clear();
                this.imageList1.Images.Add(value);
                this.lbl.ImageIndex = 0;
            }
        }

        public UCBtnImg()
        {
            InitializeComponent();
            base.BtnForeColor = ForeColor = System.Drawing.Color.FromArgb(((int)(((byte)(102)))), ((int)(((byte)(102)))), ((int)(((byte)(102)))));
            base.BtnFont = new System.Drawing.Font("微软雅黑", 17F);
            base.BtnText = "    自定义按钮";
        }
    }
}
namespace HZH_Controls.Controls
{
partial class UCBtnImg
{
///
/// 必需的设计器变量。
///
private System.ComponentModel.IContainer components = null;
///
/// 清理所有正在使用的资源。
///
///
protected override void Dispose(bool disposing)
{
if (disposing && (components != null))
{
components.Dispose();
}
base.Dispose(disposing);
}
#region 组件设计器生成的代码
///
/// 设计器支持所需的方法 - 不要
/// 使用代码编辑器修改此方法的内容。
///
private void InitializeComponent()
{
this.components = new System.ComponentModel.Container();
System.ComponentModel.ComponentResourceManager resources = new System.ComponentModel.ComponentResourceManager(typeof(UCBtnImg));
this.imageList1 = new System.Windows.Forms.ImageList(this.components);
this.SuspendLayout();
//
// lbl
//
//this.lbl.Font = new System.Drawing.Font("微软雅黑", 17F);
//this.lbl.ForeColor = System.Drawing.Color.FromArgb(((int)(((byte)(102)))), ((int)(((byte)(102)))), ((int)(((byte)(102)))));
this.lbl.ImageIndex = 0;
this.lbl.ImageList = this.imageList1;
this.lbl.Padding = new System.Windows.Forms.Padding(10, 0, 0, 0);
this.lbl.Text = " 自定义按钮";
this.lbl.TextAlign = System.Drawing.ContentAlignment.MiddleLeft;
//
// imageList1
//
this.imageList1.ImageStream = ((System.Windows.Forms.ImageListStreamer)(resources.GetObject("imageList1.ImageStream")));
this.imageList1.TransparentColor = System.Drawing.Color.Transparent;
this.imageList1.Images.SetKeyName(0, "back.png");
//
// BtnBack
//
this.AutoScaleDimensions = new System.Drawing.SizeF(6F, 12F);
this.AutoScaleMode = System.Windows.Forms.AutoScaleMode.None;
this.Name = "BtnBack";
this.ResumeLayout(false);
}
#endregion
private System.Windows.Forms.ImageList imageList1;
}
}
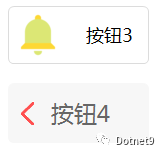
用处及效果
用处:按钮需要显示图标时使用
效果:
 自定义按钮效果
最后的话
如果你喜欢的话,请到 https://gitee.com/kwwwvagaa/net_winform_custom_control 点个星星吧,另本站转载地址:https://dotnet9.com/5260.html。
- 作者:冰封一夏
- 出处:http://www.hzhcontrols.com/doc.html
- 本文版权归作者所有,欢迎转载,但未经作者同意必须保留此段声明, 且在文章页面明显位置给出原文连接,否则保留追究法律责任的权利。
- GitHub:https://github.com/kwwwvagaa/NetWinformControl
- 码云:https://gitee.com/kwwwvagaa/net_winform_custom_control.git
Dotnet9网站常驻编辑。
长按关注我,
欢迎技术交流!
-好东西要转发,设为"星标"★抢先看-![]() 点击阅读原文,查看HZHControls站点更多博文。
点击阅读原文,查看HZHControls站点更多博文。
评论
