
vue-axios-vuex-全家桶
Github来源: | 求星星 ✨ | 给个❤️关注,❤️点赞,❤️鼓励一下作者
https://1024bibi.com/2021/09/01/vue-axios-vuex-%E5%85%A8%E5%AE%B6%E6%A1%B6/

axios
Axios 是一个基于 promise 的 HTTP 库,可以用在浏览器和 node.js 中。简单来说就是前端最火最简单的一个http请求解决方案。
功能
从浏览器中创建 XMLHttpRequests 从 node.js 创建 http 请求 支持 Promise API 拦截请求和响应 转换请求数据和响应数据 取消请求 自动转换 JSON 数据 客户端支持防御 XSRF
代码封装
工具类封装
// 引入axios
import axios from 'axios';

// 创建axios实例
const httpService = axios.create({
    // url前缀-'https://some-domain.com/api/'
    baseURL: process.env.BASE_API, // 需自定义
    // 请求超时时间
    timeout: 3000 // 需自定义
});

// request拦截器
httpService.interceptors.request.use(
    config => {
        // 根据条件加入token-安全携带
        if (true) { // 需自定义
            // 让每个请求携带token
            config.headers['User-Token'] = '';
        }
        return config;
    },
    error => {
        // 请求错误处理
        Promise.reject(error);
    }
)

// respone拦截器
httpService.interceptors.response.use(
    response => {
        // 统一处理状态
        const res = response.data;
        if (res.statuscode != 1) { // 需自定义
            // 返回异常
            return Promise.reject({
                status: res.statuscode,
                message: res.message
            });
        } else {
            return response.data;
        }
    },
    // 处理处理
    error => {
         if (error && error.response) {
            switch (error.response.status) {
                case 400:
                    error.message = '错误请求';
                    break;
                case 401:
                    error.message = '未授权,请重新登录';
                    break;
                case 403:
                    error.message = '拒绝访问';
                    break;
                case 404:
                    error.message = '请求错误,未找到该资源';
                    break;
                case 405:
                    error.message = '请求方法未允许';
                    break;
                case 408:
                    error.message = '请求超时';
                    break;
                case 500:
                    error.message = '服务器端出错';
                    break;
                case 501:
                    error.message = '网络未实现';
                    break;
                case 502:
                    error.message = '网络错误';
                    break;
                case 503:
                    error.message = '服务不可用';
                    break;
                case 504:
                    error.message = '网络超时';
                    break;
                case 505:
                    error.message = 'http版本不支持该请求';
                    break;
                default:
                    error.message = `未知错误${error.response.status}`;
            }
        } else {
            error.message = "连接到服务器失败";
        }
        return Promise.reject(error);
    }
)

/*网络请求部分*/

/*
 *  get请求
 *  url:请求地址
 *  params:参数
 * */
export function get(url, params = {}) {
    return new Promise((resolve, reject) => {
        httpService({
            url: url,
            method: 'get',
            params: params
        }).then(response => {
            resolve(response);
        }).catch(error => {
            reject(error);
        });
    });
}

/*
 *  post请求
 *  url:请求地址
 *  params:参数
 * */
export function post(url, params = {}) {
    return new Promise((resolve, reject) => {
        httpService({
            url: url,
            method: 'post',
            data: params
        }).then(response => {
            resolve(response);
        }).catch(error => {
            reject(error);
        });
    });
}

/*
 *  文件上传
 *  url:请求地址
 *  params:参数
 * */
export function fileUpload(url, params = {}) {
    return new Promise((resolve, reject) => {
        httpService({
            url: url,
            method: 'post',
            data: params,
            headers: { 'Content-Type': 'multipart/form-data' }
        }).then(response => {
            resolve(response);
        }).catch(error => {
            reject(error);
        });
    });
}

export default {
    get,
    post,
    fileUpload
}
使用
// 引入工具类-目录自定义
import fetch from '@/util/fetch'

// 使用
const TMPURL = ''; // url地址
const params = {}; // 参数
fetch.post(TMPURL + '/login/login', params);
vuex是什么?
vuex是一个专为 Vue.js 应用程序开发的状态管理模式。它采用集中式存储管理应用的所有组件的状态,并以相应的规则保证状态以一种可预测的方式发生变化。chrome安装调试工具 devtools extension
单向数据流
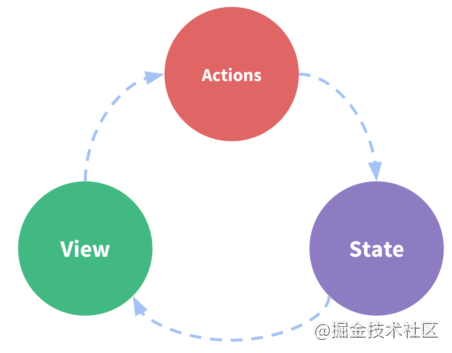
示意图说明:
State:驱动应用的数据源(单向数据流) View:以声明方式将 state 映射到视图(静态显示出来的数据源) Actions:处理用户在view上面操作而导致的状态变化(数据源变化追踪)
一个简单的demo案例:
<template>
    <div>
        <!-- view -->
        <div>{{ count }}</div>
        <button @click="increment">increment</button>
    </div>
</template>
<script>
export default {
    // state
    data () {
        return {
            count: 0
        }
    },
    // actions
    methods: {
        increment () {
            this.count++
        }
    }
}
</script>
<style>

</style>
vuex解决的问题
多个视图组件,包括父子组件,兄弟组件之间的状态共享 不同视图组件的行为需要变更同一个状态
vuex使用场景
中大型单页应用,需要考虑如何更好地在组件外部管理状态,简单应用不建议使用
vuex与全局变量的区别
响应式:vuex的状态存储是响应式的,当Vue组件从store中读取状态的时候,若store中的状态发生变化,那么相应的组件也会得到高效更新 不能直接改变store:不能直接改变store的变化,改变store中状态的唯一途径是commit mutation,方便于跟踪每一个状态的变化
vuex核心流程
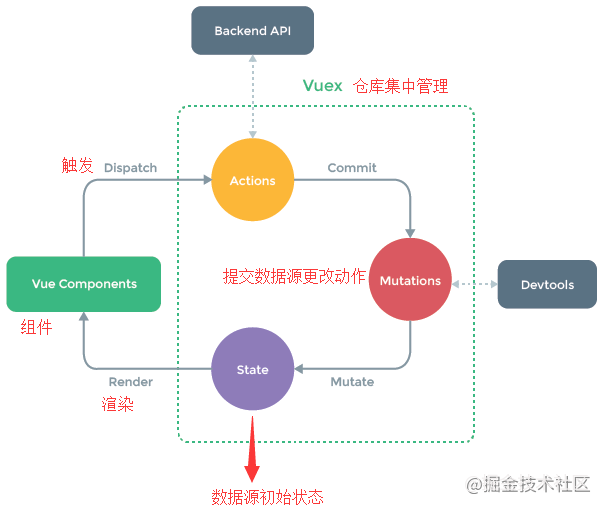
示意图说明:
Vue Components:Vue组件。HTML页面上,负责接收用户操作等交互行为,执行dispatch方法触发对应action进行回应 Dispatch:操作行为触发方法,是唯一能执行action的方法 Actions:操作行为处理模块。负责处理Vue Components接收到的所有交互行为。包含同步/异步操作,支持多个同名方法,按照注册的顺序依次触发。向后台API请求的操作就在这个模块中进行,包括触发其他action以及提交mutation的操作。该模块提供了Promise的封装,以支持action的链式触发 Commit:状态改变提交操作方法。对mutation进行提交,是唯一能执行mutation的方法 Mutations:状态改变操作方法。是Vuex修改state的唯一推荐方法,其他修改方式在严格模式下将会报错。该方法只能进行同步操作,且方法名只能全局唯一。操作之中会有一些hook暴露出来,以进行state的监控等 State:页面状态管理容器对象。集中存储Vue components中data对象的零散数据,全局唯一,以进行统一的状态管理。页面显示所需的数据从该对象中进行读取,利用Vue的细粒度数据响应机制来进行高效的状态更新 Getters:state对象读取方法。图中没有单独列出该模块,应该被包含在了render中,Vue Components通过该方法读取全局state对象
总结说明:
Vue组件接收交互行为,调用dispatch方法触发action相关处理,若页面状态需要改变,则调用commit方法提交mutation修改state,通过getters获取到state新值,重新渲染Vue Components,界面随之更新
安装
npm install vuex --save
简单示例
(1)src/vuex/store.js中写入以下代码:
// 引入vue
import Vue from 'vue'
// 引入vuex
import Vuex from 'vuex'

// 使用vuex
Vue.use(Vuex)

// 1、state:创建初始化状态
const state = {
    // 放置初始状态
    count: 1
}

// 2、mutations:创建改变状态的方法
const mutations = {
    // 状态变更函数-一般大写
    ADD (state, n) {
        state.count += n;
    }
}

// 3、getters:提供外部获取state
const getters = {
    count: function(state){
        return state.count;
    }
}

// 4、actions:创建驱动方法改变mutations
const actions ={
    // 触发mutations中相应的方法-一般小写
    add ({commit}, data) {
        commit('ADD', data)
    }
}

// 5、全部注入Store中
const store = new Vuex.Store({
    state,
    mutations,
    getters,
    actions
});

// 6、输出store
export default store;
代码说明:
state - mutations - getters - actions - store,以上写法基本固定。 小型项目用上面的简单管理状态即可。
(2)src/main.js代码中
import Vue from 'vue'
import App from './App'
import router from './router'
// 引入store
import store from './vuex/store'

Vue.config.productionTip = false

/* eslint-disable no-new */
new Vue({
  el: '#app',
  router,
  store, // 全局注入
  components: { App },
  template: '<App/>'
})
(3)src/compontent/Count.vue页面组件中代码如下:
<template>
    <div class="hello">
        <h1>{{ msg }}</h1>
        <h2>{{count}}</h2>
        <button @click="clickAdd">新增</button>
    </div>
</template>
<script>
export default {
    data () {
        return {
            msg: 'Vuex test!'
        }
    },
    computed: {
        // 获取state值
        count() {
            return this.$store.state.count;
        }
    },
    methods: {
        clickAdd() {
            //分发action中的add方法
            this.$store.dispatch('add', 1);
        }
    }
}
</script>
<style scoped>

</style>
状态对象的获取方法
在组件的template中直接使用
<h2>{{ $store.state.count }}</h2>
在计算属性computed中直接赋值
// 方式1:直接获取
computed: {
    count() {
        // this指的是main.js中的vue实例对象
        return this.$store.state.count;
    }
}
通过mapState的对象来赋值
// 方式2:利用mapState
computed: mapState({
    // es5写法
    count: function (state) {
         return state.count;
     },
    // es6写法
    count: state => state.count
})
通过mapState的数组来赋值
// 方式3:数组获取
computed: mapState(['count'])
通过mapState的JSON来赋值
// 方式4:JSON获取
computed: mapState({
    count: 'count'
})
mutations-getters-actions异步
mutations(修改状态)
(1)template中直接使用$store.commit( )触发
// template
<button @click="$store.commit('ADD')">+</button>

// src/vuex/store.js
const mutations = {
    // 状态变更函数
    ADD (state) {
        state.count++;
    }
}
(2)利用mapMutations引入触发
<template>
    <div class="hello">
        <h1>{{ msg }}</h1>
        <h2>{{count}}</h2>
        <!-- 3、、直接调用相应的方法 -->
        <button @click="ADD">+</button>
    </div>
</template>
<script>
// 1、引入mapMutations
import {mapState, mapMutations} from 'vuex'
export default {
    data () {
        return {
            msg: 'Vuex test!'
        }
    },
    // 通过mapState的JSON来赋值
    computed: mapState({
        count: 'count'
    }),
    // 2、methods中加入mapMutations
    methods: mapMutations([
        'ADD'
    ])
}
</script>
<style scoped>

</style>
getters(获取state和过滤)
(1)基本用法
// src/vuex/store.js
const getters = {
    count: function(state){
        // 返回加上100
        return state.count + 100;
    }
}
(2)常规获取值
computed: {
    // 获取getters
    count(){
        return this.$store.getters.count;
    }
}
(3)mapGetters获取值
// 1、引入mapMutations
import {mapState, mapMutations, mapGetters} from 'vuex'

// 2、使用
computed: {
    // 获取getters
    ...mapGetters(["count"])
}
actions(异步状态修改)
actions和mutations功能基本一样,不同点是,actions是异步的改变state状态,而mutations是同步改变状态。不过实际项目中一般都是通过actions改变mutations中的值。
(1)store.js中增加异步代码
// src/vuex/store.js
const actions ={
    // 触发mutations中相应的方法
    add ({commit}) {
        // 增加异步
        setTimeout(()=>{
            commit('ADD')
        },3000);
        console.log('我比reduce提前执行');
    }
}
(2)常规使用
// template
<button @click="add">+</button>

// script
methods: {
    add() {
        //分发action
        this.$store.dispatch('add');
    }
}
(3)mapActions的使用
// template
<button @click="add">+</button>

// script
// 引入mapActions
import {mapState, mapActions} from 'vuex'

// 使用mapActions
methods: {
    ...mapActions(['add'])
}
传递参数
只需要在mutations和actions相应的地方加上参数,然后调用的时候传入即可。
(1)src/vuex/store.js中
// actions中传递参数
const mutations = {
    ADD (state, n) {
        state.count += n;
    }
}

// actions中传递参数
const actions ={
    // 触发mutations中相应的方法
    add ({commit}, n) {
        // 增加异步
        setTimeout(()=>{
            commit('ADD', n);
        },3000);
        console.log('我比reduce提前执行');
    }
}
(2)页面组件常规调用传递
// template
<button @click="add">+</button>

// script
methods: {
    add() {
        // 分发action
        this.$store.dispatch('add', 99);
     }
}
(3)页面组件使用mapActions调用传递
// template
<button @click="add(99)">+</button>

// script
methods: {
    ...mapActions(['add'])
}
module-模块组
当应用非常复杂,状态非常多的时候,需要将store 分割成模块(module)。每个模块拥有自己的 state、mutation、action、getter、甚至是嵌套子模块,从上至下进行同样方式的分割。
大致的结构
// 模块A
const moduleA = {
  state: { ... },
  mutations: { ... },
  actions: { ... },
  getters: { ... }
}

// 模块B
const moduleB = {
  state: { ... },
  mutations: { ... },
  actions: { ... }
}

// 组装
const store = new Vuex.Store({
  modules: {
    a: moduleA,
    b: moduleB
  }
})

// 取值
store.state.a // -> moduleA 的状态
store.state.b // -> moduleB 的状态
实际开发中建议把module分开编写。
(1)src/vuex/module1.js
// 模块1
const module1 = {
    // 初始化状态
    state: {
        module1: {
            name: '模块1'
        }
    },
    // 编写动作
    mutations: {
        CHANGE1 (state, data) {
            state.module1 = data;
        }
    },
    // 取值
    getters: {
        module1: function(state){
            return state.module1;
        }
    },
    // 创建驱动,可异步
    actions: {
        change1 ({commit}, data) {
            commit('CHANGE1', data)
        }
    }
}

export default module1;
(2)src/vuex/module2.js
// 模块1
const module2 = {
    // 初始化状态
    state: {
        module2: {
            name: '模块2'
        }
    },
    // 编写动作
    mutations: {
        CHANGE2 (state, data) {
            state.module2 = data;
        }
    },
    // 取值
    getters: {
        module2: function(state){
            return state.module2;
        }
    },
    // 创建驱动,可异步
    actions: {
        change2 ({commit}, data) {
            commit('CHANGE2', data)
        }
    }
}

export default module2;
(3)src/vuex/store.js
// 引入vue
import Vue from 'vue'
// 引入vuex
import Vuex from 'vuex'
// 引入module1
import module1 from '@/vuex/module1'
// 引入module2
import module2 from '@/vuex/module2'

// 使用vuex
Vue.use(Vuex)

// 模块注入
const store = new Vuex.Store({
    modules: {
        a: module1,
        b: module2
    }
})

// 输出store
export default store;
(4)组件中使用,src/compontent/one.vue
<template>
    <div id="app">
        <!-- module1 -->
        <h2>{{ module1.name }}</h2>
        <button @click="change1({'name': 'change1'})">module1改变</button>

        <!-- module2 -->
        <h2>{{ module2.name }}</h2>
        <button @click="change2({'name': 'change2'})">module2改变</button>
    </div>
</template>

<script>
// 引入快捷方法
import {mapState, mapGetters, mapActions} from 'vuex'

export default {
    name: 'app',
    data () {
        return {
        }
    },
    computed:{
        // mapState取值
        // ...mapState({
        //     module1: state => state.a.module1.name,
        //     module2: state => state.b.module2.name
        // })

        // mapGetter取值
        ...mapGetters(['module1', 'module2'])
    },
    methods: {
        // mapAction取方法
        ...mapActions([
            'change1',
            'change2'
        ])
    }
}
</script>
<style>

</style>
PS:module中命名要唯一,不然获取值和改变值的时候会冲突,目前亲测mapGetters只能获取对象。
vue-router
Vue Router 是 Vue.js 官方的路由管理器。它和 Vue.js 的核心深度集成,让构建单页面应用变得易如反掌。
包含的功能有:
嵌套的路由/视图表 模块化的、基于组件的路由配置 路由参数、查询、通配符 基于 Vue.js 过渡系统的视图过渡效果 细粒度的导航控制 带有自动激活的 CSS class 的链接 HTML5 历史模式或 hash 模式,在 IE9 中自动降级 自定义的滚动条行为
安装
使用命令安装:
npm install vue-router --save
在src/router/index.js文件中
// 引入vue框架
import Vue from 'vue'
// 引入vue-router路由依赖
import Router from 'vue-router'
// 引入页面组件,命名为HelloWorld
import HelloWorld from '@/components/HelloWorld'

// Vue全局使用Router
Vue.use(Router)

// 定义路由配置
export default new Router({
  routes: [                //配置路由,这里是个数组
    {                        //每一个链接都是一个对象
      path: '/',            //链接路径
      name: 'HelloWorld',        //路由名称,
      component: HelloWorld     //对应的组件模板
    }
  ]
})
在系统入口文件main.js中注入router,代码如下:
// 引入vue框架
import Vue from 'vue'
// 引入根组件
import App from './App'
// 引入路由配置
import router from './router'

// 关闭生产模式下给出的提示
Vue.config.productionTip = false

// 定义实例
new Vue({
  el: '#app',
  router, // 注入框架中
  components: { App },
  template: '<App/>'
})
页面跳转
router-link标签跳转
在html标签内使用router-link跳转,相应于超链接a标签,使用方式如下:
<router-link to="/">[显示字段]</router-link>
to:导航路径
使用示例如下:
<p>导航 :
   <router-link to="/">首页</router-link>
   <router-link to="/hello">hello</router-link>
</p>
编程式导航-JS代码内部跳转
实际项目中,很多时候都是通过在JS代码内部进行导航的跳转,使用方式如下:
this.$router.push('/xxx')
具体的简单用法:
(1)先编写一个按钮,在按钮上绑定goHome( )方法。
<button @click="goHome">回到首页</button>
(2)在<script>模块里加入goHome方法,并用this.$router.push(‘/’)导航到首页
export default {
    name: 'app',
    methods: {
        goHome(){
            this.$router.push('/home');
        }
    }
}
其他常用方法
//  后退一步记录,等同于 history.back()
this.$router.go(-1)
// 在浏览器记录中前进一步,等同于 history.forward()
this.$router.go(1)
子路由-路由嵌套
子路由,也叫路由嵌套,采用在children后跟路由数组来实现,数组里和其他配置路由基本相同,需要配置path和component,然后在相应部分添加
src/components/Home.vue(父页面)
<template>
    <div class="hello">
        <h1>{{ msg }}</h1>
        <!-- 添加子路由导航 -->
        <p>导航 :
            <router-link to="/home">首页</router-link> |
            <router-link to="/home/one">-子页面1</router-link> |
            <router-link to="/home/two">-子页面2</router-link>
        </p>
        <!-- 子页面展示部分 -->
        <router-view/>
    </div>
</template>

<script>
export default {
    name: 'Home',
    data () {
        return {
            msg: 'Home Page!'
        }
    }
}
</script>

<style scoped>
</style>
src/components/One.vue(子页面1)
<template>
    <div class="hello">
        <h1>{{ msg }}</h1>
    </div>
</template>
<script>
export default {
    name: 'One',
    data () {
        return {
            msg: 'Hi, I am One Page!'
        }
    }
}
</script>

<style scoped>
</style>
src/components/Two.vue(子页面2)
<template>
    <div class="hello">
        <h1>{{ msg }}</h1>
    </div>
</template>
<script>
export default {
    name: 'Two',
    data () {
        return {
            msg: 'Hi, I am Two Page!'
        }
    }
}
</script>

<style scoped>
</style>
src/router/index.js(路由配置)
import Vue from 'vue'
import Router from 'vue-router'
import Home from '@/components/Home'
import One from '@/components/One'
import Two from '@/components/Two'

Vue.use(Router)

export default new Router({
    routes: [
    {
        path: '/', // 默认页面重定向到主页
        redirect: '/home'
    },
    {
        path: '/home', // 主页路由
        name: 'Home',
        component: Home,
        children:[ // 嵌套子路由
            {
                path:'one', // 子页面1
                component:One
            },
            {
                path:'two', // 子页面2
                component:Two
            },
        ]
    }
    ]
})
路由传递参数
通过<router-link> 标签中的to传参
基本语法:
<router-link :to="{name:xxx, params: {key:value}}">valueString</router-link>
PS:上面to前边是带冒号,后边跟的是一个对象形势的字符串
name:在路由配置文件中起的name值。叫做命名路由。 params:要传的参数,它是对象形式,在对象里可以传递多个值。
具体实例如下:
(1)在src/components/Home.vue里面导航中添加如下代码:
<router-link :to="{name: 'one', params:{username:'test123'}}">子页面1</router-link>
(2)在src/router/indes.js中添加如下代码,重点是name:
{
    path:'one', // 子页面1
    name: 'one', // 路由名称-命名路由
    component:One
}
(3)在src/components/One.vue里面接受参数,代码如下:
<h2>{{$route.params.username}}</h2>
url中传递参数
(1)在路由中以冒号传递,在src/router/index.js中加入如下代码:
{
    path:'/home/two/:id/:name', // 子页面2
    component:Two
},
(2)接受参数,在src/components/Two.vuez中加入如下代码:
<p>ID:{{ $route.params.id}}</p>
<p>名称:{{ $route.params.name}}</p>
(3)路由跳转,在src/components/Home.vue中加入如下代码:
<router-link to="/home/two/1/张三">子页面2</router-link>
PS:to前没有冒号为字符串路由,必须全部匹配。
(4)如果路由参数需要有特定的规则,就需要加入正则表达式了,示例如下:
{
    path:'/home/two/:id(\d+)/:name', // 子页面2
    component:Two
}
编程式导航-params传递参数
(1)在src/router/index.js页面加入如下代码:
{
    path:'/home/three', // 子页面3
    name: 'three',
    component:Three
}
(2)在src/components/Three.vue页面加入如下代码:
<p>ID:{{ $route.params.id}}</p>
<p>名称:{{ $route.params.name}}</p>
(3)在src/components/Home.vue中加入如下代码:
// template
<button @click="toThreePage">页面3-params传参</button>

// script
methods: {
    toThreePage() {
        this.$router.push({name: 'three', params: {id: 1, name: 'zhangsan'}})
    }
}
说明:
A、动态路由使用params传递参数,在this.$router.push() 方法中path不能和params一起使用,否则params将无效。需要用name来指定页面。
B、以上方式参数不会显示到浏览器的地址栏中,如果刷新一次页面,就获取不到参数了,改进方式将第一部中的代码改成如下:
{
    path:'/home/three/:id/:name', // 子页面3
    name: 'three',
    component:Three
}
编程式导航-query传递参数
(1)在src/router/index.js页面加入如下代码:
{
    path:'/home/three', // 子页面3
    name: 'three',
    component:Three
}
(2)在src/components/Three.vue页面加入如下代码:
<p>ID:{{ $route.query.id}}</p>
<p>名称:{{ $route.query.name}}</p>
(3)在src/components/Home.vue中加入如下代码:
// template
<button @click="toThreePage">页面3-params传参</button>

// script
methods: {
    toThreePage() {
        this.$router.push({path: '/home/three', query: {id: 1, name: 'zhangsan'}})
    }
}
PS:动态路由使用query传递参数,会显示到浏览器地址栏中,以上链接为
/home/three?id=1&name=zhangsan
命名路由-命名视图-重定向-别名
命名路由
给一个路由命一个唯一的名称,然后跳转调用这个名称即可。
(1)在src/router/index.js中加一个带name的路由,代码如下:
{
    path: 'one', // 子页面1
    name: 'one', // 路由名称-命名路由
    component: One // 页面组件
}
(2)在src/component/Home.vue页面中调用,代码如下:
// template跳转调用
<router-link :to="{name: 'one'}">子页面1</router-link>

// router.push函数跳转调用
router.push({ name: 'user'}})
命名视图
在同一个页面展示多个视图,如果不用嵌套,只能采用命名视图来实现了,代码如下:
(1)在src/router/index.js中,代码如下:
import Vue from 'vue'
import Router from 'vue-router'
// 创建页面组件
const Header = { template: '<div>Header</div>' }
const Left = { template: '<div>Left</div>' }
const Right = { template: '<div>Right</div>' }

Vue.use(Router)

export default new Router({
    routes: [
    {
        path: '/', // 主页路由
        components: {
            default: Header,
            a: Left,
            b: Right
        }
    }
    ]
})
(2)在src/App.vue中,代码如下:
<template>
    <div id="app">
        <router-view />
        <router-view name="a" class="left" />
        <router-view name="b" class="right" />
    </div>
</template>

<script>
export default {
    name: 'App'
}
</script>

<style>
#app {
    text-align: center;
    color: #2c3e50;
    width: 500px;
    border: 1px solid red;
    margin: 0 auto;
}

.left,.right{
    float: left;
    width:48%;
    text-align: center;
    border:1px solid red
}
</style>
PS:经过实践,命名视图只能放在最顶级的页面中,即第一步中的代码不能放在其他页面中。
重定向
重定向是通过route的配置中关键词redirect来实现的,具体代码如下:
(1)在src/router/index.js中,代码如下:
export default new Router({
    routes: [
    {
        path: '/', // 默认页面重定向到主页
        redirect: '/home' // 重定向
    },
    {
        path: '/home', // 主页路由
        component: Home,
        children:[ // 嵌套子路由
            {
                path:'/home/two/:id/:name', // 子页面2
                component:Two
            },
            {
                path:'/home/three/:id/:name', // 子页面3
                name: 'three', // 路由名称-命名路由
                redirect: '/home/two/:id/:name' // 重定向-传递参数
            },
        ]
    }
    ]
})
(2)在src/components/Home.vue中,代码如下:
<router-link to="/">首页</router-link> |
<router-link to="/home/two/1/lisi">子页面2</router-link>  |
<router-link :to="{name: 'three', params: {id: 1, name: 'zhangsan'}}">子页面3</router-link>
说明1-不带参数的重定向:
redirect: '/home' // 重定向-不带参数
说明2-带参数的重定向:
redirect: '/home/two/:id/:name' // 重定向-传递参数
别名
重定向是通过route的配置中关键词alias来实现的,具体代码如下:
(1)在src/router/index.js中,代码如下:
{
    path:'/one', // 子页面1
    component:One,
    alias: '/oneother'
}
(2)在src/components/Home.vue中,代码如下:
<router-link to="/oneother">子页面1</router-link>
说明1:redirect和alias的区别
redirect:直接改变了url的值,把url变成了真实的path路径。\ alias:url路径没有别改变,这种更友好,让用户知道自己访问的路径,只是改变了 <router-view>中的内容。
说明2:
别名请不要用在path为’/’中,如下代码的别名是不起作用的。
{
    path: '/',
    component: Hello,
    alias:'/home'
}
过渡动画
代码示例
(1)在<router-view>标签的外部添加<transition>标签,标签还需要一个name属性,代码如下:
<transition name="fade" mode="out-in">
    <router-view />
</transition>
(2)加入CSS,一共4个CSS类名,四个类名与transition的name属性有关,比如name=”fade”,相应的css如下:
/*页面切换动画*/
/*进入过渡的结束状态,元素被插入时就生效,在过渡过程完成后移除*/
.fade-enter-active {
    transition: opacity .5s;
}
/*进入过渡的开始状态,元素被插入时生效,只应用一帧后立刻删除*/
.fade-enter {
    opacity: 0;
}
/*离开过渡的开始状态,元素被删除时触发,只应用一帧后立刻删除*/
.fade-leave {
    opacity: 1;
}
/*离开过渡的结束状态,元素被删除时生效,离开过渡完成后被删除*/
.fade-leave-active {
    opacity:0;
    transition: opacity .5s;
}
过渡模式mode
in-out:新元素先进入过渡,完成之后当前元素过渡离开,默认模式。 out-in:当前元素先进行过渡离开,离开完成后新元素过渡进入。
mode与404
mode模式
代码示例:
export default new Router({
    mode: 'history', //mode模式
    routes: [...]
})
mode取值说明:
(1)histroy:URL就像正常的 url,示例:http://localhost:8080/home
(2)hash:默认值,会多一个“#”,示例:http://localhost:8080/#/home
404页面设置
如果访问的路由不存在,或者用户输入错误时,会有一个404友好的提示页面,配置如下:
(1)在/src/router/index.js中加入如下代码:
// 404
{
    path: '*',
    component: () => import('@/components/404')
}
(2)在src/components/404.vue中编写如下代码:
<template>
    <div class="hello">
        <h1>404 not found</h1>
    </div>
</template>
<script>
export default {
    data () {
        return {

        }
    }
}
</script>

<style scoped>
</style>
路由钩子
路由钩子,即导航钩子,其实就是路由拦截器,vue-router一共有三类:
全局钩子:最常用 路由单独钩子 组件内钩子
全局钩子
在src/router/index.js中使用,代码如下:
// 定义路由配置
const router = new VueRouter({ ... })

// 全局路由拦截-进入页面前执行
router.beforeEach((to, from, next) => {
    // 这里可以加入全局登陆判断
    // 继续执行
    next();
});

// 全局后置钩子-常用于结束动画等
router.afterEach(() => {
    //不接受next
});

export default router;
每个钩子方法接收三个参数:
to: Route : 即将要进入的目标 [路由对象]
from: Route : 当前导航正要离开的路由
next: Function : 继续执行函数
next():继续执行 next(false):中断当前的导航。 next(‘/‘) 或 next({ path: ‘/‘ }):跳转新页面,常用于登陆失效跳转登陆
路由单独钩子
使用:在路由配置中单独加入钩子,在src/router/index.js中使用,代码如下:
{
    path:'/home/one', // 子页面1
        component: One,
        // 路由内钩子
        beforeEnter: (to, from, next) => {
        console.log('进入前执行');
            next();
        }
}
组件内钩子
使用:在路由组件内定义钩子函数:
beforeRouteEnter:进入页面前调用 beforeRouteUpdate (2.2 新增):页面路由改变时调用,一般需要带参数 beforeRouteLeave:离开页面调用
任意找一页面,编写如下代码:
<script>
export default {
    name: 'Two',
    data () {
        return {
            msg: 'Hi, I am Two Page!'
        }
    },
    // 进入页面前调用
    beforeRouteEnter(to, from, next) {
        console.log('进入enter路由钩子')
        next()
    },
    // 离开页面调用
    beforeRouteLeave(to,from, next){
        console.log('进入leave路由钩子')
        next()
    },
    // 页面路由改变时调用
    beforeRouteUpdate(to, from, next) {
        console.log('进入update路由钩子')
        console.log(to.params.id)
        next()
    }
}
</script>
路由懒加载
路由正常模式:
// 1、先引入页面组件
import Home from '@/components/Home'

// 2、使用组件
    {
        path: '/home',
        component: Home
}
懒加载模式
大项目中,为了提高初始化页面的效率,路由一般使用懒加载模式,一共三种实现方式。
(1)第一种写法:
component: (resolve) => require(['@/components/One'], resolve)
(2)第二种写法:
component: () => import('@/components/Two')
(3)第三种写法:
components: r => require.ensure([], () => r(require('@/components/Three')), 'group-home')
PS:
一般常用第二种简写 第三种中,’group-home’是把组件按组分块打包, 可以将多个组件放入这个组中,在打包的时候Webpack会将相同 chunk 下的所有异步模块打包到一个异步块里面。
vue-cli
vue-cli是vue官方出品的快速构建单页应用的脚手架,里面集成了webpack,npm,nodejs,babel,vue,vue-router等.
全局安装vue-cli,命令行:
npm install vue-cli -g
初始化项目
在实际开发中,一般都会使用webpack这个模板,命令使用如下:
vue init webpack my-vue-demo
运行项目
npm run dev
以上命令为开发模式下运行项目
npm run build
以上命令为项目发布打包

main.js(入口文件)
// 引入vue框架
import Vue from 'vue'
// 引入根组件
import App from './App'
// 引入路由配置
import router from './router'

// 关闭生产模式下给出的提示
Vue.config.productionTip = false

// 定义实例
new Vue({
  el: '#app',
  router,
  components: { App },
  template: '<App/>'
})
router(路由配置)
// 引入vue框架
import Vue from 'vue'
// 引入vue-router路由依赖
import Router from 'vue-router'
// 引入页面组件,命名为HelloWorld
import HelloWorld from '@/components/HelloWorld'

// 使用路由依赖
Vue.use(Router)

// 定义路由配置
export default new Router({
  routes: [
    {
      path: '/',
      name: 'HelloWorld',
      component: HelloWorld
    }
  ]
})
模板
<!DOCTYPE html>
<html lang="en">
<head>
    <meta charset="UTF-8">
    <title>Vue入门之组件</title>
    <script src="https://cdn.jsdelivr.net/npm/vue/dist/vue.js"></script>
</head>
<body>
<div id="app">
    <!-- template标签模板 -->
    <template id="demo2">
        <h2 style="color:red">我是template标签模板</h2>
    </template>
</div>

<!-- script标签模板 -->
<script type="x-template" id="demo3">
    <h2 style="color:red">我是script标签模板</h2>
</script>

<script type="text/javascript">
    // 实例化
    new Vue({
        el: '#app',
        data: {
            message: 'hello'
        },
        // 选项模板
        //template:`<h1 style="color:red">我是选项模板</h1>`
        //template:'#demo2'
        template:'#demo3'
    });
</script>
</body>
</html>
组件注册
(1)全局注册
// script
Vue.component('button-counter', {
    data: function () {
        return {
            count: 0
        }
    },
    template: '<button v-on:click="count++">全局组件显示: {{ count }}</button>'
});

new Vue({
    el: '#app'
});

// html使用
<button-counter></button-counter>
(2)局部注册
// script
new Vue({
    el: '#app',
    components:{
        "button-inner":{
            data: function() {
                return {
                    inner: 0
                }
            },
            template: '<button v-on:click="inner++">局部组件显示: {{ inner }}</button>'
        }
    }
});

// html使用
<button-inner></button-inner>
自定义指令
vue中的自定义指令通过Vue.directive来实现
<!DOCTYPE html>
<html lang="en">
<head>
    <meta charset="UTF-8">
    <title>Vue入门之自定义指令</title>
    <script src="https://cdn.jsdelivr.net/npm/vue/dist/vue.js"></script>
</head>
<body>
<div id="app">
    <div v-test="color">
        {{num}}
    </div>
</div>
<button onclick="unbindApp()">解绑</button>

<script type="text/javascript">
// 解绑
function unbindApp() {
    app.$destroy();
}

// 自定义指令
Vue.directive("test",{
    //1-被绑定
    bind:function (el, binding, vnode) {
        console.log("1-bind 被绑定");
        console.log("el:",el);
        console.log("binding:",binding);
        console.log("vnode:",vnode);
        el.style.color = binding.value;
    },
    //2-被插入
    inserted:function (el, binding, vnode) {
        console.log("2-inserted 被插入");
    },
    //3-更新
    update:function (el, binding, vnode) {
        console.log("3-update 更新");
    },
    //4-更新完成
    componentUpdated:function (el, binding, vnode) {
        console.log("4-componentUpdated 更新完成");
    },
    //5-解绑
    unbind:function (el, binding, vnode) {
        console.log("5-unbind 解绑");
    }
});

var app = new Vue({
    el:'#app',
    data:{
        num: 123,
        color:'red'
    }
})
</script>
</body>
</html>
参数说明
el:指令所绑定的元素,可以用来直接操作DOM binding:一个对象,包含指令的很多信息 vnode::Vue编译生成的虚拟节点
$on(在构造器外部添加事件)
$on接收两个参数,第一个参数是调用时的事件名称,第二个参数是一个匿名方法
app.$on('reduce',function(){
    console.log('执行了reduce()');
    this.count--;
});
$once(执行一次的事件)
app.$once('reduceOnce',function(){
    console.log('只执行一次的方法');
    this.count--;
});
$off(关闭事件)
function off(){
    console.log('关闭事件');
    app.$off('reduce');
}
extends
扩展:对构造器进行扩展
// 扩展
var extendObj ={
    created: function(){
        console.log("我是被扩展出来的");
    }
}

// 实例化vue
var app = new Vue({
    // 挂载实例
    el:'#app',
    // 页面数据初始化,字符,对象、数组
    data:{
    },
    // 扩展
    extends: extendObj
})
📚掘金文章
前端日常总结 一份不可多得的TypeScript系统入门整理 JS葵花宝典秘籍笔记,为你保驾护航金三银四 TypeScript趁早学习提高职场竞争力 前端模拟面试字数过23477万内容 JavaScript数据结构之链表 | 技术点评 JavaScript的数据结构-集合 |技术点评 这是我的第一次JavaScript初级技巧 一个合格的初级前端工程师需要掌握的模块笔记 【初级】个人分享Vue前端开发教程笔记 localStorage和sessionStorage本地存储 HTML5中的拖放功能 挑战前端知识点HTTP/ECMAScript 前端170面试题+答案学习整理(良心制作)
❤️关注+点赞+收藏+评论+转发❤️
点赞、收藏和评论
我是Jeskson(达达前端),感谢各位人才的:点赞、收藏和评论,我们下期见!(如本文内容有地方讲解有误,欢迎指出☞谢谢,一起学习了)
我们下期见!
文章持续更新,可以微信搜一搜「 程序员哆啦A梦 」第一时间阅读,回复【资料】有我准备的一线大厂资料,本文 https://www.1024bibi.com 已经收录
github收录,欢迎Star:https://github.com/webVueBlog/WebFamily