手把手教你写一个简单风控系统
你知道的越多,不知道的就越多,业余的像一棵小草!
你来,我们一起精进!你不来,我和你的竞争对手一起精进!
编辑:业余草
来源:juejin.cn/post/7182774381448282172
推荐:https://www.xttblog.com/?p=5357
自律才能自由
一、背景
1.为什么要做风控?
这不得拜产品大佬所赐

目前我们业务有使用到非常多的AI能力,如ocr识别、语音测评等,这些能力往往都比较费钱或者费资源,所以在产品层面也希望我们对用户的能力使用次数做一定的限制,因此风控是必须的!
2.为什么要自己写风控?
那么多开源的风控组件,为什么还要写呢?是不是想重复发明轮子呀。

要想回答这个问题,需要先解释下我们业务需要用到的风控(简称业务风控),与开源常见的风控(简称普通风控)有何区别:
| 风控类型 | 目的 | 对象 | 规则 |
|---|---|---|---|
| 业务风控 | 实现产品定义的一些限制,达到限制时,有具体的业务流程,如充值vip等 | 比较复杂多变的,例如针对用户进行风控,也能针对用户+年级进行风控 | 自然日、自然小时等 |
| 普通风控 | 保护服务或数据,拦截异常请求等 | 接口、部分可以加上简单参数 | 一般用得更多的是滑动窗口 |
因此,直接使用开源的普通风控,一般情况下是无法满足需求的
3.其它要求
支持实时调整限制
很多限制值在首次设置的时候,基本上都是拍定的一个值,后续需要调整的可能性是比较大的,因此可调整并实时生效是必须的
二、思路
要实现一个简单的业务风控组件,要做什么工作呢?
1.风控规则的实现
a.需要实现的规则:
自然日计数 自然小时计数 自然日+自然小时计数
❝自然日+自然小时计数 这里并不能单纯地串联两个判断,因为如果自然日的判定通过,而自然小时的判定不通过的时候,需要回退,自然日跟自然小时都不能计入本次调用!
❞
b.计数方式的选择:
目前能想到的会有:
mysql+db事务
持久化、记录可溯源、实现起来比较麻烦,稍微“「重」”了一点redis+lua
实现简单,redis的可执行lua脚本的特性也能满足对“「事务」”的要求mysql/redis+分布式事务
需要上锁,实现复杂,能做到比较精确的计数,也就是真正等到代码块执行成功之后,再去操作计数
❝目前没有很精确技术的要求,代价太大,也没有持久化的需求,因此选用
❞redis+lua即可
2.调用方式的实现
a.常见的做法
先定义一个通用的入口
//简化版代码

@Component
class DetectManager {
    fun matchExceptionally(eventId: String, content: String){
        //调用规则匹配
        val rt = ruleService.match(eventId,content)
        if (!rt) {
            throw BaseException(ErrorCode.OPERATION_TOO_FREQUENT)
        }
    }
}
在service中调用该方法
//简化版代码

@Service
class OcrServiceImpl : OcrService {

    @Autowired
    private lateinit var detectManager: DetectManager

    /**
     * 提交ocr任务
     * 需要根据用户id来做次数限制
     */
    override fun submitOcrTask(userId: String, imageUrl: String): String {
       detectManager.matchExceptionally("ocr", userId)
       //do ocr
    }

}
有没有更优雅一点的方法呢? 用注解可能会更好一点(也比较有争议其实,这边先支持实现)
❝由于传入的 content 是跟业务关联的,所以需要通过Spel来将参数构成对应的content
❞
三、具体实现
1.风控计数规则实现
a.自然日/自然小时
自然日/自然小时可以共用一套lua脚本,因为它们只有key不同,脚本如下:
//lua脚本
local currentValue = redis.call('get', KEYS[1]);
if currentValue ~= false then
    if tonumber(currentValue) < tonumber(ARGV[1]) then
        return redis.call('INCR', KEYS[1]);
    else
        return tonumber(currentValue) + 1;
    end;
else
   redis.call('set', KEYS[1], 1, 'px', ARGV[2]);
   return 1;
end;
其中 KEYS[1] 是日/小时关联的key,ARGV[1]是上限值,ARGV[2]是过期时间,返回值则是当前计数值+1后的结果,(如果已经达到上限,则实际上不会计数)
b.自然日+自然小时
如前文提到的,两个的结合实际上并不是单纯的拼凑,需要处理回退逻辑
//lua脚本
local dayValue = 0;
local hourValue = 0;
local dayPass = true;
local hourPass = true;
local dayCurrentValue = redis.call('get', KEYS[1]);
if dayCurrentValue ~= false then
    if tonumber(dayCurrentValue) < tonumber(ARGV[1]) then
        dayValue = redis.call('INCR', KEYS[1]);
    else
        dayPass = false;
        dayValue = tonumber(dayCurrentValue) + 1;
    end;
else
   redis.call('set', KEYS[1], 1, 'px', ARGV[3]);
   dayValue = 1;
end;

local hourCurrentValue = redis.call('get', KEYS[2]);
if hourCurrentValue ~= false then
    if tonumber(hourCurrentValue) < tonumber(ARGV[2]) then
        hourValue = redis.call('INCR', KEYS[2]);
    else
        hourPass = false;
        hourValue = tonumber(hourCurrentValue) + 1;
    end;
else
   redis.call('set', KEYS[2], 1, 'px', ARGV[4]);
   hourValue = 1;
end;

if (not dayPass) and hourPass then
    hourValue = redis.call('DECR', KEYS[2]);
end;

if dayPass and (not hourPass) then
    dayValue = redis.call('DECR', KEYS[1]);
end;

local pair = {};
pair[1] = dayValue;
pair[2] = hourValue;
return pair;
其中 KEYS[1] 是天关联生成的key, KEYS[2] 是小时关联生成的key,ARGV[1]是天的上限值,ARGV[2]是小时的上限值,ARGV[3]是天的过期时间,ARGV[4]是小时的过期时间,返回值同上
❝这里给的是比较粗糙的写法,主要需要表达的就是,进行两个条件判断时,有其中一个不满足,另一个都需要进行回退.
❞
2.注解的实现
a.定义一个@Detect注解
@Retention(AnnotationRetention.RUNTIME)
@Target(AnnotationTarget.FUNCTION, AnnotationTarget.CLASS)
annotation class Detect(

    /**
     * 事件id
     */
    val eventId: String = "",

    /**
     * content的表达式
     */
    val contentSpel: String = ""

)
其中content是需要经过表达式解析出来的,所以接受的是个String
b.定义@Detect注解的处理类
@Aspect
@Component
class DetectHandler {

    private val logger = LoggerFactory.getLogger(javaClass)

    @Autowired
    private lateinit var detectManager: DetectManager

    @Resource(name = "detectSpelExpressionParser")
    private lateinit var spelExpressionParser: SpelExpressionParser

    @Bean(name = ["detectSpelExpressionParser"])
    fun detectSpelExpressionParser(): SpelExpressionParser {
        return SpelExpressionParser()
    }

    @Around(value = "@annotation(detect)")
    fun operatorAnnotation(joinPoint: ProceedingJoinPoint, detect: Detect): Any? {
        if (detect.eventId.isBlank() || detect.contentSpel.isBlank()){
            throw illegalArgumentExp("@Detect config is not available!")
        }
        //转换表达式
        val expression = spelExpressionParser.parseExpression(detect.contentSpel)
        val argMap = joinPoint.args.mapIndexed { index, any ->
            "arg${index+1}" to any
        }.toMap()
        //构建上下文
        val context = StandardEvaluationContext().apply {
            if (argMap.isNotEmpty()) this.setVariables(argMap)
        }
        //拿到结果
        val content = expression.getValue(context)

        detectManager.matchExceptionally(detect.eventId, content)
        return joinPoint.proceed()
    }
}
需要将参数放入到上下文中,并起名为arg1、arg2....
四、测试一下
1.写法
使用注解之后的写法:
//简化版代码

@Service
class OcrServiceImpl : OcrService {

    @Autowired
    private lateinit var detectManager: DetectManager

    /**
     * 提交ocr任务
     * 需要根据用户id来做次数限制
     */
    @Detect(eventId = "ocr", contentSpel = "#arg1")
    override fun submitOcrTask(userId: String, imageUrl: String): String {
       //do ocr
    }

}
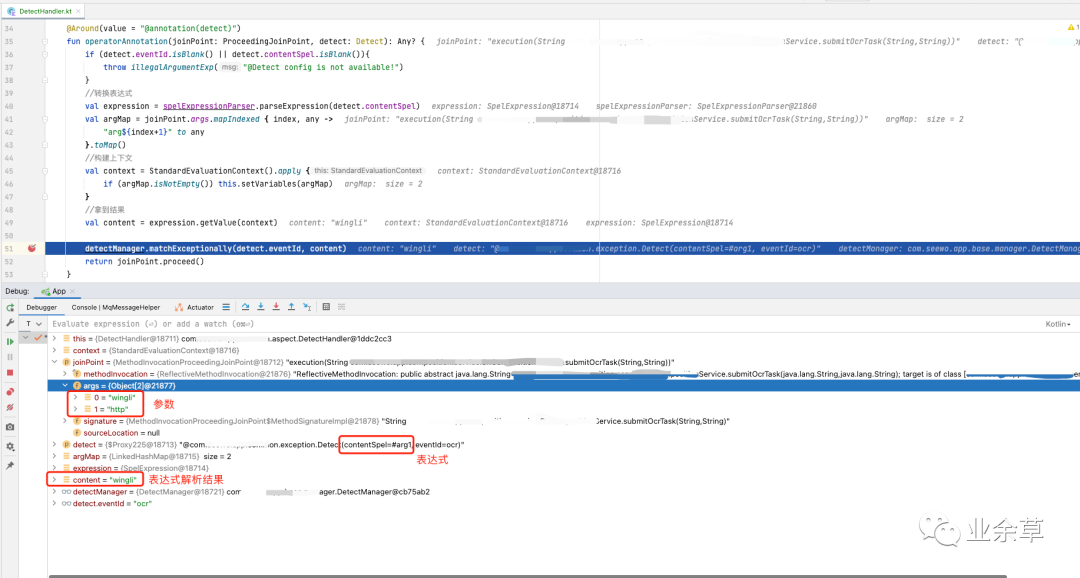
2.Debug看看

注解值获取成功 表达式解析成功
至此,一个简单的风控 demo 就完成了!实际的风控系统,业务非常复杂,千万不要小瞧了它!
