前端实现很哇塞的端扫码功能
今天分享一篇很有意思的文章,实现浏览器端扫码功能,以下是正文。
背景
不久前我做了关于获取浏览器摄像头并扫码识别的功能,本文中梳理了涉及到知识点及具体代码实现,整理成此篇文章内容。
本文主要介绍,通过使用基于 vue 技术栈的前端开发技术,在浏览器端调起摄像头 📷,并进行扫码识别功能,对识别到的二维码进行跳转或其他操作处理。本文内容分为背景介绍、实现效果、技术简介、代码实现、总结等部分组成。
实现效果
本实例中主要有两个页面首页和扫码页,具体实现效果如下图所示。
首页:点击 SCAN QRCODE按钮,进入到扫码页。扫码页:首次进入时,或弹出 获取摄像头访问权限的系统提示框,点击允许访问,页面开始加载摄像头数据并开始进行二维码捕获拾取,若捕获到二维码,开始进行二维码解析,解析成功后加载识别成功弹窗。

📸在线体验:dragonir.github.io/h5-scan-qrc…
📌提示:需要在有摄像头设备的浏览器中竖屏访问。手机横竖屏检测小知识可前往我的另一篇文章《五十音小游戏中的前端知识》 中进行了解。
技术简介
WebRTC API
WebRTC (Web Real-Time Communications) 是一项实时通讯技术,它允许网络应用或者站点,在不借助中间媒介的情况下,建立浏览器之间 点对点(Peer-to-Peer) 的连接,实现视频流和(或)音频流或者其他任意数据的传输。WebRTC 包含的这些标准使用户在无需安装任何插件或者第三方的软件的情况下,创建 点对点(Peer-to-Peer) 的数据分享和电话会议成为可能。
三个主要接口:
MediaStream:能够通过设备的摄像头及话筒获得视频、音频的同步流。RTCPeerConnection:是WebRTC用于构建点对点之间稳定、高效的流传输的组件。RTCDataChannel:使得浏览器之间建立一个高吞吐量、低延时的信道,用于传输任意数据。
🔗前往MDN深入学习:WebRTC_API
WebRTC adapter
虽然 WebRTC 规范已经相对健全稳固了,但是并不是所有的浏览器都实现了它所有的功能,有些浏览器需要在一些或者所有的 WebRTC API上添加前缀才能正常使用。
WebRTC 组织在 github 上提供了一个 WebRTC适配器(WebRTC adapter) 来解决在不同浏览器上实现 WebRTC 的兼容性问题。这个适配器是一个 JavaScript垫片,它可以让你根据 WebRTC 规范描述的那样去写代码,在所有支持 WebRTC 的浏览器中不用去写前缀或者其他兼容性解决方法。
🔗前往MDN深入学习:WebRTC adapter
核心的API navigator.mediaDevices.getUserMedia
网页调用摄像头需要调用 getUserMedia API,MediaDevices.getUserMedia() 会提示用户给予使用媒体输入的许可,媒体输入会产生一个 MediaStream,里面包含了请求的媒体类型的轨道。此流可以包含一个视频轨道(来自硬件或者虚拟视频源,比如相机、视频采集设备和屏幕共享服务等等)、一个音频轨道(同样来自硬件或虚拟音频源,比如麦克风、A/D转换器 等等),也可能是其它轨道类型。
它返回一个 Promise 对象,成功后会 resolve 回调一个 MediaStream对象;若用户拒绝了使用权限,或者需要的媒体源不可用,promise 会 reject 回调一个 PermissionDeniedError 或者 NotFoundError 。(返回的 promise对象 可能既不会 resolve 也不会 reject,因为用户不是必须选择允许或拒绝。)
通常可以使用 navigator.mediaDevices 来获取 MediaDevices ,例如:
navigator.mediaDevices.getUserMedia(constraints)
  .then(function(stream) {
    // 使用这个stream
  })
  .catch(function(err) {
    // 处理error
  })
复制代码
🔗前往MDN深入学习:navigator.mediaDevices.getUserMedia
二维码解析库 JSQR
jsQR 是一个纯 JavaScript 二维码解析库,该库读取原始图像或者是摄像头,并将定位,提取和解析其中的任何 QR码。
如果要使用 jsQR 扫描网络摄像头流,则需要 ImageData 从视频流中提取,然后可以将其传递给 jsQR。
jsQR 导出一个方法,该方法接受 4 个参数,分别是解码的 图像数据,宽、高 以及 可选的对象 进一步配置扫描行为。
imageData:格式为 [r0, g0, b0, a0, r1, g1, b1, a1, ...] 的 Uint8ClampedArray( 8位无符号整型固定数组) 的 rgba 像素值。
const code = jsQR(imageData, width, height, options);
if (code) {
  console.log('找到二维码!', code);
}
复制代码
🔗前往github深入了解:jsQR
代码实现
流程
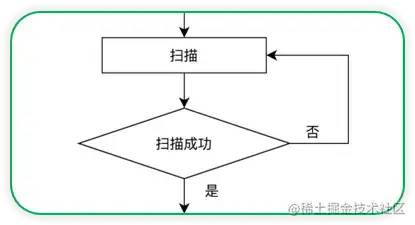
整个扫码流程如下图所示:页面初始化,先检查浏览器是否支持 mediaDevices 相关API,浏览器进行调去摄像头,调用失败,就执行失败回调;调用成功,进行捕获视频流,然后进行扫码识别,没有扫瞄到可识别的二维码就继续扫描,扫码成功后绘制扫描成功图案并进行成功回调。
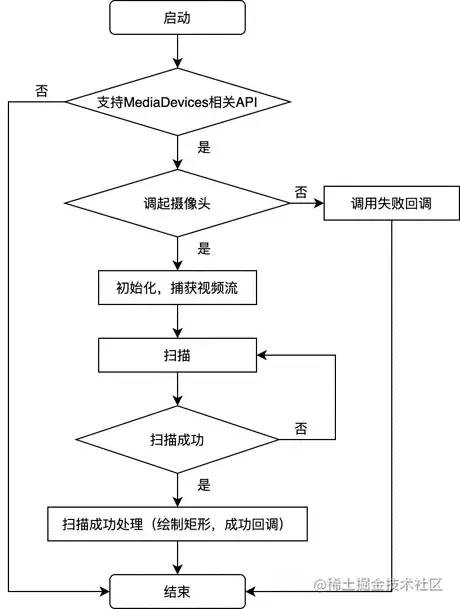
下文内容对流程进行拆分,分别实现对应的功能。
扫码组件 Scaner
页面结构
我们先看下页面结构,主要由 4 部分组成:
提示框。 扫码框。 video:展示摄像头捕获视频流。canvas: 绘制视频帧,用于二维码识别。
<template>
  <div class="scaner" ref="scaner">

    <div class="banner" v-if="showBanner">
      <i class="close_icon" @click="() => showBanner = false">i>
      <p class="text">若当前浏览器无法扫码,请切换其他浏览器尝试p>
    div>

    <div class="cover">
      <p class="line">p>
      <span class="square top left">span>
      <span class="square top right">span>
      <span class="square bottom right">span>
      <span class="square bottom left">span>
      <p class="tips">将二维码放入框内,即可自动扫描p>
    div>

    <video
      v-show="showPlay"
      class="source"
      ref="video"
      :width="videoWH.width"
      :height="videoWH.height"
      controls
    >video>
    <canvas v-show="!showPlay" ref="canvas" />
    <button v-show="showPlay" @click="run">开始button>
  div>
template>
复制代码
方法:绘制
画线。 画框(用于扫码成功后绘制矩形图形)。

// 画线
drawLine (begin, end) {
  this.canvas.beginPath();
  this.canvas.moveTo(begin.x, begin.y);
  this.canvas.lineTo(end.x, end.y);
  this.canvas.lineWidth = this.lineWidth;
  this.canvas.strokeStyle = this.lineColor;
  this.canvas.stroke();
},
// 画框
drawBox (location) {
  if (this.drawOnfound) {
    this.drawLine(location.topLeftCorner, location.topRightCorner);
    this.drawLine(location.topRightCorner, location.bottomRightCorner);
    this.drawLine(location.bottomRightCorner, location.bottomLeftCorner);
    this.drawLine(location.bottomLeftCorner, location.topLeftCorner);
  }
},
复制代码
方法:初始化
检查是否支持。 调起摄像头。 成功失败处理。
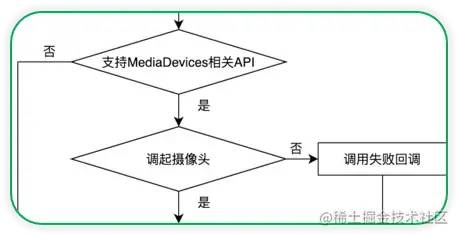
// 初始化
setup () {
  // 判断了浏览器是否支持挂载在MediaDevices.getUserMedia()的方法
  if (navigator.mediaDevices && navigator.mediaDevices.getUserMedia) {
    this.previousCode = null;
    this.parity = 0;
    this.active = true;
    this.canvas = this.$refs.canvas.getContext("2d");
    // 获取摄像头模式,默认设置是后置摄像头
    const facingMode = this.useBackCamera ? { exact: 'environment' } : 'user';
    // 摄像头视频处理
    const handleSuccess = stream => {
       if (this.$refs.video.srcObject !== undefined) {
        this.$refs.video.srcObject = stream;
      } else if (window.videoEl.mozSrcObject !== undefined) {
        this.$refs.video.mozSrcObject = stream;
      } else if (window.URL.createObjectURL) {
        this.$refs.video.src = window.URL.createObjectURL(stream);
      } else if (window.webkitURL) {
        this.$refs.video.src = window.webkitURL.createObjectURL(stream);
      } else {
        this.$refs.video.src = stream;
      }
      // 不希望用户来拖动进度条的话,可以直接使用playsinline属性,webkit-playsinline属性
      this.$refs.video.playsInline = true;
      const playPromise = this.$refs.video.play();
      playPromise.catch(() => (this.showPlay = true));
      // 视频开始播放时进行周期性扫码识别
      playPromise.then(this.run);
    };
    // 捕获视频流
    navigator.mediaDevices
      .getUserMedia({ video: { facingMode } })
      .then(handleSuccess)
      .catch(() => {
        navigator.mediaDevices
          .getUserMedia({ video: true })
          .then(handleSuccess)
          .catch(error => {
            this.$emit("error-captured", error);
          });
      });
  }
},
复制代码
方法:周期性扫描
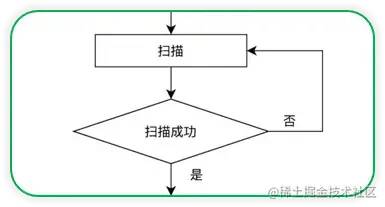
run () {
  if (this.active) {
    // 浏览器在下次重绘前循环调用扫码方法
    requestAnimationFrame(this.tick);
  }
},
复制代码
方法:成功回调

// 二维码识别成功事件处理
found (code) {
  if (this.previousCode !== code) {
    this.previousCode = code;
  } else if (this.previousCode === code) {
    this.parity += 1;
  }
  if (this.parity > 2) {
    this.active = this.stopOnScanned ? false : true;
    this.parity = 0;
    this.$emit("code-scanned", code);
  }
},
复制代码
方法:停止

// 完全停止
fullStop () {
  if (this.$refs.video && this.$refs.video.srcObject) {
    // 停止视频流序列轨道
    this.$refs.video.srcObject.getTracks().forEach(t => t.stop());
  }
}
复制代码
方法:扫描
绘制视频帧。 扫码识别。
// 周期性扫码识别
tick () {
  // 视频处于准备阶段,并且已经加载足够的数据
  if (this.$refs.video && this.$refs.video.readyState === this.$refs.video.HAVE_ENOUGH_DATA) {
    // 开始在画布上绘制视频
    this.$refs.canvas.height = this.videoWH.height;
    this.$refs.canvas.width = this.videoWH.width;
    this.canvas.drawImage(this.$refs.video, 0, 0, this.$refs.canvas.width, this.$refs.canvas.height);
    // getImageData() 复制画布上制定矩形的像素数据
    const imageData = this.canvas.getImageData(0, 0, this.$refs.canvas.width, this.$refs.canvas.height);
    let code = false;
    try {
      // 识别二维码
      code = jsQR(imageData.data, imageData.width, imageData.height);
    } catch (e) {
      console.error(e);
    }
    // 如果识别出二维码,绘制矩形框
    if (code) {
      this.drawBox(code.location);
      // 识别成功事件处理
      this.found(code.data);
    }
  }
  this.run();
},
复制代码
父组件
Scaner 的父组件主要加载页面,并展示 Scaner 扫码结果的回调。
页面结构
<template>
  <div class="scan">

    <div class="nav">
      <a class="close" @click="() => $router.go(-1)">a>
      <p class="title">Scan QRcodep>
    div>
    <div class="scroll-container">

      <Scaner
        v-on:code-scanned="codeScanned"
        v-on:error-captured="errorCaptured"
        :stop-on-scanned="true"
        :draw-on-found="true"
        :responsive="false"
      />
    div>
  div>
template>
复制代码
父组件方法
import Scaner from '../components/Scaner';

export default {
  name: 'Scan',
  components: {
    Scaner
  },
  data () {
    return {
      errorMessage: "",
      scanned: ""
    }
  },
  methods: {
    codeScanned(code) {
      this.scanned = code;
      setTimeout(() => {
        alert(`扫码解析成功: ${code}`);
      }, 200)
    },
    errorCaptured(error) {
      switch (error.name) {
        case "NotAllowedError":
          this.errorMessage = "Camera permission denied.";
          break;
        case "NotFoundError":
          this.errorMessage = "There is no connected camera.";
          break;
        case "NotSupportedError":
          this.errorMessage =
            "Seems like this page is served in non-secure context.";
          break;
        case "NotReadableError":
          this.errorMessage =
            "Couldn't access your camera. Is it already in use?";
          break;
        case "OverconstrainedError":
          this.errorMessage = "Constraints don't match any installed camera.";
          break;
        default:
          this.errorMessage = "UNKNOWN ERROR: " + error.message;
      }
      console.error(this.errorMessage);
     alert('相机调用失败');
    }
  },
  mounted () {
    var str = navigator.userAgent.toLowerCase();
    var ver = str.match(/cpu iphone os (.*?) like mac os/);
    // 经测试 iOS 10.3.3以下系统无法成功调用相机摄像头
    if (ver && ver[1].replace(/_/g,".") < '10.3.3') {
     alert('相机调用失败');
    }
  }
复制代码
完整代码
🔗github: github.com/dragonir/h5…
总结
应用扩展
我觉得以下几个功能都是可以通过浏览器调用摄像头并扫描识别来实现的,大家觉得还有哪些 很哇塞🌟 的功能应用可以通过浏览器端扫码实现 😂?
🌏链接跳转。🛒价格查询。🔒登录认证。📂文件下载。
兼容性

❗即使使用了adapter,getUserMedia API在部分浏览器中也存在不支持的。❗低版本浏览器(如iOS 10.3以下)、Android小众浏览器(如IQOO自带浏览器)不兼容。❗QQ、微信内置浏览器无法调用。
参考资料
[1]. Taking still photos with WebRTC [2]. Choosing cameras in JavaScript with the mediaDevices API [3]. 如何使用JavaScript访问设备前后摄像头
