面对 this 指向丢失,尤雨溪在 Vuex 源码中是怎么处理的
1. 前言
大家好,我是若川。好久以前我有写过《面试官问系列》,旨在帮助读者提升JS基础知识,包含new、call、apply、this、继承相关知识。其中写了 面试官问:this 指向 文章。在掘金等平台收获了还算不错的反馈。
最近有小伙伴看我的 Vuex源码 文章,提到有一处this指向有点看不懂(好不容易终于有人看我的源码文章了,感动的要流泪了^_^)。于是我写篇文章答疑解惑,简单再说说 this 指向和尤大在 Vuex 源码中是怎么处理 this 指向丢失的。
2. 对象中的this指向
var person = {
  name: '若川',
  say: function(text){
    console.log(this.name + ', ' + text);
  }
}
console.log(person.name);
console.log(person.say('在写文章')); // 若川, 在写文章
var say = person.say;
say('在写文章'); // 这里的this指向就丢失了,指向window了。(非严格模式)
3. 类中的this指向
3.1 ES5
// ES5
var Person = function(){
  this.name = '若川';
}
Person.prototype.say = function(text){
  console.log(this.name + ', ' + text);
}
var person = new Person();
console.log(person.name); // 若川
console.log(person.say('在写文章'));
var say = person.say;
say('在写文章'); // 这里的this指向就丢失了,指向 window 了。
3.2 ES6
// ES6
class Person{
  construcor(name = '若川'){
     this.name = name;
  }
  say(text){
    console.log(`${this.name}, ${text}`);
  }
}
const person = new Person();
person.say('在写文章')
// 解构
const { say } = person;
say('在写文章'); // 报错 this ,因为ES6 默认启用严格模式,严格模式下指向 undefined
4. 尤大在Vuex源码中是怎么处理的
先看代码
class Store{
  constructor(options = {}){
     this._actions = Object.create(null);
  // bind commit and dispatch to self
      // 给自己 绑定 commit 和 dispatch
      const store = this
      const { dispatch, commit } = this
      // 为何要这样绑定 ?
      // 说明调用commit和dispach 的 this 不一定是 store 实例
      // 这是确保这两个函数里的this是store实例
      this.dispatch = function boundDispatch (type, payload) {
        return dispatch.call(store, type, payload)
      }
      this.commit = function boundCommit (type, payload, options) {
        return commit.call(store, type, payload, options)
      }
  }
  dispatch(){
     console.log('dispatch', this);
  }
  commit(){
     console.log('commit', this);
  }
}
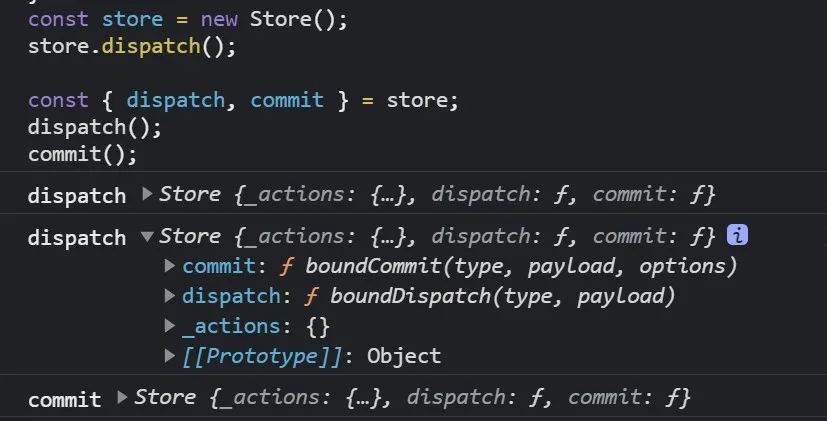
const store = new Store();
store.dispatch(); // 输出结果 this 是什么呢?

const { dispatch, commit } = store;
dispatch(); // 输出结果 this 是什么呢?
commit();  // 输出结果 this 是什么呢?

结论:非常巧妙的用了call把dispatch和commit函数的this指向强制绑定到store实例对象上。如果不这么绑定就报错了。
4.1 actions 解构 store
其实Vuex源码里就有上面解构const { dispatch, commit } = store;的写法。想想我们平时是如何写actions的。actions中自定义函数的第一个参数其实就是 store 实例。
这时我们翻看下actions文档:https://vuex.vuejs.org/zh/guide/actions.html
const store = new Vuex.Store({
  state: {
    count: 0
  },
  mutations: {
    increment (state) {
      state.count++
    }
  },
  actions: {
    increment (context) {
      context.commit('increment')
    }
  }
})
也可以用解构赋值的写法。
actions: {
  increment ({ commit }) {
    commit('increment')
  }
}
有了Vuex源码构造函数里的call绑定,这样this指向就被修正啦~不得不说祖师爷就是厉害。这一招,大家可以免费学走~
接着我们带着问题,为啥上文中的context就是store实例,有dispatch、commit这些方法呢。继续往下看。
4.2 为什么 actions 对象里的自定义函数 第一个参数就是 store 实例。
以下是简单源码,有缩减,感兴趣的可以看我的文章 Vuex 源码文章
class Store{
 construcor(){
    // 初始化 根模块
    // 并且也递归的注册所有子模块
    // 并且收集所有模块的 getters 放在 this._wrappedGetters 里面
    installModule(this, state, [], this._modules.root)
 }
}
接着我们看installModule函数中的遍历注册 actions 实现
function installModule (store, rootState, path, module, hot) {
    // 省略若干代码
    // 循环遍历注册 action
    module.forEachAction((action, key) => {
      const type = action.root ? key : namespace + key
      const handler = action.handler || action
      registerAction(store, type, handler, local)
    })
}
接着看注册 actions 函数实现 registerAction
/**
* 注册 mutation
* @param {Object} store 对象
* @param {String} type 类型
* @param {Function} handler 用户自定义的函数
* @param {Object} local local 对象
*/
function registerAction (store, type, handler, local) {
  const entry = store._actions[type] || (store._actions[type] = [])
  // payload 是actions函数的第二个参数
  entry.push(function wrappedActionHandler (payload) {
    /**
     * 也就是为什么用户定义的actions中的函数第一个参数有
     *  { dispatch, commit, getters, state, rootGetters, rootState } 的原因
     * actions: {
     *    checkout ({ commit, state }, products) {
     *        console.log(commit, state);
     *    }
     * }
     */
    let res = handler.call(store, {
      dispatch: local.dispatch,
      commit: local.commit,
      getters: local.getters,
      state: local.state,
      rootGetters: store.getters,
      rootState: store.state
    }, payload)
    // 源码有删减
}
比较容易发现调用顺序是 new Store() => installModule(this) => registerAction(store) => let res = handler.call(store)。
其中handler 就是 用户自定义的函数,也就是对应上文的例子increment函数。store实例对象一路往下传递,到handler执行时,也是用了call函数,强制绑定了第一个参数是store实例对象。
actions: {
  increment ({ commit }) {
    commit('increment')
  }
}
这也就是为什么 actions 对象中的自定义函数的第一个参数是 store 对象实例了。
好啦,文章到这里就基本写完啦~相对简短一些。应该也比较好理解。
最后再总结下 this 指向
摘抄下面试官问:this 指向文章结尾。
如果要判断一个运行中函数的 this 绑定, 就需要找到这个函数的直接调用位置。找到之后
就可以顺序应用下面这四条规则来判断 this 的绑定对象。
new调用:绑定到新创建的对象,注意:显示return函数或对象,返回值不是新创建的对象,而是显式返回的函数或对象。call或者apply( 或者bind) 调用:严格模式下,绑定到指定的第一个参数。非严格模式下,null和undefined,指向全局对象(浏览器中是window),其余值指向被new Object()包装的对象。对象上的函数调用:绑定到那个对象。 普通函数调用:在严格模式下绑定到 undefined,否则绑定到全局对象。
ES6 中的箭头函数:不会使用上文的四条标准的绑定规则, 而是根据当前的词法作用域来决定this, 具体来说, 箭头函数会继承外层函数,调用的 this 绑定( 无论 this 绑定到什么),没有外层函数,则是绑定到全局对象(浏览器中是window)。这其实和 ES6 之前代码中的 self = this 机制一样。
