FreqTrade—又强又简单的加密货币自动交易机器人
Freqtrade 是一个用 Python 编写的免费开源加密货币交易机器人。它旨在支持所有主要交易所并通过 Telegram 或 webUI 进行控制。功能包含回测、绘图和资金管理工具以及通过机器学习的策略优化。

目前支持的交易所:
Binance (*Note for binance users)
Bittrex
FTX
Gate.io
Kraken
OKX
特性:
1. 基于 Python 3.8+:适用于任何操作系统 - Windows、macOS 和 Linux。
2. 持久性:持久性是通过 sqlite 实现的。
3. Dry-run:不花钱运行机器人。
4. 回测:模拟买入/卖出策略。
5. 通过机器学习进行策略优化:使用机器学习通过真实的交易所数据优化买入/卖出策略参数。
6. 边缘头寸规模计算您的胜率、风险回报率、最佳止损位并在为每个特定市场建立头寸之前调整头寸规模。
7. 白名单加密货币:选择你要交易的加密货币或使用动态白名单。
8. 黑名单加密货币:选择你想要避免的加密货币。
9. 内置 WebUI:内置 Web UI 来管理你的机器人。
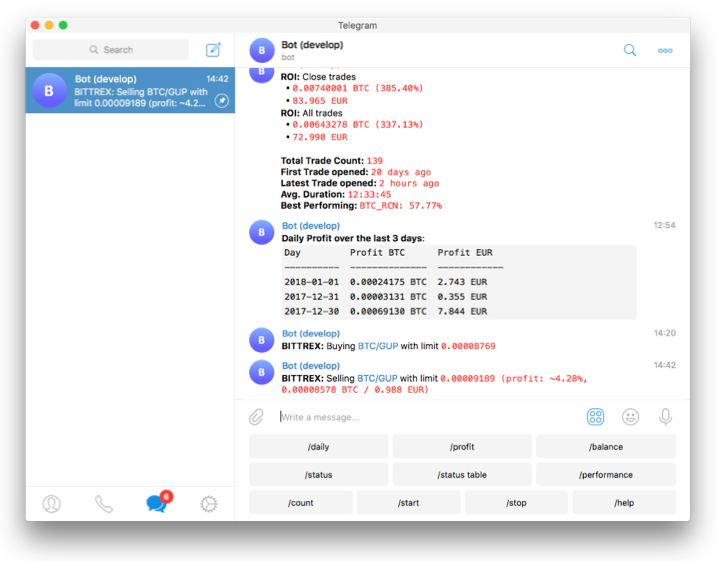
10. 可通过 Telegram管理:使用 Telegram 管理机器人。
11. 以法定货币显示盈亏:以法定货币显示你的盈亏。
12. 表现状态报告:提供你当前交易的表现状态。
1.准备
开始之前,你要确保Python和pip已经成功安装在电脑上,如果没有,可以访问这篇文章:超详细Python安装指南 进行安装。
(可选1) 如果你用Python的目的是数据分析,可以直接安装Anaconda:Python数据分析与挖掘好帮手—Anaconda,它内置了Python和pip.
(可选2) 此外,推荐大家用VSCode编辑器,它有许多的优点:Python 编程的最好搭档—VSCode 详细指南。
在Linux/MacOS下,三行命令就能完成安装:
git clone -b develop https://github.com/freqtrade/freqtrade.git
cd freqtrade
./setup.sh --install如果你无法克隆此项目,请在Python实用宝典公众号后台回复:freqtrade 下载。
Windows环境下打开Cmd(开始—运行—CMD),输入命令安装依赖:
git clone https://github.com/freqtrade/freqtrade.git
cd freqtrade
# 安装ta-lib
pip install build_helpers/TA_Lib-0.4.24-cp38-cp38-win_amd64.whl
pip install -r requirements.txt
pip install -e .
freqtrade
请注意,此处安装ta-lib时项目方提供了python3.8/3.9/3.10,其他Python版本请自行搜索下载。
输入freqtrade时,显示以下信息说明安装成功:
(freqtrade) D:\CODE\trader\freqtrade>freqtrade
2022-02-17 19:40:50,174 - freqtrade - ERROR - Usage of Freqtrade requires a subcommand to be specified.
To have the bot executing trades in live/dry-run modes, depending on the value of the `dry_run` setting in the config, run Freqtrade as `freqtrade trade [options...]`.
To see the full list of options available, please use `freqtrade --help` or `freqtrade <command> --help`.
2.快速开始
下面教你如何开发一个简单的交易策略。
一个策略文件往往包含这些东西:
指标
购买规则
卖出规则
建议最低投资回报率
强烈推荐止损
Freqtrade使用 Pandas 作为基础数据结构,它底层的OHLCV都是以Dataframe的格式存储的。
Dataframe数据流中每一行数据代表图表上的一根K线,最新的K线始终是数据库中最后一根。
dataframe.head()
                       date open high low close volume
0 2021-11-09 23:25:00+00:00  67279.67  67321.84  67255.01  67300.97   44.62253
1 2021-11-09 23:30:00+00:00  67300.97  67301.34  67183.03  67187.01   61.38076
2 2021-11-09 23:35:00+00:00  67187.02  67187.02  67031.93  67123.81  113.42728
3 2021-11-09 23:40:00+00:00  67123.80  67222.40  67080.33  67160.48   78.96008
4 2021-11-09 23:45:00+00:00  67160.48  67160.48  66901.26  66943.37  111.39292
Pandas 提供了计算指标的快速方法。为了从这种速度中受益,建议不要使用循环,而是使用矢量化方法。
矢量化操作在整个数据范围内执行计算,因此,与遍历每一行相比,在计算指标时要快得多。
dataframe.loc[(dataframe['rsi'] > 30), 'buy'] = 1类似于上面这样的赋值方法,会自动设置rsi大于30的数据的buy列的值为1。
买入规则
def populate_buy_trend(self, dataframe: DataFrame, metadata: dict) -> DataFrame:
    """
    Based on TA indicators, populates the buy signal for the given dataframe
    :param dataframe: DataFrame populated with indicators
    :param metadata: Additional information, like the currently traded pair
    :return: DataFrame with buy column
    """
    dataframe.loc[
        (
            (qtpylib.crossed_above(dataframe['rsi'], 30)) & # Signal: RSI crosses above 30
            (dataframe['tema'] <= dataframe['bb_middleband']) & # Guard
            (dataframe['tema'] > dataframe['tema'].shift(1)) & # Guard
            (dataframe['volume'] > 0) # Make sure Volume is not 0
        ),
        'buy'] = 1

    return dataframe
请注意,一定要不修改并返回"open", "high", "low", "close", "volume"列,这些是基础行情数据,如果返回错误的数据将可能会导致一些奇怪数据的产生。
如上所示的方法中,符合条件的数据的buy值会被设为1代表买入,否则为0或nan值。
卖出规则
def populate_sell_trend(self, dataframe: DataFrame, metadata: dict) -> DataFrame:
    """
    Based on TA indicators, populates the sell signal for the given dataframe
    :param dataframe: DataFrame populated with indicators
    :param metadata: Additional information, like the currently traded pair
    :return: DataFrame with buy column
    """
    dataframe.loc[
        (
            (qtpylib.crossed_above(dataframe['rsi'], 70)) & # Signal: RSI crosses above 70
            (dataframe['tema'] > dataframe['bb_middleband']) & # Guard
            (dataframe['tema'] < dataframe['tema'].shift(1)) & # Guard
            (dataframe['volume'] > 0) # Make sure Volume is not 0
        ),
        'sell'] = 1
    return dataframe
与买入类似,这里不赘述了。
最小投资回报率
在类中增加这个初始化变量,能控制投资回报率:
minimal_roi = {
    "40": 0.0,
    "30": 0.01,
    "20": 0.02,
    "0": 0.04
}
上述配置意味着:
只要达到 4% 的利润就卖出
达到 2% 利润时卖出(20 分钟后生效)
达到 1% 利润时卖出(30 分钟后生效)
交易未亏损时卖出(40 分钟后生效)
此处的计算包含费用。
要完全禁用 ROI,请将其设置为一个非常高的数字:
minimal_roi = {
    "0": 100
}
虽然从技术上讲并没有完全禁用,但一旦交易达到 10000% 利润,它就会卖出。
止损
强烈建议设置止损,以保护资金免受不利的剧烈波动。
设置 10% 止损的示例:
stoploss = -0.10一个完整代码如下:
3.启动机器人
启动机器人前还需要设定配置,配置模板在 config/examples 下面。
比如币安的配置,你还需要输入key和secret:
"exchange": {
        "name": "binance",
        "key": "your_exchange_key",
        "secret": "your_exchange_secret",
        ......
  }
}
启动机器人:
freqtrade trade --strategy AwesomeStrategy --strategy-path /some/directory -c path/far/far/away/config.json--strategy-path 指定策略文件位置
-c 参数指定配置文件位置
比如我把策略放在了user_data/strategies下,配置放在了config_examples下,这么输入命令启动机器人即可:
freqtrade trade --strategy SampleStrategy --strategy-path user_data/strategies -c config_examples/config_binance.example.json由于篇幅问题,本文只是介绍了freqtrade的冰山一角,在启动机器人前,一定要进行回测并进行模拟交易。它还有TG通知功能、WebUI管理界面,详细的使用方法大家可以参考官方教程:
https://www.freqtrade.io/en/stable/
我们的文章到此就结束啦,如果你喜欢今天的Python 实战教程,请持续关注Python实用宝典。
有任何问题,可以在公众号后台回复:加群,回答相应红字验证信息,进入互助群询问。
原创不易,希望你能在下面点个赞和在看支持我继续创作,谢谢!
点击下方阅读原文可获得更好的阅读体验
Python实用宝典 (pythondict.com)
不只是一个宝典
欢迎关注公众号:Python实用宝典
