
5分钟学会Flutter开发
点击“开发者技术前线”,选择“星标🔝”
让一部分开发者看到未来

一、环境配置:
1.1 下载Flutter SDK
git clone https://github.com/flutter/flutter.git
1.2 配置环境变量
# FLUTTER_HOME为下载的Flutter文件夹路径export FLUTTER_HOME=/Users/.../flutterexport PATH=$PATH:$FLUTTER_HOME/binexport PATH=$PATH:$FLUTTER_HOME/bin/cache/dart-sdk/bin
1.3 刷新环境变量
source ~/.bash_profilesource ~/.zshrc(如安装zsh插件)
1.4 开发工具
1. Xcode + Android Studio(推荐) 2. Visual Studio Code
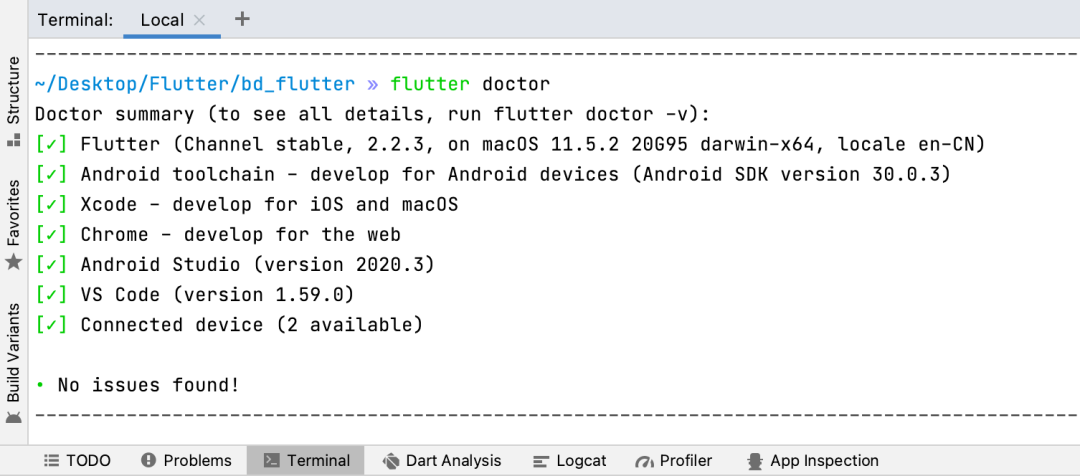
cd /Applications/Android\ Studio.app/Contents/jreln -s ../jre jdkln -s "/Library/Internet Plug-Ins/JavaAppletPlugin.plugin" jdkflutter doctor
二、工程创建
2.1 创建Flutter项目
flutter create xxx
2.2 创建Flutter模块(用于原生集成Flutter)
create --template module xxx
2.3 工程结构
bd_flutter.dart_tool.............记录依赖库信息.idea..................当前项目配置android................Android工程目录iOS....................iOS工程目录lib....................Flutter代码目录test...................单元测试目录web....................Web工程目录pubspec.yaml...........Pub第三方依赖配置文件,类似Cocoapods、Gradle
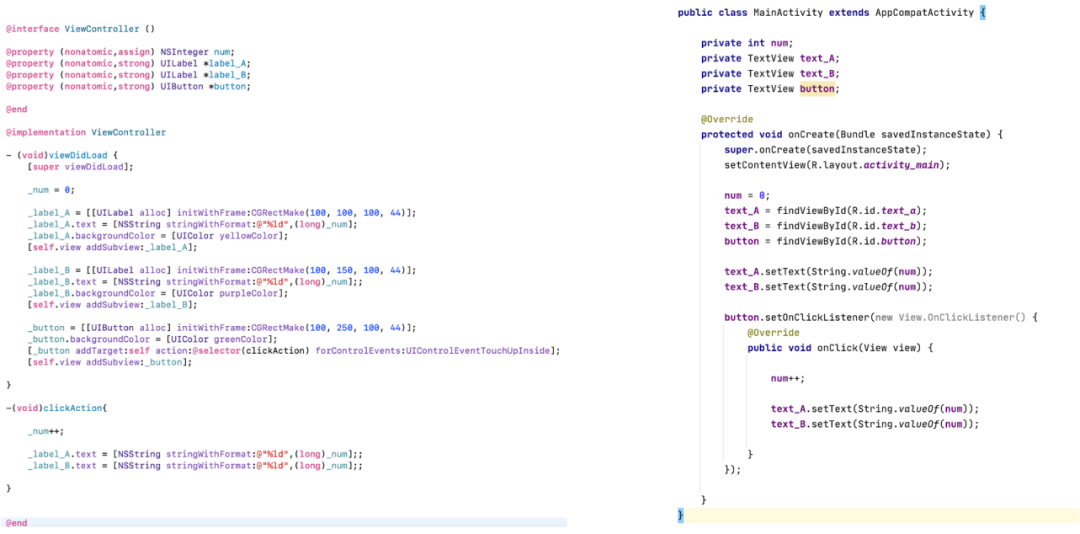
三、编程范式
3.1 命令式编程
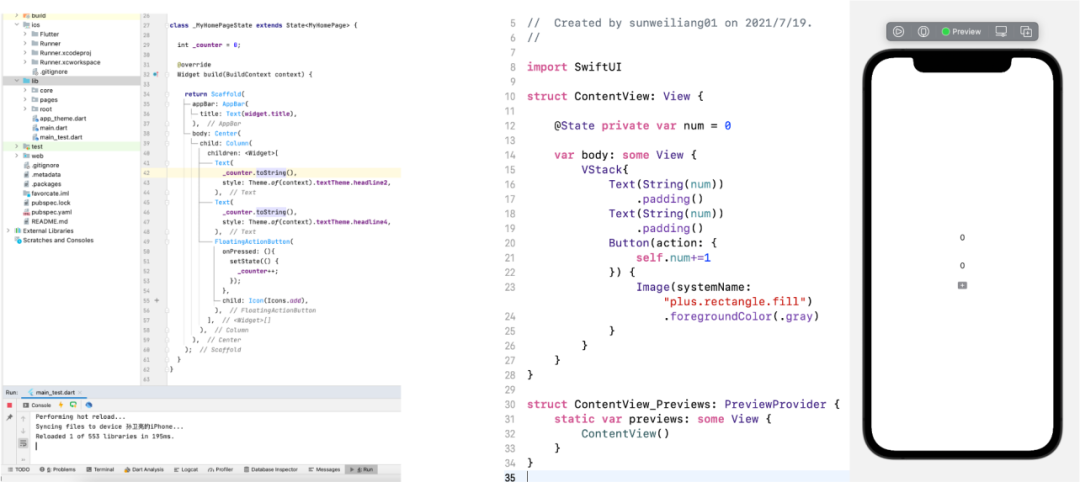
3.2 声明式编程
3.3 我们举一个栗子,来帮我我们理解这两者的区别

四、基础架构

4.1 Embedder
4.2 Engine
4.3 Framework
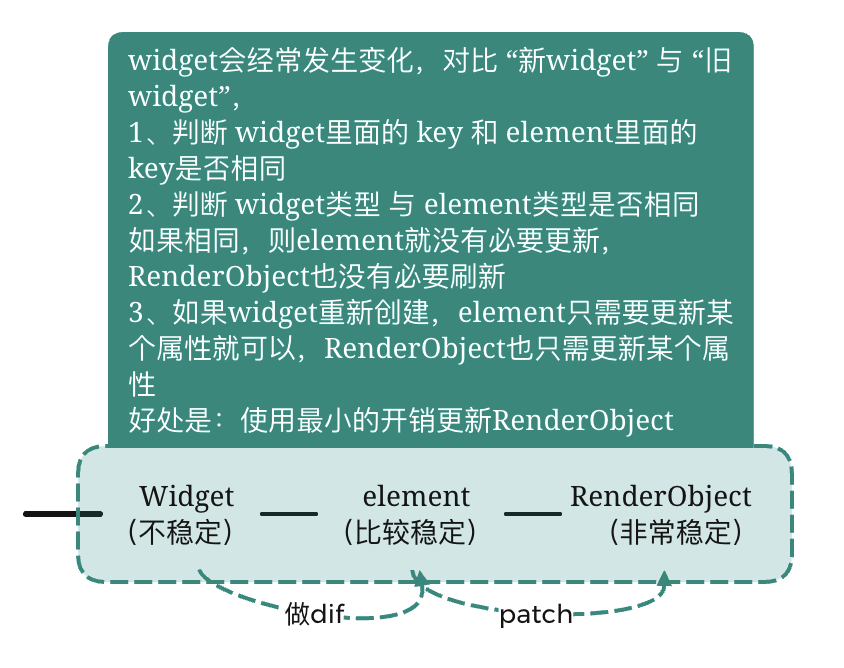
五、视图渲染
5.1 Widget
5.2 渲染过程
//Text -> StatelessWidget -> Widgetclass Text extends StatelessWidget {}abstract class StatelessWidget extends Widget {StatelessElement createElement() => StatelessElement(this);}abstract class Widget extends DiagnosticableTree {Element createElement(); // 创建element抽象方法}
//Column -> Flex -> MultiChildRenderObjectWidget - > RenderObjectWidget -> Widgetclass Column extends Flex {}class Flex extends MultiChildRenderObjectWidget {// ⽅法实现RenderFlex createRenderObject(BuildContext context) {//返回RenderFlexreturn RenderFlex -> RenderBox -> RenderObject} }abstract class MultiChildRenderObjectWidget extends RenderObjectWidget {}abstract class RenderObjectWidget extends Widget {RenderObjectElement createElement();RenderObject createRenderObject(BuildContext context); // 抽象⽅法-创建RenderObjectvoid updateRenderObject(BuildContext context, covariant RenderObject renderObject) {}void didUnmountRenderObject(covariant RenderObject renderObject) { }}abstract class Widget extends DiagnosticableTree {Element createElement(); // 抽象⽅法-创建element}class RenderFlex extends RenderBox with ContainerRenderObjectMixin<RenderBox,FlexParentData>,RenderBoxContainerDefaultsMixin<RenderBox,FlexParentData>,DebugOverflowIndicatorMixin {}abstract class RenderBox extends RenderObject {}
六、混合开发
6.1 Flutter调用原生方法
/*Flutter代码*/static const platform = const MethodChannel("leo.com/getudid");void getUDID() async {final result = await platform.invokeMethod("nativeGetUDID"); // 要调⽤的⽅法// final result = await platform.invokeMethod("nativeGetUDID",["flutter参数"]);setState(() {_udid = result;});}
/*iOS代码*/// 1.获取FlutterViewControllerlet controller: FlutterViewController = window.rootViewController as!FlutterViewController;// 2.创建FlutterMethodChannel,跟controller⼆进制消息通信let channel = FlutterMethodChannel(name: "leo.com/getudid", binaryMessenger:controller.binaryMessenger);// 3.监听channel调⽤⽅法,当flutter调⽤nativeGetUDID的时候调⽤channel.setMethodCallHandler { (call: FlutterMethodCall, result:FlutterResult) in// 1.判断当前是否是nativeGetUDIDguard call.method == "nativeGetUDID" else {result(FlutterMethodNotImplemented); // 报⼀个没有⽅法的错误return;}call.arguments; //传递过来的参数// 2.获取UDIDlet udid = "xxxx-xxxx-xxxx-xxxx"result(udid) //回调值}
/*Android代码*/private val CHANNEL = "leo.com/getudid"override fun configureFlutterEngine( flutterEngine: FlutterEngine) {GeneratedPluginRegistrant.registerWith(flutterEngine);// 1.创建MethodChannel对象val methodChannel = MethodChannel(flutterEngine.dartExecutor.binaryMessenger,CHANNEL)// 2.添加调⽤⽅法的回调methodChannel.setMethodCallHandler {// Note: this method is invoked on the main thread.call, result ->// 2.1.如果调⽤的⽅法是nativeGetUDID,那么正常执⾏if (call.method == "nativeGetUDID") {// 2.1.1.调⽤另外⼀个⾃定义⽅法回去电量信息val udid = "xxxx-xxxx-xxxx-xxxx";result.success(udid)} else {//⽅法找不到,回调notImplementedresult.notImplemented()}}}
create --template module native_add_flutter
// CocoaPods集成flutter_application_path = '../native_add_flutter'load File.join(flutter_application_path, '.ios', 'Flutter', 'podhelper.rb’)
// 初始化Flutter引擎 , 为引擎起名为leolet flutterEngine:FlutterEngine = FlutterEngine(name: "leo");// 启动flutter引擎,默认函数⼊⼝为mainflutterEngine.run();let flutterVC = FlutterViewController(engine: engine, nibName: nil, bundle: nil);flutterVC.modalPresentationStyle = .fullScreen;self.present(flutterVC, animated: true, completion: nil);
// 在gradle进⾏配置// 创建Android项⽬、添加相关的依赖// 1、修改Android项⽬settings.gradlesetBinding(new Binding([gradle: this])) // newevaluate(new File( // newsettingsDir.parentFile, // new'native_add_flutter/.android/include_flutter.groovy' // new))include ':native_add_flutter'project(':native_add_flutter').projectDir = new File('../native_add_flutter')// 2、配置Android项⽬的build.gradledependencies {...implementation project(':flutter') //增加flutter依赖}// 3、AndroidManifest.xml配置<activity android:name="io.flutter.embedding.android.FlutterActivity"android:configChanges="orientation|keyboardHidden|keyboard|screenSize|locale|layoutDirection|fontScale|screenLayout|density|uiMode"android:hardwareAccelerated="true"android:windowSoftInputMode="adjustResize"/>
import io.flutter.embedding.android.FlutterActivity;public class MainActivity extends AppCompatActivity {protected void onCreate(Bundle savedInstanceState) {super.onCreate(savedInstanceState);startActivity(FlutterActivity.createDefaultIntent(this));}}
flutter create flutterdemo main.dart
// 导⼊类import 'package:flutter/material.dart';//⼊⼝函数,程序加载时调⽤void main() {runApp(MyApp()); //调⽤runApp⽅法,并初始化MyApp}class MyApp extends StatelessWidget {// This widget is the root of your application.Widget build(BuildContext context) { //初始化会调⽤build⽅法return MaterialApp( //Material为Google的⼀种UI⻛格,MaterialApp可为项⽬配置App标题、主题等title: 'Flutter Demo',theme: ThemeData(// This is the theme of your application.//// Try running your application with "flutter run". You'll see the// application has a blue toolbar. Then, without quitting the app, try// changing the primarySwatch below to Colors.green and then invoke// "hot reload" (press "r" in the console where you ran "flutter run",// or simply save your changes to "hot reload" in a Flutter IDE).// Notice that the counter didn't reset back to zero; the application// is not restarted.primarySwatch: Colors.blue,),home: MyHomePage(title: 'Flutter Demo Home Page'), //设置主⻚为MyHomePage);}}//由于点击需要更改Text显示,所以此处继承StatefulWidgetclass MyHomePage extends StatefulWidget {MyHomePage({Key? key, required this.title}) : super(key: key);// This widget is the home page of your application. It is stateful, meaning// that it has a State object (defined below) that contains fields that affect// how it looks.// This class is the configuration for the state. It holds the values (in this// case the title) provided by the parent (in this case the App widget) and// used by the build method of the State. Fields in a Widget subclass are// always marked "final".final String title;_MyHomePageState createState() => _MyHomePageState();}class _MyHomePageState extends State<MyHomePage> {int _counter = 0;//下的按钮的点击事件void _incrementCounter() {// setState会标记需要刷新UIsetState(() {// This call to setState tells the Flutter framework that something has// changed in this State, which causes it to rerun the build method below// so that the display can reflect the updated values. If we changed// _counter without calling setState(), then the build method would not be// called again, and so nothing would appear to happen._counter++; //点击按钮时候,counter+1, 并⾃动更新UI显示});}Widget build(BuildContext context) {// This method is rerun every time setState is called, for instance as done// by the _incrementCounter method above.//// The Flutter framework has been optimized to make rerunning build methods// fast, so that you can just rebuild anything that needs updating rather// than having to individually change instances of widgets.return Scaffold(appBar: AppBar( //配置导航// Here we take the value from the MyHomePage object that was created by// the App.build method, and use it to set our appbar title.title: Text(widget.title),),body: Center( //配置布局显示在中⼼// Center is a layout widget. It takes a single child and positions it// in the middle of the parent.child: Column( //⼀种竖向布局⽅式,相当于listview// Column is also a layout widget. It takes a list of children and// arranges them vertically. By default, it sizes itself to fit its// children horizontally, and tries to be as tall as its parent.//// Invoke "debug painting" (press "p" in the console, choose the// "Toggle Debug Paint" action from the Flutter Inspector in Android// Studio, or the "Toggle Debug Paint" command in Visual Studio Code)// to see the wireframe for each widget.//// Column has various properties to control how it sizes itself and// how it positions its children. Here we use mainAxisAlignment to// center the children vertically; the main axis here is the vertical// axis because Columns are vertical (the cross axis would be// horizontal).mainAxisAlignment: MainAxisAlignment.center,children: <Widget>[ //返回多个widget数组,Text('You have pushed the button this many times:',),Text( '$_counter',//显示_counter的值style: Theme.of(context).textTheme.headline4,//显示样式,使⽤主题的headline4显示),],),),floatingActionButton: FloatingActionButton( //⼀个可点击的按钮,固定在右下⻆onPressed: _incrementCounter, //点击事件tooltip: 'Increment',child: Icon(Icons.add), //按钮显示为内部⾃带的add图⽚), // This trailing comma makes auto-formatting nicer for build methods.);}}
八、附:近期重要更新
支持java1.8
增加了JavaScript与Dart的通信通道
增加了对Android App Bundles的支持
通过减少调用构造函数和静态方法,提升AOT(预编译)10%-20%的性能
添加了集成测试
提高热重载性能
决定删除动态更新计划
添加对Linux和Windows的Flutter运行支持
优化Flutter tools支持
支持32位和64位Android bundles
开始支持web端和实验性支持桌面端
桌面平台实验性支持
新增24种语言环境支持
支持macOS Catalina和iOS 13
Android增加对构建AAR的支持
支持Android 10
支持iOS13暗黑模式
可以将Flutter模块集成到Android或iOS应用中
将Web支持从开发版转变为beta版;将MacOS支持纳入开发版本
推出新工具DartPad(DartPad 是一个可以让你在任何现代化的浏览器中体验 Dart 编程语言线上工具)
减少18.5%应用体积
提升了20%-37%导航性能
降低了40% iOS动画CPU/GPU使用率
增加对谷歌字体的支持:fonts.google.com
完成对Type Scale部分的重构,符合 2018 Material 设计规范
提升了iOS 50%渲染速度(iPhone5s+、iOS10+支持Metal 渲染);不完全支持扔使用OpenGL渲染
增强了UTF-8解码
pubspec.yaml插件不再支持旧格式
在Visual Studio Code中预览嵌入式Dart DevTools
引入新的混编插件-Pigeon,可以在Dart方法中直接调用Java/Objective-C/Kotlin/Swift方法并传递非原始数据对象。
增加应用体积分析工具
提供了国际化和本地化工具,并实现了热重载支持
支持Android 11;支持新的屏幕类型 (如挖孔屏和瀑布屏),以及同步Android 11动画效果
支持iOS 14、Xcode 12新图标以及对新iOS 14 App Clips功能的预览支持;默认模板版本从8.0升级到9.0
可正式使用的 Google Maps 和 WebView 插件,将 Android 和 iOS 系统的原生界面组件托管在 Flutter 应用中
Web支持从测试版转变为稳定版
除了HTML渲染,增加了CanvasKit渲染,桌面端浏览器会默认调用CanvasKit版本,移动端的浏览器会调用HTML版本。
混合开发多flutter实例(经测试iOS平台存在内存问题)
桌面平台的支持(beta)
Google Mobile Ads(Beta)
Dart 2.12 增加了空安全
更好的iOS、Android、Web跨平台支持
Dart 2.13 更新,引入Type aliases
Flutter Web 提升稳定性
优化iOS端渲染动画帧时间、实现了增量iOS安装,缩短更新安装时间。
Android中引入延迟组件,允许Flutter应用在运行时下载包含提前编译的代码模块,减少初始安装大小。
— 完 —
点这里👇关注我,记得标星呀~
前线推出学习交流一定要备注:研究/工作方向+地点+学校/公司+昵称(如JAVA+上海 扫码加小编微信,进群和大佬们零距离
END 后台回复“电子书” “资料” 领取一份干货,数百面试手册等 历史推荐
好文点个在看吧!
评论