你不可不知的任务调度神器-AirFlow
点击上方蓝色字体,选择“设为星标”


Airflow 使用 DAG (有向无环图) 来定义工作流,配置作业依赖关系非常方便,从管理方便和使用简单角度来讲,AirFlow远超过其他的任务调度工具。
Airflow 的天然优势
灵活易用,AirFlow 本身是 Python 编写的,且工作流的定义也是 Python 编写,有了 Python胶水的特性,没有什么任务是调度不了的,有了开源的代码,没有什么问题是无法解决的,你完全可以修改源码来满足个性化的需求,而且更重要的是代码都是 –human-readable 。
功能强大,自带的 Operators 都有15+,也就是说本身已经支持 15+ 不同类型的作业,而且还是可自定义 Operators,什么 shell 脚本,python,mysql,oracle,hive等等,无论不传统数据库平台还是大数据平台,统统不在话下,对官方提供的不满足,完全可以自己编写 Operators。
优雅,作业的定义很简单明了, 基于 jinja 模板引擎很容易做到脚本命令参数化,web 界面更是也非常 –human-readable ,谁用谁知道。
极易扩展,提供各种基类供扩展, 还有多种执行器可供选择,其中 CeleryExcutor 使用了消息队列来编排多个工作节点(worker), 可分布式部署多个 worker ,AirFlow 可以做到无限扩展。
丰富的命令工具,你甚至都不用打开浏览器,直接在终端敲命令就能完成测试,部署,运行,清理,重跑,追数等任务,想想那些靠着在界面上不知道点击多少次才能部署一个小小的作业时,真觉得AirFlow真的太友好了。
Airflow 是免费的,我们可以将一些常做的巡检任务,定时脚本(如 crontab ),ETL处理,监控等任务放在 AirFlow 上集中管理,甚至都不用再写监控脚本,作业出错会自动发送日志到指定人员邮箱,低成本高效率地解决生产问题。但是由于中文文档太少,大多不够全全,因此想快速上手并不十分容易。首先要具备一定的 Python 知识,反复阅读官方文档,理解调度原理。本系列分享由浅入深,逐步细化,尝试为你揭开 AirFlow 的面纱。
AirFlow 的架构和组成

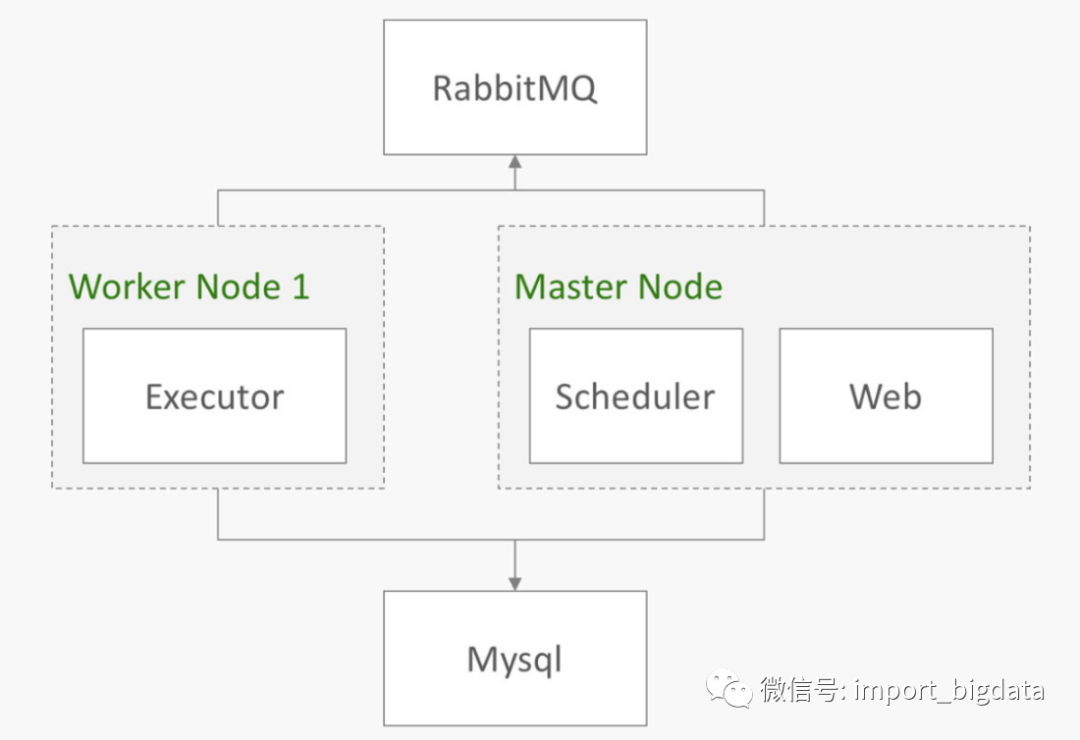
AirFlow的架构图如上图所示,包含了以下核心的组件:
元数据库:这个数据库存储有关任务状态的信息。
调度器:Scheduler 是一种使用 DAG 定义结合元数据中的任务状态来决定哪些任务需要被执行以及任务执行优先级的过程。调度器通常作为服务运行。
执行器:Executor 是一个消息队列进程,它被绑定到调度器中,用于确定实际执行每个任务计划的工作进程。有不同类型的执行器,每个执行器都使用一个指定工作进程的类来执行任务。例如,LocalExecutor 使用与调度器进程在同一台机器上运行的并行进程执行任务。其他像 CeleryExecutor 的执行器使用存在于独立的工作机器集群中的工作进程执行任务。
Workers:这些是实际执行任务逻辑的进程,由正在使用的执行器确定。
其中主要的部件介绍如下:
Scheduler
调度器。调度器是整个airlfow的核心枢纽,负责发现用户定义的dag文件,并根据定时器将有向无环图转为若干个具体的dagrun,并监控任务状态。
Dag 有向无环图。有向无环图用于定义任务的任务依赖关系。任务的定义由算子operator进行,其中,BaseOperator是所有算子的父类。
Dagrun 有向无环图任务实例。在调度器的作用下,每个有向无环图都会转成任务实例。不同的任务实例之间用dagid/ 执行时间(execution date)进行区分。
Taskinstance dagrun下面的一个任务实例。具体来说,对于每个dagrun实例,算子(operator)都将转成对应的Taskinstance。由于任务可能失败,根据定义调度器决定是否重试。不同的任务实例由 dagid/执行时间(execution date)/算子/执行时间/重试次数进行区分。
Executor 任务执行器。每个任务都需要由任务执行器完成。BaseExecutor是所有任务执行器的父类。
LocalTaskJob 负责监控任务与行,其中包含了一个重要属性taskrunner。
TaskRunner 开启子进程,执行任务。
AirFlow安装和初体验
安装 AirFlow 需要 Pyhton环境,关于环境的安装大家可以自行查询,不在展开。这里我们直接使用python的pip工具进行 AirFlow 的安装:
# airflow 需要 home 目录,默认是~/airflow,
# 但是如果你需要,放在其它位置也是可以的
# (可选)
export AIRFLOW_HOME = ~/airflow

# 使用 pip 从 pypi 安装
pip install apache-airflow

# 初始化数据库
airflow initdb

# 启动 web 服务器,默认端口是 8080
airflow webserver -p 8080

# 启动定时器
airflow scheduler

# 在浏览器中浏览 localhost:8080,并在 home 页开启 example dag
AirFlow默认使用sqlite作为数据库,直接执行数据库初始化命令后,会在环境变量路径下新建一个数据库文件airflow.db。当然了你也可以指定 Mysql 作为 AirFlow的数据库,只需要修改airflow.conf 即可:
# The executor class that airflow should use. Choices include
# SequentialExecutor, LocalExecutor, CeleryExecutor, DaskExecutor, KubernetesExecutor
executor = LocalExecutor
# The SqlAlchemy connection string to the metadata database.
# SqlAlchemy supports many different database engine, more information
# their website
sql_alchemy_conn = mysql://root:xxxxxx@localhost:3306/airflow
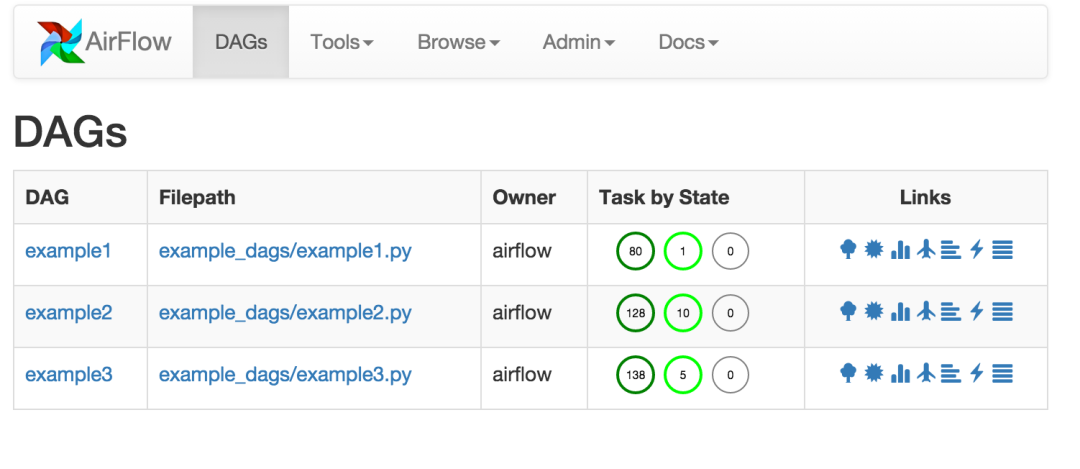
安装完毕,启动 AirFlow我们进入 UI页面可以看到:
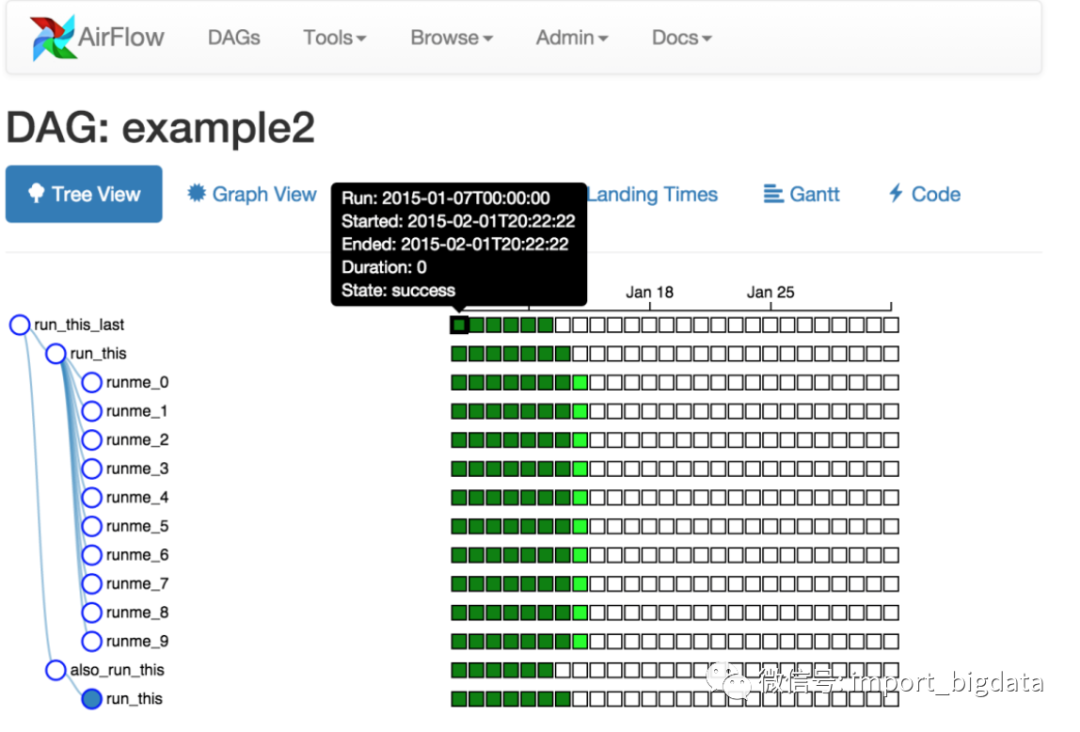
 当然我们还可以切换到树视图模式:

此外,还支持图标视图、甘特图等模式,是不是非常高大上?
Hello AirFlow!
到此我们本地已经安装了一个单机版本的 AirFlow,然后我们可以根据官网可以做一个Demo来体验一下 AirFlow的强大。首先在此之前,我们要介绍一些概念和原理:
我们在编写AirFlow任务时,AirFlow到底做了什么?
首先用户编写Dag文件
其次,SchedulerJob发现新增DAG文件,根据starttime、endtime、schedule_interval将Dag转为Dagrun。由于Dag仅仅是一个定位依赖关系的文件,因此需要调度器将其转为具体的任务。在细粒度层面,一个Dag转为若干个Dagrun,每个dagrun由若干个任务实例组成,具体来说,每个operator转为一个对应的Taskinstance。Taskinstance将根据任务依赖关系以及依赖上下文决定是否执行。
然后,任务的执行将发送到执行器上执行。具体来说,可以在本地执行,也可以在集群上面执行,也可以发送到celery worker远程执行。
最后,在执行过程中,先封装成一个LocalTaskJob,然后调用taskrunner开启子进程执行任务。
那么我们就需要新增一个自己的Dag文件,我们直接使用官网的例子,这是一个典型的ETL任务:
"""
### ETL DAG Tutorial Documentation
This ETL DAG is compatible with Airflow 1.10.x (specifically tested with 1.10.12) and is referenced
as part of the documentation that goes along with the Airflow Functional DAG tutorial located
[here](https://airflow.apache.org/tutorial_decorated_flows.html)
"""
# [START tutorial]
# [START import_module]
import json

# The DAG object; we'll need this to instantiate a DAG
from airflow import DAG

# Operators; we need this to operate!
from airflow.operators.python import PythonOperator
from airflow.utils.dates import days_ago

# [END import_module]

# [START default_args]
# These args will get passed on to each operator
# You can override them on a per-task basis during operator initialization
default_args = {
    'owner': 'airflow',
}
# [END default_args]

# [START instantiate_dag]
with DAG(
    'tutorial_etl_dag',
    default_args=default_args,
    description='ETL DAG tutorial',
    schedule_interval=None,
    start_date=days_ago(2),
    tags=['example'],
) as dag:
    # [END instantiate_dag]
    # [START documentation]
    dag.doc_md = __doc__
    # [END documentation]

    # [START extract_function]
    def extract(**kwargs):
        ti = kwargs['ti']
        data_string = '{"1001": 301.27, "1002": 433.21, "1003": 502.22}'
        ti.xcom_push('order_data', data_string)

    # [END extract_function]

    # [START transform_function]
    def transform(**kwargs):
        ti = kwargs['ti']
        extract_data_string = ti.xcom_pull(task_ids='extract', key='order_data')
        order_data = json.loads(extract_data_string)

        total_order_value = 0
        for value in order_data.values():
            total_order_value += value

        total_value = {"total_order_value": total_order_value}
        total_value_json_string = json.dumps(total_value)
        ti.xcom_push('total_order_value', total_value_json_string)

    # [END transform_function]

    # [START load_function]
    def load(**kwargs):
        ti = kwargs['ti']
        total_value_string = ti.xcom_pull(task_ids='transform', key='total_order_value')
        total_order_value = json.loads(total_value_string)

        print(total_order_value)

    # [END load_function]

    # [START main_flow]
    extract_task = PythonOperator(
        task_id='extract',
        python_callable=extract,
    )
    extract_task.doc_md = """\
#### Extract task
A simple Extract task to get data ready for the rest of the data pipeline.
In this case, getting data is simulated by reading from a hardcoded JSON string.
This data is then put into xcom, so that it can be processed by the next task.
"""

    transform_task = PythonOperator(
        task_id='transform',
        python_callable=transform,
    )
    transform_task.doc_md = """\
#### Transform task
A simple Transform task which takes in the collection of order data from xcom
and computes the total order value.
This computed value is then put into xcom, so that it can be processed by the next task.
"""

    load_task = PythonOperator(
        task_id='load',
        python_callable=load,
    )
    load_task.doc_md = """\
#### Load task
A simple Load task which takes in the result of the Transform task, by reading it
from xcom and instead of saving it to end user review, just prints it out.
"""

    extract_task >> transform_task >> load_task

# [END main_flow]

# [END tutorial]
tutorial.py这个文件需要放置在airflow.cfg设置的 DAGs 文件夹中。DAGs 的默认位置是~/airflow/dags。然后执行以下命令:
python ~/airflow/dags/tutorial.py
如果这个脚本没有报错,那就证明您的代码和您的 Airflow 环境没有特别大的问题。我们可以用一些简单的脚本查看这个新增的任务:
# 打印出所有正在活跃状态的 DAGs
airflow list_dags

# 打印出 'tutorial' DAG 中所有的任务
airflow list_tasks tutorial

# 打印出 'tutorial' DAG 的任务层次结构
airflow list_tasks tutorial --tree
然后我们就可以在上面我们提到的UI界面中看到运行中的任务了!
AirFlow本身还有一些常用的命令:
backfill            Run subsections of a DAG for a specified date range
list_tasks          List the tasks within a DAG
clear               Clear a set of task instance, as if they never ran
pause               Pause a DAG
unpause             Resume a paused DAG
trigger_dag         Trigger a DAG run
pool                CRUD operations on pools
variables           CRUD operations on variables
kerberos            Start a kerberos ticket renewer
render              Render a task instance's template(s)
run                 Run a single task instance
initdb              Initialize the metadata database
list_dags           List all the DAGs
dag_state           Get the status of a dag run
task_failed_deps    Returns the unmet dependencies for a task instance
                    from the perspective of the scheduler. In other words,
                    why a task instance doesn't get scheduled and then
                    queued by the scheduler, and then run by an executor).
task_state          Get the status of a task instance
serve_logs          Serve logs generate by worker
test                Test a task instance. This will run a task without
                    checking for dependencies or recording it's state in
                    the database.
webserver           Start a Airflow webserver instance
resetdb             Burn down and rebuild the metadata database
upgradedb           Upgrade the metadata database to latest version
scheduler           Start a scheduler instance
worker              Start a Celery worker node
flower              Start a Celery Flower
version             Show the version
connections         List/Add/Delete connections
总体来看,AirFlow的上手难度和特性支持都还不错,同时还有比较不错的扩展性。如果用户熟悉Python能进行一些定制化开发,简直不要太爽!
而且,Airflow 已经在 Adobe、Airbnb、Google、Lyft 等商业公司内部得到广泛应用;国内,阿里巴巴也有使用(Maat),业界有大规模实践经验。
快来试一试吧!

Hadoop YARN:调度性能优化实践
大数据可视化从未如此简单 - Apache Zepplien全面介绍
JVM性能调优实践—G1垃圾收集器全视角解析

版权声明:
编辑 《大数据技术与架构》
文章不错?点个【在看】吧! ?


