
React 多页签缓存处理

暑不尽的盛夏

关注并将「趣谈前端」设为星标
每早08:30按时推送技术干货/优秀开源/技术思维
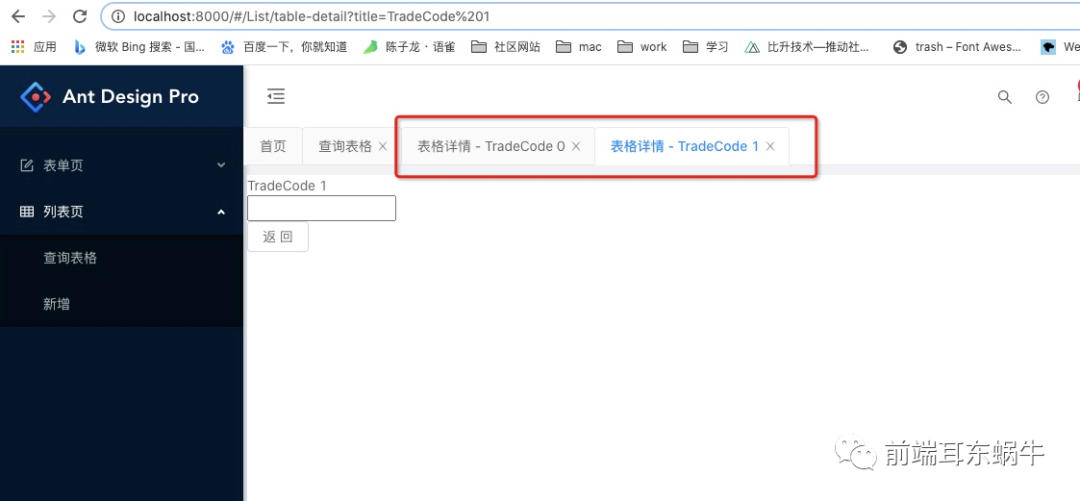
1. 背景ant design pro v2的项目需要多页签显示页面而且还需要页面能够缓存下来。
- 多页面展示
- 不同数据会对应不同的详情页面
- 代码里面的路由跳转可以正常进行页面切换
- 页签可以关闭
这里主要是考虑多页面+缓存问题。
这里是借用了ant tabs标签的缓存作用。tabs的多页面只是显示和隐藏,组件本身还存在。
路由这一块,其实路由目前的基本使用页面只是会渲染当前匹配成功的路由节点。
这里钻了一个空子。Route在没有标注path的情况下会作为没有匹配路径的url进行渲染,作为没有匹配任何路由的情况下渲染节点。
因为我们通过路由path去匹配是不行,只有使用不带path的情况下渲染节点,而且不能使用switch。
而且不使用path的情况下,路由对应渲染的组件则不能依赖于react-router的机制来自动匹配,页面的渲染就需要我们进行手动处理。因为打开多少个页面就会有多少个no path的Route的节点。
3. 讲解回到具体的实现:BasicLayout.js
3.1 原先的版本
const layout = (
      <Layout>
        {isTop && !isMobile ? null : (
          <SiderMenu
            logo={logo}
            theme={navTheme}
            onCollapse={this.handleMenuCollapse}
            menuData={menuData}
            isMobile={isMobile}
            {...this.props}
          />
        )}
        <Layout
          style={{
            ...this.getLayoutStyle(),
            minHeight: '100vh',
          }}
        >
          <Header
            menuData={menuData}
            handleMenuCollapse={this.handleMenuCollapse}
            logo={logo}
            isMobile={isMobile}
            {...this.props}
          />
          <Content className={styles.content} style={contentStyle}>
            <Authorized authority={routerConfig} noMatch={<Exception403 />}>
              {children}
            </Authorized>
          </Content>
          <Footer />
        </Layout>
      </Layout>
    );
以前的版本里直接渲染对应children。这里具体ant deisgn pro,或者umijs做了对应的处理,我没具体去看。现在的话我们不会用这个版本去做。
3.2 现在的版本
3.2.1 layout
const layout = (
      <Layout>
        {isTop && !isMobile ? null : (
          <SiderMenu
            logo={logo}
            theme={navTheme}
            onCollapse={this.handleMenuCollapse}
            menuData={menuData}
            isMobile={isMobile}
            {...this.props}
            // onHandlePage={this.onHandlePage}
          />
        )}
        <Layout
          style={{
            ...this.getLayoutStyle(),
            minHeight: '100vh',
          }}
        >
          <Header
            menuData={menuData}
            handleMenuCollapse={this.handleMenuCollapse}
            logo={logo}
            isMobile={isMobile}
            {...this.props}
          />
          <Content className={styles.content} style={contentStyle}>
            <div className={styles.contentBox}>
              <div className={styles.contentTabUrlBox}>
                <div className={styles.contentTabUrl}>
                  <Tabs
                    activeKey={activeKey}
                    onChange={this.onChange}
                    tabBarExtraContent={operations}
                    type="editable-card"
                    tabBarStyle={{ background: '#fff' }}
                    tabPosition="top"
                    tabBarGutter={-1}
                    onEdit={this.onEdit}
                    hideAdd
                  >
                    {listenRouterState.map(item => (
                      <TabPane tab={item.tab} key={item.key} closable={item.closable}>
                        <RouterContext.Provider value={customerMatchs}>
                          <Route key={item.key} component={item.content} exact />
                        </RouterContext.Provider>
                        {/* {item.component()} */}
                      </TabPane>
                    ))}
                  </Tabs>
                  <Footer />
                </div>
              </div>
            </div>
          </Content>
        </Layout>
      </Layout>
    );
核心的代码是
  <Tabs
    activeKey={activeKey}
    onChange={this.onChange}
    tabBarExtraContent={operations}
    type="editable-card"
    tabBarStyle={{ background: '#fff' }}
    tabPosition="top"
    tabBarGutter={-1}
    onEdit={this.onEdit}
    hideAdd
  >
    {listenRouterState.map(item => (
      <TabPane tab={item.tab} key={item.key} closable={item.closable}>
        <RouterContext.Provider value={customerMatchs}>
          <Route key={item.key} component={item.content} exact />
        </RouterContext.Provider>
      </TabPane>
    ))}
  </Tabs>
这里使用的是tab + 路由 with no path的方式。现在我们需要将组件和path进行关联起来。因为没有使用路由匹配了。代码里的listenRouterState就是我们打开页面的key和对应组件的mapping关系。
这里path的处理我使用的是路由监控,因为是对于整个系统的页面多页签,所以我使用了路由监控。
3.2.2 componentDidMount路由监控
UN_LISTTEN = history.listen(route => {
      const { listenRouterState, listenRouterKey, customerMatchs } = this.state;
      let replaceRouter = routerArray.filter(itemRoute =>
        pathToRegexp(itemRoute.key || '').test(route.pathname),
      )[0];

      let currentKey = '';

      if (replaceRouter && replaceRouter.isOnlyOnePage) {
        currentKey = route.pathname;
      } else {
        currentKey = route.pathname + this.parseQueryString(route.search);
      }

      if (!listenRouterKey.includes(currentKey)) {
        if (!replaceRouter) {
          replaceRouter = routerArray.filter(itemroute => itemroute.key === '/404')?.[0];

          this.setState({
            listenRouterState: [
              ...listenRouterState,
              { ...replaceRouter, key: currentKey, tab: '404' },
            ],
            activeKey: currentKey,
            listenRouterKey: [...listenRouterKey, currentKey],
          });
        } else {
          const match = matchPath(route.pathname, { path: replaceRouter.key });

          this.setState({
            listenRouterState: [
              ...listenRouterState,
              {
                ...replaceRouter,
                key: currentKey,
                tab:
                  this.getPageTitle(route.pathname, breadcrumbNameMap) +
                  this.getDetailPagePrimaryId(route, match),
              },
            ],
            activeKey: currentKey,
            listenRouterKey: [...listenRouterKey, currentKey],
            customerMatchs: [...customerMatchs, { key: currentKey, match }],
          });
        }
      }

      this.setState({
        activeKey: currentKey,
      });
    });
  }
3.2.2.1 主要介绍
这里主要是在做什么,监控路由然后进行路由匹配,获取对应的组件。先介绍一下这里面用到的一些state变量
- listenRouterState:打开页面数据对象,也是在layout渲染的数组,存储了pathname和component的mapping关系
- activeKey:当前打开的页面key
- listenRouterKey:listenRouterState对象key属性的数组集合,用于一些数据判断。
- customerMatchs:适配match,这里可以先不管,因为这个是服务于下面实际问题的。
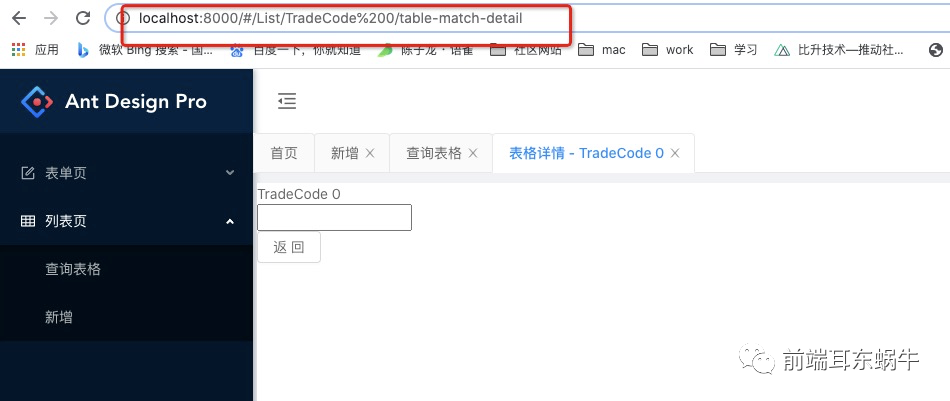
这里的主要逻辑就是,监控路由,判断路由是否已经打开,如果已经打开就不会重新打开。这里的key是全路径,是加上查询参数的。如下面的这个地址:
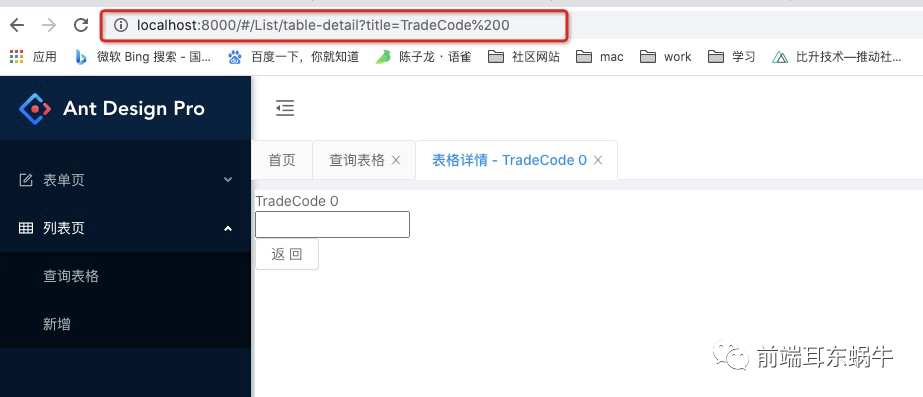
3.2.2.2 pathname 和 key的区别
但是匹配组件内容不能使用这个进行匹配的,还是需要使用pathname进行匹配的。还是先看一下具体路由监控的到的route数据是什么?
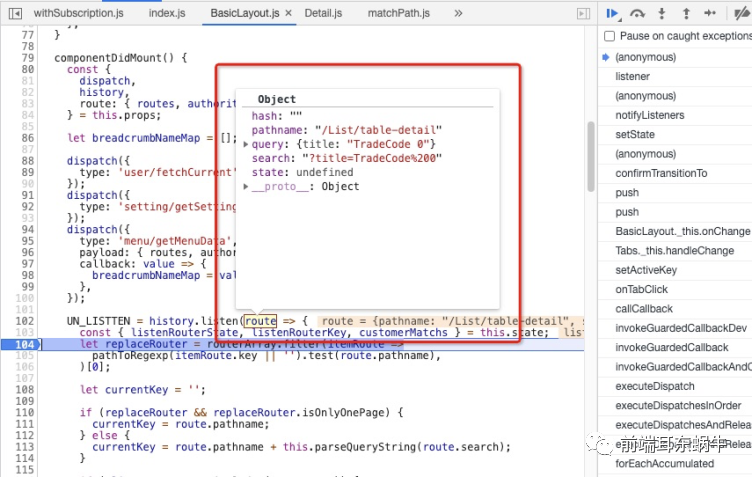
所以我们上面说的key:是pathname + query。这里要分清key和pathname的区别,因为pathname是用来匹配获取组件的,key是为了进行多个详情页面的区分,如果不是全路径是没有办法区分不同详情页面的。
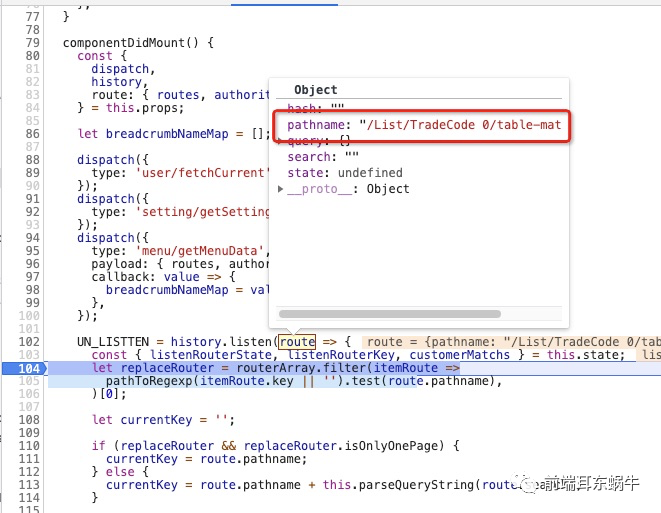
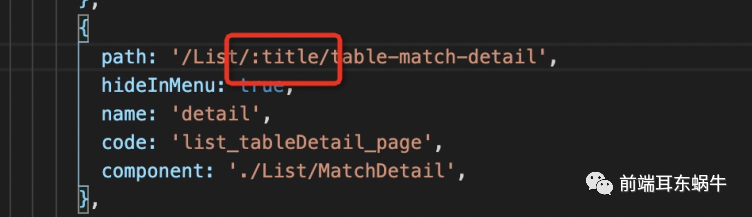
当然我们这个pathname是比较好匹配的,假如是下面的这种,下面的路由对应的是:
          {
            path: '/List/:title/table-match-detail',
            hideInMenu: true,
            name: 'detail',
            code: 'list_tableDetail_page',
            component: './List/MatchDetail',
          },
3.2.2.3 如何将pathname和路由正确的匹配
pathToRegexp(itemRoute.key || '').test(route.pathname)
针对路由的匹配,因为有match参数的存在,所以这里我用的是pathToRegexp,可以很好的解决这个问题。
3.2.2.4 listenRouterState的逻辑判断
if (!listenRouterKey.includes(currentKey)) {
        if (!replaceRouter) {
          replaceRouter = routerArray.filter(itemroute => itemroute.key === '/404')?.[0];

          this.setState({
            listenRouterState: [
              ...listenRouterState,
              { ...replaceRouter, key: currentKey, tab: '404' },
            ],
            activeKey: currentKey,
            listenRouterKey: [...listenRouterKey, currentKey],
          });
        } else {
          const match = matchPath(route.pathname, { path: replaceRouter.key });

          this.setState({
            listenRouterState: [
              ...listenRouterState,
              {
                ...replaceRouter,
                key: currentKey,
                tab:
                  this.getPageTitle(route.pathname, breadcrumbNameMap) +
                  this.getDetailPagePrimaryId(route, match),
              },
            ],
            activeKey: currentKey,
            listenRouterKey: [...listenRouterKey, currentKey],
            customerMatchs: [...customerMatchs, { key: currentKey, match }],
          });
        }
      }

      this.setState({
        activeKey: currentKey,
      });
这里做的就是对当前的key进行判断,如果不存在,那就是页面没有打开,则添加新的数据进行,如果已经打开,则跳转到新的页面,如果匹配路径获取组件没有成功,则跳转到404。
3.2.2.5 不同详情页面的title如何处理
因为详情页有多个,但是tab的标签页title要不同
tab: this.getPageTitle(route.pathname, breadcrumbNameMap)
     + this.getDetailPagePrimaryId(route, match),
getPageTitle主要用的还是之前的逻辑,主要说明一下getDetailPagePrimaryId
getDetailPagePrimaryId = (route, match) => {
    const detailPageIdEnum = ['id', 'title', 'activityNo'];
    let titleValue = '';

    // 处理query类型
    Object.keys(route.query).forEach(item => {
      if (detailPageIdEnum.includes(item) && !titleValue) {
        titleValue = route.query[item];
      }
    });

    // 处理match
    Object.keys(match.params).forEach(item => {
      if (detailPageIdEnum.includes(item) && !titleValue) {
        titleValue = match.params[item];
      }
    });

    return titleValue ? ` - ${titleValue}` : '';
  };
这里的逻辑主要是从query和match中间变量值,只要匹配成功,就会返回匹配的数据值。detailPageIdEnum主要是系统层级可能对应的变量名称
比如query中的title

或者match中title 【当然这里的match是有问题的,在下面实际问题的时候会说明一下】
3.2.3 其他代码
其他的就不是核心代码,基本分为两块,一块是初始化处理,另外一块是table的menu的处理.
3.2.3.1 初始化处理
  constructor(props) {
    super(props);
    this.getPageTitle = memoizeOne(this.getPageTitle);
    this.matchParamsPath = memoizeOne(this.matchParamsPath, isEqual);
    routerArray = this.updateTree(props.route.routes);
    const homeRouter = routerArray.filter(itemroute => itemroute.key === '/')[0];

    this.state = {
      listenRouterState: [{ ...homeRouter, key: '/', tab: '首页', closable: false }],
      listenRouterKey: ['/'],
      activeKey: '/',

      customerMatchs: [],
    };
  }
主要就是会将routers的数据做一个基础处理,第二个就是添加一个首页在tab标签页面。
3.2.3.2 tab menu的处理
主要处理,关闭打开的页签,关闭当前页面,关闭全部页面,关闭其他页面
这一块比较简单,就不介绍了。
onClickHover = e => {
    // message.info(`Click on item ${key}`);
    const { key } = e;
    const { activeKey, listenRouterState, listenRouterKey, routeKey } = this.state;

    if (key === '1') {
      this.setState({
        activeKey: routeKey,
        listenRouterState: listenRouterState.filter(
          v => v.key !== activeKey || v.key === routeKey || !v.closable,
        ),
        listenRouterKey: listenRouterKey.filter(
          v => v !== activeKey || v === routeKey || !v.closable,
        ),
      });
    } else if (key === '2') {
      this.setState({
        activeKey,
        listenRouterState: listenRouterState.filter(
          v => v.key === activeKey || v.key === routeKey || !v.closable,
        ),
        listenRouterKey: listenRouterKey.filter(
          v => v === activeKey || v === routeKey || v === '/',
        ),
        customerMatchs: listenRouterState.filter(
          v => v.key === activeKey || v.key === routeKey || !v.closable,
        ),
      });
    } else if (key === '3') {
      this.setState({
        activeKey: '/',
        listenRouterState: listenRouterState.filter(v => v.key === routeKey || !v.closable),
        listenRouterKey: listenRouterKey.filter(v => v === routeKey || v === '/'),
        customerMatchs: listenRouterState.filter(v => v.key === routeKey || !v.closable),
      });
    }
  };

  onEdit = (targetKey, action) => {
    this[action](targetKey);
  };

  remove = targetKey => {
    const { activeKey, listenRouterState } = this.state;

    let newActiviKey = activeKey;
    let lastIndex;

    listenRouterState.forEach((pane, i) => {
      if (pane.key === targetKey) {
        lastIndex = i - 1;
      }
    });
    const tabList = [];
    const tabListKey = [];
    listenRouterState.forEach(pane => {
      if (pane.key !== targetKey) {
        tabList.push(pane);
        tabListKey.push(pane.key);
      }
    });
    if (lastIndex >= 0 && activeKey === targetKey) {
      newActiviKey = tabList[lastIndex].key;
    }
    router.push(newActiviKey);
    this.setState({
      listenRouterState: tabList,
      activeKey: newActiviKey,
      listenRouterKey: tabListKey,
    });
};4.1 问题
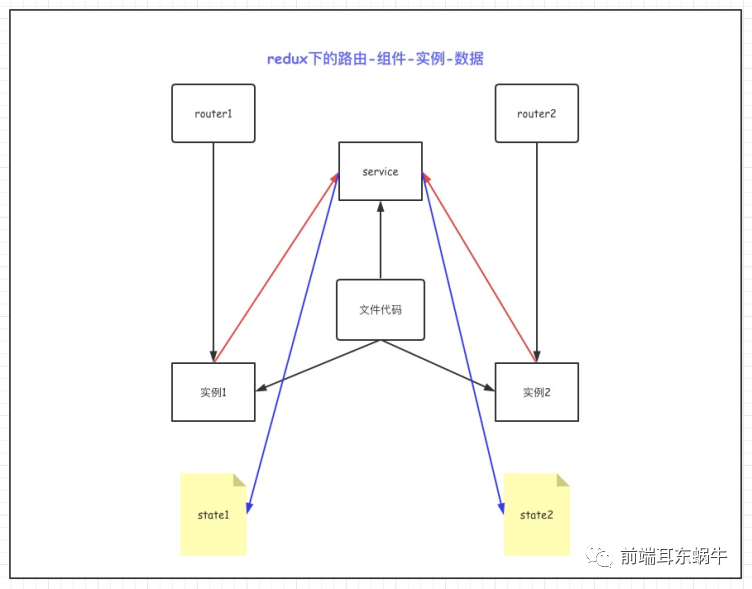
redux在多页签的页面里会存在问题,比如以下两种情况:
- 详情页面:因为详情页面可以打开多个,但是都是公用同一个redux。
- 多列表页面共用同一个model
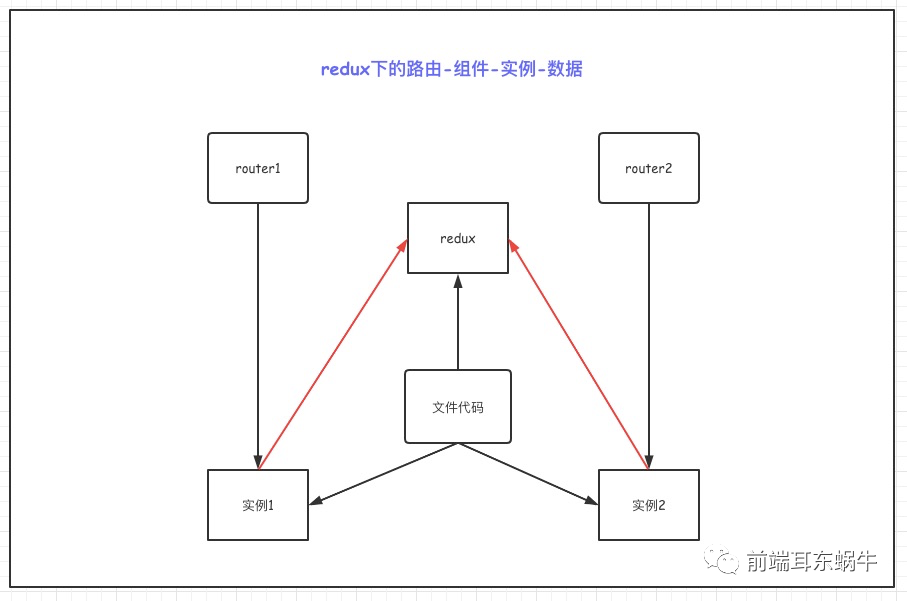
4.2 解决思路
- 动态路由,手动注册model实现,但是在ant design pro内部不是很好实现。提了一个官方issue问题:ant design pro多页签缓存问题
- 不使用redux,大部分页面是不需要使用redux。只通过页面调用接口请求,数据存储都放在组件state中去。
- 使用redux,同一个model通过关键key进行数据区分
4.3 公用同一个model的具体操作
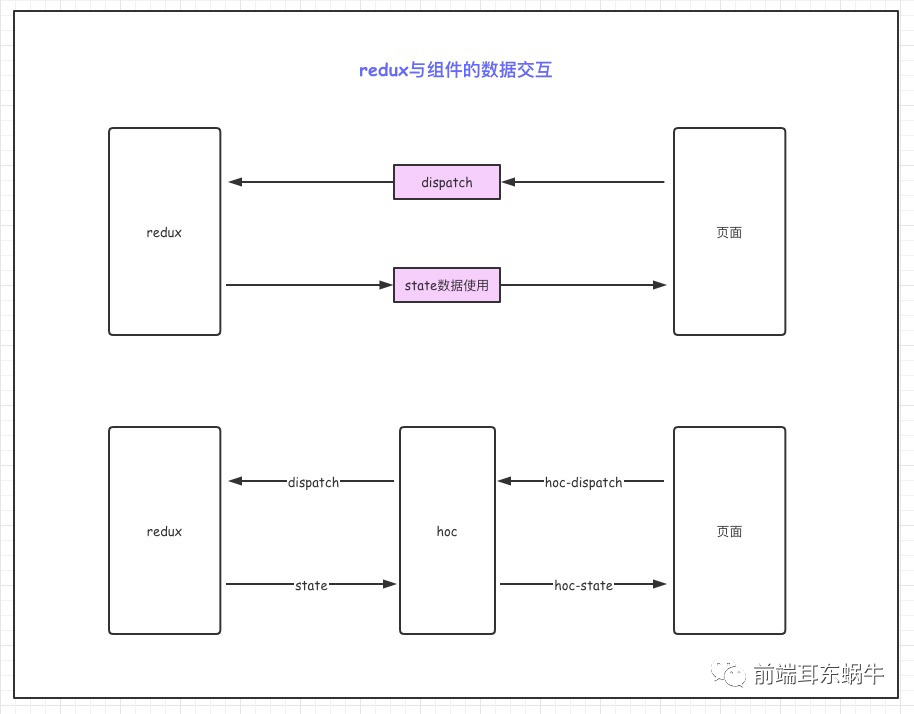
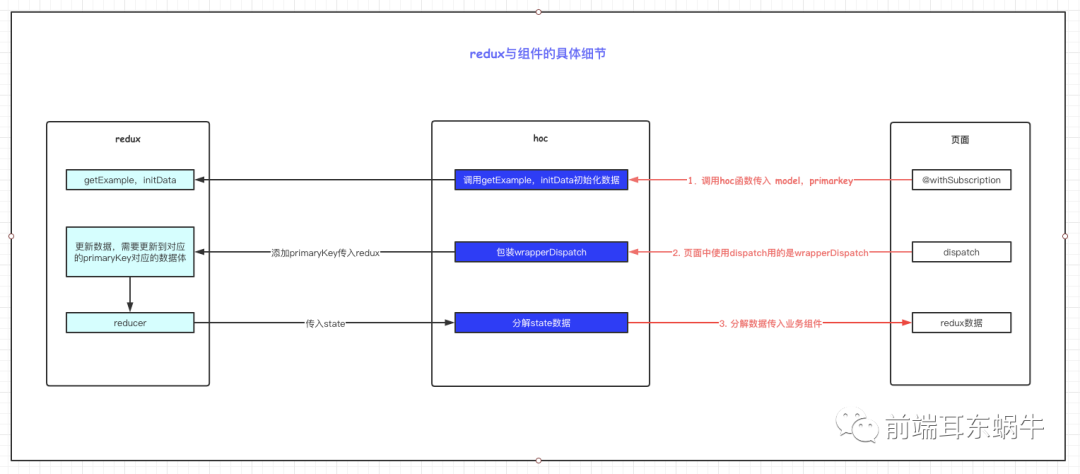

4.3.1 hoc
为什么使用hoc,这里是为了不影响业务页面做修改,将修改的地方放在hoc统一处理掉。这里主要是两个问题:
- dispatch需要将当前primaryKey传到redux,因为对应的数据更新需要放到对应的primarykey对应的state里面去。
- 业务组件使用state数据的时候,需要将当前primaryKey对应的数据传入到props里面
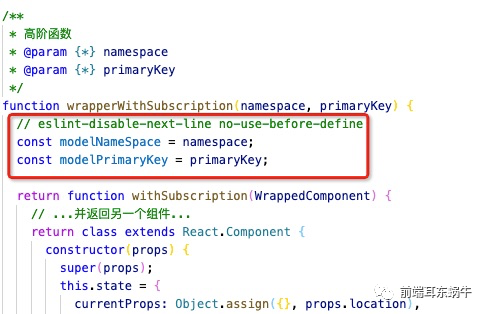
/**
 * 高阶函数
 * @param {*} namespace
 * @param {*} primaryKey
 */
function wrapperWithSubscription(namespace, primaryKey) {
  // eslint-disable-next-line no-use-before-define
  const modelNameSpace = namespace;
  const modelPrimaryKey = primaryKey;

  return function withSubscription(WrappedComponent) {
    // ...并返回另一个组件...
    return class extends React.Component {
      constructor(props) {
        super(props);
        this.state = {
          currentProps: Object.assign({}, props.location),
          initData: {},
        };
      }

      componentWillMount() {
        const { dispatch, location } = this.props;

        dispatch({
          type: `${modelNameSpace}/initData`,
          payload: {
            primaryKey: location.query[modelPrimaryKey],
          },
        });

        dispatch({
          type: `${modelNameSpace}/getExample`,
          payload: {},
          callback: result => {
            this.setState({
              initData: result,
            });
          },
        });
      }

      componentWillUnmount() {
        // 可以自定扩展如何消除当前primarykey对应的数据
        // 一般情况下,前端业务组件会自己清除state的数据
      }

      wrapperDispatch = (dispatchPrams) => {
        const {
          dispatch,
        } = this.props;

        const { currentProps: { query } } = this.state;

        dispatch({
          ...dispatchPrams,
          primaryKey: query[modelPrimaryKey],
        });
      };

      render() {
        const {
          initData,
          currentProps: { query },
        } = this.state;

        const modelNameSpaceProps = {
          // eslint-disable-next-line react/destructuring-assignment
          [modelNameSpace]: this.props[modelNameSpace][query[modelPrimaryKey]] || initData,
        };

        return (
          <WrappedComponent
            {...this.props}
            dispatch={this.wrapperDispatch}
            {...modelNameSpaceProps}
          />
        );
      }
    };
  };
}
4.3.1.1 wrapperDispatch
其实页面组件的dispatch会走当前的页面,这里会统一将primaryKey传入进去
wrapperDispatch = (dispatchPrams) => {
  const {
    dispatch,
  } = this.props;

  const { currentProps: { query } } = this.state;

  dispatch({
    ...dispatchPrams,
    primaryKey: query[modelPrimaryKey],
  });
};
4.3.1.2 render
render函数会处理redux的state,将对应当前页面的数据传回,页面组件还按照之前直接访问,下面的detail就是当前页面对应的model的namespace名称
const { history, location, detail } = this.props;
      render() {
        const {
          initData,
          currentProps: { query },
        } = this.state;

        const modelNameSpaceProps = {
          // eslint-disable-next-line react/destructuring-assignment
          [modelNameSpace]: this.props[modelNameSpace][query[modelPrimaryKey]] || initData,
        };

        return (
          <WrappedComponent
            {...this.props}
            dispatch={this.wrapperDispatch}
            {...modelNameSpaceProps}
          />
        );
      }
4.3.2 model文件会做哪些改变呢?
4.3.2.1 初始state的不同
const initDataExample = {
  data: {
    name: '',
  },
};

export default {
  namespace: 'detail',

  state: {},

  *****
}
现在我们的state里面初始是没有值,因为state的一级属性值使我们页面对应的primaryKey。
我们会定义一个基础结构,initDataExample。用于在组件初始化的时候使用这个初始值添加到state对应的primaryKey。
4.3.2.2 新增两个服务于hoc方法effects
    *getExample({ callback }) {
      if (callback) callback({ ...initDataExample });
    },
    *initData({ payload }, { put }) {
      yield put({
        type: 'init',
        payload: {
          [payload.primaryKey]: {
            ...initDataExample,
          },
        },
      });
    },
getExample:获取初始数据结构
initData:初始化数据结构
getExample呢,是因为hoc内部初始化函数的时候,state是异步的,不会直接在页面render的时候直接初始成功,所以这里的getExample是为了在state还没有更新的情况下,使用初始函数去拿到值,传递给组件。
hoc
      componentWillMount() {
        const { dispatch, location } = this.props;

        dispatch({
          type: `${modelNameSpace}/initData`,
          payload: {
            primaryKey: location.query.title,
          },
        });

        dispatch({
          type: `${modelNameSpace}/getExample`,
          payload: {},
          callback: result => {
            this.setState({
              initData: result,
            });
          },
        });
      }


   *****


     render() {
        const {
          initData,
          currentProps: { query },
        } = this.state;

        const modelNameSpaceProps = {
          // eslint-disable-next-line react/destructuring-assignment
          [modelNameSpace]: this.props[modelNameSpace][query[modelPrimaryKey]] || initData,
        };

        return (
          <WrappedComponent
            {...this.props}
            dispatch={this.wrapperDispatch}
            {...modelNameSpaceProps}
          />
        );
      }
4.3.2.3 更新state的不同
    *fetch({ payload, primaryKey }, { put, select }) {
      const currentPrimaryKeyState = yield select(state => state.detail[primaryKey]);

      yield put({
        type: 'save',
        payload: updateWrapperModel('data', payload, primaryKey, currentPrimaryKeyState),
      });
    }
现在更新数据,需要定位到更新到哪一个primaryKey。所以这里提供了一个函数:更新的时候传入对应的值,然后更新对应primaryKey下的具体的key / value
/**
 * updateWrapperModel
 * @param {*} updateKey
 * @param {*} updateValue
 * @param {*} primaryKey
 * @param {*} currentPrimaryKeyState
 */
export function updateWrapperModel(updateKey, updateValue, primaryKey, currentPrimaryKeyState) {
  return {
    [primaryKey]: {
      ...currentPrimaryKeyState,
      [updateKey]: updateValue,
    },
  };
}
4.4 业务组件的修改
我们使用hoc就是为了尽量少的减少业务组件的改动。
hoc内部是一个统一的函数处理,所以hoc是不知道具体当前业务组件对应的modelspace是什么,以及当前路由下对应的primaryKey的key是什么,因为有的页面可能是id,有的页面取得是title。所以modelNamespace和primaryKey需要传入到hoc。
业务组件只需要添加下面的一行代码进行hoc的传递就可以了。
@withSubscription('detail', 'title')
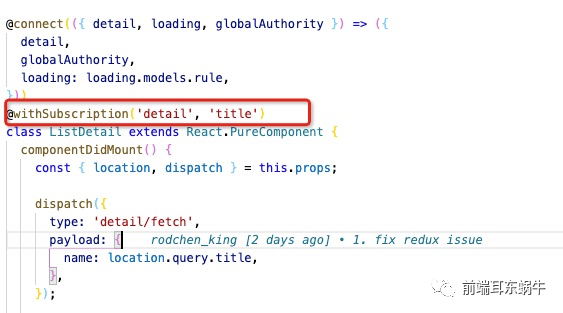
高阶函数会接受这两个值使用
5.1 控制是否使用多页签
这里其实是想可以控制部分页面不需要根据key进行判断,而是根据pathname进行判断就好了。
解决的代码提交是https://github.com/rodchen-king/ant-design-pro-v2/commit/86430c03d3c13f2aed1090c71fb96cf95f195853
路由需要进行只会存在一个页面标示:
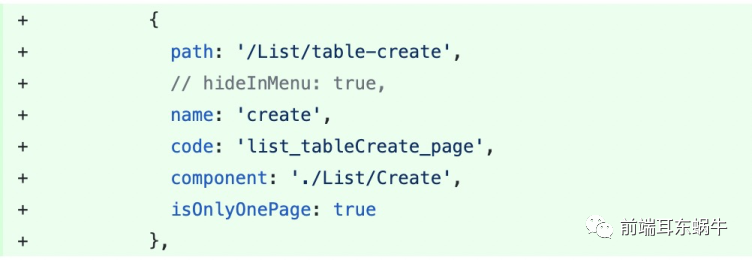
路由监控的地方,判断当前路由如果是isOnlyOnePage,则采用pathname进行key标示
5.2 支持路由match数据
这里其实就是为了处理参数在pathname里面的参数
这里主要的问题是采用目前的这种方式,match的数据是不会正常返回的
所以这里对于项目中用到的props.match都需要单独处理一下。
所以在BasicLayout里面做了单独的处理,就是上面说的customerMatch。其实是为了处理这个问题的。
5.2.1 具体实现
整体的思想和redux应用里面有类似的思路。不同的是
监控路由匹配的时候会处理得到当前路由的match值。
const match = matchPath(route.pathname, { path: replaceRouter.key });
这里其实是处理当前url和匹配的路由pathname处理得到一个match的结果。

至于matchPath这个方法,其实是我从react-router源码里面复制出来的:
import pathToRegexp from 'path-to-regexp';

const cache = {};
const cacheLimit = 10000;
let cacheCount = 0;

function compilePath(path, options) {
  const cacheKey = `${options.end}${options.strict}${options.sensitive}`;
  const pathCache = cache[cacheKey] || (cache[cacheKey] = {});

  if (pathCache[path]) return pathCache[path];

  const keys = [];
  const regexp = pathToRegexp(path, keys, options);
  const result = { regexp, keys };

  if (cacheCount < cacheLimit) {
    pathCache[path] = result;
    // eslint-disable-next-line no-plusplus
    cacheCount++;
  }

  return result;
}

/**
 * Public API for matching a URL pathname to a path.
 */
function matchPath(pathname, options = {}) {
  if (typeof options === 'string' || Array.isArray(options)) {
    // eslint-disable-next-line no-param-reassign
    options = { path: options };
  }

  const { path, exact = false, strict = false, sensitive = false } = options;

  const paths = [].concat(path);

  // eslint-disable-next-line no-shadow
  return paths.reduce((matched, path) => {
    if (!path && path !== '') return null;
    if (matched) return matched;

    const { regexp, keys } = compilePath(path, {
      end: exact,
      strict,
      sensitive,
    });
    const match = regexp.exec(pathname);

    if (!match) return null;

    const [url, ...values] = match;
    const isExact = pathname === url;

    if (exact && !isExact) return null;

    return {
      path, // the path used to match
      url: path === '/' && url === '' ? '/' : url, // the matched portion of the URL
      isExact, // whether or not we matched exactly
      params: keys.reduce((memo, key, index) => {
        // eslint-disable-next-line no-param-reassign
        memo[key.name] = values[index];
        return memo;
      }, {}),
    };
  }, null);
}

export default matchPath;
然后不同页面的match值会存储在customerMatchs。然后通过context进行数据传递。
<RouterContext.Provider value={customerMatchs}>
  <Route key={item.key} component={item.content} exact />
</RouterContext.Provider>
HOC函数进行消费withRouterMath
import React from 'react';
import { RouterContext } from '@/layouts/BasicLayout';

/**
 * 高阶函数: 适配match
 */
function withRouterMath() {
  // eslint-disable-next-line no-use-before-define

  return function withSubscription(WrappedComponent) {
    // ...并返回另一个组件...
    return class extends React.Component {
      constructor(props) {
        super(props);
        this.state = {
          currentLocation: Object.assign({}, props.location),
        };
      }

      getMatch = value => {
        const {
          currentLocation: { pathname },
        } = this.state;

        const returnValue = value.filter(item => item.key === pathname);

        if (returnValue.length) {
          return returnValue[0].match;
        }

        return {};
      };

      render() {
        return (
          <RouterContext.Consumer>
            {_value => <WrappedComponent {...this.props} match={this.getMatch(_value)} />}
          </RouterContext.Consumer>
        );
      }
    };
  };
}

export default withRouterMath;
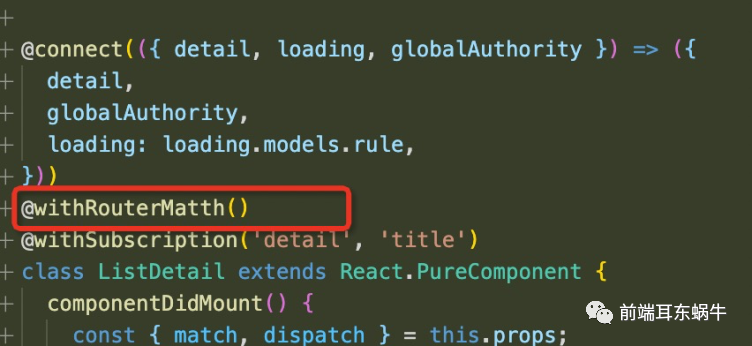
使用的时候
@withRouterMatth()
@withSubscription('detail', 'title')
class ListDetail extends React.PureComponent {
  componentDidMount() {
    const { match, dispatch } = this.props;
    dispatch({
      type: 'detail/fetch',
      payload: {
        name: match.params.title,
      },
    });
  }
}
这样页面就可以正常使用match,和原先的location一样获取值,然后系统层级也会匹配query和match的数据进行primarykey处理。
5.3 业务页面不是由单个的参数进行唯一表示,而是多个业务参数进行唯一表示
前面说的都是单个primarykey作为唯一页面标示的,但是可能部分代码存在很复杂的情况。
举个例子,存在一个业务组件既是详情页面,也是新增页面,而且业务上还存在多个。
类似营销活动:为了更好的说明,我在单独加一个字段,templateName
满减活动【templateName:满减】
- activityType:1;
- 详情的时候会有一个activityNo
- 新增的时候则没有activityNo
满折活动【templateName:满折】
- activityType:2:
- 详情的时候会有一个activityNo,
- 新增的时候则没有activityNo
5.3.1 具体实现
https://github.com/rodchen-king/ant-design-pro-v2/commit/d0ecfd2e795cb90837b0ed94de5f4ad13012af31
这里主要是支持多个参数:
修改BasicLayout.js
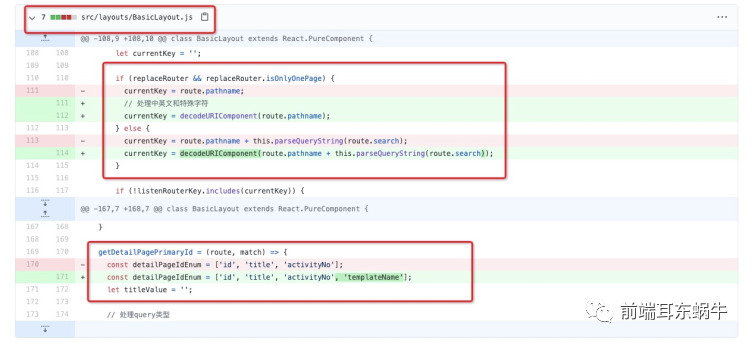
因为可能参数当中涉及到中文,所以判断key的逻辑用了decodeURIComponent方法解析。
第二个在getDetailPagePrimaryId,这里加上这个是为了适配新的查询参数。
修改wrapperWithSubscription
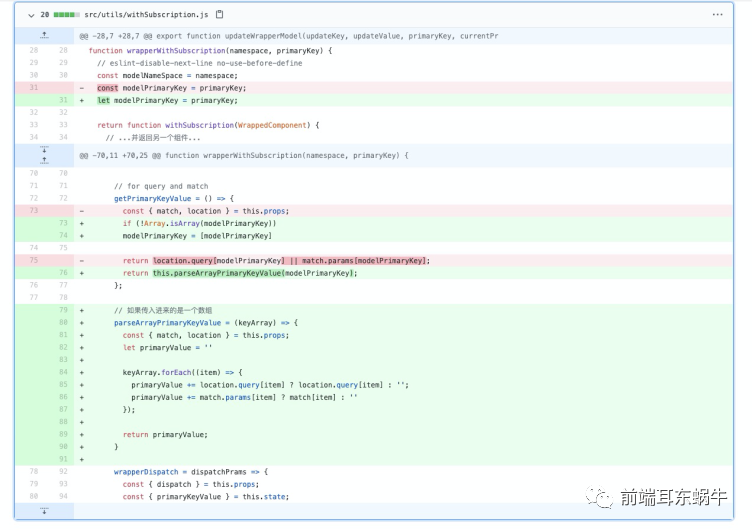
主要是兼容多个参数的情况,传进来的是一个数组。
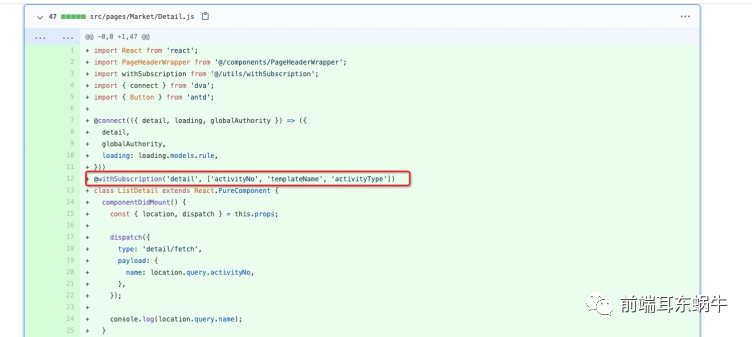
调用的方式参考新增的业务Maket组件的调用方式
@withSubscription('detail', ['activityNo', 'templateName', 'activityType'])
6. 优化
6.1 dispatch.then的使用
代码:https://github.com/rodchen-king/ant-design-pro-v2/commit/5f160db67aaad31cb1ac04d4d01a66a1fc6d0582
开发过程中存在dispatch().then的方式:
所以这里支持也要优化一下:
    wrapperDispatch = dispatchPrams => {
        const { dispatch } = this.props;
        const { primaryKeyValue } = this.state;

        dispatch({
          ...dispatchPrams,
          primaryKey: primaryKeyValue,
        });
      };
6.2 redux-state更新多个参数
代码:https://github.com/rodchen-king/ant-design-pro-v2/commit/5f160db67aaad31cb1ac04d4d01a66a1fc6d0582
/**
 * model相关的处理函数
 */

/**
 * updateWrapperModel
 * @param {*} updateStateObject         要更新state的健值对
 * @param {*} primaryKey                当前页面对应的primaryKey
 * @param {*} currentPrimaryKeyState    primaryKey对应的数据源
 */
export function updateWrapperModel(updateStateObject, primaryKey, currentPrimaryKeyState) {
  return {
    [primaryKey]: {
      ...currentPrimaryKeyState,
      ...updateStateObject,
    },
  };
}
https://procomponents.ant.design/components/layout
因为最新的v5 菜单已经采用ProLayout作为布局。所以这里一种方式是利用配置项目的childRender
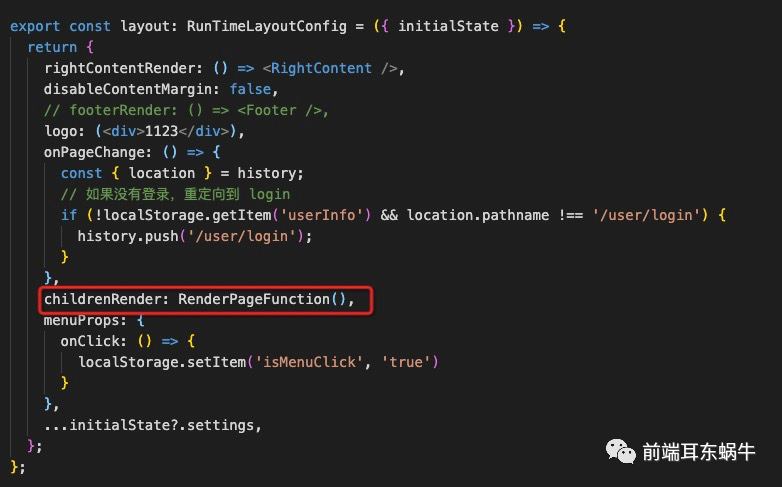
另一种方式则是注释这里的代码,然后重新写以前版本的BasicLayout.js
❤️ 看完三件事
如果你觉得这篇内容对你挺有启发,我想邀请你帮我三个小忙:
- 点个【在看】,或者分享转发,让更多的人也能看到这篇内容
- 关注公众号【趣谈前端】,定期分享 工程化 / 可视化 / 低代码 / 优秀开源。

基于Koa + React + TS从零开发全栈文档编辑器(进阶实战)
点个在看你最好看
