IDEA下创建SpringBoot+MyBatis+MySql项目实现动态登录与注册功能

来源:blog.csdn.net/caoxiaohong1005
Just Code It
一、搭建SpringBoot项目
1.1、file ——> new ——> project——> Spring Initializr——> next——> next——> next——> finish
注意选择包依赖关系
Web下的Spring Web。
Template Engines下的Thymeleaf。
SQL下的JDBC API、Spring Data JDBC、MySQL Driver。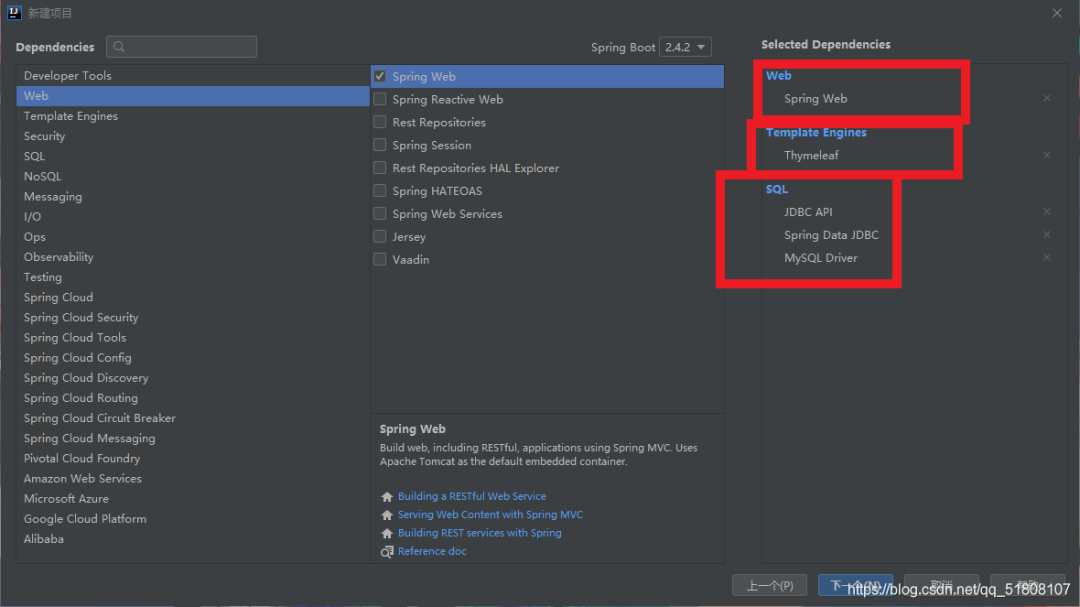
二、springboot整合mybatis.mysql
2.1、整体结构
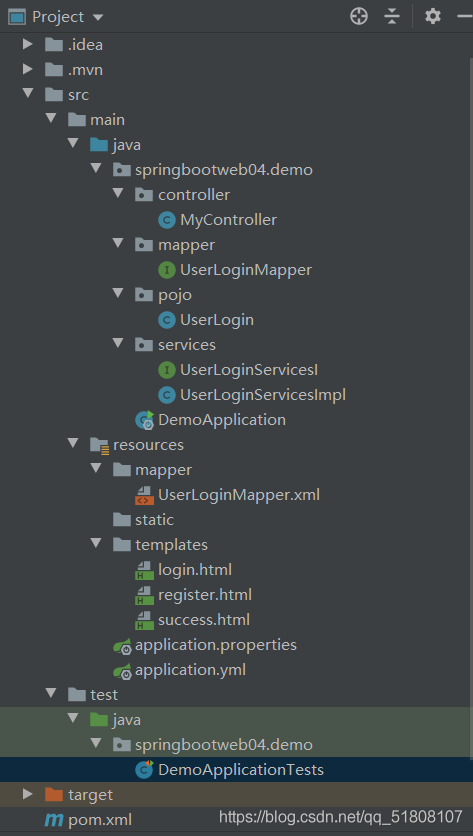
2.2、设置所需要的依赖
即pom.xml文件
<project xmlns="http://maven.apache.org/POM/4.0.0" xmlns:xsi="http://www.w3.org/2001/XMLSchema-instance"xsi:schemaLocation="http://maven.apache.org/POM/4.0.0 https://maven.apache.org/xsd/maven-4.0.0.xsd"><modelVersion>4.0.0modelVersion><parent><groupId>org.springframework.bootgroupId><artifactId>spring-boot-starter-parentartifactId><version>2.4.2version><relativePath/>parent><groupId>springboot-web04groupId><artifactId>demoartifactId><version>0.0.1-SNAPSHOTversion><name>demoname><description>Demo project for Spring Bootdescription><properties><java.version>1.8java.version>properties><dependencies><dependency><groupId>org.springframework.bootgroupId><artifactId>spring-boot-starter-data-jdbcartifactId>dependency><dependency><groupId>org.springframework.bootgroupId><artifactId>spring-boot-starter-jdbcartifactId>dependency><dependency><groupId>org.springframework.bootgroupId><artifactId>spring-boot-starter-thymeleafartifactId>dependency><dependency><groupId>org.springframework.bootgroupId><artifactId>spring-boot-starter-webartifactId>dependency><dependency><groupId>mysqlgroupId><artifactId>mysql-connector-javaartifactId><scope>runtimescope>dependency><dependency><groupId>org.springframework.bootgroupId><artifactId>spring-boot-starter-testartifactId><scope>testscope>dependency><dependency><groupId>org.springframework.bootgroupId><artifactId>spring-boot-starter-jdbcartifactId>dependency><dependency><groupId>org.springframework.bootgroupId><artifactId>spring-boot-starter-thymeleafartifactId>dependency><dependency><groupId>org.springframework.bootgroupId><artifactId>spring-boot-starter-webartifactId>dependency><dependency><groupId>org.mybatis.spring.bootgroupId><artifactId>mybatis-spring-boot-starterartifactId><version>2.1.3version>dependency><dependency><groupId>mysqlgroupId><artifactId>mysql-connector-javaartifactId>dependency><dependency><groupId>org.projectlombokgroupId><artifactId>lombokartifactId><version>1.18.12version><scope>providedscope>dependency><dependency><groupId>com.alibabagroupId><artifactId>druidartifactId><version>1.2.1version>dependency><dependency><groupId>org.springframework.bootgroupId><artifactId>spring-boot-starter-testartifactId><scope>testscope><exclusions><exclusion><groupId>org.junit.vintagegroupId><artifactId>junit-vintage-engineartifactId>exclusion>exclusions>dependency><dependency><groupId>org.xmlunitgroupId><artifactId>xmlunit-coreartifactId>dependency><dependency><groupId>org.mybatisgroupId><artifactId>mybatisartifactId><version>3.4.6version>dependency>dependencies><build><plugins><plugin><groupId>org.springframework.bootgroupId><artifactId>spring-boot-maven-pluginartifactId>plugin>plugins>build>project>
2.3、设置application.yml文件与pplication.properties文件
在resources目录下新建yml文件,用于存放数据库连接需要的一些数据
spring:datasource:driver-class-name: com.mysql.cj.jdbc.Driverurl: jdbc:mysql://localhost:3306/mybatis?serverTimezone=GMT%2B8&useSSL=trueusername: root #数据库password: sm1208 #密码
在application.properties文件中加入
#端口号server.port=8080#druid数据库连接池type=com.alibaba.druid.pool.DruidDataSource#清除缓存spring.thymeleaf.cache=false#配置mappermybatis.mapper-locations=classpath:mapper/*.xml
2.4、在pojo下的新建类UserLogin
package springbootweb04.demo.pojo;import lombok.AllArgsConstructor;import lombok.Data;import lombok.NoArgsConstructor;public class UserLogin {private String username;private String password;public String getUsername() {return username;}}
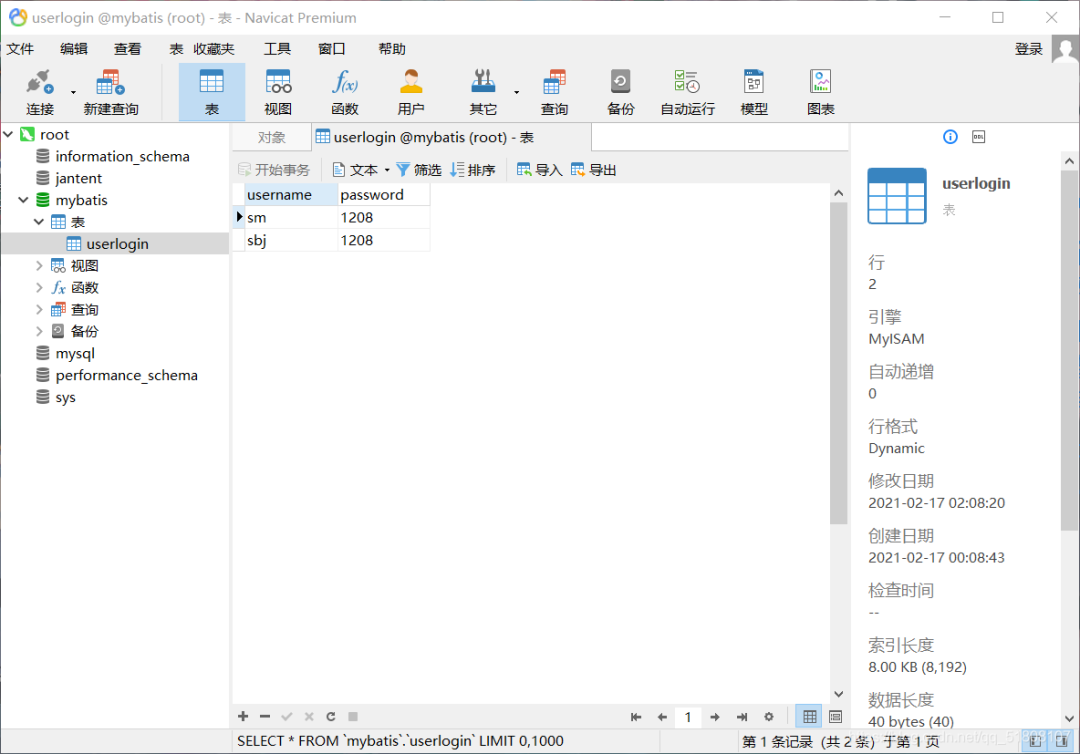
2.5、新建数据库,名为mybatis,创建用户表,名为userLogin,创建username、password字段
2.5.1、数据库名可以随意,不过要与application.yml文件中的一致
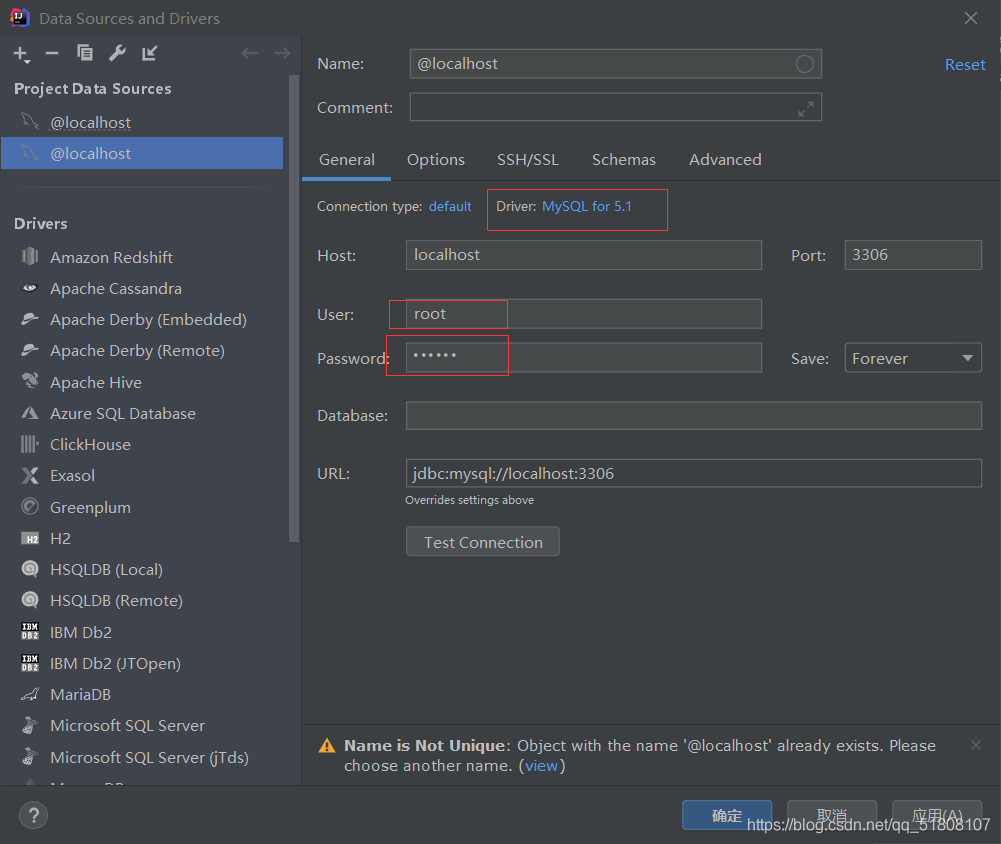
2.5.2、IDEA中连接数据库
Database——> +——> Data Source——> Mysql
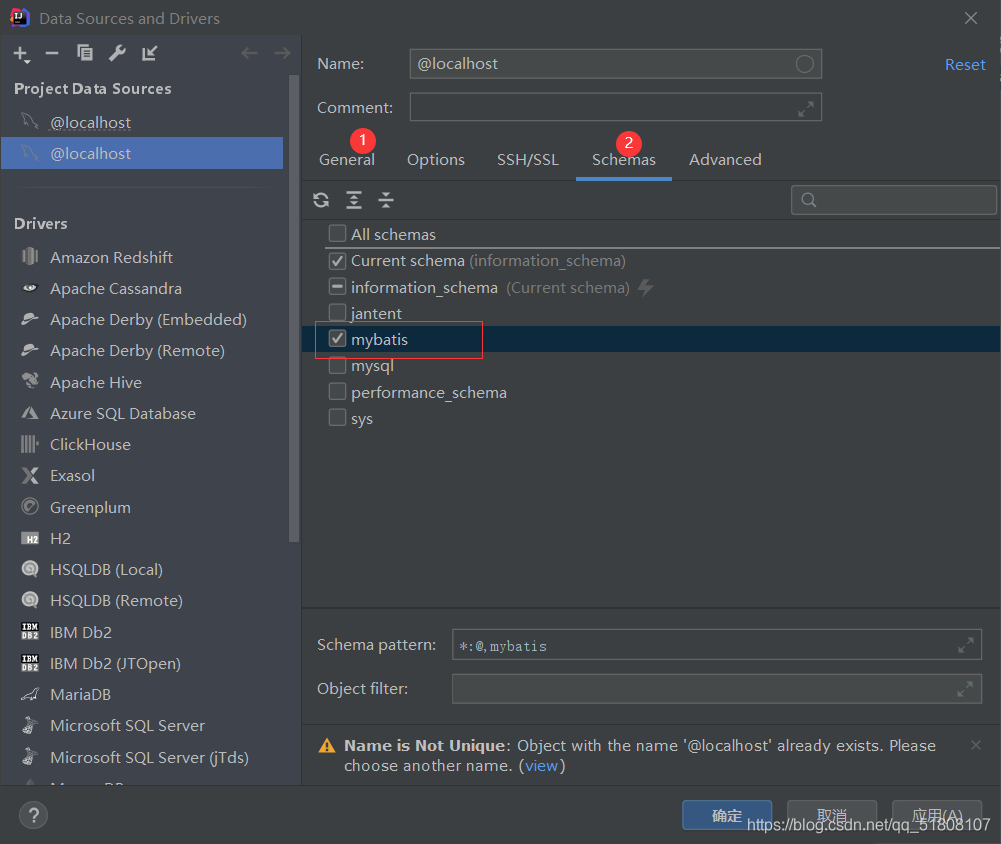
2.6、mapper层
新建UserLoginMapper接口
package springbootweb04.demo.mapper;import org.apache.ibatis.annotations.Mapper;import org.springframework.stereotype.Repository;import springbootweb04.demo.pojo.UserLogin;import java.util.List;public interface UserLoginMapper {//查询public ListqueryAll() ;//添加数据public int add(UserLogin userLogin);//根据用户名查询数据public UserLogin queryByName(String username);}
2.7、resources目录下的mapper目录
在resources目录下新建mapper目录,并在这个目录下新建UserLoginMapper.xml文件
PUBLIC "-//mybatis.org//DTD Mapper 3.0//EN""http://mybatis.org/dtd/mybatis-3-mapper.dtd"><mapper namespace="springbootweb04.demo.mapper.UserLoginMapper"><select id="queryAll" resultType="springbootweb04.demo.pojo.UserLogin">select * from userLoginselect><insert id="add" parameterType="springbootweb04.demo.pojo.UserLogin">insert into userLogin values (#{username},#{password})insert><select id="queryByName" resultType="springbootweb04.demo.pojo.UserLogin">select * from userLogin where username = #{username}select>mapper>
2.8、测试
在test.Java.springbootweb04.demo类中,测试是否能联通数据库,没有报错说明成功。
package springbootweb04.demo;import org.junit.jupiter.api.Test;import org.springframework.boot.test.context.SpringBootTest;import springbootweb04.demo.mapper.UserLoginMapper;import springbootweb04.demo.pojo.UserLogin;import org.springframework.beans.factory.annotation.Autowired;import javax.sql.DataSource;import java.sql.Connection;import java.sql.SQLException;import java.util.List;@SpringBootTestclass DemoApplicationTests {@AutowiredDataSource dataSource;@Testvoid contextLoads() throws SQLException {System.out.println(dataSource.getClass());Connection connection = dataSource.getConnection();System.out.println(connection);//template模板,拿来即用connection.close();}@AutowiredUserLoginMapper userLoginMapper;@Testpublic void toTest(){List<UserLogin> userLogins = userLoginMapper.queryAll();userLogins.forEach(e-> System.out.println(e));}}
2.9、services层
在services下新建接口UserLoginServicesI和类UserLoginServicesImpl
UserLoginServicesI接口:
package springbootweb04.demo.services;import springbootweb04.demo.pojo.UserLogin;import java.util.List;public interface UserLoginServicesI {//查询public ListqueryAll() ;//添加数据public int add(UserLogin userLogin);//根据用户名查询数据public UserLogin queryByName(String username);}
UserLoginServicesImpl类
package springbootweb04.demo.services;import springbootweb04.demo.mapper.UserLoginMapper;import springbootweb04.demo.pojo.UserLogin;import org.springframework.beans.factory.annotation.Autowired;import org.springframework.stereotype.Service;import java.util.List;@Servicepublic class UserLoginServicesImpl implements UserLoginServicesI {@AutowiredUserLoginMapper userLoginMapper;@Overridepublic ListqueryAll() { return userLoginMapper.queryAll();}@Overridepublic int add(UserLogin userLogin) {return userLoginMapper.add(userLogin);}@Overridepublic UserLogin queryByName(String username) {return userLoginMapper.queryByName(username);}}
2.A、controller层
编写MyController类
package springbootweb04.demo.controller;import springbootweb04.demo.pojo.UserLogin;import springbootweb04.demo.services.UserLoginServicesImpl;import org.springframework.beans.factory.annotation.Autowired;import org.springframework.stereotype.Controller;import org.springframework.ui.Model;import org.springframework.web.bind.annotation.RequestMapping;public class MyController {UserLoginServicesImpl userLoginServicesImpl;public String toLogin(){return "login";}public String LoginSuccess(Model model, UserLogin userLogin){//先查询看该用户名是否存在UserLogin userLogin1 = userLoginServicesImpl.queryByName(userLogin.getUsername());if(userLogin1 != null){ // 如果查询的用户不为空System.out.println(userLogin1.toString());return "success";}else{//返回到登录页面model.addAttribute("data","该用户不存在,请先注册");return "login";}}//登录界面public String toRegister(){return "register";}public String toRegisterSuccess(Model model,UserLogin userLogin){//将账号密码加入到数据库中int add = userLoginServicesImpl.add(userLogin);System.out.println("数据插入成功!");model.addAttribute("data","注册成功,请登录!");return "login";}}
三、编写前端页面
将以下三个页面放在templates下面
login.html:登录页面
<html lang="en" xmlns:th="http://www.thymeleaf.org"><head><meta charset="UTF-8"><title>Titletitle>head><body style="background: aqua"><div align="center"><br><br><h2>登录界面h2><br><br><span th:text="${data}" style="text-color:red;font-size: 10px">span><form method="get" action="/LoginSuccess">用户名:<input type="text" name="username" placeholder="请输入用户名" required/><br><br>密码:<input type="text" name="password" placeholder="请输入密码" required/><br><br><input type="submit" value="登录">form><br><form method="get" action="/toRegister"><input type="submit" value="注册">form>div>body>html>
register.html:注册页面
<html lang="en" xmlns:th="http://www.thymeleaf.org"><head><meta charset="UTF-8"><title>Titletitle>head><body style="background: aqua"><div align="center"><br><br>注册界面<br><br><form method="get" action="/RegisterSuccess">用户名:<input type="text" name="username" placeholder="请输入用户名" required/><br><br>密码:<input type="text" name="password" placeholder="请输入密码" required/><br><br>确认密码:<input type="text" name="password2" placeholder="请输入密码" required/><br><br><input type="submit" value="注册">form>div>body>html>
success.html:成功界面
<html lang="en"><head><meta charset="UTF-8"><title>Titletitle>head><body>body>html>
四、运行测试
:localhost:8080/toLogin
框架实现动态登录与注册功能
PS:如果觉得我的分享不错,欢迎大家随手点赞、在看。
END
评论
