
pkg打包node应用全指南

node应用部署
node应用部署的常见方式就是把代码放服务器上,然后用命令行执行代码就可以了。比如express框架会自动生成一个www启动文件,部署时执行这段就可以了:
node ./bin/www
但是这种方式的缺点也很明显,代码赤裸裸地放在服务器上,这对于软件交付来说并不是安全可靠的做法。今天就来介绍一个node应用的打包工具--pkg,非常方便,不过有许多需要注意的地方,相信对你有用!
pkg打包node应用
这里要说的pkg是一个npm包,可以用来打包node应用为可执行文件。想想看,一个node应用被打包成exe文件,这样丢到服务器上,即省事又安全。来看看怎么操作吧!
安装
可以直接全局安装pkg,方便打包
npm install -g pkg
pkg入口配置
pkg执行打包的原理就是从入口文件开始,根据相关依赖顺藤摸瓜地执行打包过程,显然这个入口文件与node应用程序的自身是一样的。在配置文件package.json里,需要加上bin属性,专门指定pkg的执行入口,入口可以有多种方式:
// package.json
{
...
"bin": "./bin/www",
"bin": "./service.js"
...
}
pkg执行配置
pkg的用法可以看下官方文档[1],在命令行输入pkg -h 也可以看到相关指导说明
 pkg [options] <input>

 Options:

   -h, --help           output usage information
   -v, --version        output pkg version
   -t, --targets        comma-separated list of targets (see examples)
   -c, --config         package.json or any json file with top-level config
   --options            bake v8 options into executable to run with them on
   -o, --output         output file name or template for several files
   --out-path           path to save output one or more executables
   -d, --debug          show more information during packaging process [off]
   -b, --build          don't download prebuilt base binaries, build them
   --public             speed up and disclose the sources of top-level project
   --public-packages    force specified packages to be considered public
   --no-bytecode        skip bytecode generation and include source files as plain js
   -C, --compress       [default=None] compression algorithm = Brotli or GZip

 Examples:

 – Makes executables for Linux, macOS and Windows
   $ pkg index.js
 – Takes package.json from cwd and follows 'bin' entry
   $ pkg .
 – Makes executable for particular target machine
   $ pkg -t node14-win-arm64 index.js
 – Makes executables for target machines of your choice
   $ pkg -t node12-linux,node14-linux,node14-win index.js
 – Bakes '--expose-gc' and '--max-heap-size=34' into executable
   $ pkg --options "expose-gc,max-heap-size=34" index.js
 – Consider packageA and packageB to be public
   $ pkg --public-packages "packageA,packageB" index.js
 – Consider all packages to be public
   $ pkg --public-packages "*" index.js
 – Bakes '--expose-gc' into executable
   $ pkg --options expose-gc index.js
 – reduce size of the data packed inside the executable with GZip
   $ pkg --compress GZip index.js
pkg执行是最关键的打包动作,比如我这里用到的这行配置是这样写的:
// package.json
{
  "scripts"{
    "pkg":"pkg . -t node12-win-x64 --out-path=dist/"
  }
}
结合官方文档内容,我们来看下这行代码中这些参数的意思:
1、 pkg .,意思就是它会寻找指定目录下的package.json文件,然后再寻找bin字段作为入口文件。
2、-t 用来指定打包的目标平台和Node版本,如-t node12-win-x64,node12-linux-x64,node12-macos-x64,可以同时打包3个平台的可执行程序;
3、--out-path 用来指定输出的目录地址;后面的"=dist/"就是指定的目录地址,也可以这样写"--out-path dist/",用空格替代"="
静态资源配置
这块较关键,前面提到pkg打包会从入口开始根据依赖去找相关资源,并把这些都打包进去,不过直接打包这种情况仅限于require引用方式,如果你的代码中有用到__dirname拼接变量的形式,就要在packge.json中进行配置了。
比如我的代码中有这样两行代码:
app.set('views',path.join(__dirname, './views'))
...
app.use(express.static(path.join(__dirname, './public')));
那views与public文件夹中的文件都不会被pkg自动打包,需要进行配置:
{
"script": {},
"pkg": {
    "assets": ["public/**/*","views/**/*"],
    "scripts": "workers/**/*.js"
  },
}
要注意的是像public/**/* 这种通配符写法,表示public下所有文件都被打包进去了; assets表示静态资源相关配置,scritps表示需要配置才能打包的js脚本;
至此,打包的相关配置基本完成,完整的配置文件可以看下:
{
  "name": "pngservice",
  "version": "0.0.0",
  "private": true,
  "bin": "./bin/www",
  "scripts": {
    "start": "node ./bin/www",
    "restart": "pm2 start ./bin/www --watch",
    "pkg": "pkg . -t  node12-win-x64 --out-path dist/",
    "pkgout": "pkg . -t  node12-win-x64 --out-path D:/ --dist"
  },
  "pkg": {
    "assets": ["public/**/*","views/**/*"],
    "scripts": "workers/**/*.js"
  },
  "dependencies": {
    "cookie-parser": "~1.4.4",
    "debug": "~2.6.9",
    "ejs": "^3.1.6",
    "express": "~4.16.1",
    "http-errors": "~1.6.3",
    "jade": "~1.11.0",
    "mime": "^2.5.2",
    "morgan": "~1.9.1",
    "mssql": "^6.2.3",
    "pngjs": "^6.0.0",
    "request": "^2.88.2",
    "tedious": "^9.2.1"
  },
  "devDependencies": {
    "babel-preset-env": "^1.7.0",
    "babel-register": "^6.26.0"
  }
}
外置配置文件
有时会有这种需求,我需要把配置文件放在外面,不用打包进exe中,方便部署时修改相关配置。这时就需要用到process.cwd了,具体如下:
// 配置文件会打包到执行文件exe中
var config = require("../config/cfg.json")

// 配置文件不会被打包,文件exe与config目录需要整体部署
const fs = require("fs");
const path = require("path");

var config =  null;
fs.readFileSync(path.join(process.cwd(), '../config/config.json'), callback)
function callback(err, data){
  config = JSON.parse(data)
}
需要注意的是这里最好用fs.readFileSync同步写法,而不是fs.readFile异步写法,这样保证后续代码在用到config值时不会报错,不然打包会出错。
遇到的问题
我在打包时遇到很多问题,写文章时已经把坑填上了,按照前面的内容操作基本不会有啥问题。不过我在打包时遇到这个问题:
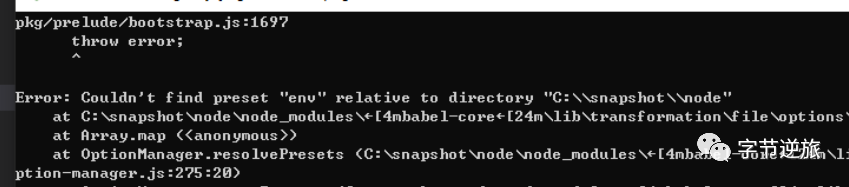 非常的诡异,后来在找到代码中用到env变量的地方,在www文件下有这样一段代码:
 require('babel-register')({
   presets: ['env']
 });
'babel-register'改写了 node 本身的 require,添加钩子,然后在 require 其他模块的时候,就会触发 babel 编译,即实时编译。也就是说引入 require('babel-register') 的文件代码,是不会被编译的。这就导致我用pkg打包时,www文件无法被编译到exe中。于是我果断把这段代码给注释了,表示我需要此文件被编译,然后就正常了。
 //require('babel-register')({
 //  presets: ['env']
 //});
好了,文章到此结束,如果对你有用请记得点赞、分享、在看哦,谢谢鼓励!
参考资料:
https://www.jianshu.com/p/5aa149e16ab9 https://juejin.cn/post/6844903937057751054 https://juejin.cn/post/6844903569062117384 https://www.cnblogs.com/mordom/archive/2018/01/23/8337337.html https://blog.csdn.net/u012211003/article/details/112872859 https://www.cnblogs.com/mengff/p/9753867.html
扫码关注 字节逆旅 公众号,为您奉献更多技术干货!