Apache thrift 之使用示例
最近看到一些招聘说明有关于thrift的要求:

作为一个面向简历编程的程序员,多年来使用的都是springmvc下的http调用,不免对这个thrift有了一丝好奇,于是thrift的学习就提上了日程。
Thrift 基本概念
百度百科的定义如下:
Thrift是一种接口描述语言和二进制通讯协议,它被用来定义和创建跨语言的服务。它被当作一个远程过程调用(RPC)框架来使用,是由Facebook为“大规模跨语言服务开发”而开发的。
关于那些大而泛的概念,本文就不多介绍了,直接进入thfrit的学习吧。
Thrift的数据类型
Thrift 脚本可定义的数据类型包括以下几种类型:
基本类型:
bool: 布尔值 byte: 8位有符号整数 i16: 16位有符号整数 i32: 32位有符号整数 i64: 64位有符号整数 double: 64位浮点数 string: UTF-8编码的字符串 binary: 二进制串 结构体类型:
struct: 定义的结构体对象 容器类型:
list: 有序元素列表 set: 无序无重复元素集合 map: 有序的key/value集合 异常类型:
exception: 异常类型 服务类型:
service: 具体对应服务的类
Thrift的协议
Thrift可以让用户选择客户端与服务端之间传输通信协议的类别,在传输协议上总体划分为**文本(text)「和」二进制(binary)**传输协议。为节约带宽,提高传输效率,一般情况下使用二进制类型的传输协议为多数,有时还会使用基于文本类型的协议,这需要根据项目/产品中的实际需求。常用协议有以下几种:
TBinaryProtocol:二进制编码格式进行数据传输TCompactProtocol:高效率的、密集的二进制编码格式进行数据传输TJSONProtocol: 使用JSON文本的数据编码协议进行数据传输TSimpleJSONProtocol:只提供JSON只写的协议,适用于通过脚本语言解析
Thrift的传输层
常用的传输层有以下几种:
TSocket:使用阻塞式I/O进行传输,是最常见的模式TNonblockingTransport:使用非阻塞方式,用于构建异步客户端TFramedTransport:使用非阻塞方式,按块的大小进行传输,类似于Java中的NIO
Thrift的服务端类型
TSimpleServer:单线程服务器端,使用标准的阻塞式I/OTThreadPoolServer:多线程服务器端,使用标准的阻塞式I/OTNonblockingServer:单线程服务器端,使用非阻塞式I/OTHsHaServer:半同步半异步服务器端,基于非阻塞式IO读写和多线程工作任务处理TThreadedSelectorServer:多线程选择器服务器端,对THsHaServer在异步IO模型上进行增强
简单了解完上面的概念后,接下来我们将通过一个实例来演示thrift的使用。
安装
使用thrift前,需要安装thrift命令行工具,该工具用来将编写的thfirt文件编译成指定的源码文件。
在 Mac 上用如下命令安装:
$ brew install thrift
安装成功后,查看版本:
$ thrift -v
Thrift version 0.14.1
其他操作系统的安装过程可自行百度。
编写 thrift 文件
这里我们编写两个服务。
HelloService.thrift
namespace java com.attempt.thrift02.gen.service

service HelloService {
   string hello(1: string text);
}
这里定义了一个HelloService,里面仅有一个hello(String)方法
QueryResult.thrift
namespace java com.attempt.thrift02.gen.vo

struct QueryResult {
   1: required i32 code;         // 请求的code 必选
   2: optional string msg;       // 请求返回信息,可选
}
这里定义了一个对象实体,里面有两个属性:code与msg,用来接收返回参数。
QueryService.thrift
namespace java com.attempt.thrift02.gen.service

// 引入另一文件
include "QueryResult.thrift"

service QueryService {
    // QueryResult在另一个文件中,使用方式为 文件名.对象名
   QueryResult.QueryResult query(1: i32 code);
}
这是另一个Service:QueryService,该service中只有一个方法:query(...),该方法返回对象为QueryResult,由于该对象在QueryResult.thrift文件中,因此需要使用include命令引入,并且在引用时,需要使用文件名.对象名的方式。
生成
在命令行中执行如下命令(指定文件的源码文件为java):
$ thrift -r --gen java QueryService.thrift
$ thrift -r --gen java HelloService.thrift
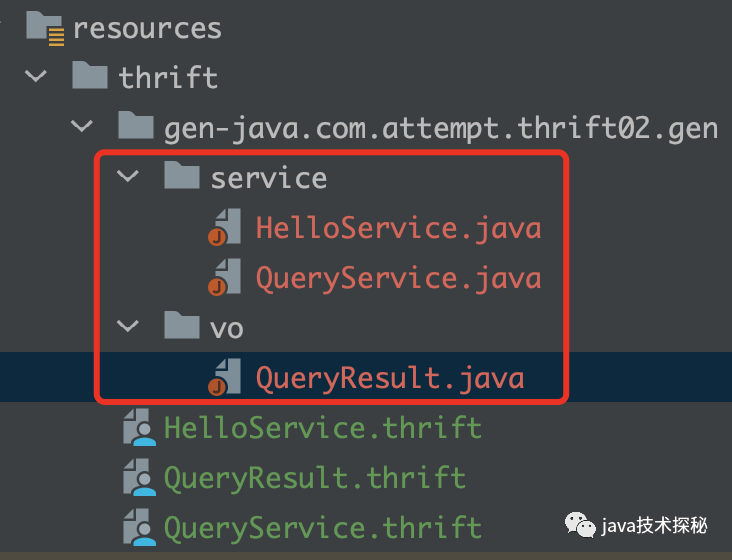
在QueryService.thrift中引用了QueryResult.thrift文件,因此只需生成QueryService.thrift,QueryResult.thrift就可自动生成。
生成的文件如下:

实现
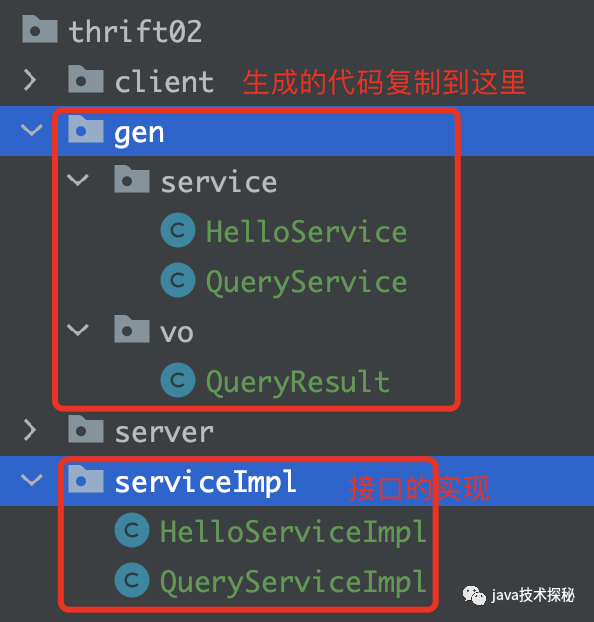
我们将上一步生成的java代码复制到src/main/java下,目录结构如下:

引入 thrift jar 包
除了复制生成的文件外,还需要在项目中引入thrift 的 jar 包,jar包的GAV如下:
<dependency>
    <groupId>org.apache.thrift</groupId>
    <artifactId>libthrift</artifactId>
    <version>0.14.1</version>
</dependency>
HelloService的实现:HelloServiceImpl
package com.attempt.thrift02.serviceImpl;

import com.attempt.thrift02.gen.service.HelloService;
import org.apache.thrift.TException;

/**
 * {这里添加描述}
 *
 * @author chengyan
 * @date 2021-05-06 11:50 上午
 */
public class HelloServiceImpl implements HelloService.Iface {

    @Override
    public String hello(String text) throws TException {
        return "hello, " + text + " !";
    }
}
HelloServiceImpl是我们自己编写的类,它实现了HelloService.Iface,在对应的方法中编写我们自己的业务逻辑,而HelloService.Iface是由thrift生成的类。
QueryService的实现:QueryServiceImpl
package com.attempt.thrift02.serviceImpl;

import com.attempt.thrift02.gen.service.QueryService;
import com.attempt.thrift02.gen.vo.QueryResult;
import org.apache.thrift.TException;

/**
 * {这里添加描述}
 *
 * @author chengyan
 * @date 2021-05-06 11:51 上午
 */
public class QueryServiceImpl implements QueryService.Iface {

    @Override
    public QueryResult query(int code) throws TException {
        QueryResult result = new QueryResult();
        if (code == 1) {
            result.code = 1;
            result.msg = "success";
        } else {
            result.code = 0;
            result.msg = "fail";
        }
        return result;
    }
}
同样地,QueryServiceImpl是我们自己编写的类,它实现了QueryService.Iface,在对应的方法中编写我们自己的业务逻辑,而QueryService.Iface是由thrift生成的类。
客户端与服务端
接下来就是实现各服务对应的客户端了。
HelloService
server:
package com.attempt.thrift02.server;

import com.attempt.thrift02.gen.service.HelloService;
import com.attempt.thrift02.serviceImpl.HelloServiceImpl;
import org.apache.thrift.server.TServer;
import org.apache.thrift.server.TSimpleServer;
import org.apache.thrift.transport.TServerSocket;
import org.apache.thrift.transport.TServerTransport;

/**
 * {这里添加描述}
 *
 * @author chengyan
 * @date 2021-05-06 11:53 上午
 */
public class HelloServer {

    private static final int SERVER_PORT = 8090;

    public static void main(String[] args) {
        try {
            HelloService.Processor processor = new HelloService.Processor<>(
                new HelloServiceImpl());
            TServerTransport transport = new TServerSocket(SERVER_PORT);
            TServer server = new TSimpleServer(new TServer.Args(transport)
                .processor(processor));
            System.out.println("Starting the simple server...");
            server.serve();
        } catch (Exception e) {
            e.printStackTrace();
        }
    }
}
client:
package com.attempt.thrift02.client;

import com.attempt.thrift02.gen.service.HelloService;
import org.apache.thrift.protocol.TBinaryProtocol;
import org.apache.thrift.protocol.TProtocol;
import org.apache.thrift.transport.TSocket;
import org.apache.thrift.transport.TTransport;

/**
 * {这里添加描述}
 *
 * @author chengyan
 * @date 2021-05-06 11:52 上午
 */
public class HelloClient {
    private static final int SERVER_PORT = 8090;

    public static void main(String[] args) {
        TTransport transport = null;
        try {
            transport = new TSocket("localhost", SERVER_PORT);
            transport.open();

            TProtocol protocol = new TBinaryProtocol(transport);
            HelloService.Client client = new HelloService.Client(protocol);

            String result = client.hello("thrift world");
            System.out.println("result=" + result);
        } catch (Exception e) {
            e.printStackTrace();
        } finally {
            if(null != transport) {
                transport.close();
            }
        }
    }

}
启动 server:

运行 client:

QueryService
server:
package com.attempt.thrift02.server;

import com.attempt.thrift02.gen.service.QueryService;
import com.attempt.thrift02.serviceImpl.QueryServiceImpl;
import org.apache.thrift.server.TServer;
import org.apache.thrift.server.TSimpleServer;
import org.apache.thrift.transport.TServerSocket;
import org.apache.thrift.transport.TServerTransport;

/**
 * {这里添加描述}
 *
 * @author chengyan
 * @date 2021-05-06 11:53 上午
 */
public class QueryServer {
    private static final int SERVER_PORT = 8091;

    public static void main(String[] args) {
        try {
            QueryService.Processor processor = new QueryService.Processor<>(
                new QueryServiceImpl());
            TServerTransport transport = new TServerSocket(SERVER_PORT);
            TServer server = new TSimpleServer(new TServer.Args(transport)
                .processor(processor));
            System.out.println("Starting the simple server...");
            server.serve();
        } catch (Exception e) {
            e.printStackTrace();
        }
    }
}
client:
package com.attempt.thrift02.client;

import com.attempt.thrift02.gen.service.QueryService;
import com.attempt.thrift02.gen.vo.QueryResult;
import org.apache.thrift.protocol.TBinaryProtocol;
import org.apache.thrift.protocol.TProtocol;
import org.apache.thrift.transport.TSocket;
import org.apache.thrift.transport.TTransport;

/**
 * {这里添加描述}
 *
 * @author chengyan
 * @date 2021-05-06 11:53 上午
 */
public class QueryClient {
    private static final int SERVER_PORT = 8091;

    public static void main(String[] args) {
        TTransport transport = null;
        try {
            transport = new TSocket("localhost", SERVER_PORT);
            transport.open();

            TProtocol protocol = new TBinaryProtocol(transport);
            QueryService.Client client = new QueryService.Client(protocol);

            QueryResult result = client.query(1);
            System.out.println("query result=" + result);
        } catch (Exception e) {
            e.printStackTrace();
        } finally {
            if(null != transport) {
                transport.close();
            }
        }
    }
}
启动 server:

运行 client:

复合服务
以上同一个项目中有两个thrift服务,我们是开两个端口对外提供服务,在实际生产环境,thrift服务可能会更多,这种时候我们能不能只开一个jvm进程来处理呢?thrift 提供了TMultiplexedProcessor来解决这个问题,使用方法如下:
server:
package com.attempt.thrift02.server;

import com.attempt.thrift02.gen.service.HelloService;
import com.attempt.thrift02.gen.service.QueryService;
import com.attempt.thrift02.serviceImpl.HelloServiceImpl;
import com.attempt.thrift02.serviceImpl.QueryServiceImpl;
import org.apache.thrift.TMultiplexedProcessor;
import org.apache.thrift.TProcessor;
import org.apache.thrift.server.THsHaServer;
import org.apache.thrift.server.TNonblockingServer;
import org.apache.thrift.server.TServer;
import org.apache.thrift.server.TSimpleServer;
import org.apache.thrift.server.TThreadPoolServer;
import org.apache.thrift.transport.TNonblockingServerSocket;
import org.apache.thrift.transport.TServerSocket;
import org.apache.thrift.transport.TServerTransport;
import org.apache.thrift.transport.TTransportException;

/**
 * {这里添加描述}
 *
 * @author chengyan
 * @date 2021-05-06 12:45 下午
 */
public class MultipleServer {

    private static final int SERVER_PORT = 8093;

    public static void main(String[] args) {
        try {
            TMultiplexedProcessor processor = new TMultiplexedProcessor();
            // 注册 helloService
            processor.registerProcessor("helloService",
                    new HelloService.Processor<>(new HelloServiceImpl()));
            // 注册 queryService
            processor.registerProcessor("queryService",
                    new QueryService.Processor<>(new QueryServiceImpl()));
            TServer server = getSimpleServer(SERVER_PORT, processor);
            System.out.println("Starting the simple server...");
            server.serve();
        } catch (Exception e) {
            e.printStackTrace();
        }
    }

    /** 简单的单线程服务模型,一般用于测试 */
    public static TServer getSimpleServer(int port, TProcessor processor)
            throws TTransportException {
        TServerTransport transport = new TServerSocket(port);
        TServer server = new TSimpleServer(new TServer.Args(transport)
            .processor(processor));
        return server;
    }

}
client:
服务端使用了TMultiplexedProcessor,客户端也需要使用:
package com.attempt.thrift02.client;

import com.attempt.thrift02.gen.service.HelloService;
import com.attempt.thrift02.gen.service.QueryService;
import org.apache.thrift.TException;
import org.apache.thrift.protocol.TBinaryProtocol;
import org.apache.thrift.protocol.TMultiplexedProtocol;
import org.apache.thrift.protocol.TProtocol;
import org.apache.thrift.transport.TSocket;
import org.apache.thrift.transport.TTransport;

/**
 * {这里添加描述}
 *
 * @author chengyan
 * @date 2021-05-06 12:46 下午
 */
public class MultipleClient {
    private static final int SERVER_PORT = 8093;
    public static void main(String[] args) {
        TTransport transport = null;
        try {
            transport = new TSocket("localhost", SERVER_PORT);
            transport.open();
            TProtocol protocol = new TBinaryProtocol(transport);

            // helloService
            TMultiplexedProtocol helloService = new TMultiplexedProtocol(
                    protocol, "helloService");
            HelloService.Client client = new HelloService.Client(helloService);
            System.out.println(client.hello("thrift world"));

            // queryService
            TMultiplexedProtocol helloProtocol = new TMultiplexedProtocol(
                    protocol, "queryService");
            QueryService.Client queryClient = new QueryService.Client(helloProtocol);
            System.out.println(queryClient.query(1));

        } catch (TException e) {
            e.printStackTrace();
        } finally {
            transport.close();
        }
    }
}
启动 server:

启动 client:

关于 thrift 的使用介绍就到这里了,下篇我们来分析源码的实现。
参考:
Apache Thrift系列详解(一) - 概述与入门:https://juejin.cn/post/6844903622380093447
限于作者个人水平,文中难免有错误之处,欢迎指正!原创不易,商业转载请联系作者获得授权,非商业转载请注明出处。
本文首发于微信公众号 「Java技术探秘」,如果您喜欢本文,欢迎关注该公众号,让我们一起在技术的世界里探秘吧!
