spring下的多数据源,读写分离经典案例

spring mybtis 下的多数据源
最近在项目中遇到了需要读写分离的需求优化,在此正好记录一下这次实现的过程及遇到的问题和自己的一些扩展(机智如我)。实现的方式就是一些公共的方案:
1 继承AbstractRoutingDataSource 重写 determineCurrentLookupKey 方法
2 使用 自定义注解 aop 的方式切换数据源
使用上述方法基本上可以完成多数据源的读写分离了,那还等什么?
1 自定义动态数据源
public class RoutingDataSource extends AbstractRoutingDataSource {

  public RoutingDataSource(DataSource master,DataSource slave) {
    setTargetDataSources(ImmutableMap.builder().put("master",master).put("slave",slave).build());
  }
  @Override
  protected Object determineCurrentLookupKey() {
    return DataSourceContextHolder.getDataSourceKey();
  }
}
交给 spring 管理
@Configuration
public class DataSourceConfig {

  @Autowired
  private Props props;
  @Primary
  @Bean("master")
  DataSource masterDataSource() {
    return dataSource(props.getMasterUrl(),props.getMasterUsername(),props.getMasterPassword());
  }

  @Bean("slave")
  DataSource slaveDataSource() {
    return dataSource(props.getSlaveUrl(),props.getSlaveUsername(),props.getSlavePassword());
  }

  private DataSource dataSource(String url, String user, String pwd) {
    BasicDataSource basicDataSource = new BasicDataSource();
    basicDataSource.setUrl(url);
    basicDataSource.setUsername(user);
    basicDataSource.setPassword(pwd);
    basicDataSource.setMaxTotal(24); // 最好不要超过cpu个数
    basicDataSource.setMaxIdle(5); // 连接池最大空闲数
    basicDataSource.setMinIdle(3); // 连接池最小空闲数
    basicDataSource.setInitialSize(10); // 初始化连接池时的连接数
    basicDataSource.setMaxConnLifetimeMillis(60000);
    basicDataSource.setRemoveAbandonedTimeout(30);
    return basicDataSource;
    }
  //分布式事务 XA
//  @Primary
//  @Bean("master")
//  DataSource masterDataSource() {
//    return atomicDataSource(props.getMasterUrl(),props.getMasterUsername(),props.getMasterPassword(),"master");
//  }
//  @Bean("slave")
//  DataSource slaveDataSource() {
//    return atomicDataSource(props.getSlaveUrl(),props.getSlaveUsername(),props.getSlavePassword(),"slave");
//  }
//  private AtomikosDataSourceBean atomicDataSource(String url, String user, String pwd,String name) {
//    AtomikosDataSourceBean atomikosDataSourceBean = new AtomikosDataSourceBean();
//    atomikosDataSourceBean.setUniqueResourceName(name);
//    atomikosDataSourceBean.setXaDataSourceClassName(
//        "com.mysql.cj.jdbc.MysqlXADataSource");
//    Properties properties = new Properties();
//    properties.put("URL",url);
//    properties.put("user", user);
//    properties.put("password", pwd);
//    atomikosDataSourceBean.setXaProperties(properties);
//    return atomikosDataSourceBean;
//  }
//动态数据源
  @Bean("dataSource")
  public RoutingDataSource dataSource(@Qualifier("master") DataSource master,@Qualifier("slave") DataSource slave) {
//    return new RoutingDataSource(dataSource(props.getMasterUrl(),props.getMasterUsername(),props.getMasterPassword()),dataSource(props.getSlaveUrl(),props.getSlaveUsername(),props.getSlavePassword()));
    return new RoutingDataSource(master,slave);
  }
  //定义mybatis的动态session
  @Bean
  SqlSessionFactory sqlSessionFactory(@Qualifier("dataSource") RoutingDataSource dataSource) {
    SqlSessionFactory sessionFactory = null;
    try {
      SqlSessionFactoryBean bean = new SqlSessionFactoryBean();
      bean.setDataSource(dataSource);
      sessionFactory = bean.getObject();
    } catch (Exception e) {
      e.printStackTrace();
    }
    return sessionFactory;
  }
可以看到先定义两个数据源 master 数据源和 slave 数据源
2 自定义注解
@Target({ElementType.METHOD})
@Retention(RetentionPolicy.RUNTIME)
@Documented
public @interface TargetDataSource {
  String value() default "master";
}
自定义注解大家应该都会,这里代码就像上边一样不做过多的解释了,自定义注解不知道的赶紧自己去百度!!!
3 aop 这次切换数据源不仅用到了aop的切面编程,还用到了ThreadLocal用来保存现在使用的是什么数据库
public class DataSourceContextHolder {
  private static final ThreadLocal<String> contextHolder = ThreadLocal.withInitial(() -> "master");

  public static void setDataSourceKey(String key) {
    contextHolder.set(key);
  }

  public static String getDataSourceKey() {
    return contextHolder.get();
  }

  public static void clearDataSourceKey() {
    contextHolder.remove();
  }
}
定义一个 holder用于存放当前线程的数据库名称,接下来就是定义切面了。
@Aspect
@Component
public class DataSourceAspect {
  private final Logger logger = LoggerFactory.getLogger(getClass());

  private static final List<String> DATA_SOURCE_KEYS = Arrays.asList("master", "slave");


  @Before("@annotation(targetDataSource)")
  public void switchDataSource(JoinPoint joinPoint,TargetDataSource targetDataSource){
    if (!DATA_SOURCE_KEYS.contains(targetDataSource.value())) {
      logger.error(
          "datasource [{}] doesn't exist, use default datasource [{}]", targetDataSource.value());
    } else {
      DataSourceContextHolder.setDataSourceKey(targetDataSource.value());
      logger.info(
          "switch datasource to [{}] in method [{}]",
          DataSourceContextHolder.getDataSourceKey(),
          joinPoint.getSignature());
    }
  }

  @After("@annotation(targetDataSource))")
  public void restoreDataSource(JoinPoint point, TargetDataSource targetDataSource) {
    DataSourceContextHolder.clearDataSourceKey();
    logger.info(
        "restore datasource to [{}] in method [{}]",
        DataSourceContextHolder.getDataSourceKey(),
        point.getSignature());
  }
}
这里主要是切面那个注解,来实现将要使用的数据库放入 threadLocal,来实现在 RoutingDataSource 切换数据源
用法示例:
 @TargetDataSource("master")
//  @Transactional
  public String getNickName(){
//    String title = getLiveTitle();
    System.out.println(title);
    return  userMapper.getUserNameById(2022L);
  }
  @TargetDataSource("slave")
  public String getLiveTitle(){
    return liveMapper.getLiveName("83a09baea4c7");
  }
用法就如上述代码一样这样就可以愉快的切换数据源了。但是aop也是有一些问题的,比如像下面这样的代码就会出问题,其实是动态代理的问题就是动态代理不能代理到同一个类中方法的嵌套方法,说的有点不明白看一下下面的代码就知道了。
 @Service

public class TestService {

  @Autowired
  private UserMapper userMapper;
  @Autowired
  private LiveMapper liveMapper;
  @Autowired
  private LiveUserMapper liveUserMapper;

  @Autowired
  private Test3Service test3Service;
  @TargetDataSource("master")
//  @Transactional
  public String getNickName(){
    String title = getLiveTitle();
    System.out.println(title);
    return  userMapper.getUserNameById(2022L);
  }
  public String getSalveTest(){
    return  getLiveTitle();
  }
看完上述代码大家有没有什么想法或者解决办法呢?动态代理使用不当就会出现这种问题,给大家30秒考虑一下,到底怎么办呢。。。
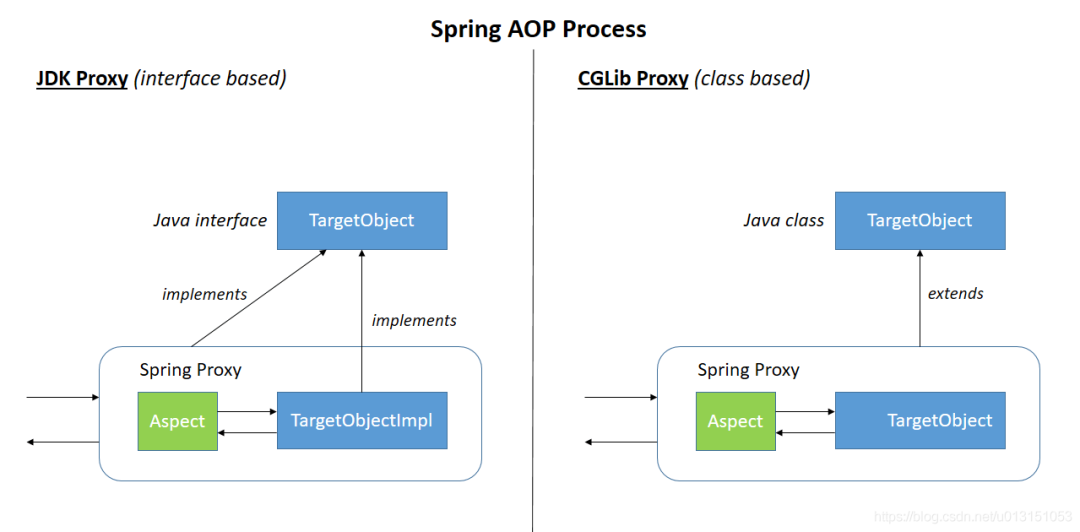
问题的原因,在调用 getNickName()方法的时候,spring 会为 TestService 生成一个代理类,在代理类中先执行切面中的业务,如我们的切换数据源,之后是 this 执行 getNickName,就是真实的类去调用的 getNickName 和然后调用他内部的 getLiveTitle() 方法,getLiveTitle 不是代理类调用的就不会有切换数据源的一些操作,所以就会报错切换不了数据源。只要是 aop 都避免不了上述的问题

那问题来了,咋办啊??我需要这种方式的调用 那怎么解决呢!
解决办法就是如下
@Service
@EnableAspectJAutoProxy(proxyTargetClass = true, exposeProxy = true)
public class TestService {
在类上增加 @EnableAspectJAutoProxy(proxyTargetClass = true, exposeProxy = true)这个开关之后 在方法中
public void insert(){
    TestService currentclass= (TestService ) AopContext.currentProxy();
    currentclass.insertLive();
    currentclass.insertUser();
  }
看代码其实不难理解就是获取到代理类通过代理类调用这些内部方法就可以了
以上的方式实现读写分离已经可以了,但是如果我们不是实现读写分离是真的多数据源怎么办呢?上述的方法还是可以用的吗 其实如果大部分情况还是可以的,但是如果引入了事务就会出现问题啦,出现加入事务的时候不能再愉快的切换数据源了。
我草 那怎么办啊 别急欢迎大家看我的下一章 spring mybatis 多数据源开启事务,数据源不能切换的解决办法及源码分析
哈哈哈以上就是我分享的内容,如果有什么讲的不对的地方,及时给我留言我立刻改正,要是误导了其他的正在学的小朋友,那老夫就罪孽深重了哈哈哈哈哈哈!!!
