自适配日历组件开发
作者:JYeontu
来源:SegmentFault 思否社区
自适配日历组件开发
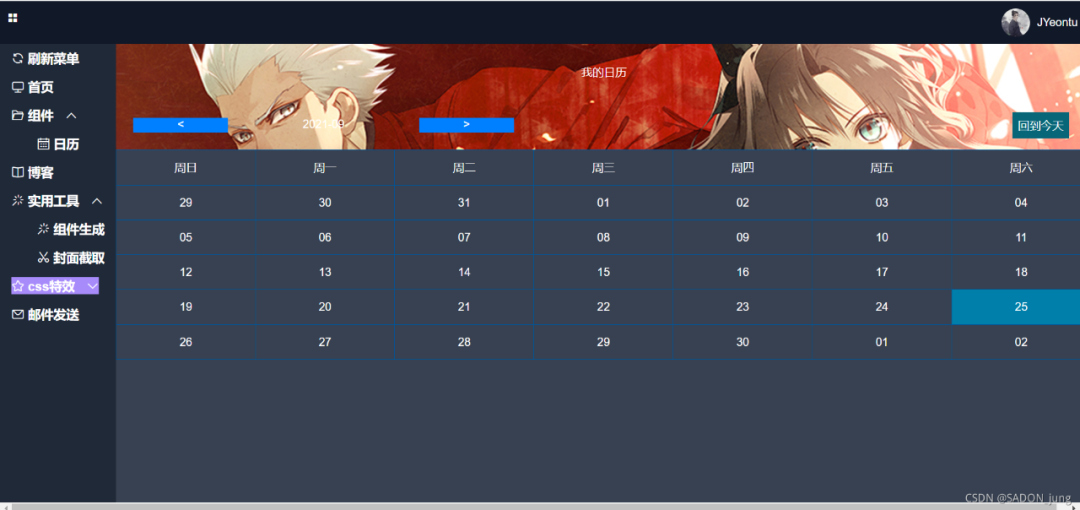
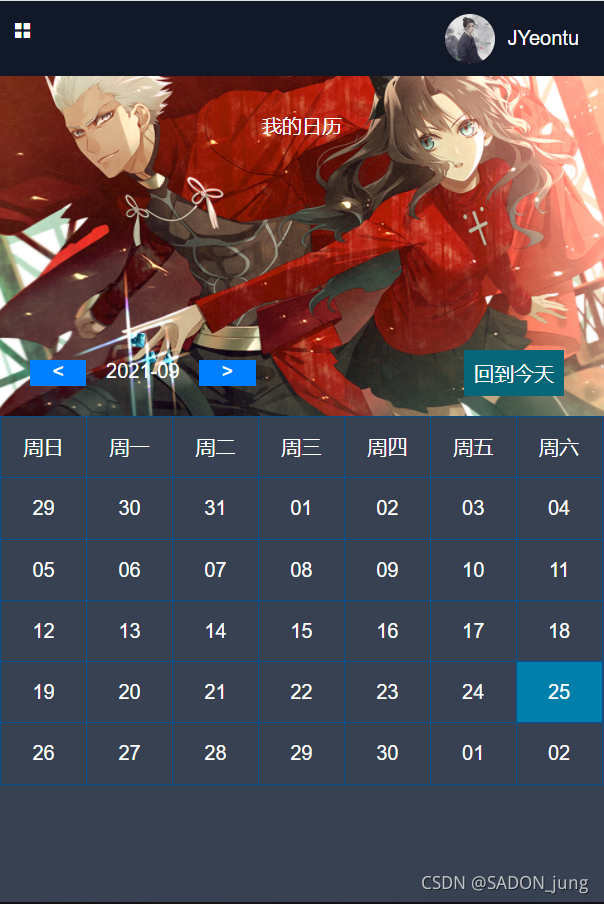
效果图
PC端

移动端

预览
预览地址:http://jdhnv787.xyz/JYeontu/#/components/calendar
1、传入参数
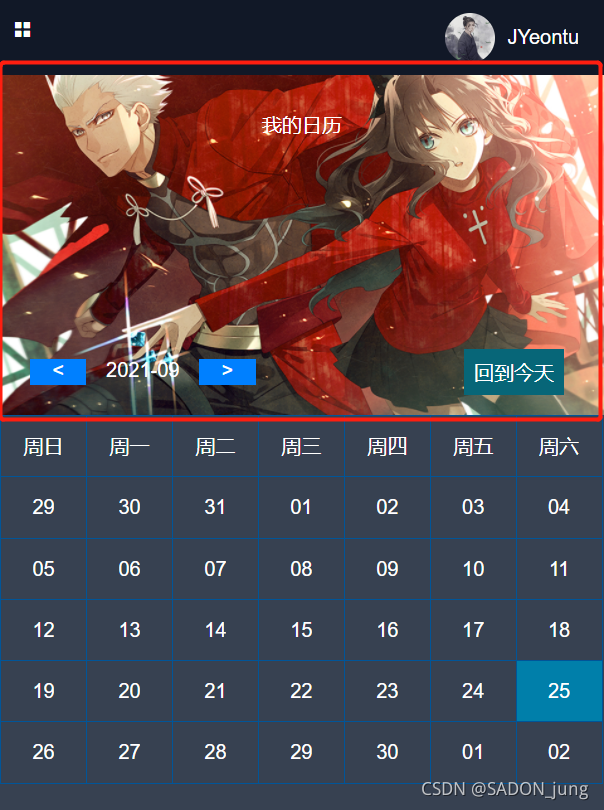
1.1、顶部背景图片

如上图红圈区域的照片背景设置
在组件参数中定义
bgSrc: {
    type: String,
        default: 'https://images8.alphacoders.com/992/992329.jpg'
}
1.2、日历标题

如上图圈住区域文字设置
在组件参数中定义
title: {
    type: String,
    default: '日历'
}
2、回调方法
2.1、选中日期
使用this.$emit()向父组件传递数据。
在组件日期点击事件中执行。
clickDay (day) {
    this.selectDay = day
    this.$emit('selectDay', day)
}
2.2、切换月份
使用this.$emit()向父组件传递数据。
在组件日期点击事件中执行。
//上个月
toPreMonth () {
    let year = this.selectMonth.split('-')[0]
    let month = this.selectMonth.split('-')[1]
    month = parseInt(month) - 1
    if (month === 0) {
        month = 12
        year = parseInt(year) - 1
    }
    this.days = this.fillDays(year, month)
    this.$emit('changeMonth', year + '-' + this.zero(month))
},
//下个月
toNextMonth () {
    let year = this.selectMonth.split('-')[0]
    let month = this.selectMonth.split('-')[1]
    month = parseInt(month) + 1
    if (month === 13) {
        month = 1
        year = parseInt(year) + 1
    }
    this.days = this.fillDays(year, month)
    this.$emit('changeMonth', year + '-' + this.zero(month))
}
3、组件js模块开发流程
3.1、月份天数确认
3.1.1、判断润年
/**
 * 判断润年
 * @param {string} year 需要判断的年份
 * @return {Boolean}
 */
function isLeap(year) {
    if((year%4==0 && year%100!=0)||(year%400==0)){
        return true;
    }
    return false;
}
3.1.2、获取月份天数
/**
 * 获取月份天数
 * @param {string} year  年份
 * @param {string} month 月份
 * @return {string}
 */
function getMonthDays(year,month) {
    month = parseInt(month) - 1;
    if(month < 0 || month > 11) return ''
    let months = [31,28,31,30,31,30,31,31,30,31,30,31];
    if(isLeap(year)){
        months[1] = 29;
    }
    return months[month];
}
3.1.3、获取星期
/**
 * 获取星期
 * @param {string} date 需要获取星期的日期
 * @return {string}
 */
function getWeek(date){
    let weeks = new Array("日","一","二","三","四","五","六");
    let Stamp = new Date(date);
    console.log(weeks[Stamp.getDay()])
}
3.1.4、补充满天数
/**
 * 补零
 * @param {string} str 需要补零的数
 * @return {string}
 */
function zero(str){
    return str > 9 ? str : '0' + str;
}
/**
 * 补充满天数
 * @param {string} year  年份
 * @param {string} month 月份
 * @return {string}
 */
function fillDays(year,month) {
    const months = getMonthDays(year,month);
    const startWeek = getWeek(year + '-' + month + '-' + '01');
    const endWeek = getWeek(year + '-' + month + '-' + months);

    year = parseInt(year);
    month = parseInt(month);

    let preYear = year;
    let preMonth = month - 1;
    if(preMonth == 0){
        preMonth = 12;
        preYear = year - 1;
    }
    const preMonths = getMonthDays(preYear,preMonth);

    let nextYear = year;
    let nextMonth = month + 1;
    if(nextMonth == 13){
        nextMonth = 1;
        nextYear = year + 1;
    }
    const nextMonths = getMonthDays(nextYear,nextMonth);

    let days = [];
    for(let i = 0; i < startWeek; i++){
        days.unshift(preYear + '-' + preMonth + '-' + (preMonths - i));
    }
    for(let i = 1; i <= months; i++){
        days.push(year + '-' + zero(month) + '-' + zero(i));
    }
    for(let i = 0; i < (6 - endWeek); i++){
        days.push(nextYear + '-' + nextMonth + '-0' + (i + 1));
    }
    return days;
}
3.2、点击事件
3.2.1、月份切换
toPreMonth () {
    let year = this.selectMonth.split('-')[0]
    let month = this.selectMonth.split('-')[1]
    month = parseInt(month) - 1
    if (month === 0) {
        month = 12
        year = parseInt(year) - 1
    }
    this.days = this.fillDays(year, month)
    this.$emit('changeMonth', year + '-' + this.zero(month))
},
toNextMonth () {
    let year = this.selectMonth.split('-')[0]
    let month = this.selectMonth.split('-')[1]
    month = parseInt(month) + 1
    if (month === 13) {
        month = 1
        year = parseInt(year) + 1
    }
    this.days = this.fillDays(year, month)
    this.$emit('changeMonth', year + '-' + this.zero(month))
}
3.2.2、日期点击
clickDay (day) {
    this.selectDay = day
    this.$emit('selectDay', day)
}
4、html模块
<template>
    <div>
        <div id="header" class="header">
            <div class="header-title">{{title}}</div>
            <div class="btn-list">
        <div class="btn-list-left">
          <div class="btn-pre" @click="toPreMonth()"><</div>
          <div class="select-month">{{selectMonth}}</div>
          <div class="btn-next" @click="toNextMonth()">></div>
        </div>
                <div class="btn-today" @click="toNowDay()">回到今天</div>
            </div>
        </div>
        <div class="content" id="content">
          <div class="calendar-content">
             <div class="grid-week grid" v-for="(item,index) in weeks" :key="index">
                 周{{item}}
             </div>
             <div @click="clickDay(item)"
                  class="grid-day grid"
                  :class="{'selected': item == selectDay}"
                  v-for="(item,index) in days"
                  :key="index">
                 {{item.split('-')[2]}}
             </div>
          </div>
        </div>
    </div>
</template>
5、CSS样式
<style lang="scss" scoped>
  @media screen and (max-width:500px) {
    .header{
      height: calc(100vw * 9 / 16);
    }
  }
  .header{
    display: flex;
    flex-direction: column;
    .header-title{
      line-height: 5rem;
    }
    .btn-list{
      display: flex;
      padding: 1rem;
      margin-top: auto;
      .btn-list-left{
        padding: 0.5rem;
        width: 40%;
        display: flex;
        .select-month{
          flex: 2;
        }
        .btn-pre{
          flex: 1;
          background-color: #0080FF;
        }
        .btn-next{
          flex: 1;
          background-color: #0080FF;
        }
      }
      .btn-today{
        padding: 0.5rem;
        margin-left: auto;
        margin-right: 1rem;
        background-color: #076678;
        color: white;
      }
    }
  }
    .calendar-content{
        display: flex;
        flex-wrap: wrap;
        width: 100%;
    .selected{
      background-color: #007FAA;
    }
    .grid{
      width: calc((100% - 9px)/7);
      height: 3rem;
      line-height: 3rem;
      border-left: #005599 solid 1px;
      border-bottom: #005599 solid 1px;
    }
    .grid-week{
      border-top: #005599 solid 1px;
    }
    .grid-week:nth-child(7){
      border-right: #005599 solid 1px;
    }
    .grid-day:nth-child(14){
      border-right: #005599 solid 1px;
    }
    .grid-day:nth-child(21){
      border-right: #005599 solid 1px;
    }
    .grid-day:nth-child(28){
      border-right: #005599 solid 1px;
    }
    .grid-day:nth-child(35){
      border-right: #005599 solid 1px;
    }
    .grid-day:nth-child(42){
      border-right: #005599 solid 1px;
    }
    }
</style>
源码地址
Gitee:
https://gitee.com/zheng_yongtao/jyeontu-component-warehouse/tree/master/components
点击左下角阅读原文,到 SegmentFault 思否社区 和文章作者展开更多互动和交流,扫描下方”二维码“或在“公众号后台“回复“ 入群 ”即可加入我们的技术交流群,收获更多的技术文章~
- END -

评论
