
C#集成ViewFaceCore人脸检测识别库
1前言
人脸检测与识别现在已经很成熟了,C# 上有 ViewFaceCore 这个很方便的库,但这种涉及到 native 调用的库,一般会有一些坑,本文记录一下开发和部署的过程。
本文的项目是 AIHub ,关于本项目的开发过程,可以参考之前的文章:项目完成小结:使用Blazor和gRPC开发大模型客户端
而且经过最近一个月的工作,我把这个项目重构了一遍,界面换成了 Ant Design ,增加了很多功能,更多的我会在后续的博客文章中分享。
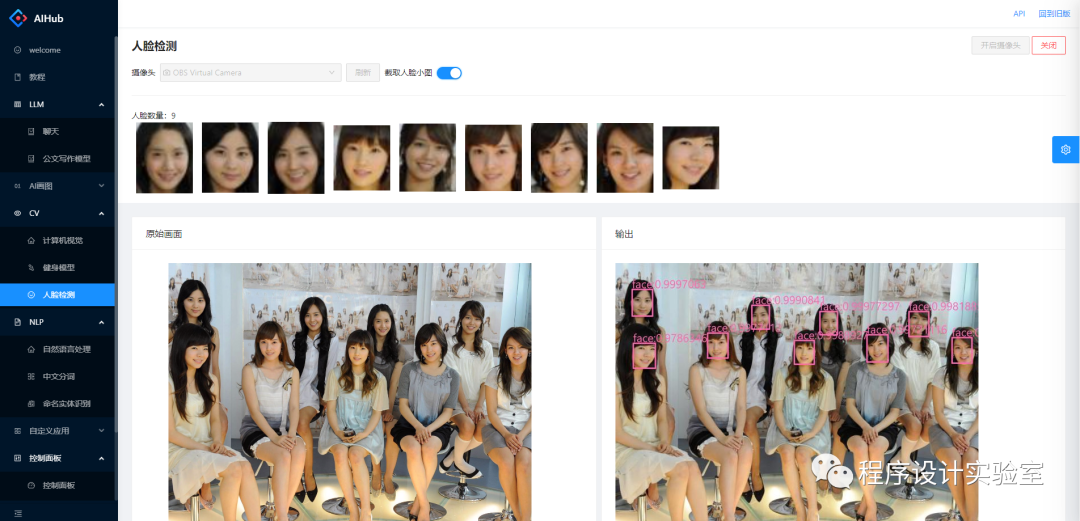
2先看效果
多目标检测,我一下就想到了以前读书时很火的「少女时代」
3ViewFaceCore简介
这是一个基于 SeetaFace6 的 .NET 人脸识别解决方案
SeetaFace6是中科视拓最新开源的商业正式版本。突破了之前社区版和企业版版本不同步发布的情况,这次开源的v6版本正式与商用版本同步。
主要做了对 SeetaFace6 的 .Net 封装。
支持以下功能:
-
年龄预测
-
眼睛状态检测
-
性别预测
-
人脸检测
-
口罩检测 / 戴口罩关键定定位,5个关键点
-
人脸关键定定位 (5点 / 68点)
-
人脸识别 (5点 / 68点)
-
活体检测
-
姿态检测
-
质量检测
在 C# 中使用非常简单,不过因为是调用了C++的库,所以部署的时候会有点小坑,本文记录了这些小坑和解决方案。
4添加依赖
先添加以下依赖
<PackageReference Include="ViewFaceCore" Version="0.3.8" />
<PackageReference Include="ViewFaceCore.all_models" Version="6.0.7" />
<PackageReference Include="ViewFaceCore.Extension.ImageSharp" Version="0.3.7" />
<PackageReference Include="ViewFaceCore.runtime.ubuntu.20.04.x64" Version="6.0.7" />
<PackageReference Include="ViewFaceCore.runtime.win.x64" Version="6.0.7" />
以 ViewFaceCore.runtime. 开头的运行时,需要根据开发和部署的环境来安装,我这里安装了 Windows 版和 Linux 版本。
注意 Linux 版本还依赖 libgomp1 这个库,如果使用的时候报错,需要先安装。
5人脸检测
很简单,先创建个 FaceDetector 对象。
因为这个模型是调用了非托管资源,所以要记得使用 using 或者手动调用 Dispose 方法释放资源。
using FaceDetector _faceDetector = new();
然后传入图片对象就可以进行检测了,如果检测到人脸,会返回人脸框的四个坐标。
支持三种图片库:
-
SkiaSharp
-
ImageSharp
-
System.Drawing
第三个是微软官方的,据说要 Obsolete 了,所以我一般用 ImageSharp ,纯 C# 实现,跨平台也好用。
需要安装 ViewFaceCore.Extension.ImageSharp 依赖以支持 ImageSharp 图片。
简单例子
先来一个最简单的例子,检测人脸,并把人脸框出来。
public async Task<byte[]> DrawFaceFrame(byte[] imageBuffer, string format = "jpg") {
  using var inputStream = new MemoryStream(imageBuffer);
  using var image = await Image.LoadAsync(inputStream);
  var faceInfos = await _faceDetector.DetectAsync(image);
  foreach (var face in faceInfos) {
    image.Mutate(x => {
      x.Draw(
        Color.HotPink, 2.5f,
        new RectangleF(face.Location.X, face.Location.Y, face.Location.Width, face.Location.Height)
      );
    });
  }

  using var outputStream = new MemoryStream();
  await image.SaveAsync(outputStream, image.DetectEncoder($"demo.{format}"));
  return outputStream.ToArray();
}
以上代码实现了传入 byte[] 类型的图片流,然后输出画了人脸框的图片,同样是 byte[] 类型。
非常滴简单,不过 ImageSharp 的文档太少了,还是得探索一下才知道咋画方框。
完整用法
以前文「先看效果」为例,先定义一下数据结构
public class FaceItem {
  public FaceInfo FaceInfo { get; set; }
  public FaceMarkPoint[] FaceMarkPoints { get; set; }
  public float[]? FaceFeatures { get; set; }
  public byte[]? ImageBuffer { get; set; }
}

public class FaceDetectResult {
  public List<FaceItem> FaceItems { get; set; }
  public byte[] ImageBuffer { get; set; }
}
需要使用 ViewFaceCore 里的三个对象
// 人脸检测
private readonly FaceDetector _faceDetector = new();

// 人脸标记点位
private readonly FaceLandmarker _faceMark = new();

// 人脸识别
private readonly FaceRecognizer _faceRecognizer = new();
关键代码
PS:代码写得很粗糙,性能一般般,只是凑合能用
/// <summary>
/// 人脸检测
/// </summary>
/// <param name="extractFeatures">是否提取人脸特征</param>
/// <param name="cropEveryFace">是否裁剪每个人脸小图</param>
/// <returns></returns>
public async Task<FaceDetectResult> Detect(
  byte[] imageBuffer, string format = "jpg",
  bool extractFeatures = false, bool cropEveryFace = false
) {
  var font = GetFont("segoeui.ttf");

  using var inputStream = new MemoryStream(imageBuffer);
  using var image = await Image.LoadAsync<Rgba32>(inputStream);
  using var resultImage = image.Clone();

  var result = new FaceDetectResult { FaceItems = new List<FaceItem>() };
  var faceInfos = await _faceDetector.DetectAsync(image);

  foreach (var face in faceInfos) {
    var faceItem = new FaceItem {
      FaceInfo = face,
      FaceMarkPoints = await _faceMark.MarkAsync(image, face)
    };

    // 提取人脸特征
    if (extractFeatures) {
      faceItem.FaceFeatures = await _faceRecognizer.ExtractAsync(image, faceItem.FaceMarkPoints);
    }

    // 裁剪人脸小图
    if (cropEveryFace) {
      using var faceImage = image.Clone();
      var cropRect = GetCropRect(face, 5);
      try {
        faceImage.Mutate(x => x.Crop(cropRect));
      }
      catch (ArgumentException ex) {
        faceImage.Mutate(x => x.Crop(GetCropRect(face, 0)));
      }

      using (var faceImageStream = new MemoryStream()) {
        await faceImage.SaveAsync(faceImageStream, faceImage.DetectEncoder($"demo.{format}"));
        faceItem.ImageBuffer = faceImageStream.ToArray();
      }
    }

    result.FaceItems.Add(faceItem);

    // 画人脸框
    resultImage.Mutate(x => {
      x.Draw(
        Color.HotPink, 2.5f,
        new RectangleF(face.Location.X, face.Location.Y, face.Location.Width, face.Location.Height)
      );
      x.DrawText(
        $"face:{face.Score}", font, Color.HotPink,
        new PointF(face.Location.X, face.Location.Y - 20)
      );
    });
  }

  using var outputStream = new MemoryStream();
  await resultImage.SaveAsync(outputStream, resultImage.DetectEncoder($"demo.{format}"));
  result.ImageBuffer = outputStream.ToArray();

  return result;
}
字体和生成矩形的代码
ImageSharp 的文档非常缺乏,每一步都需要经过大量的搜索……
private Font GetFont(string fontFileName) {
  var path = !string.IsNullOrWhiteSpace(_pathPrefix) ? Path.Combine(_pathPrefix, fontFileName) : fontFileName;
  FontCollection collection = new();
  FontFamily family = collection.Add(path);
  return family.CreateFont(20, FontStyle.Bold);
}

private static Rectangle GetCropRect(FaceInfo faceInfo, int cropOffset) {
  return new Rectangle(faceInfo.Location.X - cropOffset, faceInfo.Location.Y - cropOffset,
                       faceInfo.Location.Width + cropOffset * 2, faceInfo.Location.Height + cropOffset * 2);
}
6人脸识别
人脸识别的思路:
-
检测到人脸
-
确定人脸关键点位置 (5点/68点)
-
根据关键点提取特征
-
在向量数据库中搜索该特征对应的人
最后一步使用了向量数据库,其实不用也行,人脸特征提取出来是 float[] 类型,理论上保存在任何地方都行,然后识别的时候把人脸特征拿出来与保存的特征库做遍历对比。
FaceRecognizer 对象提供了 Compare 功能,可以计算两个人脸特征的相似度。
这个特征其实是个向量,所以理论上是可以自己用其他算法来计算相似度,比如
基于距离的欧氏距离、曼哈顿距离、
夹角余弦
皮尔逊相关系数
在上面人脸检测的「完整用法」中,已经把检测人脸、关键点位置、特征提取这部分搞定了。
接下来需要做的
-
人脸信息录入,需要传统关系型数据库搭配向量数据库,或者是 PostgreSql 这类支持向量存储的数据库也行
-
人脸信息比对,使用向量数据库的向量搜索功能,或者自行实现向量搜索算法
因为篇幅限制,本文就不展开人脸识别这一块内容了,接下来有时间单独写一篇文章。
7部署
接下来是填坑。
使用 docker 部署应用
本项目使用 .Net Core 7.0 所以对应使用 mcr.microsoft.com/dotnet/aspnet:7.0 基础镜像
这个镜像是基于 Debian11 系统制作
默认没有 libgomp1 这个库,需要自行添加
apt 软件源
首先准备 sources.list 文件,用于修改 apt 仓库为国内源
# 默认注释了源码镜像以提高 apt update 速度,如有需要可自行取消注释
deb https://mirrors.tuna.tsinghua.edu.cn/debian/ bullseye main contrib non-free
# deb-src https://mirrors.tuna.tsinghua.edu.cn/debian/ bullseye main contrib non-free

deb https://mirrors.tuna.tsinghua.edu.cn/debian/ bullseye-updates main contrib non-free
# deb-src https://mirrors.tuna.tsinghua.edu.cn/debian/ bullseye-updates main contrib non-free

deb https://mirrors.tuna.tsinghua.edu.cn/debian/ bullseye-backports main contrib non-free
# deb-src https://mirrors.tuna.tsinghua.edu.cn/debian/ bullseye-backports main contrib non-free

# deb https://mirrors.tuna.tsinghua.edu.cn/debian-security bullseye-security main contrib non-free
# # deb-src https://mirrors.tuna.tsinghua.edu.cn/debian-security bullseye-security main contrib non-free

deb https://security.debian.org/debian-security bullseye-security main contrib non-free
# deb-src https://security.debian.org/debian-security bullseye-security main contrib non-free
dockerfile
在 base 构建阶段,安装 libgomp1 这个库
FROM mcr.microsoft.com/dotnet/aspnet:7.0 AS base
COPY ./sources.list /etc/apt/sources.list
RUN apt update && apt install libgomp1
WORKDIR /app
EXPOSE 80
EXPOSE 443

FROM base AS final
WORKDIR /app
COPY . .
ENTRYPOINT ["./AIHub.Blazor"]
docker-compose.yml
version: '3.6'

services:
  web:
    image: ${DOCKER_REGISTRY-}web
    container_name: aihub
    restart: always
    environment:
      - ASPNETCORE_ENVIRONMENT=Production
      - ASPNETCORE_URLS=http://+:80
    build:
      context: .
    volumes:
      - .:/app
    networks:
      - default
      - swag

networks:
  swag:
    name: swag
    external: true
  default:
    name: aihub
启动!
一切准备就绪。
C#,启动!
docker compose up --build -d
8参考资料
-
https://github.com/ViewFaceCore/ViewFaceCore/
-
https://mirrors.tuna.tsinghua.edu.cn/help/debian/
-
https://stackoverflow.com/questions/70183074/oserror-libgomp-so-1-not-found-when-importing-gluoncv-through-azure-app-service
-
https://docs.sixlabors.com/api/ImageSharp.Drawing/SixLabors.ImageSharp.Drawing.Processing.DrawRectangleExtensions.html