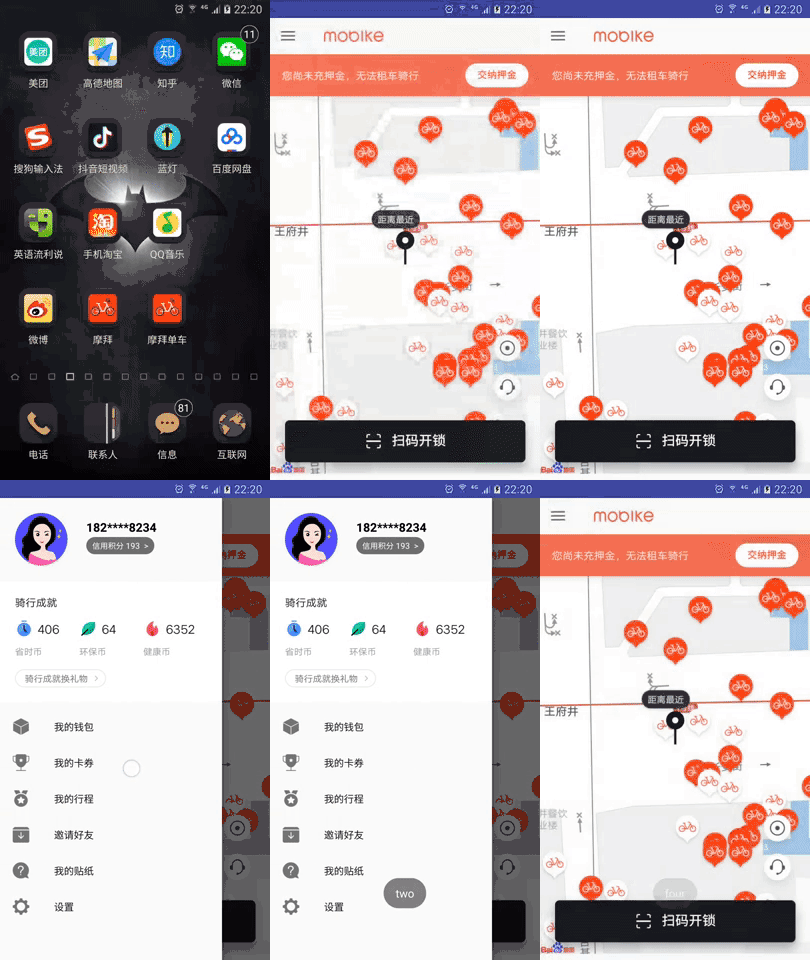
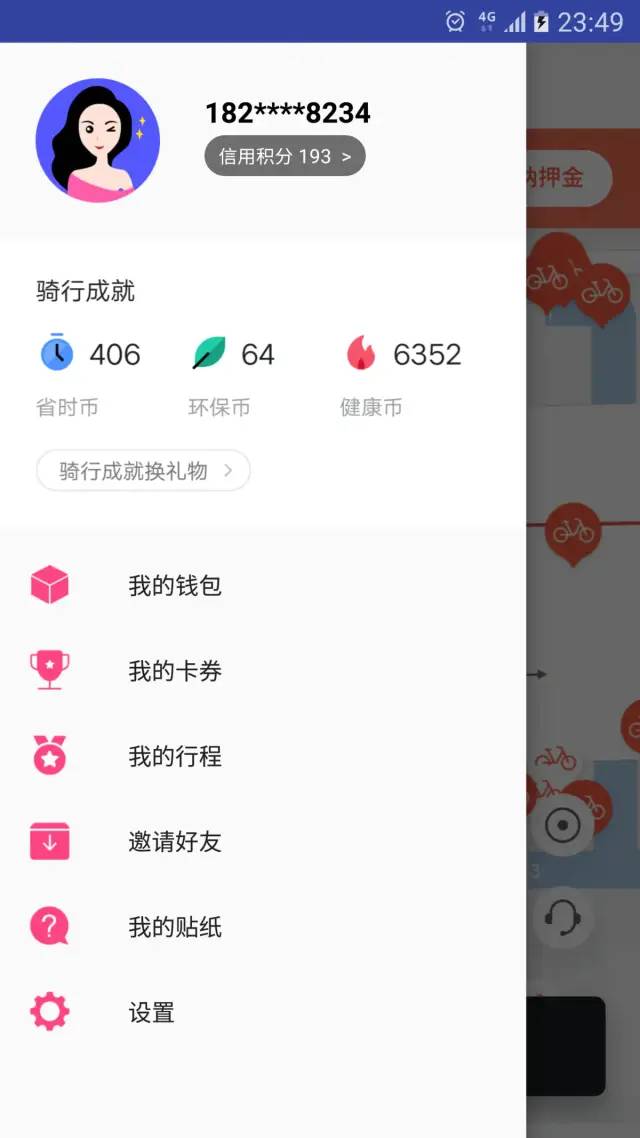
Android仿摩拜单车侧滑菜单
视觉效果:

制作步骤:
1、使用到了NavigationView,来自于design包,需添加依赖:
compile 'com.android.support:design:26.0.0-alpha1'DrawerLayout有两个子view,分别主界面布局和侧滑界面布局:主界面顶部为Toolbar,侧滑界面为NavigationView,需要给NavigationView设置:
android:layout_gravity="start"app:headerLayout="@layout/navigation_header"表示添加侧边头布局app:menu="@menu/navigation_menu"表示添加列表菜单。
android:layout_width="match_parent"android:layout_height="match_parent"xmlns:android="http://schemas.android.com/apk/res/android"xmlns:app="http://schemas.android.com/apk/res-auto">android:layout_width="match_parent"android:layout_height="wrap_content"android:orientation="vertical">android:id="@+id/toolbar"android:layout_width="match_parent"android:layout_height="48dp"xmlns:android="http://schemas.android.com/apk/res/android">android:layout_width="80dp"android:layout_height="16dp"android:background="@mipmap/ic_mobike"/>android:layout_width="match_parent"android:layout_height="wrap_content"android:background="@mipmap/location"/>android:id="@+id/navigationview"android:layout_width="match_parent"android:layout_height="match_parent"android:layout_gravity="start"app:headerLayout="@layout/navigation_header"app:menu="@menu/navigation_menu"/>
3、navigation_header.xml头布局:
xmlns:android="http://schemas.android.com/apk/res/android"android:layout_width="match_parent"android:layout_height="wrap_content"android:orientation="vertical">android:layout_width="match_parent"android:layout_height="wrap_content"android:padding="20dp">android:id="@+id/iv_avator"android:layout_width="wrap_content"android:layout_height="wrap_content"android:layout_marginRight="25dp"android:background="@mipmap/internet_star"/>android:layout_width="wrap_content"android:layout_height="wrap_content"android:textSize="16sp"android:textColor="#000"android:textStyle="bold"android:layout_marginTop="8dp"android:layout_toRightOf="@id/iv_avator"android:text="182****8234"/>android:id="@+id/tv_author"android:layout_width="wrap_content"android:layout_height="23dp"android:layout_marginTop="32dp"android:background="@drawable/btn_halftransparent_roundshape"android:gravity="center"android:layout_toRightOf="@id/iv_avator"android:text="信用积分 193 >"android:textColor="#fff"android:textSize="11sp"/>android:layout_width="match_parent"android:layout_height="wrap_content"android:background="@mipmap/bg_header"android:scaleType="centerCrop"/>
4、创建menu包,menu包下的navigation_menu菜单文件:
android:icon="@mipmap/my_favorites"android:title="我的钱包"/>android:icon="@mipmap/my_competition"android:title="我的卡券"/>android:icon="@mipmap/my_honor"android:title="我的行程"/>android:icon="@mipmap/my_offline_cache"android:title="邀请好友"/>android:icon="@mipmap/my_help_and_feedback"android:title="我的贴纸"/>android:icon="@mipmap/my_set_up"android:title="设置"/>
setSupportActionBar(toolbar)设置toolbar;setHomeButtonEnabled(true)设置是否使用自带返回键;setDisplayHomeAsUpEnabled(true)给左上角图标的左边加上一个返回的图标 ;mDrawerLayout.setDrawerListener(mToggle)给drawerlayout设置开关事件触发。
toolbar = (Toolbar) findViewById(R.id.toolbar);mDrawerLayout = (DrawerLayout) findViewById(R.id.drawerlayout);navigationView = (NavigationView) findViewById(R.id.navigationview);toolbar.setTitle("");setSupportActionBar(toolbar);getSupportActionBar().setHomeButtonEnabled(true);getSupportActionBar().setDisplayHomeAsUpEnabled(true);mToggle = new ActionBarDrawerToggle(this,mDrawerLayout,toolbar,R.string.open,R.string.close){@Overridepublic void onDrawerOpened(View drawerView) {super.onDrawerOpened(drawerView);}@Overridepublic void onDrawerClosed(View drawerView) {super.onDrawerClosed(drawerView);}};mToggle.syncState();mDrawerLayout.setDrawerListener(mToggle);
6、给菜单添加点击事件:
navigationView.setNavigationItemSelectedListener(new NavigationView.OnNavigationItemSelectedListener() {@Overridepublic boolean onNavigationItemSelected(@NonNull MenuItem item) {switch (item.getItemId()){case R.id.one:Toast.makeText(getApplicationContext(),"one",Toast.LENGTH_SHORT).show();break;case R.id.two:Toast.makeText(getApplicationContext(),"two",Toast.LENGTH_SHORT).show();break;case R.id.three:Toast.makeText(getApplicationContext(),"three",Toast.LENGTH_SHORT).show();break;case R.id.four:Toast.makeText(getApplicationContext(),"four",Toast.LENGTH_SHORT).show();break;case R.id.five:Toast.makeText(getApplicationContext(),"five",Toast.LENGTH_SHORT).show();break;case R.id.six:Toast.makeText(getApplicationContext(),"six",Toast.LENGTH_SHORT).show();break;}return true;}});
MainActivity完整代码:
package com.example.drawerlayout;import android.support.annotation.NonNull;import android.support.design.widget.NavigationView;import android.support.v4.widget.DrawerLayout;import android.support.v7.app.ActionBarDrawerToggle;import android.support.v7.app.AppCompatActivity;import android.os.Bundle;import android.support.v7.widget.Toolbar;import android.view.MenuItem;import android.view.View;import android.widget.Toast;public class MainActivity extends AppCompatActivity {private Toolbar toolbar;private ActionBarDrawerToggle mToggle;private DrawerLayout mDrawerLayout;private NavigationView navigationView;@Overrideprotected void onCreate(Bundle savedInstanceState) {super.onCreate(savedInstanceState);setContentView(R.layout.activity_main);init();}private void init() {toolbar = (Toolbar) findViewById(R.id.toolbar);mDrawerLayout = (DrawerLayout) findViewById(R.id.drawerlayout);navigationView = (NavigationView) findViewById(R.id.navigationview);toolbar.setTitle("");setSupportActionBar(toolbar);getSupportActionBar().setHomeButtonEnabled(true);getSupportActionBar().setDisplayHomeAsUpEnabled(true);mToggle = new ActionBarDrawerToggle(this,mDrawerLayout,toolbar,R.string.open,R.string.close){@Overridepublic void onDrawerOpened(View drawerView) {super.onDrawerOpened(drawerView);}@Overridepublic void onDrawerClosed(View drawerView) {super.onDrawerClosed(drawerView);}};mToggle.syncState();mDrawerLayout.setDrawerListener(mToggle);navigationView.setNavigationItemSelectedListener(new NavigationView.OnNavigationItemSelectedListener() {@Overridepublic boolean onNavigationItemSelected(@NonNull MenuItem item) {switch (item.getItemId()){case R.id.one:Toast.makeText(getApplicationContext(),"one",Toast.LENGTH_SHORT).show();break;case R.id.two:Toast.makeText(getApplicationContext(),"two",Toast.LENGTH_SHORT).show();break;case R.id.three:Toast.makeText(getApplicationContext(),"three",Toast.LENGTH_SHORT).show();break;case R.id.four:Toast.makeText(getApplicationContext(),"four",Toast.LENGTH_SHORT).show();break;case R.id.five:Toast.makeText(getApplicationContext(),"five",Toast.LENGTH_SHORT).show();break;case R.id.six:Toast.makeText(getApplicationContext(),"six",Toast.LENGTH_SHORT).show();break;}return true;}});}}
使用技巧:
1、获取头布局控件:
View headerView = navigationView.getHeaderView(0);ImageView ivAvatar = headerView.findViewById(R.id.iv_avator);
app:itemIconTint="@color/blue"
navigationView.setItemIconTintList(null)评论
