Go 使用依赖注入设计更好的代码
点击上方蓝色“Golang来啦”关注我哟
加个“星标”,天天 15 分钟,掌握 Go 语言
via:
https://medium.com/effective-development/building-better-software-in-go-with-di-faf8301a9f84
作者:Sergey Suslov
四哥水平有限,如有翻译或理解错误,烦请帮忙指出,感谢!
原文如下:
在这篇文章中,我将简单介绍下什么是 SOLID 理论、什么是依赖注入(DI)以及如何运用它们去编写更好的代码。我们会演示很多的的代码示例。本文的重点是展示如何使用 DI 和 SOLID 编写更具测试性和高可用的代码。

什么是 SOLID?
SOLID 是 Robert Martin 在他的书中提出的一组原则:
单一职责原则(S)
开闭原则(O)
里氏替换原则(L)
接口分离原则(I)
依赖倒置原则(D)
上面这些原则可以帮助我们编写更好的代码,今天我们只会介绍第一条和最后一条原则。
依赖倒置原则(DIP)
这条原则是说软件模块应该依赖于抽象而不依赖于具体的实现,这样才能设计更具灵活性的系统。
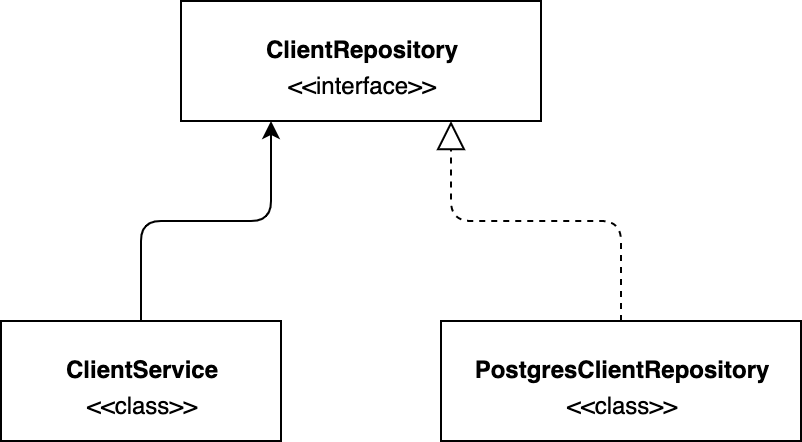
一起来看下下面这个例子:

在这个图上,可以看到有两个类 ClientService 和 PostgresClientRepository。我们假设 ClientService 包含业务逻辑,通过 PostgresClientRepository 类可以操作 PostgreSQL。ClientService 依赖于 PostgresClientRepository。
代码如下:
type PostgresClientRepository struct {
}

func (c PostgresClientRepository) Do() {
   log.Println("Done")
}

type ClientService struct {
   clientRepository PostgresClientRepository
}
上面这种代码设计违背了依赖倒置原则(DIP),因为 ClientService 依赖于具体的实现。这种关系一定程度上限制了我们去修改 PostgresClientRepository 类,降低了代码灵活性。
基于依赖倒置原则(DIP),解决办法如下:

现在,这两个类都依赖于 ClientRepository 接口,ClientService 依赖于稳定的接口 ClientRepository,它可以基于该接口实现自己想要的东西。PostgresClientRepository 也依赖于该接口,并且可以保持其灵活性。
修改之后代码如下:
type ClientRepository interface {
   Do()
}

type PostgresClientRepository struct {
}

func (c PostgresClientRepository) Do() {
   log.Println("Done")
}

type ClientService struct {
   clientRepository ClientRepository
}
单一职责原则(SRP)
这个原则是说一个模块只有一个理由去修改,换句话说,一个模块只需要承担唯一的职责。(ps:各种逻辑处理不能冗杂在一个函数里面,一个函数完成一项功能即可)。
这样做是为了实现:
测试更方便;
减少改动代码之后模块之间相互影响;
让我给你举个例子,这个原则是如何使生活变得更美好的。让我们假设现在有一个接口和它的实现,ClientRepository 是接口,ClientRepositoryImpl是它的实现。
type ClientRepository interface {
   Do()
}

type ClientRepositoryImpl struct {
}

func (c ClientRepositoryImpl) Do() {
   log.Println("Done")
}
现在来看下基于 ClientRepository 及其构造函数提供的服务。
type ClientService struct {
   clientRepository ClientRepository
}

func NewClientService() *ClientService {
   return &ClientService{clientRepository: ClientRepositoryImpl{}}
}
这个构造函数违背了单一职责原则(SRP),它不应该负责创建 ClientRepository。作为 ClientService 的一部分,这个构造函数决定了 ClientRepository 的具体实现。
这非常糟糕,作为开发人员,如果我们想换一种实现方式就必须重写构造函数;另外,在测试的时候也如法模拟 clientRepository。
这个问题的解决办法很明显:
type ClientService struct {
   clientRepository ClientRepository
}

func NewClientService(clientRepository ClientRepository) *ClientService {
   return &ClientService{clientRepository}
}
但是,这个解决办法有个新的问题,想要创建 ClientService,必须自己先创建 ClientRepository 并将其作为参数传递给构造函数。
这就是依赖注入(DI)可以提供极大帮助的地方。
依赖注入机制
依赖注入是一种对象接收其所依赖的对象的技术。
Uber dig 就是一个强大易用的 DI 工具包,并且提供了很多好的示例。
这个包提供了两个主要的函数,第一个就是 Provide,允许我们定义自己的依赖项。
通过 Provide 方法将不同类型的构造函数添加到容器里面。构造函数只需要将其添加为函数参数就可以声明对另一类型的依赖。类型的依赖关系可以在添加类型之前或之后添加到图中。
提供 ClientService
让我们尝试解决上一节中创建 ClientService 遇到的问题。
下面的代码提供 ClientRepositoryImpl 作为 ClientRepository 实现:
type ClientRepository interface {
   Do()
}

type ClientRepositoryImpl struct {
}

func (c ClientRepositoryImpl) Do() {
   log.Println("Done")
}
var C *dig.Container

func main() {
   C = dig.New()
   C.Provide(func() ClientRepository {
      return &ClientRepositoryImpl{}
   })
}
使用 dig 的好处是能自动地为构造函数提供所需要的依赖。在这个例子中,可能像下面这样提供 ClientSevice:
type ClientService struct {
   clientRepository ClientRepository
}

func NewClientService(clientRepository ClientRepository) *ClientService {
   return &ClientService{clientRepository}
}
var C *dig.Container

func main() {
   C = dig.New()
   C.Provide(func() ClientRepository {
      return &ClientRepositoryImpl{}
   })
   C.Provide(NewClientService)
}
从现在开始,就可以在程序的任务位置,像下面这样从 dig 容器中获取 ClientService。
var clientService *ClientService
C.Invoke(func(s *ClientService) {
   clientService = s
})
使用 Dig 的好处
不依赖具体的实现,使得代码更灵活且有利于单元测试;
开发人员无需费心创建所有的依赖项;
所有的实现可以集中在一处位置进行控制;
总结
遵循 SOLID 原则使得代码更加灵活、易于测试和使用。依赖注入可以帮助你构建对象,并可以减少冗余代码。
推荐阅读
站长 polarisxu
自己的原创文章
不限于 Go 技术
职场和创业经验
Go语言中文网
每天为你
分享 Go 知识
Go爱好者值得关注
