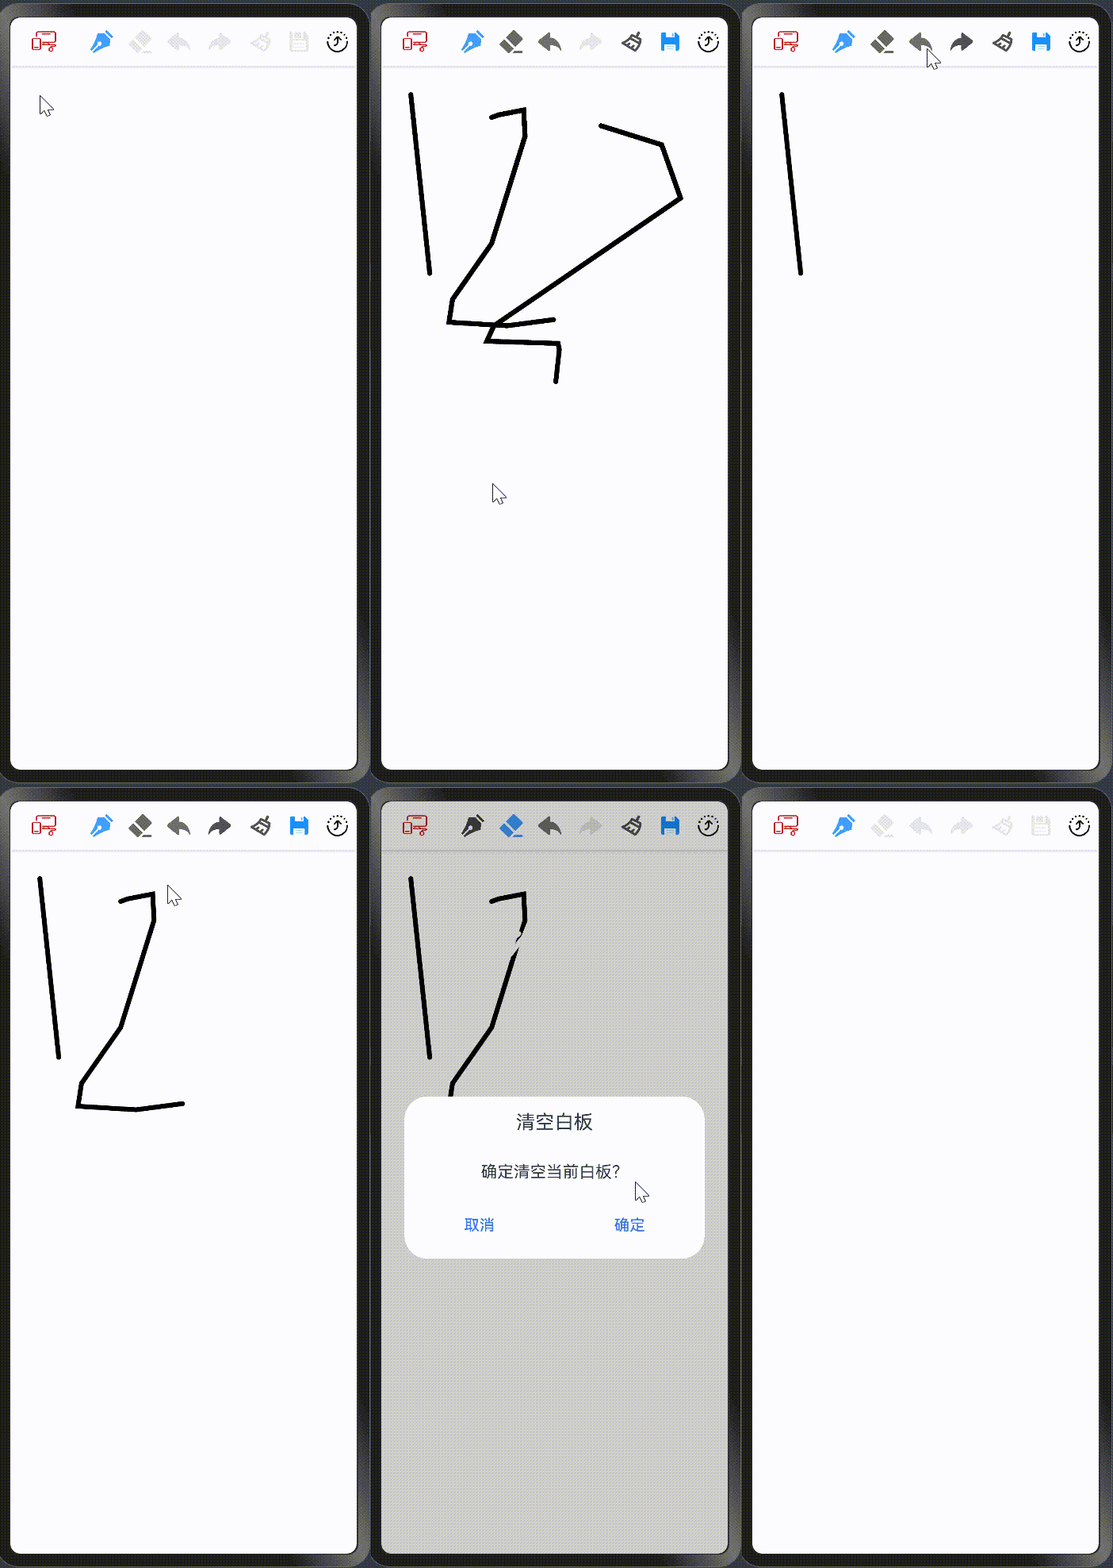
【HarmonyOS开发】案例-签名板基础上开发移动白板

前段时间写了个签名板的应用,在手机上测试还是很流畅的,可以将签名信息保存到手机相册,在此基础上加上数据共享、橡皮檫、前进、后退等功能,就是一个移动白板。
【HarmonyOS开发】案例-签名板开发
功能点分析
1、画笔功能:可设置画笔粗细和颜色;
2、橡皮擦功能:可设置橡皮擦大小;
3、撤回和回撤功能;
4、清空画板功能;
5、分布式,多设备共享数据;
6、保存当前绘制内容;
技术点拆分
-
Canvas画布组件的使用;
-
fs操作文件,buffer数据格式转换;
-
@ohos.file.picker保存图片;
-
权限配置与调用授权;
-
设备管理(@ohos.distributedHardware.deviceManager),数据共享(@ohos.data.distributedKVStore);
画笔绘制功能
使用onTouch方法,监听触摸事件
-
手指按下:使用方法moveTo记录起点;
手指移动:使用方法beginPath创建新的路径,lineTo记录移动的点,并绘制;
// 创建一个新的绘制路径this.crc.beginPath()// 设置起点坐标this.crc.moveTo(x, y)// 设置移动点this.crc.lineTo(x, y)// 进行路径绘制this.crc.stroke()设置画笔样式
// 线的宽度,可以通过Slider控制线的宽度this.crc.lineWidth = 5
// 线的颜色,通过颜色选择器修改画笔颜色this.crc.strokeStyle = 'rgba(0,0,0,0)'颜色选择器,通过Canvas的CanvasRenderingContext2D实现
export struct ColorPickerView {// 渲染设置-抗锯齿private settings: RenderingContextSettings = new RenderingContextSettings(true)// 颜色面板-画布渲染上下文对象private crcBoard: CanvasRenderingContext2D = new CanvasRenderingContext2D(this.settings)// 颜色条-画布渲染上下文对象private crcBar: CanvasRenderingContext2D = new CanvasRenderingContext2D(this.settings)// 颜色面板宽度private boardWidth = 0// 颜色面板高度private boardHeight = 0// 颜色面板指示器大小boardIndicatorSize: number = 0// 颜色面板指示器的X偏移量boardIndicatorOffsetX: number = 0// 颜色面板指示器的Y偏移量boardIndicatorOffsetY: number = 0// 颜色条宽度private barWidth = 0// 颜色条高度private barHeight = 0// 颜色条指示器大小barIndicatorSize: number = 0// 颜色条指示器的偏移量barIndicatorOffsetY: number = 1// 颜色选择改变回调private colorChange: (color: string) => void
/*** 颜色面板*/ColorBoard() {Canvas(this.crcBoard).onAreaChange((oldValue: Area, newValue: Area) => {// 获取组件的宽高this.boardWidth = parseInt(newValue.width.toString())this.boardHeight = parseInt(newValue.height.toString())this.boardIndicatorSize = this.boardWidth / 20this.boardIndicatorOffsetX = this.boardWidth - 1// 绘制颜色面板this.drawColorBoard()})}
/*** 颜色面板指示器*/ColorBoardIndicator() {if (this.boardIndicatorSize != 0) {Stack() {Stack() {}.width(this.boardIndicatorSize - 1).height(this.boardIndicatorSize - 1).border({ color: Color.White, width: 1, radius: this.boardIndicatorSize / 2 })
Stack() {}.width(this.boardIndicatorSize).height(this.boardIndicatorSize).border({ color: Color.Black, width: 1, radius: this.boardIndicatorSize / 2 })}.offset({ x: this.boardIndicatorOffsetX, y: this.boardIndicatorOffsetY }).markAnchor({ x: '50%', y: '50%' })}}
/*** 颜色条*/ColorBar() {Canvas(this.crcBar).onAreaChange((oldValue: Area, newValue: Area) => {// 获取组件的宽高this.barWidth = parseInt(newValue.width.toString())this.barHeight = parseInt(newValue.height.toString())this.barIndicatorSize = this.barWidth / 3// 创建渐变色的范围const grad = this.crcBar.createLinearGradient(0, 0, 0, this.barHeight)// 设置渐变颜色和比例。grad.addColorStop(0, 'rgb(255, 0, 0)')grad.addColorStop(1 * 1 / 6, 'rgb(255, 255, 0)')grad.addColorStop(2 * 1 / 6, 'rgb(0, 255, 0)')grad.addColorStop(3 * 1 / 6, 'rgb(0, 255, 255)')grad.addColorStop(4 * 1 / 6, 'rgb(0, 0, 255)')grad.addColorStop(5 * 1 / 6, 'rgb(255, 0, 255)')grad.addColorStop(1, 'rgb(255, 0, 0)')// 设置渐变色this.crcBar.fillStyle = grad// 绘制矩形this.crcBar.fillRect(0, 0, this.barWidth, this.barHeight)}).width('100%').borderWidth(0.5)}
/*** 颜色条指示器*/ColorBarIndicator() {Row() {if (this.barIndicatorSize != 0) {Path().width(this.barIndicatorSize).height(this.barIndicatorSize).commands(`M0 0 L${vp2px(this.barIndicatorSize)} ${vp2px(this.barIndicatorSize / 2)} L0 ${vp2px(this.barIndicatorSize)} Z`).fill('#00000000').stroke(Color.Black).strokeWidth(0.8)
Blank()
Path().width(this.barIndicatorSize).height(this.barIndicatorSize).commands(`M0 ${vp2px(this.barIndicatorSize / 2)} L${vp2px(this.barIndicatorSize)} 0 L${vp2px(this.barIndicatorSize)} ${vp2px(this.barIndicatorSize)} Z`).fill('#00000000').stroke(Color.Black).strokeWidth(0.8)}}.width('100%').padding(1).offset({ y: this.barIndicatorOffsetY }).markAnchor({ y: '50%' })}
build() {Row() {// 颜色面板-宽度占比85%Stack() {// 颜色面板this.ColorBoard()// 颜色面板指示器this.ColorBoardIndicator()}.width('85%').height('100%').alignContent(Alignment.TopStart).onTouch((event) => this.onTouchEventBoard(event))
// 颜色条区域-宽度占比15%Row() {Stack() {// 颜色条this.ColorBar()// 颜色条指示器if (this.barIndicatorSize != 0) {this.ColorBarIndicator()}}.width('60%').height('100%').alignContent(Alignment.Top).onTouch((event) => this.onTouchEventBar(event))
}.width('15%').height('100%').justifyContent(FlexAlign.Center)
}.width('100%').height('100%')}
/*** 绘制颜色面板* @param bgColor 背景颜色 默认颜色:红色*/drawColorBoard(bgColor = 'rgb(255, 0, 0)') {// 清空画布this.crcBoard.clearRect(0, 0, this.boardWidth, this.boardHeight)
// 绘制背景色this.crcBoard.fillStyle = bgColorthis.crcBoard.fillRect(0, 0, this.boardWidth, this.boardHeight)
// 绘制渐变色:白色->透明色const gradWhite = this.crcBoard.createLinearGradient(0, 0, this.boardWidth, 0)gradWhite.addColorStop(0, 'rgb(255,255,255)')gradWhite.addColorStop(1, 'rgba(255,255,255,0)')this.crcBoard.fillStyle = gradWhitethis.crcBoard.fillRect(0, 0, this.boardWidth, this.boardHeight)
// 绘制渐变色:黑色->透明色const gradBlack = this.crcBoard.createLinearGradient(0, this.boardHeight, 0, 0)gradBlack.addColorStop(0, 'rgb(0,0,0)')gradBlack.addColorStop(1, 'rgba(0,0,0,0)')this.crcBoard.fillStyle = gradBlackthis.crcBoard.fillRect(0, 0, this.boardWidth, this.boardHeight)}
/*** 颜色条触摸事件*/onTouchEventBar(event: TouchEvent) {// x坐标let x = event.touches[0].x// y坐标let y = event.touches[0].y// 触摸区域限制if (x < 0)x = 0if (x > this.barWidth - 1.2) x = this.barWidth - 1.2if (y < 1)y = 1if (y > this.barHeight - 1.2) y = this.barHeight - 1.2console.log(`颜色条-当前坐标:x = ${x}, y = ${y}`)// 触摸y坐标赋值给指示器偏移量this.barIndicatorOffsetY = y// 获取颜色条坐标点一个像素的颜色值let imageData = this.crcBar.getImageData(x, y, px2vp(5), px2vp(5))console.log(`--------颜色条-当前颜色:` + JSON.stringify(imageData))// 绘制颜色面板this.drawColorBoard(`rgb(${imageData.data[0]},${imageData.data[1]},${imageData.data[2]})`)// 获取颜色面板选中的颜色this.getBoardSelectColor()}
/*** 颜色面板触摸事件*/onTouchEventBoard(event: TouchEvent) {// x坐标let x = event.touches[0].x// y坐标let y = event.touches[0].y// 触摸区域限制if (x < 0)x = 0if (x > this.boardWidth - 1) x = this.boardWidth - 1if (y < 0)y = 0if (y > this.boardHeight - 1) y = this.boardHeight - 1// 触摸xy坐标赋值给指示器偏移量this.boardIndicatorOffsetX = xthis.boardIndicatorOffsetY = y// 获取颜色面板选中的颜色this.getBoardSelectColor()}/*** 获取颜色面板选中的颜色*/getBoardSelectColor() {console.log(`颜色面板-当前坐标:x = ${this.boardIndicatorOffsetX}, y = ${this.boardIndicatorOffsetY}`)// 获取坐标点一个像素的颜色值let imageData = this.crcBoard.getImageData(this.boardIndicatorOffsetX, this.boardIndicatorOffsetY, px2vp(5), px2vp(5))console.log(`颜色面板-当前颜色:` + JSON.stringify(imageData))this.colorChange(`rgb(${imageData.data[0]},${imageData.data[1]},${imageData.data[2]})`)}}API9实现
import { ColorPickerView } from '../../../../../../ColorPicker/src/main/ets/components/ColorPicker/ColorPicker'
struct Index {color: string = 'rgb(255, 0, 0)'
build() {Column() {Text('颜色选择器').fontSize(80).fontWeight(FontWeight.Bold).fontColor(this.color)
Stack() {ColorPickerView({colorChange: (color) => {this.color = color}})}.zIndex(999).width(300).height(300).margin({ top: 30 })
}.width('100%').height('100%').justifyContent(FlexAlign.Center)}}使用颜色选择器
橡皮擦功能
通过globalCompositeOperation绘制属性实现橡皮擦功能
// 新内容在之前内容的之上this.crc.globalCompositeOperation = 'source-over'
// 新内容与之前内容相交位置变透明this.crc.globalCompositeOperation = 'destination-out'
撤回和回撤功能
最简单的方法就是使用一个数组保存绘制信息,包含以下几个信息:
-
-
是否为画笔 /橡皮擦 ;
-
画笔/橡皮擦的颜色或宽度;
-
坐标点(X、Y);
-
每次绘制的信息,保存在数组中,在点击撤回时,撤回数+1;回撤时,撤回数-1,并截取数组,清空画布,遍历数组绘制笔画信息。
/*** 坐标点* @param x 坐标点x* @param y 坐标点y*/export class Coord {// 坐标点xx: number;// 坐标点yy: number;constructor(x: number, y: number) {this.x = x;this.y = y;}}
/*** 绘制信息* @param lineColor 线颜色* @param lineWidth 线宽度* @param listCoord 坐标点集合*/export class BoardInfoModel {// 是否为画笔,是:画笔,否:橡皮擦// 根据此字段设置绘制属性:合成操作globalCompositeOperationisPen: boolean;// 线颜色lineColor: string;// 线宽度lineWidth: number;// 坐标点集合listCoord: Array<Coord>;constructor(isPen: boolean, lineColor: string, lineWidth: number, listCoord: Array<Coord>) {this.isPen = isPen;this.lineColor = lineColor;this.lineWidth = lineWidth;this.listCoord = listCoord;}}
移动白板清空功能
白板一旦清空,需要屏蔽撤回/回撤/清空功能,并清空存储的数组绘制信息,还原画笔/橡皮擦样式等。
通过clearRect方法清空移动白板,
// 撤回不可用this.revocationEnabled = false// 回撤不可用this.unRevocationEnabled = false// 清空不可用this.clearEnabled = false// 记录的数组清空this.listTempXY = []this.listAllXY = []// 选中画笔this.isSelectPen = true// 清空画布this.crc.clearRect(0, 0, this.canvasWidth, this.canvasHeight)
保存当前内容为图片功能
提供图片保存功能,将画板内容存储到手机相册中,用于后续查看等。
import picker from '@ohos.file.picker';import fs from '@ohos.file.fs';import buffer from '@ohos.buffer';import common from '@ohos.app.ability.common';import abilityAccessCtrl from '@ohos.abilityAccessCtrl';
handleSave() {let context = getContext(this) as common.UIAbilityContext;const image: string = this.context.toDataURL()this.imageUrl = imageconsole.log('========data============', JSON.stringify(image))let atManager = abilityAccessCtrl.createAtManager();atManager.requestPermissionsFromUser(context, ["ohos.permission.WRITE_MEDIA", "ohos.permission.READ_MEDIA"], (error, result) => {if (result) {console.log("requestPermissionsFromUser-result: " + JSON.stringify(result));if (result.authResults[0] === 0) {this.saveImage(image)}} else {console.log("requestPermissionsFromUser-error: " + JSON.stringify(error));}});}
saveImage(base64: string) {//文件保存路径let uri = '';console.error('saveImage======666===>');try {let PhotoSaveOptions = new picker.PhotoSaveOptions();//保存图片默认名称PhotoSaveOptions.newFileNames = [`image_${new Date().getTime()}.png`];let photoPicker = new picker.PhotoViewPicker();console.error('saveImage======999===>');//调起系统的图片保存功能try {photoPicker.save(PhotoSaveOptions).then((PhotoSaveResult) => {console.error('saveImage======888===>', JSON.stringify(PhotoSaveResult));uri = PhotoSaveResult[0];//获取图片的base64字符串let imageStr = base64.split(',')[1];//打开文件let file = fs.openSync(uri, fs.OpenMode.READ_WRITE);//base64字符串转成bufferconst decodeBuffer = buffer.from(imageStr, 'base64').buffer;//写入文件fs.writeSync(file.fd, decodeBuffer);//关闭文件fs.closeSync(file);console.error('saveImage======000===>');}).catch((err: Error) => {console.error('saveImage======111===>', err + '');})} catch (err) {console.error('saveImage======010101===>', JSON.stringify(err));}} catch (e) {console.error('saveImage====222=====>', e);}}
分布式功能
-
通过@ohos.distributedDeviceManager获取设备信息;
-
通过@ohos.data.distributedKVStore管理数据的共享;
具体可以参考:【HarmonyOS开发】分布式应用的开发实践

