不用找了,30分钟让你学会Spring框架的使用

汪伟俊 | 作者
Java技术迷 | 出品
IOC
Spring框架中非常重要的两个内容,IOC和AOP,其中IOC指的是控制反转(Inversion Of Control),AOP指的是面向切面编程,现在我们就来看看IOC究竟是何方神圣?
控制反转其实是一种思想,指的是将对象的操作权限交给Spring容器管理,传统的编程中,我们都是自己创建对象,自己管理,比如:
class A{}class B{private A a;public B(A a){this.a = a;}}class Main{public static void main(String[] args){A a = new A();B b = new B(a);}}
这段程序中,类A和类B是由我们自己创建,类B的构造方法需要一个类A,这种类之间的关系也需要我们自己去维护,显然,当系统中的类逐渐增多,类与类之间的关系错综复杂,靠人为地维护它们不仅费时费力,而且容易出错。基于此,IOC的概念成功提出,它的思想是通过容器来实现对象的装配和管理,在Spring框架中,对IOC思想的具体实现是依赖注入(Dependency Injection),即:Spring容器管理着所有的Bean(Spring中的类被称为Bean),当发现某些Bean依赖别的Bean时,Spring会自动将所需要的Bean注入给它。
这里尤其需要区分两个概念,IOC和DI,IOC指控制反转,是一种思想;DI指依赖注入,是Spring框架对IOC思想的具体实现。
Spring初体验
回忆我们在JavaWeb阶段学习的Servlet,需要创建一个类实现Servlet接口或者继承HttpServlet,并在web.xml中进行配置,然而在整个项目中,我们并没有去显式地创建Servlet,那Servlet对象从何而来呢?原来,这个创建Servlet的过程是Tomcat容器帮助我们实现的。Spring容器与其非常类似,通过Spring容器,我们也无需自己创建对象,而只需要在配置文件中进行配置即可,类与类之间的依赖关系也无需我们操心。
创建一个普通的Maven项目,并引入依赖:
<dependency><groupId>org.springframework</groupId><artifactId>spring-context</artifactId><version>5.2.5.RELEASE</version></dependency>
该依赖中集成了使用Spring框架所需要的一些依赖,比如:spring-core、spring-beans、spring-expression等等,现在我们就可以开始使用Spring了,先创建一个Bean:
public class User {private String name;private Integer age;public User(){System.out.println("对象被创建了");}@Overridepublic String toString() {return "User{" +"name='" + name + '\'' +", age=" + age +'}';}}
然后在resource目录下创建Spring的配置文件:
<?xml version="1.0" encoding="UTF-8"?><beans xmlns="http://www.springframework.org/schema/beans"xmlns:xsi="http://www.w3.org/2001/XMLSchema-instance"xsi:schemaLocation="http://www.springframework.org/schema/beans http://www.springframework.org/schema/beans/spring-beans.xsd"><bean id="user" class="com.wwj.spring.bean.User"/></beans>
非常有必要来解释一下这个配置文件,该配置文件以 <beans> 标签作为根标签,在该标签内配置的就是一个一个的Bean,所以通过 <bean> 标签即可配置一个Bean,其中:
•id:Bean的唯一标识,Spring容器是一个Map集合,其中Map的键就是Bean的id,所以id不能重复•class:Bean的全类路径,用于反射创建对象
配置完成后,编写测试代码:
public class Main {public static void main(String[] args) {ApplicationContext context = new ClassPathXmlApplicationContext("applicationContext.xml");User user = (User) context.getBean("user");System.out.println(user);}}
通过类路径下的配置文件构造出容器对象(ApplicationContext),此时便可以通过对象的id获取到容器中的Bean,运行结果:
对象被创建了User{name='null', age=null}
也可以通过对象的类型获取:
User user = context.getBean(User.class);但很显然,这样的方式存在一个弊端,当容器中存在着相同类型的多个Bean时,它将无法正确获取到Bean,我们来看看Spring会抛出什么样的错误,修改配置文件:
<?xml version="1.0" encoding="UTF-8"?><beans xmlns="http://www.springframework.org/schema/beans"xmlns:xsi="http://www.w3.org/2001/XMLSchema-instance"xsi:schemaLocation="http://www.springframework.org/schema/beans http://www.springframework.org/schema/beans/spring-beans.xsd"><bean id="user" class="com.wwj.spring.bean.User"/><bean id="user2" class="com.wwj.spring.bean.User"/></beans>
此时容器中就配置了两个相同类型的Bean,重新执行测试代码,运行结果:
Exception in thread "main" org.springframework.beans.factory.NoUniqueBeanDefinitionException: No qualifying bean of type 'com.wwj.spring.bean.User' available: expected single matching bean but found 2: user,user2意思是期望匹配到一个Bean,但是却发现了两个Bean:user和user2,此时,我们就必须通过id来分别获取:
User user = (User) context.getBean("user");User user2 = (User) context.getBean("user2");
Spring还提供了另一种重载的getBean方法:
User user = context.getBean("user", User.class);User user2 = context.getBean("user2", User.class);
使用这种方式将免去强制类型转换的苦恼。
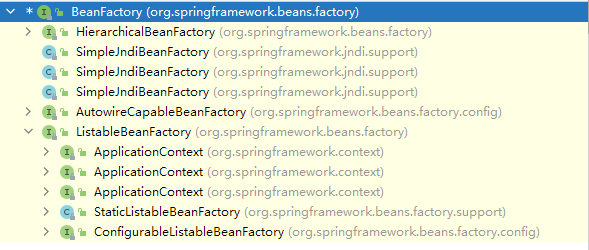
通过查看继承关系,我们可以发现ApplicationContext的顶层接口为BeanFactory:

事实上,BeanFactory和ApplicationContext都可以用来获取Bean,但它俩又有一些区别:
1.BeanFactory是Spring框架中比较原始的接口,所以它无法支持Spring插件,例如:web-mvc、aop等2.BeanFactory采用的是延迟加载策略,即:读取完配置文件后,仅仅是实例化了容器,只有调用getBean方法时才会实例化Bean3.ApplicationContext采用的是立即加载策略,读取完配置文件后,Bean就被实例化了
我们可以来测试一下,首先测试BeanFactory:
public class Main {public static void main(String[] args) {BeanFactory beanFactory = new XmlBeanFactory(new ClassPathResource("applicationContext.xml"));}}
执行该程序,控制台没有任何输出,再来测试一下ApplicationContext:
public class Main {public static void main(String[] args) {ApplicationContext context = new ClassPathXmlApplicationContext("applicationContext.xml");}}
运行结果:
对象被创建了对象被创建了
对于两者的选择,推荐选择后者,因为BeanFactory能做的事情,ApplicationContext都能做,而ApplicationContext能做的事情,BeanFactory也许就无能为力了。
创建Bean的方式
在Spring中,共有三种创建Bean对象的方式:
1.通过构造方法创建2.通过静态工厂创建3.通过实例工厂创建
在刚才的案例中其实就是通过构造方法创建的Bean对象,当我们在配置文件中配置了一个 <bean> 标签后,Spring就会自动调用该类的无参构造方法创建Bean实例,所以我们一定要保证类中含有一个无参的构造方法,否则程序就会报错,可以来测试一下:
public class User {private String name;private Integer age;public User(String name){System.out.println("对象被创建了");}}
因为该类显式地声明了一个带参的构造方法,所以默认的无参构造方法就不会生成,现在来运行一下程序:
Caused by: org.springframework.beans.BeanInstantiationException: Failed to instantiate [com.wwj.spring.bean.User]: No default constructor found; nested exception is java.lang.NoSuchMethodException: com.wwj.spring.bean.User.<init>()意思是没有找到默认的构造方法。
第二种方式是通过静态工厂创建,所以先来创建一个工厂:
public class MyStaticBeanFactory {public static User getBean(){return new User();}}
然后进行配置:
<bean id="user" class="com.wwj.spring.bean.MyStaticBeanFactory" factory-method="getBean"/>此时class属性配置的就是工厂类的全类名了,还需要指定factory-method属性为工厂类中的getBean方法。
最后一种方式就是通过实例工厂创建,它与静态工厂的唯一区别就是方法不为静态,但此时就需要先获取工厂的实例了,还是先来创建一个工厂:
public class MycBeanFactory {public User getBean(){return new User();}}
然后进行配置:
<bean id="myBeanFactory" class="com.wwj.spring.bean.MycBeanFactory"/><bean id="user" factory-bean="myBeanFactory" factory-method="getBean"/>
factory-bean需要指定实例工厂的id,factory-method仍然是指定实例工厂中的getBean方法。
Bean的作用范围
在Spring中,Bean可以有五种作用范围:
1.singleton2.prototype3.request4.session5.global-session
其中,Spring中的Bean默认是singleton,表示单例的Bean,比如:
public class Main {public static void main(String[] args) {ApplicationContext context = new ClassPathXmlApplicationContext("applicationContext.xml");User user = context.getBean(User.class);User user2 = context.getBean(User.class);System.out.println(user == user2);}}
运行结果:
对象被创建了true
通过 <bean> 标签的scope属性可以设置Bean的作用范围:
<bean id="user" class="com.wwj.spring.bean.User" scope="prototype"/>运行结果:
对象被创建了对象被创建了false
能够很清楚地看到,prototype值会使我们每次从容器中获取到的Bean都是新创建的。由于request、session、global-session都需要建立在Web工程中,所以这里就不做测试了。
Bean的生命周期
任何对象都有其生命周期,在Spring中,单例Bean和非单例Bean的生命周期是不相同的,对于单例Bean,它随着容器的创建而创建,随着容器的销毁而销毁:
public class User {private String name;private Integer age;public User(){System.out.println("对象被创建了");}public void init(){System.out.println("对象被初始化了");}public void destroy(){System.out.println("对象被销毁了");}}
在User类中添加两个方法:init和destroy,它将作为类的初始化和销毁方法,当然了,这两个方法需要进行配置,否则是不起作用的:
<bean id="user" class="com.wwj.spring.bean.User" init-method="init" destroy-method="destroy"/>init-method属性用于指定当前Bean的初始化方法,那么destroy-method属性就是用于指定当前Bean的销毁方法了,测试代码:
public class Main {public static void main(String[] args) {ClassPathXmlApplicationContext context = new ClassPathXmlApplicationContext("applicationContext.xml");User user = context.getBean(User.class);context.close();}}
运行结果:
对象被创建了对象被初始化了对象被销毁了
而非单例对象只有在被使用时才会创建(比如调用getBean方法),至于什么时候销毁,因为Spring容器无法知晓该对象什么时候需要被销毁,所以非单例对象的销毁是由垃圾回收器决定的,当没有对象引用它,并且触发GC时,垃圾回收器便会回收该对象(关于垃圾回收的内容不是本文的重点)。
依赖注入
在文章的最开始,我们就提到了,依赖注入,是Spring框架对于IOC的一种具体实现,那么依赖注入体现在何处呢?来看一个案例:
class A {private B b = new B();public void saveUser() {b.save();}}class B {public void save() {System.out.println("保存成功");}}
可以看到,类A是依赖于类B的,而两个类之间的关系是由我们自己来维护的,而有了Spring之后,对于类的依赖关系,我们就彻底解放了,Spring将替我们管理类与类之间的关系,并将所需的类自动注入到类中。
Spring中共有三种方式实现依赖注入:
1.通过构造方法注入2.通过setXXX方法注入3.通过注解注入(注解注入方式将在后续提及)
支持注入基本类型、String、引用类型(集合、其它的Bean),先来看看基本类型和String:
public class User {private String name;private int age;public User(String name, int age) {this.name = name;this.age = age;}@Overridepublic String toString() {return "User{" +"name='" + name + '\'' +", age=" + age +'}';}}
User类中分别有一个String类型和一个int类型变量,该如何通过构造方法注入呢?
<bean id="user" class="com.wwj.spring.bean.User"><constructor-arg type="int" value="30"/><constructor-arg type="java.lang.String" value="zhangsan"/></bean>
其中type用于指定属性的类型,value用于指定属性的值,这种方式显然是有弊端的,比如:
public class User {private String name;private int age;private int salary;public User(String name, int age,int salary) {this.name = name;this.age = age;this.salary = salary;}}
此时User类的构造方法中有两个int类型的变量,那么在进行注入时我们就很容易被混淆,所以,我们可以借助另一个属性进行控制:
<bean id="user" class="com.wwj.spring.bean.User"><constructor-arg index="0" value="zhangsan"/><constructor-arg index="1" value="20"/><constructor-arg index="2" value="3000"/></bean>
通过index可以指定当前注入的参数在构造方法中的索引位置,这样就能够准确地将数据注入到属性中。还可以通过如下方式进行设置:
<bean id="user" class="com.wwj.spring.bean.User"><constructor-arg name="name" value="zhangsan"/><constructor-arg name="age" value="20"/><constructor-arg name="salary" value="3000"/></bean>
name属性用于指定当前注入的参数在构造方法中的属性名称,通过它也能够准确地将数据注入到属性中,它的好处是能够更加直观地看到注入的是构造方法中的哪个属性值。对于一些特殊的类型变量,比如日期类型,就需要先配置日期类的Bean,再将其注入到属性中:
<bean id="user" class="com.wwj.spring.bean.User"><constructor-arg name="name" value="zhangsan"/><constructor-arg name="age" value="20"/><constructor-arg name="salary" value="3000"/><constructor-arg name="birthday" ref="date"/></bean><bean id="date" class="java.time.LocalDateTime" factory-method="now"/>
由于LocalDateTime类的构造方法被私有化了,所以我们必须指定factory-method属性,让其通过now方法创建对象实例,此时在注入的时候就得使用ref属性指定Bean的id。
同样的参数,也可以使用setXXX方法进行注入,所以先提供对应的setXXX方法:
public class User {private String name;private int age;private int salary;private LocalDateTime birthday;public void setName(String name) {this.name = name;}public void setAge(int age) {this.age = age;}public void setSalary(int salary) {this.salary = salary;}public void setBirthday(LocalDateTime birthday) {this.birthday = birthday;}}
setXXX方法是较为常用的一种注入方式,它使用property标签来实现:
<bean id="user" class="com.wwj.spring.bean.User"><property name="name" value="zhangsan"/><property name="age" value="30"/><property name="salary" value="3000"/><property name="birthday" ref="date"/></bean><bean id="date" class="java.time.LocalDateTime" factory-method="now"/>
需要区分property和constructor-arg中的name属性,在constructor-arg标签中,name指定的是构造方法中的属性名,而在property标签中,name指定的是setXXX中的XXX部分,比如: setAge ,则name值就为 age 。
知道了如何注入之后,我们就可以修改最开始的程序:
public class A {private B b;public void setB(B b) {this.b = b;}public void saveUser() {b.save();}}public class B {public void save() {System.out.println("保存成功");}}
配置一下:
<bean id="a" class="com.wwj.spring.bean.A"><property name="b" ref="b"/></bean><bean id="b" class="com.wwj.spring.bean.B"/>
此时程序中的耦合就被解除了。
对于集合类型,它的注入方式就特殊一些,比如:
public class User {private String[] array;private List<String> list;private Set<String> set;private Map<String, String> map;private Properties prop;public void setArray(String[] array) {this.array = array;}public void setList(List<String> list) {this.list = list;}public void setSet(Set<String> set) {this.set = set;}public void setMap(Map<String, String> map) {this.map = map;}public void setProp(Properties prop) {this.prop = prop;}}
它们的注入方式分别如下:
<?xml version="1.0" encoding="UTF-8"?><beans xmlns="http://www.springframework.org/schema/beans"xmlns:xsi="http://www.w3.org/2001/XMLSchema-instance"xsi:schemaLocation="http://www.springframework.org/schema/beans http://www.springframework.org/schema/beans/spring-beans.xsd"><bean id="user" class="com.wwj.spring.bean.User"><!--注入数组--><property name="array"><array><value>zhangsan</value><value>lisi</value><value>wangwu</value></array></property><!--注入List--><property name="list"><list><value>zhangsan</value><value>lisi</value><value>wangwu</value></list></property><!--注入Set--><property name="set"><set><value>zhangsan</value><value>lisi</value><value>wangwu</value></set></property><!--注入Map--><property name="map"><map><entry key="001" value="zhangsan"/><entry key="002" value="lisi"/><entry key="003" value="wangwu"/></map></property><!--注入Properties--><property name="prop"><props><prop key="001">zhangsan</prop><prop key="002">lisi</prop><prop key="003">wangwu</prop></props></property></bean></beans>
集合类型的注入其实非常简单,而且结构相同的集合类型,标签还可以互相使用,比如:
<property name="array"><list><value>zhangsan</value><value>lisi</value><value>wangwu</value></list></property>
在数组类型中使用 <list> 标签是没有任何问题的,甚至可以使用 <set> 标签,但最好还是和类型对应使用,这样可以使程序的可读性更高。
本文作者:汪伟俊 为Java技术迷专栏作者 投稿,未经允许请勿转载。

往 期 推 荐
1、Intellij IDEA这样 配置注释模板,让你瞬间高出一个逼格! 2、基于SpringBoot的迷你商城系统,附源码! 3、最牛逼的 Java 日志框架,性能无敌,横扫所有对手! 4、把Redis当作队列来用,真的合适吗? 5、惊呆了,Spring Boot居然这么耗内存!你知道吗? 6、全网最全 Java 日志框架适配方案!还有谁不会? 7、Spring中毒太深,离开Spring我居然连最基本的接口都不会写了

点分享

点收藏

点点赞

点在看

