这篇看完,Paging3还不会你捶我!
作者:黄林晴
https://huanglinqing.blog.csdn.net/
Paging是什么?
想想我们之前的业务中,实现分页加载需要怎么处理?一般我们都是自己封装RecycleView或者使用XRecycleView这种第三方库去做,而Paging 就是Google为我们提供的分页功能的标准库,这样我们就无须自己去基于RecycleView实现分页功能,并且Paging为我们提供了许多可配置选项,使得分页功能更加灵活。而Paging3是Paging库当前的最新版本,仍处于测试版本,相比较于Paging2的使用就简洁多了。
Paging的使用
项目搭建
首先我们新建项目,在gradle中引用paging库如下:
def paging_version = "3.0.0-alpha07"
implementation "androidx.paging:paging-runtime:$paging_version"
testImplementation "androidx.paging:paging-common:$paging_version"
项目示例,我们使用Kotlin语言并且使用了协程和Flow,所以也需要添加协程的库如下:
implementation 'org.jetbrains.kotlinx:kotlinx-coroutines-android:1.3.7-mpp-dev-11'
项目示例
在官方文档中也给出了我们Paging在架构中的使用图。

通过上图我们也可以清晰的看出来,Paging在仓库层、ViewModel和UI层都有具体的表现,接下来我们通过一个示例来逐步讲解Paging是如何在项目架构中工作的。
API接口准备
这里我们已经写好了RetrofitService类用于创建网络请求的service代码如下所示:
object RetrofitService {


    /**
     * okhttp client
     */
    lateinit var okHttpClient: OkHttpClient

    /**
     * 主Url地址
     */
    private const val BASEAPI = "https://www.wanandroid.com/";


    /**
     * 创建service对象
     */
    fun <T> createService(mClass: Class<T>): T {
        val builder: OkHttpClient.Builder = OkHttpClient.Builder();
        okHttpClient = builder.build()
        val retrofit: Retrofit = Retrofit.Builder()
            .baseUrl(BASEAPI)
            .client(okHttpClient)
            .addConverterFactory(GsonConverterFactory.create())
            .build()
        return retrofit.create(mClass) as T
    }

}
和 DataApi接口,这里我们将方法声明为挂起函数,便于在协程中调用。
interface DataApi {

    /**
     * 获取数据
     */
    @GET("wenda/list/{pageId}/json")
    suspend fun getData(@Path("pageId") pageId:Int): DemoReqData
}
定义数据源
首先我们来定义数据源DataSource继承自PagingSource,代码如下所示:
class DataSource():PagingSource<Int,DemoReqData.DataBean.DatasBean>(){
    override suspend fun load(params: LoadParams<Int>): LoadResult<Int, DemoReqData.DataBean.DatasBean> {
        TODO("Not yet implemented")
    }
}
我们可以看到PagingSource中有两个参数Key 和 Value,这里Key我们定义为Int类型Value DemoReqData 是接口返回数据对应的实体类,这里的意思就是我们传Int类型的值(如页码)得到返回的数据信息DemoReqData对象。
这里需要提醒的是如果你使用的不是Kotlin 协程而是Java,则需要继承对应的PagingSource如RxPagingSource或ListenableFuturePagingSource。
DataSource为我们自动生成了load方法,我们主要的请求操作就在load方法中完成。主要代码如下所示:
override suspend fun load(params: LoadParams<Int>): LoadResult<Int, DemoReqData.DataBean.DatasBean> {

    return try {

        //页码未定义置为1
        var currentPage = params.key ?: 1
        //仓库层请求数据
        var demoReqData = DataRespority().loadData(currentPage)
        //当前页码 小于 总页码 页面加1
        var nextPage = if (currentPage < demoReqData?.data?.pageCount ?: 0) {
            currentPage + 1
        } else {
            //没有更多数据
            null
        }
        if (demoReqData != null) {
            LoadResult.Page(
                data = demoReqData.data.datas,
                prevKey = null,
                nextKey = nextPage
            )
        } else {
            LoadResult.Error(throwable = Throwable())
        }
    } catch (e: Exception) {
        LoadResult.Error(throwable = e)
    }
}
上面代码我们可以看到在datasource中我们通过DataRespority()仓库层,去请求数据,如果没有更多数据就返回null,最后使用 LoadResult.Page将结果返回,如果加载失败则用LoadResult.Error返回,由于 LoadResult.Page中的data 必须是非空类型的,所以我们需要判断返回是否为null。
接下来我们看下DataRespority仓库层的代码,代码比较简单,如下所示:
class DataRespority {

    private var netWork = RetrofitService.createService(
        DataApi::class.java
    )

    /**
     * 查询护理数据
     */
    suspend fun loadData(
        pageId: Int
    ): DemoReqData? {
        return try {
            netWork.getData(pageId)
        } catch (e: Exception) {
            //在这里处理或捕获异常
            null
        }

    }
}
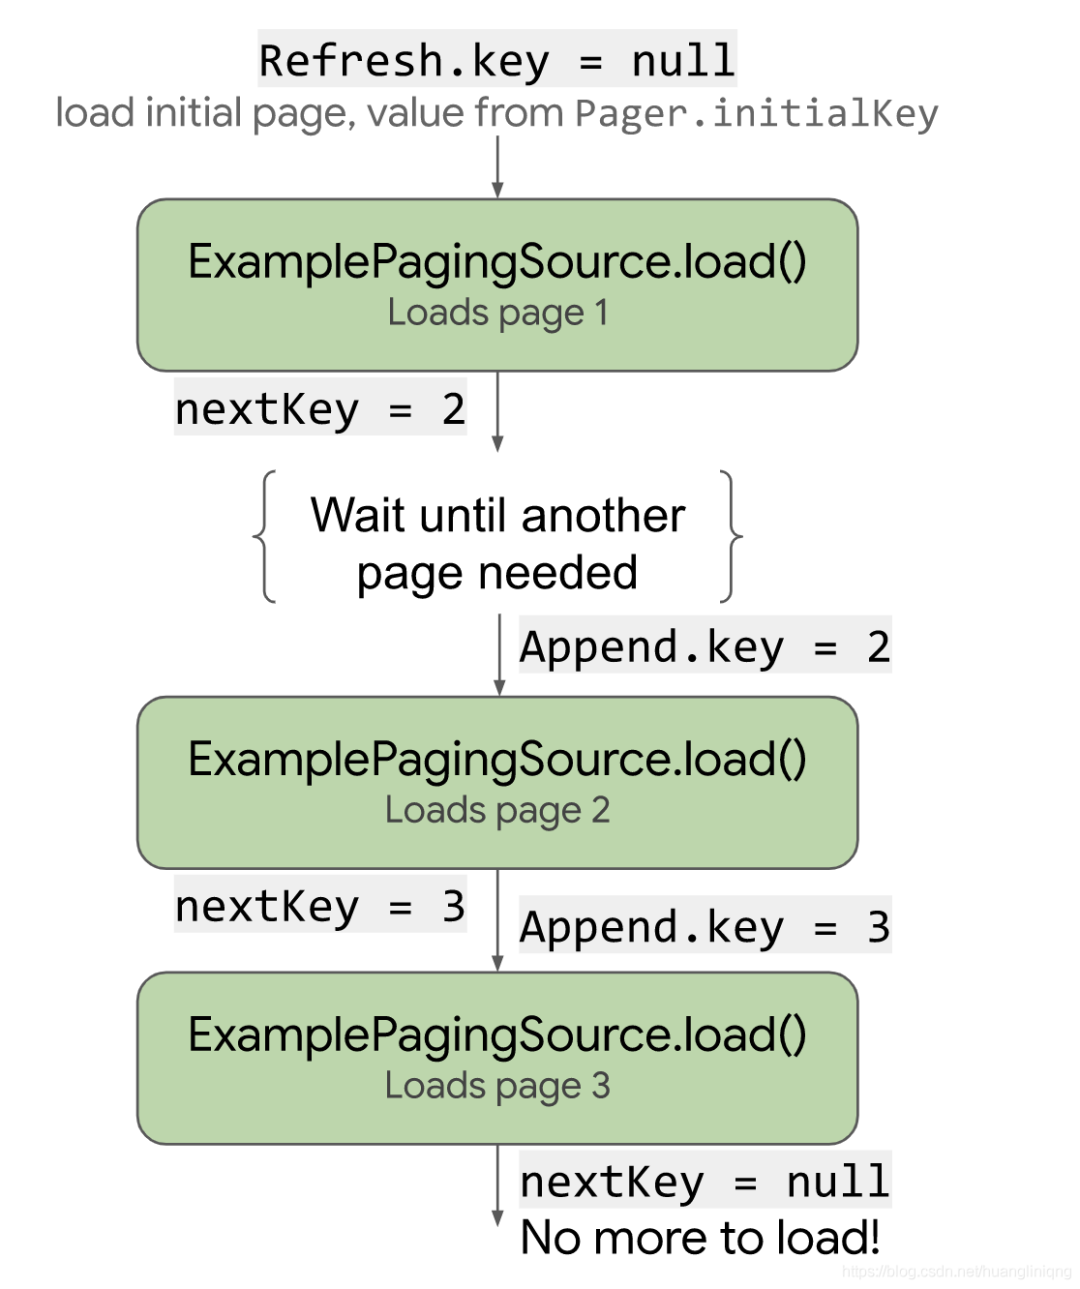
Load调用官方给出的流程如下所示:

从上图可以知道,load的方法 是我们通过Paging的配置自动触发的,不需要我们每次去调用,那么我们如何来使用DataSource呢?
调用PagingSource
The Pager object calls the load() method from the PagingSource object, providing it with the LoadParams object and receiving the LoadResult object in return.
这句话翻译过来的意思就是:Pager对象从PagingSource对象调用load()方法,为它提供LoadParams对象,并作为回报接收LoadResult对象。
所以我们在创建viewModel对象,并创建pager对象从而调用PagingSource方法 ,代码如下所示:
class MainActivityViewModel : ViewModel() {

    /**
     * 获取数据
     */
    fun getData() = Pager(PagingConfig(pageSize = 1)) {
        DataSource()
    }.flow
}
在viewmodel中我们定义了一个getData的方法,Pager中通过配置PagingConfig来实现特殊的定制,我们来看下PagingConfig中的参数如下:
pageSize:定义从PagingSource一次加载的项目数。
prefetchDistance:预取距离,简单解释就是 当距离底部还有多远的时候自动加载下一页,即自动调用load方法,默认值和pageSize相等。
enablePlaceholders:是否显示占位符,当网络不好的时候,可以考到页面的框架,从而提升用户体验。
还有一些其他参数这里就不一一介绍了,从构造方法的源码中可以看出pageSize这个参数是必填的,其他的是可选项,所以我们这里传了1。
定义RecycleViewAdapter
这一步,和我们平时定义普通的RecycleViewAdapter没有太大的区别,只是我们继承的是PagingDataAdapter,主要代码如下所示:
class DataRecycleViewAdapter :
    PagingDataAdapter<DemoReqData.DataBean.DatasBean, RecyclerView.ViewHolder>(object :
        DiffUtil.ItemCallback<DemoReqData.DataBean.DatasBean>() {

        override fun areItemsTheSame(
            oldItem: DemoReqData.DataBean.DatasBean,
            newItem: DemoReqData.DataBean.DatasBean
        ): Boolean {
            return oldItem.id == newItem.id
        }

        @SuppressLint("DiffUtilEquals")
        override fun areContentsTheSame(
            oldItem: DemoReqData.DataBean.DatasBean,
            newItem: DemoReqData.DataBean.DatasBean
        ): Boolean {
            return oldItem == newItem
        }
    }) {
    override fun onBindViewHolder(holder: RecyclerView.ViewHolder, position: Int) {
        var dataBean = getItem(position)
        (holder as DataViewHolder).binding.demoReaData = dataBean
    }

    override fun onCreateViewHolder(parent: ViewGroup, viewType: Int): TestViewHolder {

    return TestViewHolder(
        DataBindingUtil.inflate(
            LayoutInflater.from(parent.context),
            R.layout.health_item_test,
            parent,
            false
        )
    )
}

    inner class DataViewHolder(private val dataBindingUtil: ItemDataBinding) :
        RecyclerView.ViewHolder(dataBindingUtil.root) {
        var binding = dataBindingUtil
    }


}
这里我们要提醒的是DiffUtil这个参数,用于计算列表中两个非空项目之间的差异的回调。无特殊情况一般都是固定写法。
View层数据请求并将结果显示在View上
到这里,基本工作已经差不多了,当然我们说的差不多了只是快能看到成果了,其中需要讲解的地方还有很多,最后一步我们在view中请求数据,并将结果绑定在adapter上。我们在View代码中调用viewModel中的getData方法,代码如下所示:
val manager = LinearLayoutManager(this)
rv_data.layoutManager = manager
rv_data.adapter = dataRecycleViewAdapter
btn_get.setOnClickListener {
    lifecycleScope.launch {
        mainActivityViewModel.getData().collectLatest {
            dataRecycleViewAdapter.submitData(it)
        }
    }
}
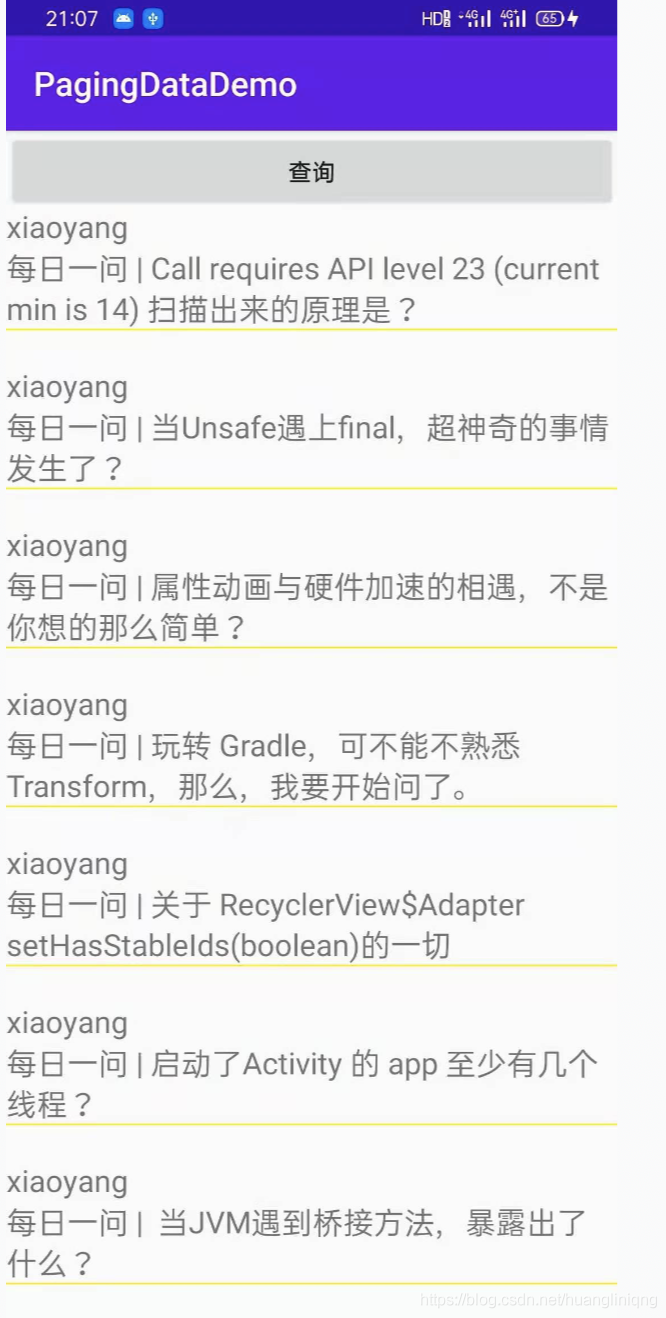
我们在协程中调用getData方法,接收最新的数据,通过PagingAdapter的submitData方法为adapter提供数据,运行结果如下所示(忽略丑陋的UI.jpg)。

当我们往下滑动时,当底部还剩1个(pageSize)数据的时候会自动加载下一页。
当然对于这个接口不需要传pageSize,所以返回的数据大小并不会受pageSize的影响,如此一来,我们就使用Paging3 完成了简单的数据分页请求。
/ Paging的加载状态 /
Paging3 为我们提供了获取Paging加载状态的方法,其中包含添加监听事件的方式以及在adapter中直接显示的方式,首先我们来看监听事件的方式。
使用监听事件方式获取加载状态
上面我们在Activity中创建了dataRecycleViewAdapter来显示页面数据,我们可以使用addLoadStateListener方法添加加载状态的监听事件,如下所示:
dataRecycleViewAdapter.addLoadStateListener {
    when (it.refresh) {
        is LoadState.NotLoading -> {
            Log.d(TAG, "is NotLoading")
        }
        is LoadState.Loading -> {
            Log.d(TAG, "is Loading")
        }
        is LoadState.Error -> {
            Log.d(TAG, "is Error")
        }
    }
}
这里的it是CombinedLoadStates数据类,有refresh、Append、Prepend 区别如下表格所示:
refresh | 在初始化刷新的使用 |
append | 在加载更多的时候使用 |
prepend | 在当前列表头部添加数据的时候使用 |
也就是说如果监测的是it.refresh,当加载第二页第三页的时候,状态是监听不到的,这里只以it.refresh为例。
LoadState的值有三种,分别是NotLoading:当没有加载动作并且没有错误的时候。Loading和Error顾名思义即对应为正在加载 和加载错误的时候,监听方式除了addLoadStateListener外,还可以直接使用loadStateFlow的方式,由于flow内部是一个挂起函数 所以我们需要在协程中执行,代码如下所示:
lifecycleScope.launch {
    dataRecycleViewAdapter.loadStateFlow.collectLatest {
        when (it.refresh) {
            is LoadState.NotLoading -> {

            }
            is LoadState.Loading -> {

            }
            is LoadState.Error -> {

            }
        }
    }
}
接下来我们运行上节的示例,运行成功后,点击查询按钮,将数据显示出来,我们看打印如下:
2020-11-14 16:39:19.841 23729-23729/com.example.pagingdatademo D/MainActivity: is NotLoading
2020-11-14 16:39:24.529 23729-23729/com.example.pagingdatademo D/MainActivity: 点击了查询按钮
2020-11-14 16:39:24.651 23729-23729/com.example.pagingdatademo D/MainActivity: is Loading
2020-11-14 16:39:25.292 23729-23729/com.example.pagingdatademo D/MainActivity: is NotLoading
首先是NotLoading 状态,因为我们什么都没有操作,点击了查询按钮后变成Loading状态因为正在加载数据,查询结束后再次回到了NotLoading的状态,符合我们的预期,那这个状态有什么用呢? 我们在Loading状态显示一个progressBar过渡提升用户体验等,当然最重要的还是Error状态,因为我们需要Error状态下告知用户。
我们重新打开App,断开网络连接,再次点击查询按钮,打印日志如下:
2020-11-14 16:48:25.943 26846-26846/com.example.pagingdatademo D/MainActivity: is NotLoading
2020-11-14 16:48:27.218 26846-26846/com.example.pagingdatademo D/MainActivity: 点击了查询按钮
2020-11-14 16:48:27.315 26846-26846/com.example.pagingdatademo D/MainActivity: is Loading
2020-11-14 16:48:27.322 26846-26846/com.example.pagingdatademo D/MainActivity: is Error
这里要注意的是什么呢,就是这个Error的状态,不是Paging为我们自动返回的,而是我们在DataSource中捕获异常后,使用LoadResult.Error方法告知的。
我们也需要在Error状态下监听具体的错误,无网络的话就显示无网络UI 服务器异常的话 就提示服务器异常,代码如下所示:
is LoadState.Error -> {
    Log.d(TAG, "is Error:")
    when ((it.refresh as LoadState.Error).error) {
        is IOException -> {
            Log.d(TAG, "IOException")
        }
        else -> {
            Log.d(TAG, "others exception")
        }
    }
}
我们在断网状态下,点击查询,日志如下所示:
2020-11-14 17:29:46.234 12512-12512/com.example.pagingdatademo D/MainActivity: 点击了查询按钮
2020-11-14 17:29:46.264 12512-12512/com.example.pagingdatademo D/MainActivity: 请求第1页
2020-11-14 17:29:46.330 12512-12512/com.example.pagingdatademo D/MainActivity: is Loading
2020-11-14 17:29:46.339 12512-12512/com.example.pagingdatademo D/MainActivity: is Error:
2020-11-14 17:29:46.339 12512-12512/com.example.pagingdatademo D/MainActivity: IOException
在adapter中显示
Paging3为我们提供了添加底部、头部adapter的方法,分别为withLoadStateFooter、withLoadStateHeader以及同时添加头部和尾部方法withLoadStateHeaderAndFooter,这里我们以添加尾部方法为例。
首先我们创建viewHolder LoadStateViewHolder绑定布局是底部显示的布局,一个正在加载的显示以及一个重试按钮,xml布局如下所以:
<layout>

    <androidx.constraintlayout.widget.ConstraintLayout xmlns:android="http://schemas.android.com/apk/res/android"
        xmlns:app="http://schemas.android.com/apk/res-auto"
        android:layout_width="match_parent"
        android:layout_height="match_parent">


        <LinearLayout
            android:id="@+id/ll_loading"
            android:layout_width="match_parent"
            android:layout_height="wrap_content"
            android:gravity="center"
            android:orientation="horizontal"
            android:visibility="gone"
            app:layout_constraintEnd_toEndOf="parent"
            app:layout_constraintStart_toStartOf="parent"
            app:layout_constraintTop_toTopOf="parent">

            <TextView
                android:layout_width="wrap_content"
                android:layout_height="wrap_content"
                android:text="正在加载数据... ..."
                android:textSize="18sp" />

            <ProgressBar
                android:layout_width="20dp"
                android:layout_height="20dp" />
        </LinearLayout>

        <Button
            android:id="@+id/btn_retry"
            android:layout_width="match_parent"
            android:layout_height="wrap_content"
            android:text="加载失败,重新请求"
            android:visibility="gone"
            app:layout_constraintStart_toStartOf="parent"
            app:layout_constraintTop_toBottomOf="@id/ll_loading" />

    </androidx.constraintlayout.widget.ConstraintLayout>
</layout>
正在加载提示和重新请求的布局默认都是隐藏,LoadStateViewHolder代码如下所示:
class LoadStateViewHolder(parent: ViewGroup, var retry: () -> Void) : RecyclerView.ViewHolder(
    LayoutInflater.from(parent.context)
        .inflate(R.layout.item_loadstate, parent, false)
) {

    var itemLoadStateBindingUtil: ItemLoadstateBinding = ItemLoadstateBinding.bind(itemView)

    fun bindState(loadState: LoadState) {
        if (loadState is LoadState.Error) {
            itemLoadStateBindingUtil.btnRetry.visibility = View.VISIBLE
            itemLoadStateBindingUtil.btnRetry.setOnClickListener {
                retry()
            }
        } else if (loadState is LoadState.Loading) {
            itemLoadStateBindingUtil.llLoading.visibility = View.VISIBLE
        }

    }

}
我们这里是和Adapter分为两个类中的,所以我们要将adapter中的parent当做参数传过来,retry()是一个高阶函数,便于点击重试后,在adapter中做重试逻辑。
bindState即为设置数据,根据State的状态来显示不同的UI。
接着我们来创建LoadStateFooterAdapter 继承自LoadStateAdapter,对应的viewHolder即为LoadStateViewHolder,代码如下所示:
class LoadStateFooterAdapter(private val retry: () -> Void) :
    LoadStateAdapter<LoadStateViewHolder>() {

    override fun onBindViewHolder(holder: LoadStateViewHolder, loadState: LoadState) {
        (holder as LoadStateViewHolder).bindState(loadState)
    }

    override fun onCreateViewHolder(parent: ViewGroup, loadState: LoadState): LoadStateViewHolder {
        return LoadStateViewHolder(parent, retry)
    }

}
这里的代码比较简单,就不作讲解了,最后我们来添加这个adapter.
rv_data.adapter =
    dataRecycleViewAdapter.withLoadStateFooter(footer = LoadStateFooterAdapter(retry = {
        dataRecycleViewAdapter.retry()
    }))
这里要注意的是,应该把withLoadStateFooter返回的adapter设置给recyclerview,如果你是这样写:dataRecycleViewAdapter.withLoadStateFooter后 在单独设置recycleView的adapter,则会是没有效果的。
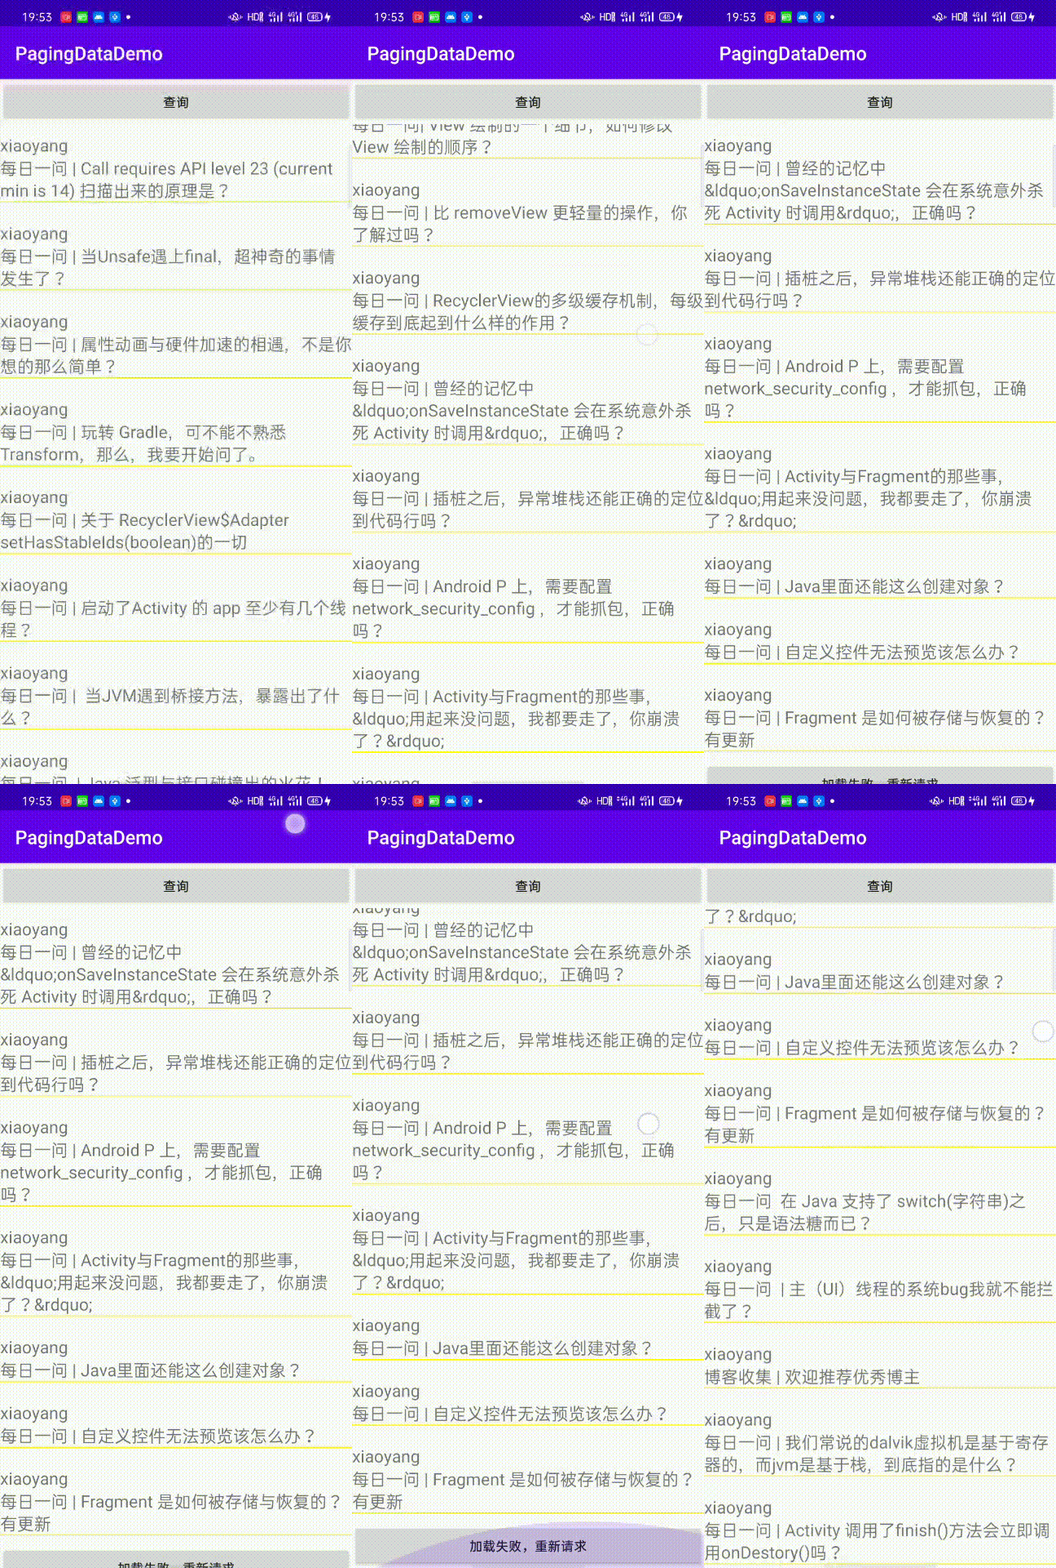
这里我们点击重试dataRecycleViewAdapter的retry()方法即可,我们运行程序求救第一页后,断开网络,然后往下滚动,效果如下所示:

如此,我们就在adapter中完成了数据加载状态的显示。
除此之外,Paging3中还有一个比较重要的RemoteMediator,用来更好的加载网络数据库和本地数据库,我们后续有机会再为大家单独分享吧~
2020年11月21日更新
paging3的设计理念是不建议对列表数据直接修改;而是对数据源进行操作,数据源的变化会自动更新到列表,看到评论区中很多朋友说如何操作item的删除和修改,这里我们使用最简单的方式即可。
对单个item的修改
我们都知道RecycleView中是没有直接监听item的Api的,一般都是在onBindViewHolder中去操作,或者通过回调在View层操作,在这里回调也可以写为一个高阶函数,我们这里回调到View层的原因是评论区中有伙伴评论说要操作viewModel,所以避免在将viewModel注入到adapter,我们直接使用一个高阶函数回调即可。修改DataRecycleViewAdapter代码如下所示:
class DataRecycleViewAdapter(
    val itemUpdate: (Int, DemoReqData.DataBean.DatasBean?,DataRecycleViewAdapter) -> Unit
) :
    PagingDataAdapter<DemoReqData.DataBean.DatasBean, RecyclerView.ViewHolder>(object :
        DiffUtil.ItemCallback<DemoReqData.DataBean.DatasBean>() {

        override fun areItemsTheSame(
            oldItem: DemoReqData.DataBean.DatasBean,
            newItem: DemoReqData.DataBean.DatasBean
        ): Boolean {
            return oldItem.id == newItem.id
        }

        @SuppressLint("DiffUtilEquals")
        override fun areContentsTheSame(
            oldItem: DemoReqData.DataBean.DatasBean,
            newItem: DemoReqData.DataBean.DatasBean
        ): Boolean {
            return oldItem == newItem
        }
    }) {
    override fun onBindViewHolder(holder: RecyclerView.ViewHolder, position: Int) {
        val dataBean = getItem(position)
        (holder as DataViewHolder).binding.demoReaData = dataBean
        holder.binding.btnUpdate.setOnClickListener {
            itemUpdate(position, dataBean,this)
        }
    }

    override fun onCreateViewHolder(parent: ViewGroup, viewType: Int): RecyclerView.ViewHolder {
        val binding: ItemDataBinding =
            DataBindingUtil.inflate(
                LayoutInflater.from(parent.context),
                R.layout.item_data,
                parent,
                false
            )
        return DataViewHolder(binding)
    }


    inner class DataViewHolder(private val dataBindingUtil: ItemDataBinding) :
        RecyclerView.ViewHolder(dataBindingUtil.root) {
        var binding = dataBindingUtil
    }


}
为了便于演示我们这里在数据列表中新增了一个更新数据的按钮,在Activity中声明adapter的代码修改如下:
private var dataRecycleViewAdapter = DataRecycleViewAdapter { position, it, adapter ->
    it?.author = "黄林晴${position}"
    adapter.notifyDataSetChanged()
}
我们通过执行高阶函数 将作者的名字修改为黄林晴和当前点击的序号,然后调用notifyDataSetChanged即可,演示效果如下所示:

对数据的删除、新增
我们都知道,在之前,我们给adapter设置一个List,如果需要删除或者新增,我们只要改变List即可,但是在Paging3中好像没有办法,因为数据源是PagingSource ,看了下官网的介绍。
A PagingSource / PagingData pair is a snapshot of the data set. A new PagingData / PagingData must be created if an update occurs, such as a reorder, insert, delete, or content update occurs. A PagingSource must detect that it cannot continue loading its snapshot (for instance, when Database query notices a table being invalidated), and call invalidate. Then a new PagingSource / PagingData pair would be created to represent data from the new state of the database query.
大致意思就是如果数据发生变化 必须创建新的PagingData ,所以暂时我也不知道如何可以在不重新请求的情况下,在数据删除、新增后来刷新,如果你有好的方案,欢迎赐教!
推荐阅读
• 耗时2年,Android进阶三部曲第三部《Android进阶指北》出版!
推荐我的技术博客
推荐一下我的独立博客: liuwangshu.cn ,内含Android最强原创知识体系,一直在更新,欢迎体验和收藏!
BATcoder技术群,让一部分人先进大厂
你好,我是刘望舒,百度百科收录的腾讯云TVP,著有畅销书《Android进阶之光》《Android进阶解密》《Android进阶指北》,蝉联四届电子工业出版社年度优秀作者,谷歌开发者社区特邀讲师。
前华为面试官,现大厂技术负责人。
欢迎添加我的微信 henglimogan ,备注:BATcoder,加入BATcoder技术群。
