
Android仿直播评论功能效果
废话不多说,直接上效果图:
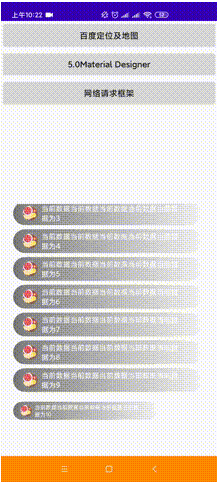
相信很多人对这个效果都不陌生,在很多的APP上面都有类似的效果,特别是在直播类的,一般涉及到评论的地方都会有很多这种效果出现,今天我们就来看一看如何去实现这个效果。
首先分析一下:
1.可以动态添加视图并且支持滚动,所以可以采用ScrollView+LinearLayout或者RecyclerView来实现,在这里我采用的是ScrollView+LinearLayout。
2.当新添加一个视图的时候,自动将其他视图顶上去,所以添加完视图之后需要将视图滚动到底部。
3.每个视图出现的时候是带有一定的动画效果,即从右下角变成完整的样式。
那么,接下来我们就来实现一下:
(1)设置布局
<RelativeLayoutandroid:layout_width="match_parent"android:layout_height="500dp"app:layout_constraintBottom_toBottomOf="parent"app:layout_constraintEnd_toEndOf="parent"app:layout_constraintStart_toStartOf="parent"><ScrollViewandroid:layout_width="match_parent"android:layout_height="wrap_content"android:layout_alignParentBottom="true"android:layout_marginLeft="20dp"android:layout_marginTop="80dp"android:layout_marginRight="20dp"android:layout_marginBottom="60dp"android:overScrollMode="never"android:scrollbars="none"><com.steven.baselibrary.view.CommentRollingandroid:id="@+id/comment_rolling_layout"android:layout_width="match_parent"android:layout_height="wrap_content" /></ScrollView></RelativeLayout>
(2)自定义类继承自LinearLayout,在这里实现动态添加View
public class CommentRolling extends LinearLayout {private Context mContext;private List<Map<String, Object>> mCommentList;private int mCurrent = 0;public CommentRolling(Context context) {this(context, null);}public CommentRolling(Context context, @Nullable AttributeSet attrs) {this(context, attrs, 0);}public CommentRolling(Context context, @Nullable AttributeSet attrs, int defStyleAttr) {super(context, attrs, defStyleAttr);this.mContext = context;setOrientation(VERTICAL);mCommentList = new ArrayList<>();}/*** 设置数据*/public void setList(List<Map<String, Object>> commentList) {if (mCommentList != null) {mCommentList.addAll(commentList);addText();}}/*** 添加单条数据*/public void addList(Map<String, Object> map) {if (mCommentList != null) {mCommentList.add(map);addText();}}/*** 添加View*/private void addText() {View view = LayoutInflater.from(mContext).inflate(R.layout.view_comment_rolling, this, false);ShapeableImageView imageView = view.findViewById(R.id.comment_rolling_image);TextView textView = view.findViewById(R.id.comment_rolling_text);Glide.with(mContext).load(mCommentList.get(mCurrent).get("commentImage")).into(imageView);textView.setText(String.valueOf(mCommentList.get(mCurrent).get("commentText")));if (mCurrent == 0) {view.setAlpha(0);}addView(view)view.post(() -> {((ScrollView) getParent()).fullScroll(ScrollView.FOCUS_DOWN);ScaleAnimation scaleAnimation1 = new ScaleAnimation(0f, 1f, 0f, 1f, 0, view.getHeight());scaleAnimation1.setDuration(1000);scaleAnimation1.setAnimationListener(new Animation.AnimationListener() {@Overridepublic void onAnimationStart(Animation animation) {if (mCurrent == 0) {view.setAlpha(1);}}@Overridepublic void onAnimationEnd(Animation animation) {if (mCurrent > 20) {removeViewAt(0);}mCurrent++;if (mCurrent < mCommentList.size()) {addText();}}@Overridepublic void onAnimationRepeat(Animation animation) {}});view.startAnimation(scaleAnimation1);});}}
在这里需要注意几点:
1》新添加一个视图的时候,自动将其他视图顶上去
((ScrollView) getParent()).fullScroll(ScrollView.FOCUS_DOWN);2》在每次addView的时候,视图并没有马上加上去,这个时候启动动画不一定有效果,所以需要使用view.post()将动画包裹。
3》视图不能无限叠加,否则容易出现OOM,按照自己的需求在合适的地方去removeViewAt(int position)。
(3)添加数据实现效果
val list = mutableListOf<MutableMap<String, Any>>().apply {for (i in 0..10) {val map = mutableMapOf<String, Any>().apply {put("commentImage","https://i.52112.com/icon/jpg/256/20210315/113065/4866441.jpg")put("commentText", "当前数据当前数据当前数据当前数据当前数据为$i")}add (map)}}comment_rolling_layout.setList(list)
当然,这仅仅只是功能的实现,并未进行进一步的封装,大家可以根据自己的需要去进行处理。
评论