
NetCore配置框架详解

前言
这边文章主要是对netcore中的配置框架做一个实战详解,篇幅较长内容涉及比较多,请耐心阅读并进行尝试,均采用控制台程序进行展示。
环境:
netcore 3.1.4
win10
vs 2019 16.5.5
1、依赖项安装
以下所有依赖项是包含了配置框架中主要用到的依赖项。
主要是以下两个包:
Microsoft.Extensions.Configuration.Abstractions 配置框架抽象包
Microsoft.Extensions.Configuration 实现包
配置框架中几个重要的对象:
IConfigurationBuilder
IConfigurationRoot
IConfiguration
IConfigurationProvider
其他的都主要是配置框架中的扩展项。下面介绍到相关的时候会给出是依赖于那个包,耐心阅读。
  <ItemGroup>
    <PackageReference Include="Microsoft.Extensions.Configuration" Version="3.1.4" />
    <PackageReference Include="Microsoft.Extensions.Configuration.Abstractions" Version="3.1.4" />
    <PackageReference Include="Microsoft.Extensions.Configuration.Binder" Version="3.1.4" />
    <PackageReference Include="Microsoft.Extensions.Configuration.CommandLine" Version="3.1.4" />
    <PackageReference Include="Microsoft.Extensions.Configuration.EnvironmentVariables" Version="3.1.4" />
    <PackageReference Include="Microsoft.Extensions.Configuration.FileExtensions" Version="3.1.4" />
    <PackageReference Include="Microsoft.Extensions.Configuration.Ini" Version="3.1.4" />
    <PackageReference Include="Microsoft.Extensions.Configuration.Json" Version="3.1.4" />
    <PackageReference Include="Microsoft.Extensions.Hosting" Version="3.1.4" />
    <PackageReference Include="Microsoft.Extensions.Hosting.Abstractions" Version="3.1.4" />
    <PackageReference Include="Microsoft.Extensions.Options" Version="3.1.4" />
  </ItemGroup>
2、根路径输出
在使用添加文件的配置时需要设置程序根目录,这里做了一个添加根目录的汇总以及输出展示。
可以看到AppContext.BaseDirectory和AppDomain.CurrentDomain.BaseDirectory输出了根目录绝对路径(后面多了\),而Environment.CurrentDirectory和Directory.GetCurrentDirectory()输出后面没有\。
有\的意义表示bin文件夹里的所有文件和文件夹;反之,bin文件夹里的所有文件和与bin同节的文件
一般都是使用Directory.GetCurrentDirectory()进行设置根目录,这里尝试了添加文件配置的时候四种方式都是可以的。
3、注册各种配置方式
下面代码块展示了添加各种配置的方式。
添加文件的时候有三个参数,第一个参数路径,第二个参数该文件是否可选,第三个参数是否热更新(文件发生变化配置自动更新)。
var builder = new ConfigurationBuilder();
builder.SetBasePath(Directory.GetCurrentDirectory());
//Microsoft.Extensions.Configuration.Json包
builder.AddJsonFile("appsetting.json", optional: false, reloadOnChange: true);
//Microsoft.Extensions.Configuration.Ini包
builder.AddIniFile("appsetting.ini", optional: false, reloadOnChange: true);
//Microsoft.Extensions.Configuration包
builder.AddInMemoryCollection(new Dictionary<string, string>
{
    {"Name","Jonny" },
    {"Age","25" },
    {"Gender","Male" },
    {"Address:Address1","重庆奉节" },
    {"Address:Address2","重庆渝北" }
});
//Microsoft.Extensions.Configuration.CommandLine包
builder.AddCommandLine(args);
//Microsoft.Extensions.Configuration.EnvironmentVariables包
builder.AddEnvironmentVariables();
| 方法 | 依赖包 | 说明 |
|---|---|---|
| AddJsonFile | Microsoft.Extensions.Configuration.Json | 通过Json文件,aspnet core中最常用的配置方式appsetting.json |
| AddIniFile | Microsoft.Extensions.Configuration.Ini | ini文件配置方式 |
| AddInMemoryCollection | Microsoft.Extensions.Configuration | 内存中配置 |
| AddCommandLine | Microsoft.Extensions.Configuration.CommandLine | 命令行 |
| AddEnvironmentVariables | Microsoft.Extensions.Configuration.EnvironmentVariables | 环境变量,环境变量在windows中使用key1:key2:value的方式进行层级之分。而在Linux中:使用双下划线__代替,在编写代码的时候照样使用:取,只是在添加环境变量的时候使用__ |
3.1 内存配置的读取
上面在内容中添加了配置,这里进行读取。
#region 内存配置的读取
{
    Console.WriteLine("=======================内存配置的读取======================");
    var configRoot = builder.Build();
    Console.WriteLine($"Name:{configRoot["Name"]}");
    Console.WriteLine($"Age:{configRoot["Age"]}");
    Console.WriteLine($"Gender:{configRoot["Gender"]}");
    //这里读取出Address节点下内容
    var addressRoot = configRoot.GetSection("Address");
    Console.WriteLine($"Address__Address1:{addressRoot["Address1"]}");
    Console.WriteLine($"Address__Address2:{addressRoot["Address2"]}");
}
#endregion
通过IConfiguration的GetSection()方法获取节点块,再通过配置Key名称获取对应的值,在IConfiguration中也可以通过:来分层读取,这里介绍了使用key的方式读取后下面在介绍其他方式的时候就不做过多介绍。
例如:
这里的Address1可以直接通过
configRoot["Address:Address1"]
读取。
最终的结果展示: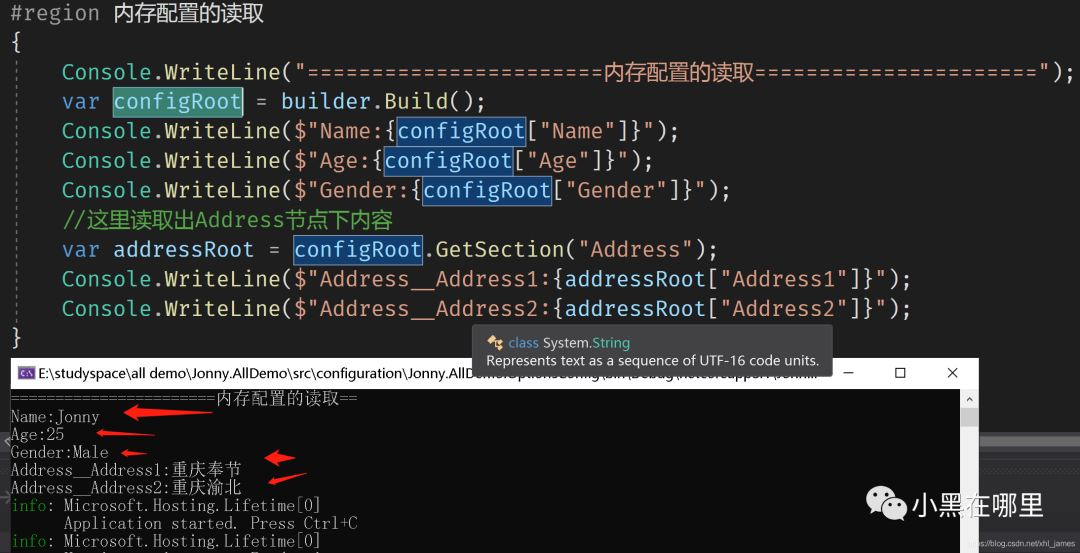
3.2 JSON配置的读取
配置文件appsetting.json内容如下:
{
  "AppConfig": {
    "RemoteService": "http://localhost:44371",
    "Hospital": {
      "Name": "重庆市妇幼保健院 一分院",
      "Tel": "023-56781234",
      "Level": 3
    }
  }
}
这里层级比较深,专为上面的GetSection()方法和:再一次验证。
测试代码:
#region JSON配置的读取
{
    Console.WriteLine("=======================JSON配置的读取======================");
    var configRoot = builder.Build();
    var appConfigRoot = configRoot.GetSection("AppConfig");
    Console.WriteLine($"AppConfig__RemoteService:{appConfigRoot["RemoteService"]}");
    var hospitalRoot = appConfigRoot.GetSection("Hospital");
    Console.WriteLine($"AppConfig__Hospital__Name:{hospitalRoot["Name"]}");
    Console.WriteLine($"AppConfig__Hospital__Tel:{hospitalRoot["Tel"]}");
    //这里通过一步到位获取一个值
    Console.WriteLine($"AppConfig__Hospital__Level:{configRoot["AppConfig:Hospital:Level"]}");
    //解释一下这里为什么用__来分隔,因为在Linux中:就是用双下划线__来替换的
}
#endregion
最终效果展示: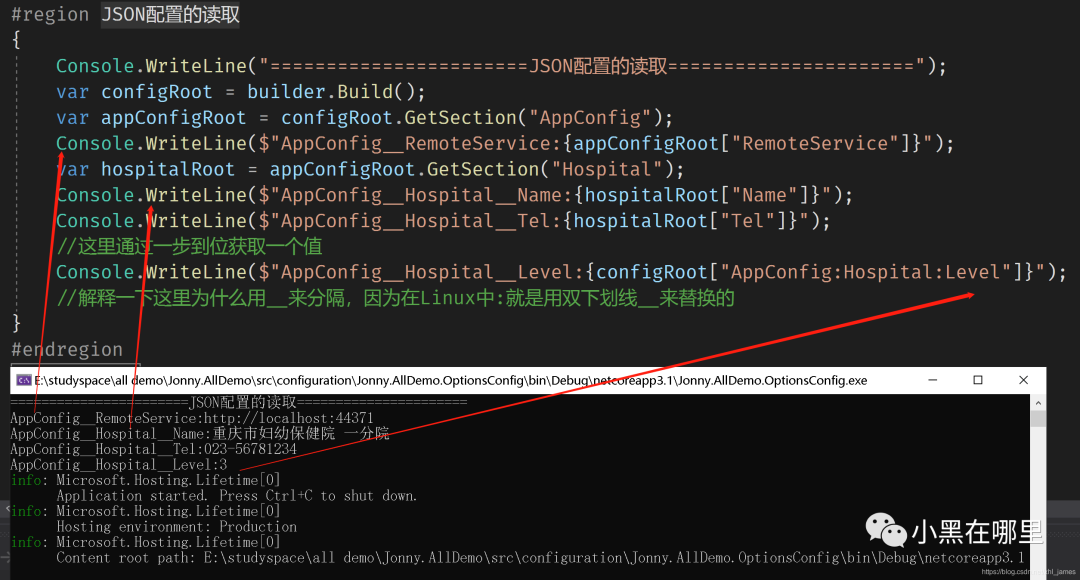
3.3 INI配置的读取
文件内容:
[服务器]
RemoteService=http://localhost:44372
Account=admin
测试代码:
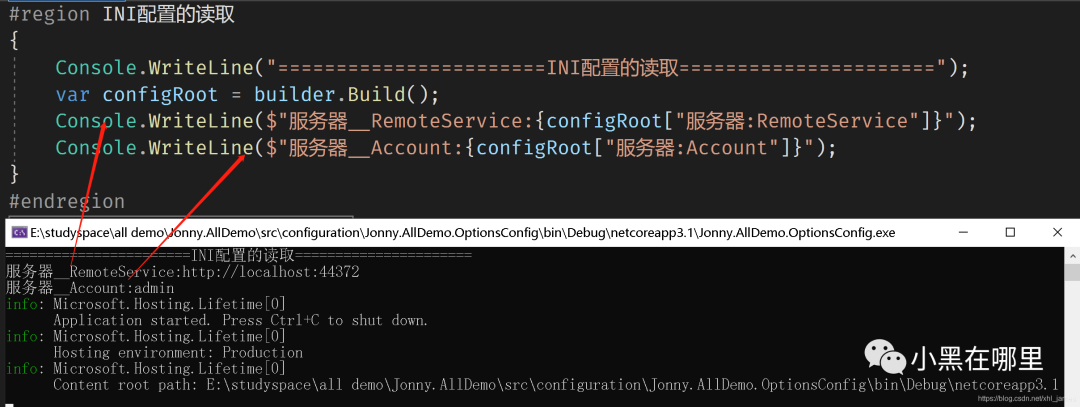
#region INI配置的读取
{
    Console.WriteLine("=======================INI配置的读取======================");
    var configRoot = builder.Build();
    Console.WriteLine($"服务器__RemoteService:{configRoot["服务器:RemoteService"]}");
    Console.WriteLine($"服务器__Account:{configRoot["服务器:Account"]}");
}
#endregion
3.4 命令行配置
#region 命令行配置
{
     Console.WriteLine("=======================命令行配置======================");
     //Microsoft.Extensions.Configuration.CommandLine包
     builder.AddCommandLine(args);
     var configRoot = builder.Build();
     Console.WriteLine($"CommandLine1:{configRoot["CommandLine1"]}");
     Console.WriteLine($"CommandLine2:{configRoot["CommandLine2"]}");
 }
 #endregion
通过项目属性–>调试–>添加命令行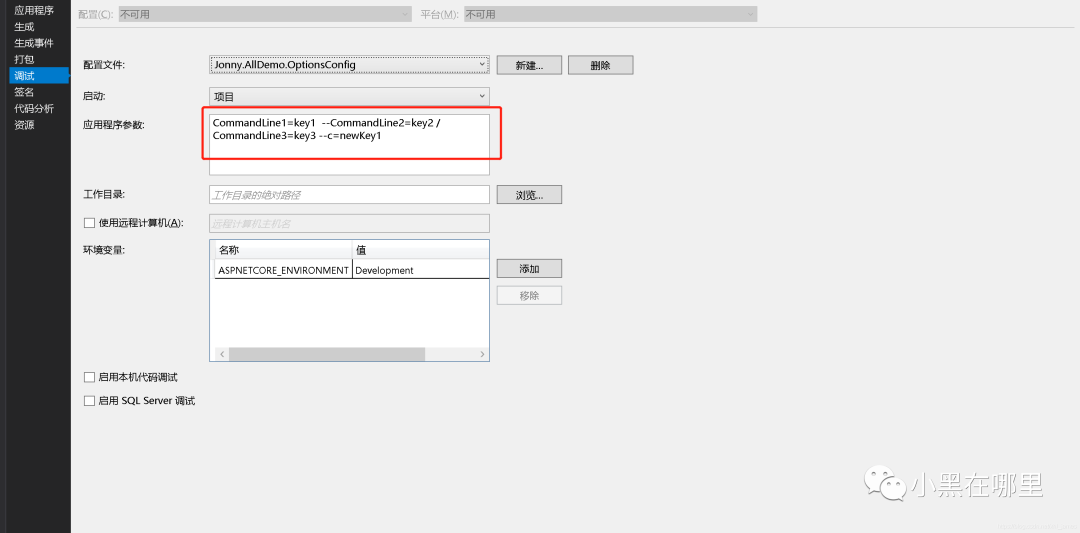
也可以使用launchSettings.json文件添加命令行
{
  "profiles": {
    "Jonny.AllDemo.OptionsConfig": {
      "commandName": "Project",
      "commandLineArgs": "CommandLine1=key1  --CommandLine2=key2 /CommandLine3=key3 --c=newKey1",
      "environmentVariables": {
        "ASPNETCORE_ENVIRONMENT": "Development"
      }
    },
    "launchSetting.json": {
      "commandName": "Executable"
    }
  }
}
commandLineArgs节点配置命令行。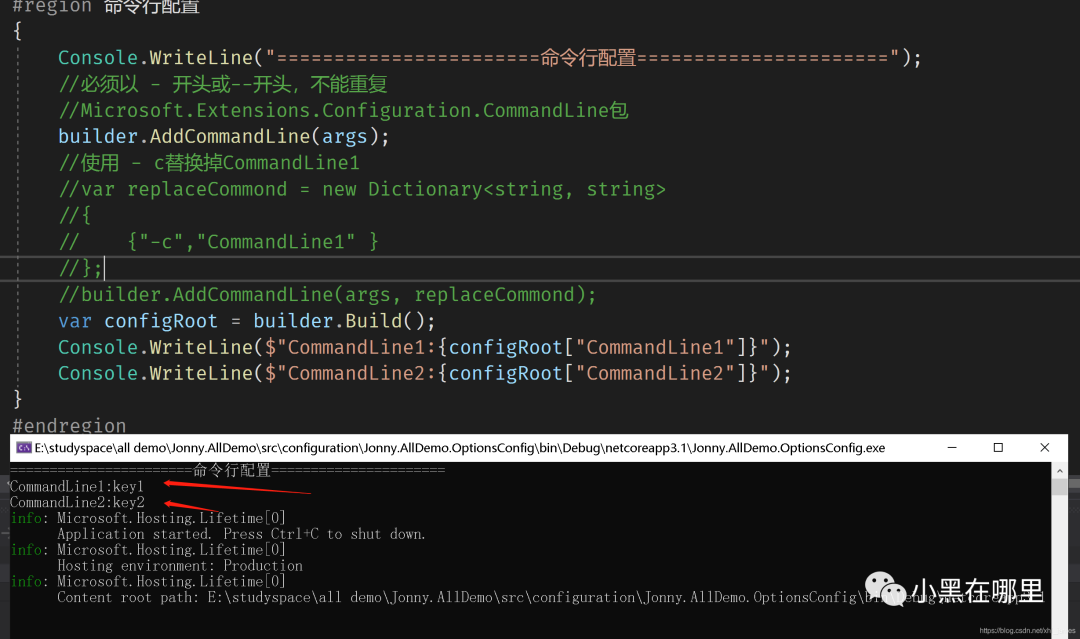
在dotnet-cli中我们可以看到–help命也可以使用-h代替,那么我们也可以这样操作。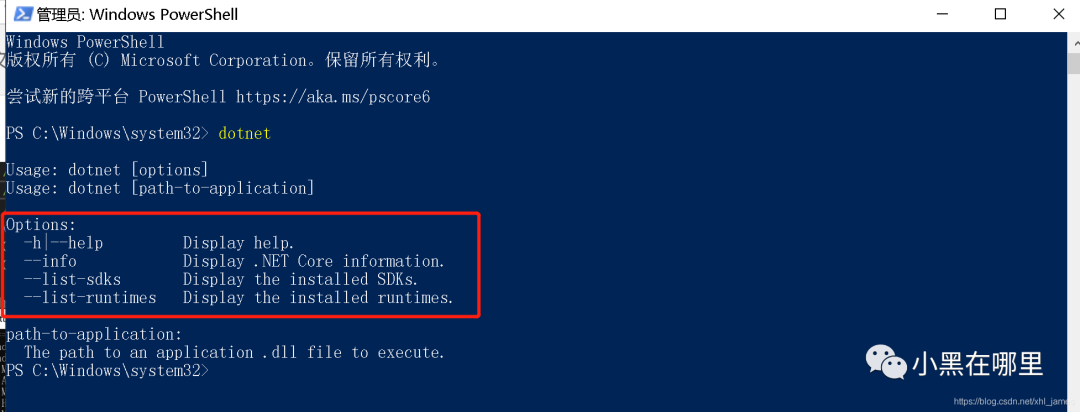
在上面的添加命令行方法AddCommandLine()第二个参数加入进去,使用-c代替CommandLine1命令。
//使用 - c替换掉CommandLine1
var replaceCommond = new Dictionary<string, string>
 {
     {"-c","CommandLine1" }
 };
 builder.AddCommandLine(args, replaceCommond);
修改命令行:
"commandLineArgs": "CommandLine1=key1 --CommandLine2=key2 /CommandLine3=key3 -c=newKey1"
将上面的–c改成-c。可以看到输出值变成了newKey1,不再是==key1 ==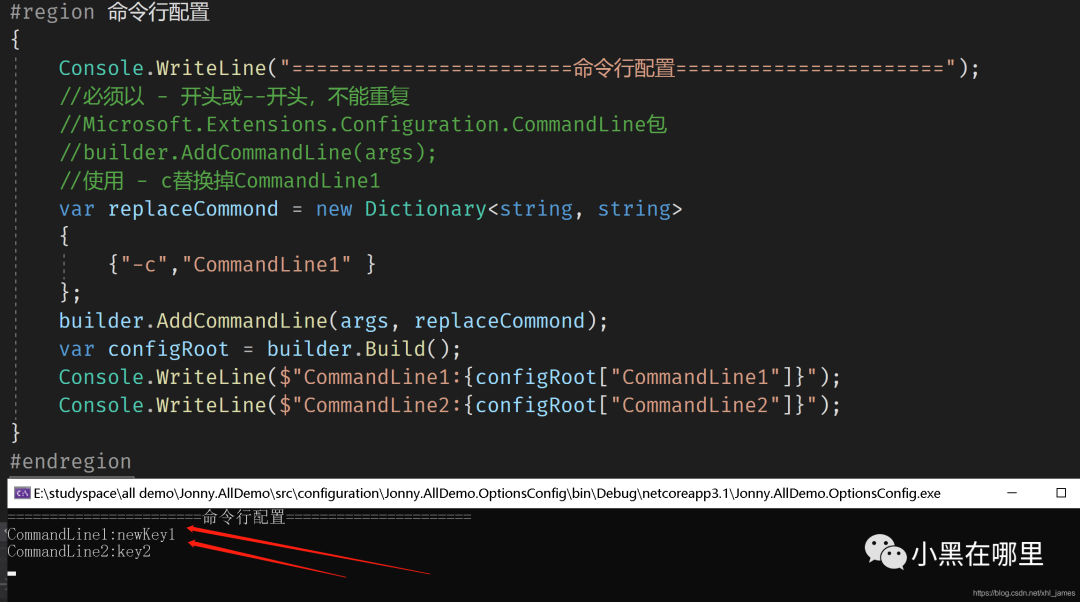
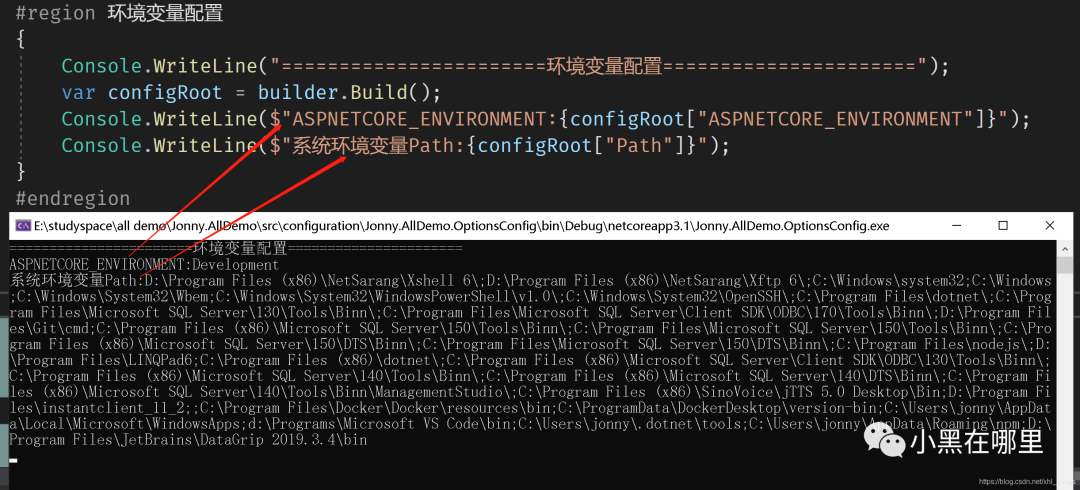
3.5 环境变量
项目中添加环境变量
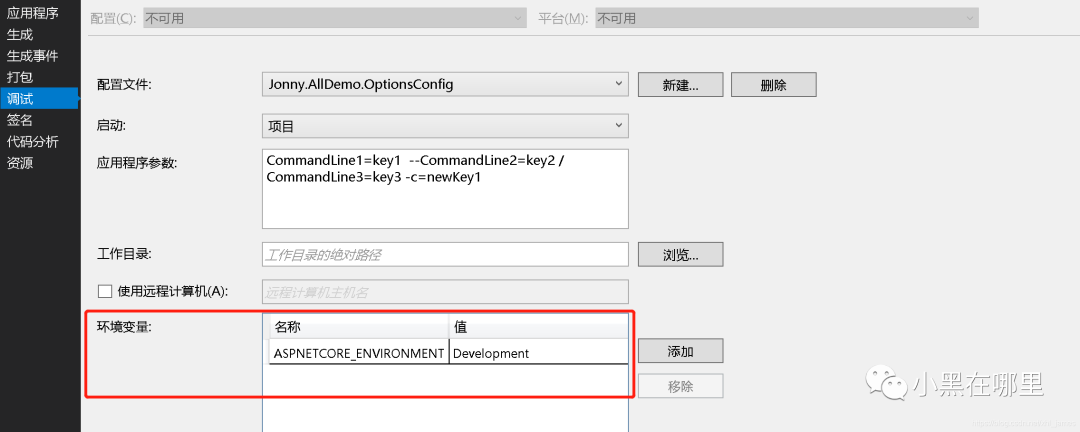
一般在asp.net core直接在文件中通过environmentVariables添加环境变量。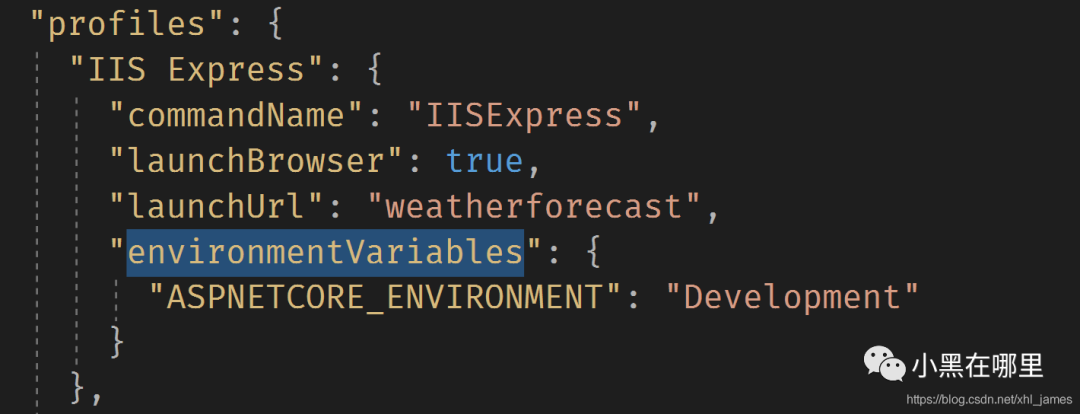
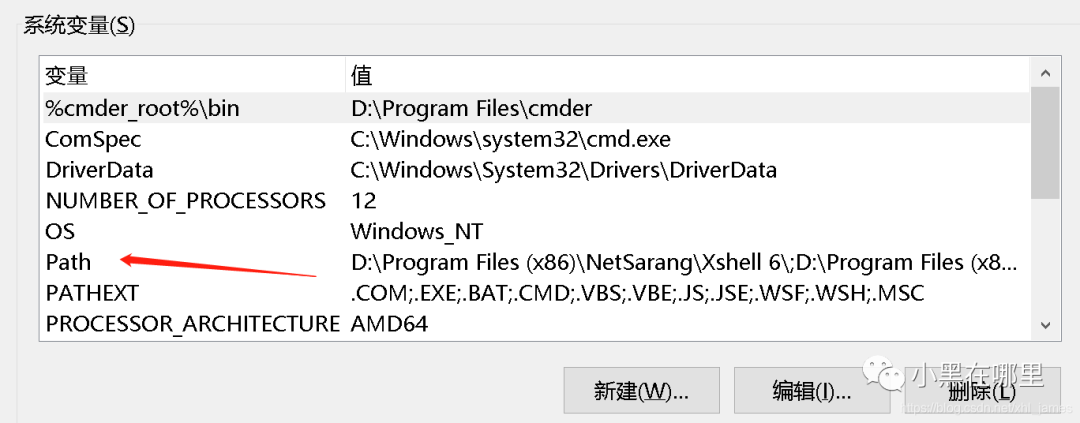
系统环境变量
读取
4、实体绑定配置
通过上面的各种方式来测试了配置框架中实现,但是在开发中一般不会这么操作 ,而是通过实体的绑定来进行操作的,在实体中操作又要涉及到netcore 框架中的依赖注入,本能篇幅就不对依赖注入进行展开,后面会更新。
这里我们定义配置实体IdentityClientOption,新增配置文件内容。
"IdentityClients": {
   "Default": {
     "GrantType": "password",
     "ClientId": "Jonny.AllDemo.OptionsConfig",
     "ClientSecret": "1q2w3E*",
     "UserName": "admin",
     "UserPassword": "1q2w3E*",
     "Authority": "https://localhost:44371",
     "Scope": "OptionsConfig"
   }
 }
public class IdentityClientOption
{
    public string GrantType { get; set; }
    public string ClientId { get; set; }
    public string ClientSecret { get; set; }
    public string UserName { get; set; }
    public string UserPassword { get; set; }
    public string Authority { get; set; }
    public string Scope { get; set; }
}
为了方便测试我们这里增加一个IUserAppService接口,其实也是可以直接通过ServiceProvider获取进行测试,但是在官方文档中这样的操作是返回的,应该使用注入的方式进行获取。
测试服务代码:
public class AppUser
{
     public string Name { get; set; }
     public int Age { get; set; }
     public Gender Gender { get; set; }
     public override string ToString()
     {
         return $"Name:{Name},Age:{Age},Gender:{Gender}";
     }
}
public enum Gender
{
    Unkonw,
    Male,
    Famale
}
public interface IUserAppService
{
    List<AppUser> GetUsers();
}
public class UserAppService : IUserAppService
{
    protected readonly IdentityClientOption _identityMonitor;
    protected readonly IdentityClientOption _identitySnapshot;
    protected readonly IdentityClientOption _identity;
    public UserAppService(IOptionsMonitor<IdentityClientOption> optionsMonitor,
        IOptionsSnapshot<IdentityClientOption> optionsSnapshot,
        IOptions<IdentityClientOption> options)
    {
        _identityMonitor = optionsMonitor?.CurrentValue;
        _identitySnapshot = optionsSnapshot?.Value;
        _identity = options?.Value;
        Console.WriteLine($"Monitor:\t{_identityMonitor?.ToString()}");
        Console.WriteLine($"Snapshot:\t{_identitySnapshot?.ToString()}");
        Console.WriteLine($"Options:\t{_identity?.ToString()}");
    }
    public List<AppUser> GetUsers()
    {
        return new List<AppUser>
        {
            new AppUser
            {
                Name="Jonny",
                Age=25,
                Gender=Gender.Male
            }
        };
    }
}
在测试之前我这里引入Host概念,这是asp.net core中的宿主静类。
宿主主要有两个依赖包:
Microsoft.Extensions.Hosting.Abstractions 抽象包
Microsoft.Extensions.Hosting 实现包
测试代码:
#region 实体绑定+验证+修改配置
{
    var configRoot = builder.Build();
    Host.CreateDefaultBuilder(args).ConfigureServices(services =>
    {
        services.AddSingleton<IUserAppService, UserAppService>();
        var defaultOption = configRoot.GetSection("IdentityClients:Default");
        //绑定实体
        {
            //这种方式任何生命周期注册都可以使用IOptions IOptionsSnapshot IOptionsMonitor
            services.AddOptions<IdentityClientOption>().Bind(defaultOption);
            //使用Configure的方式绑定
            services.Configure<IdentityClientOption>(defaultOption);
            //测试获取
            var userApp = services.BuildServiceProvider().GetRequiredService<IUserAppService>();
        }
    }).Build().Run();
}
通过ServiceProvider获取容器中的服务时会自动调用构造,具体服务之间的构造先后顺序以及涉及到的生命周期我这里就不再展开了。下面结果可以看到配置文件绑定到了IdentityClientOption中。
上面代码中可以看到使用了两种方式绑定:
//这种方式任何生命周期注册都可以使用IOptions IOptionsSnapshot IOptionsMonitor
services.AddOptions<IdentityClientOption>().Bind(defaultOption);
//使用Configure的方式绑定
services.Configure<IdentityClientOption>(defaultOption);
而使用IOptionsMonitor时使用CurrentValue,其他两个使用Value。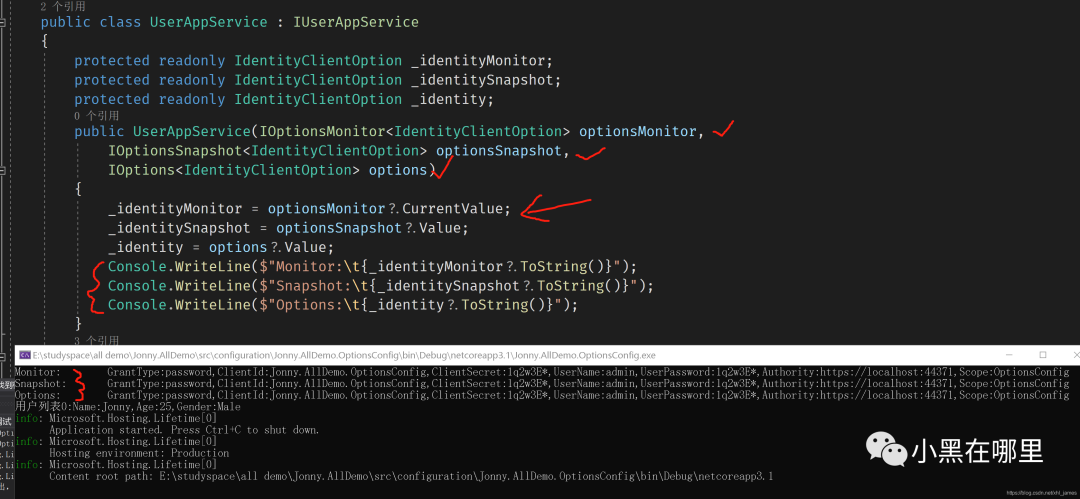
4.1 实体绑定验证
4.1.1 Validate()方法验证
这里测试之间将前面的appsetting.json内容GrantType值改成Client。
//验证--通过Validate()方法验证
services.AddOptions<IdentityClientOption>()
.Validate(option =>
{
    if (option.GrantType == "password")
    {
        return true;
    }
    return false;
});
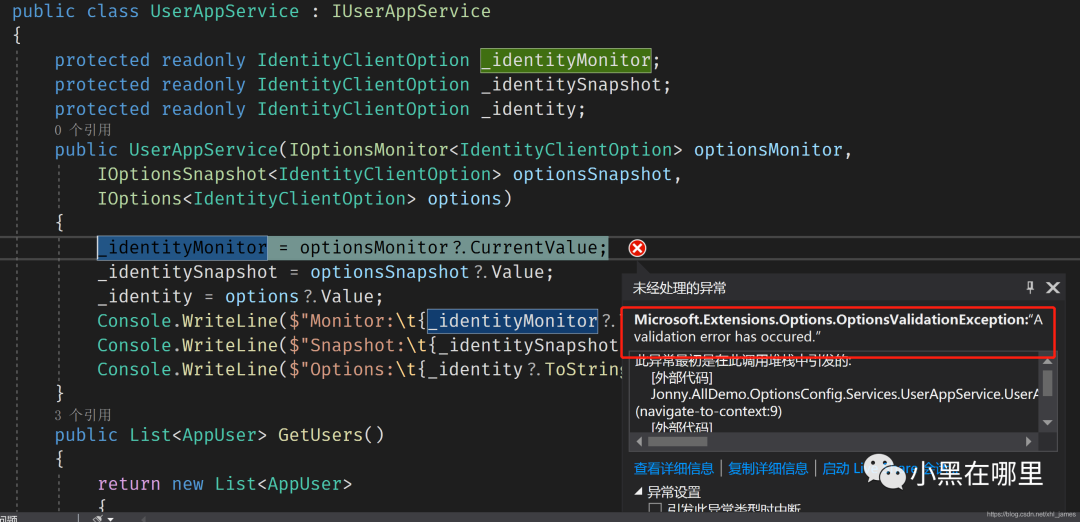
下面会抛出一个错误,这样配置中加入验证是为了程序部署的时候配置不成功不让启动,这样保证了程序正确性。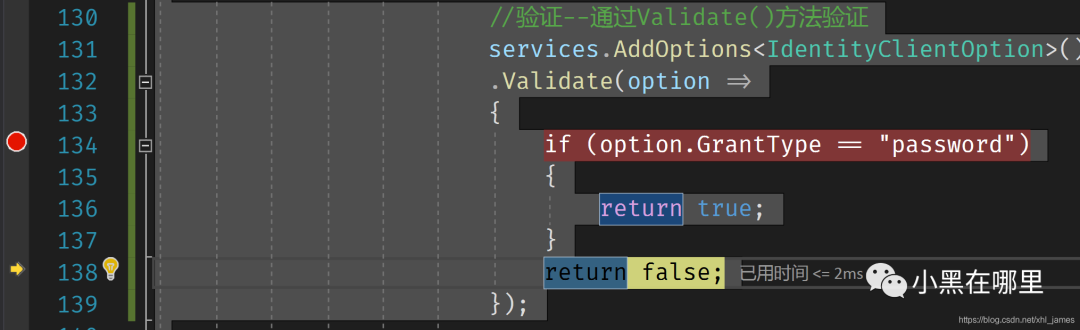
4.1.2 实现IValidateOptions添加验证
这种验证方式也是常用的验证方式,这样可以对复杂的配置项进行验证,验证代码统一 管理,单一职责性。
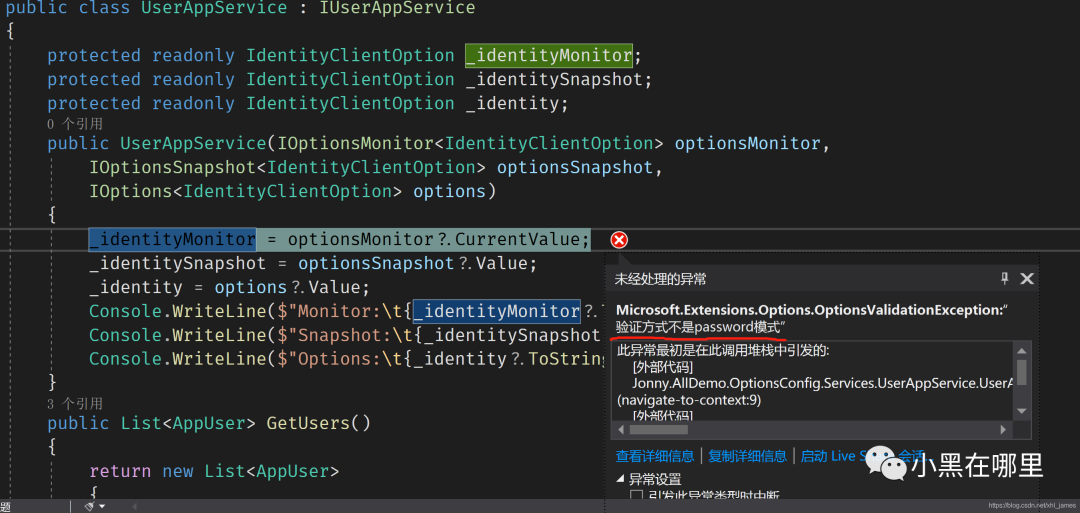
public class IdentityValitate : IValidateOptions<IdentityClientOption>
{
    public ValidateOptionsResult Validate(string name, IdentityClientOption options)
    {
        if (options.GrantType=="password")
        {
            return ValidateOptionsResult.Success;
        }
        return ValidateOptionsResult.Fail("验证方式不是password模式");
    }
}
添加验证到服务中:
//验证-- > 通过注册Validator来验证
services.AddSingleton<IValidateOptions<IdentityClientOption>, IdentityValitate>();
4.1.3 ValidateDataAnnotations()
安装Microsoft.Extensions.Options.DataAnnotations包,对于这个包相比大家都不是很陌生,以前MVC开发中模型验证都会用到DataAnnotations下的特性。
配置属性上增加验证。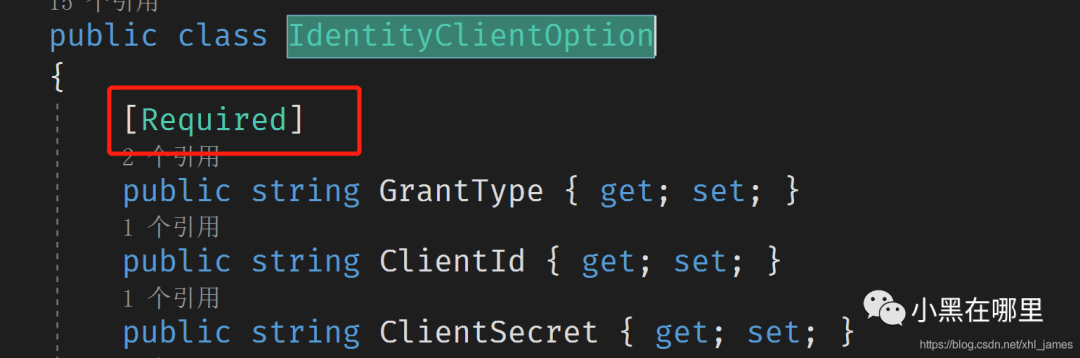
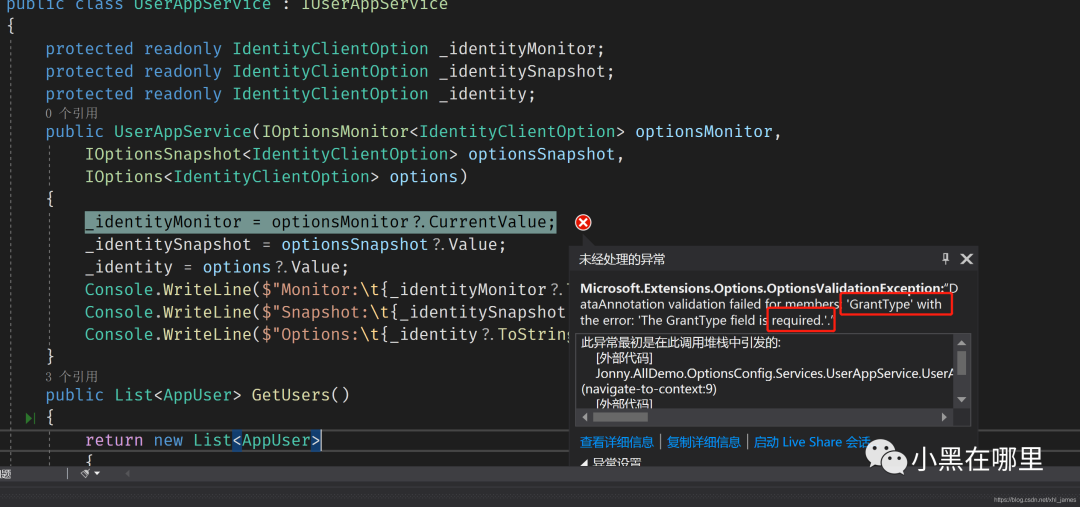
5、配置热更新
有时候项目上线后需要用到不停机的情况下修改配置,这样就要用到热更新。
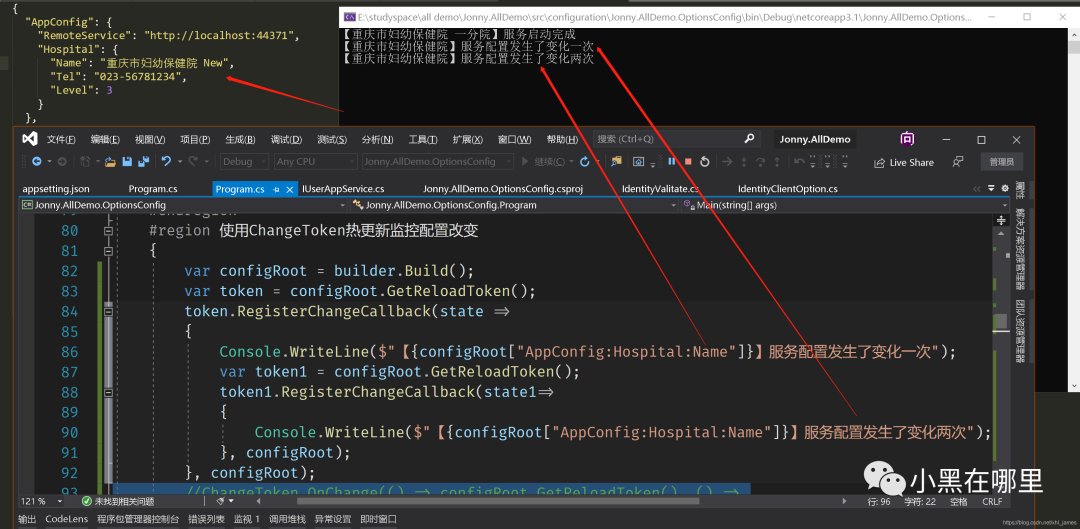
5.1 IChangeToken注册
#region 使用ChangeToken热更新监控配置改变
{
    var configRoot = builder.Build();
    var token = configRoot.GetReloadToken();
    token.RegisterChangeCallback(state =>
    {
        Console.WriteLine($"【{configRoot["AppConfig:Hospital:Name"]}】服务配置发生了变化一次");
        var token1 = configRoot.GetReloadToken();
        token1.RegisterChangeCallback(state1=>
        {
            Console.WriteLine($"【{configRoot["AppConfig:Hospital:Name"]}】服务配置发生了变化两次");
        }, configRoot);
    }, configRoot);
    Console.WriteLine($"【{configRoot["AppConfig:Hospital:Name"]}】服务启动完成");
}
#endregion
上面我直接注册了两次RegisterChangeCallback()方法,当我第一次修改文件Name值保存会输出更改值,当后面再更改后就没有发生变化。
所以,使用IChangeToken注册的只能触发第一次的更改变化,这样显然是达不到要求的。下面会接受另外的方式。
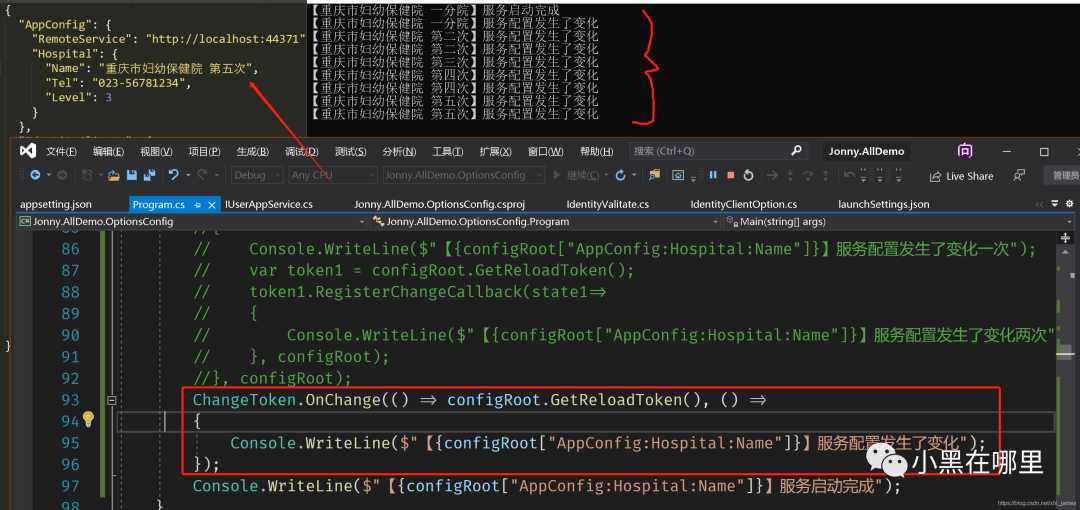
5.2 静态类ChangeToken
使用静态类ChangeToken的OnChange()方法进行监控。
ChangeToken.OnChange(() => configRoot.GetReloadToken(), () =>
{
    Console.WriteLine($"【{configRoot["AppConfig:Hospital:Name"]}】服务配置发生了变化");
});
修改bin\Debug文件夹下的配置文件进行测试,测试的过程中发现只要触发了文件的保存操作都会触发OnChange()方法,无论内容是否变化,不知这里是一个什么原因???
注意,由于我这里测试使用的是控制台应用程序,需要修改bin\Debug文件下面的配置文件才能生效,但是使用asp.net core就不用,直接修改项目中的配置文件就可以。
5.3 IOptionsSnapshot和IOptionsMonitor
由于我这里是控制台应用程序,我这里采用RegisterChangeCallback()方法来借助测试,通过更改后重新获取IUserAppService,输出可以看见
//测试获取
var userApp = services.BuildServiceProvider().GetRequiredService<IUserAppService>();
var token = configRoot.GetReloadToken();
token.RegisterChangeCallback(state =>
{
    var userNewApp = services.BuildServiceProvider().GetRequiredService<IUserAppService>();
}, configRoot);
这里包括IOptions也更新了,不知道是不是控制台应用程序的原因????
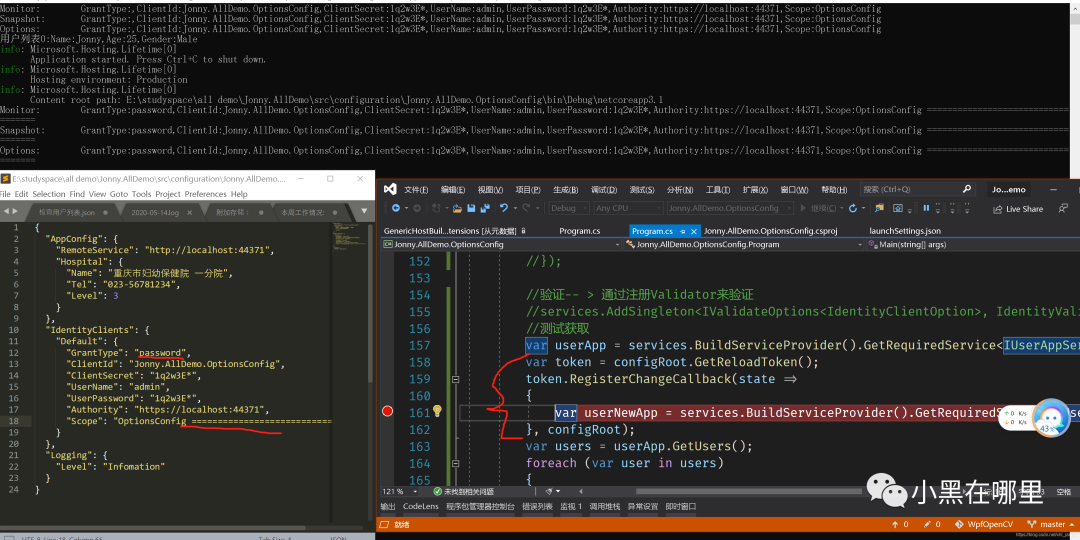
出现上面这么一个问题后我立马用asp.net core做了一个测试。测试结果表明`IOptions并不会更新,那么为什么上面就更新了呢??程序那点没写对??知道的大佬欢迎指正下,我下来也会去摸索。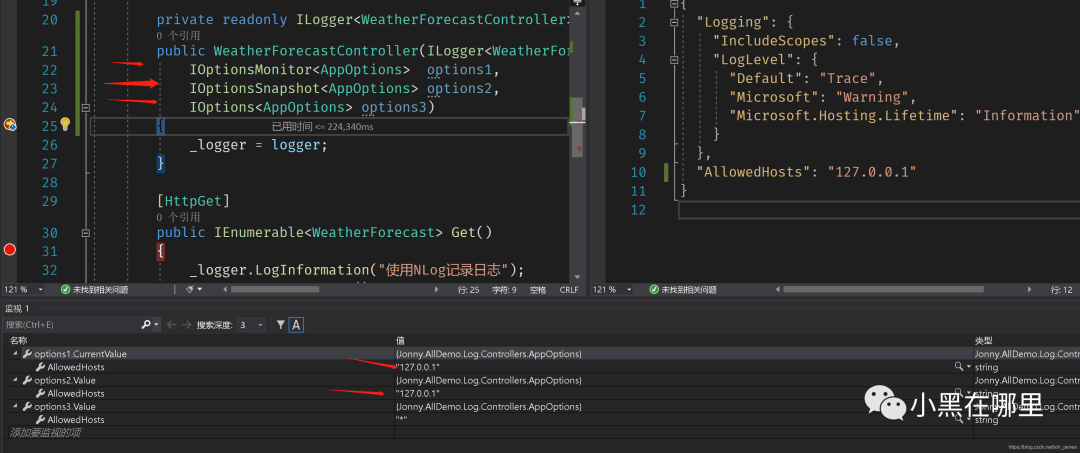
6 总结
以上所有内容的测试和文章记录多多少少花了两个晚上的时间,希望能够快速的给园友们带来帮助,写这篇文章让我对配置框架有了一个更深的认知,写了差不多3个小时左右,写作不易希望得园友们的支持点赞和关注。
文章中提到了依赖注入也使用了依赖注入的测试,后面会对依赖注入框架分享一篇文章。
.NET Core实战项目之CMS 第一章 入门篇-开篇及总体规划
【.NET Core微服务实战-统一身份认证】开篇及目录索引
Redis基本使用及百亿数据量中的使用技巧分享(附视频地址及观看指南)
.NET Core中的一个接口多种实现的依赖注入与动态选择看这篇就够了
用abp vNext快速开发Quartz.NET定时任务管理界面