访问Hive数据的几种骚姿势

关于Hive访问的几个名词
metadata :hive元数据,即hive定义的表名,字段名,类型,分区,用户这些数据。一般存储关系型书库mysql中,在测试阶段也可以用hive内置Derby数据库。
metastore :hivestore服务端。主要提供将DDL,DML等语句转换为MapReduce,提交到hdfs中。
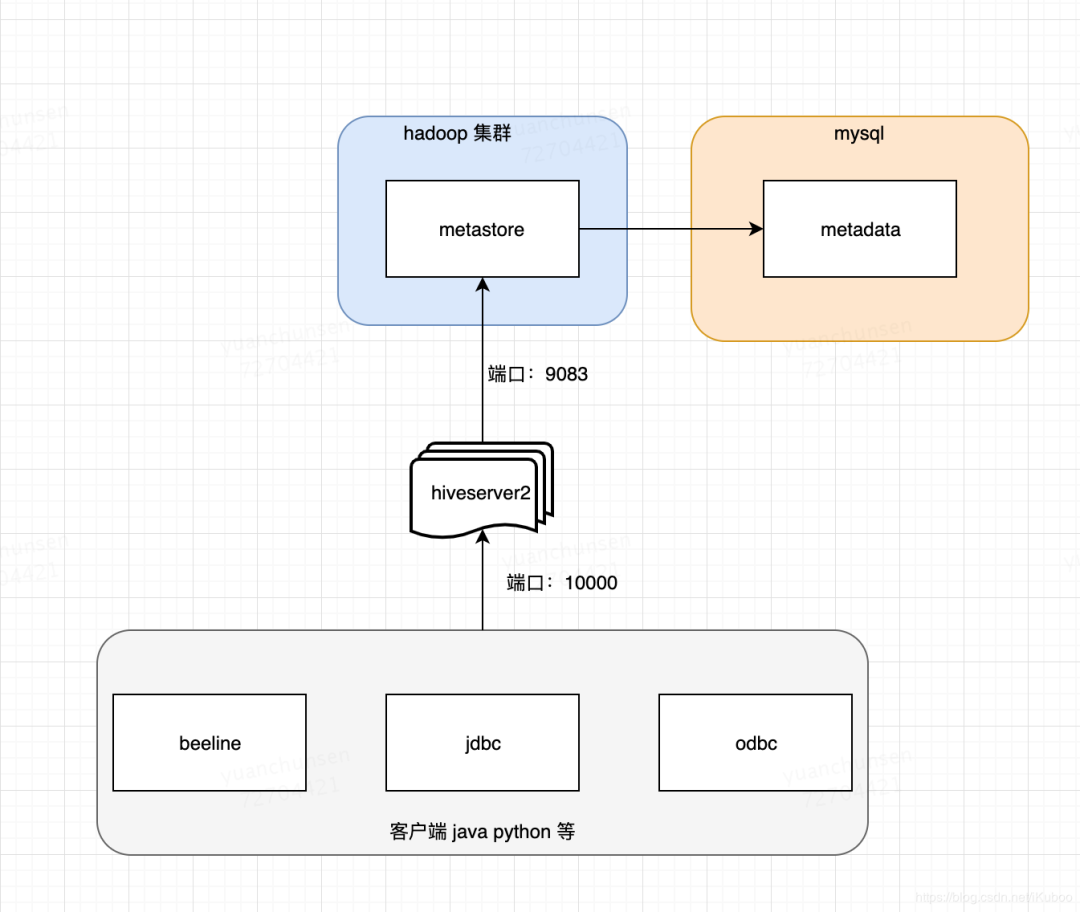
hiveserver2:hive服务端。提供hive服务。客户端可以通过beeline,jdbc(即用java代码链接)等多种方式链接到hive。
beeline:hive客户端链接到hive的一个工具。可以理解成mysql的客户端。如:navite cat 等。
hive-cli是一个遗留工具,它有两个主要的使用场景。第一个是它作为Hadoop上SQL的重客户端,第二个是它作为hiveserver(也就是现在说的"HiveServer1")的命令行工具。但是自从hive1.0 开始hiveserver已被弃用并从代码库中删除,并被替换为HiveServer2因此第二个使用场景不再适用。对于第一个使用场景,Beeline提供或应该提供相同的功能,但实现方式与hivecli不同。
其它语言访问hive主要是通过hiveserver2服务,HiveServer2(HS2)是一种能使客户端执行Hive查询的服务。HiveServer2可以支持对 HiveServer2 的嵌入式和远程访问,支持多客户端并发和身份认证。旨在为开放API客户端(如JDBC和ODBC)提供更好的支持。
会启动一个hive服务端默认端口为:10000,可以通过beeline,jdbc,odbc的方式链接到hive。hiveserver2启动的时候会先检查有没有配置hive.metastore.uris,如果没有会先启动一个metastore服务,然后在启动hiveserver2。如果有配置hive.metastore.uris。会连接到远程的metastore服务。这种方式是最常用的。部署在图如下:
 Python访问Hive
Python3访问hive需要安装的依赖有:
pip3 install thrift
pip3 install PyHive
pip3 install sasl
pip3 install thrift_sasl
这里有一个Python访问Hive的工具类:
# -*- coding:utf-8 -*-

from pyhive import hive


class HiveClient(object):
    """docstring for HiveClient"""
    def __init__(self, host='hadoop-master',port=10000,username='hadoop',password='hadoop',database='hadoop',auth='LDAP'):
        """
        create connection to hive server2
        """
        self.conn = hive.Connection(host=host,
            port=port,
            username=username,
            password=password,
            database=database,
            auth=auth)

    def query(self, sql):
        """
        query
        """
        with self.conn.cursor() as cursor:
            cursor.execute(sql)
            return cursor.fetchall()

    def insert(self, sql):
        """
        insert action
        """
        with self.conn.cursor() as cursor:
            cursor.execute(sql)
            # self.conn.commit()
            # self.conn.rollback()

    def close(self):
        """
        close connection
        """
        self.conn.close()
使用的时候,只需要导入,然后创建一个对象实例即可,传入sql调用query方法完成查询。
# 拿一个连接
hclient = hive.HiveClient()

# 执行查询操作
...

# 关闭连接
hclient.close()
注意:在insert插入方法中,我将self.conn.commit()和self.conn.rollback()即回滚注释了,这是传统关系型数据库才有的事务操作,Hive中是不支持的。
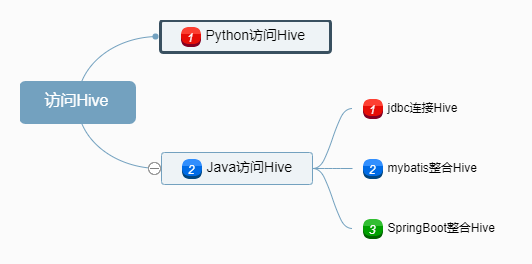
Java作为大数据的基础语言,连接hive自然是支持的很好的,这里介绍通过jdbc和mybatis两种方法连接hive。
1. Jdbc连接
java通过jdbc连接hiveserver,跟传统的jdbc连接mysql方法一样。
需要hive-jdbc依赖:
<dependency>
    <groupId>org.apache.hivegroupId>
    <artifactId>hive-jdbcartifactId>
    <version>1.2.1version>
dependency>
代码跟连接mysql套路一样,都是使用的DriverManager.getConnection(url, username, password):
@NoArgsConstructor
@AllArgsConstructor
@Data
@ToString
public class HiveConfigModel {

    private String url = "jdbc:hive2://localhost:10000";
    private String username = "hadoop";
    private String password = "hadoop";

}

@Test
public void test(){
    // 初始化配置
    HiveConfigModel hiveConfigModel = ConfigureContext.getInstance("hive-config.properties")
            .addClass(HiveConfigModel.class)
            .getModelProperties(HiveConfigModel.class);

    try {
        Connection conn = DriverManager.getConnection(hiveConfigModel.getUrl(),
                hiveConfigModel.getUsername(), hiveConfigModel.getPassword());


        String sql = "show tables";
        PreparedStatement preparedStatement = conn.prepareStatement(sql);
        ResultSet rs = preparedStatement.executeQuery();
        List tables = new ArrayList<>();
        while (rs.next()){
            tables.add(rs.getString(1));
        }

        System.out.println(tables);
    } catch (SQLException e) {
        e.printStackTrace();
    }
}
在hive-jdbc-1.2.1.jar的META-INF下有个services目录,里面有个java.sql.Driver文件,内容是:
org.apache.hive.jdbc.HiveDriver
java.sql.DriverManager使用spi实现了服务接口与服务实现分离以达到解耦,在这里jdbc的实现org.apache.hive.jdbc.HiveDriver根据java.sql.Driver提供的统一规范实现逻辑。客户端使用jdbc时不需要去改变代码,直接引入不同的spi接口服务即可。
DriverManager.getConnection(url, username, password)
这样即可拿到连接,前提是具体实现需要遵循相应的spi规范。
2. 整合mybatis
通常都会使用mybatis来做dao层访问数据库,访问hive也是类似的。
配置文件sqlConfig.xml:
        "http://mybatis.org/dtd/mybatis-3-config.dtd">
<configuration>
    <environments default="production">
        <environment id="production">
            <transactionManager type="JDBC"/>
            <dataSource type="POOLED">
                <property name="driver" value="org.apache.hive.jdbc.HiveDriver"/>
                <property name="url" value="jdbc:hive2://master:10000/default"/>
                <property name="username" value="hadoop"/>
                <property name="password" value="hadoop"/>
            dataSource>
        environment>
    environments>
    <mappers>
        <mapper resource="mapper/hive/test/test.xml"/>
    mappers>
configuration>
mapper代码省略,实现代码:
public classTestMapperImpl implements TestMapper {

    private static SqlSessionFactory sqlSessionFactory = HiveSqlSessionFactory.getInstance().getSqlSessionFactory();

    @Override
    public int getTestCount(String dateTime) {
        SqlSession sqlSession = sqlSessionFactory.openSession();
        TestMapper testMapper = sqlSession.getMapper(TestMapper.class);

        int count = testMapper.getTestCount(dateTime);

        sqlSession.close();

        return count;
    }
}
3. 整合SpringBoot
公司内部各个部门人员是层次不齐的,不可能都会使用大数据分析后台,更不会写sql,这时候可以开发一套自助取数系统,通过页面操作即可获取相应的数据,这时候通常需要使用SpringBoot连接mysql和Hive生成报表。SpringBoot整合Hive这里整合了Druid连接池。
需要完成的任务
每个人都可以在
web页面写sql,完成Hive查询任务;查询数据量不能太大,不要超过60天数据量(那将是灾难);
提交查询任务后,获取
yarn的资源情况,如果紧张,则拒绝;后台将异常,以及拒绝服务的原因通过抛出异常,反馈信息给前台页面;
如果前面有人查过了会将结果存入
mysql,第二个人查询,无需再查询Hive,只需要从mysql里面取;
1) 需要的依赖
为了节省篇幅,这里给出hiveserver2方式连接hive主要的maven依赖,父工程springboot依赖省略。
<properties>
    <hadoop.version>2.6.5hadoop.version>
    <mybatis.version>3.2.7mybatis.version>
properties>
<dependency>
    <groupId>org.mybatisgroupId>
    <artifactId>mybatisartifactId>
    <version>${mybatis.version}version>
dependency>


<dependency>
    <groupId>org.apache.hadoopgroupId>
    <artifactId>hadoop-commonartifactId>
    <version>${hadoop.version}version>
dependency>


<dependency>
    <groupId>org.apache.hivegroupId>
    <artifactId>hive-jdbcartifactId>
    <version>1.2.1version>
dependency>


<dependency>
    <groupId>org.jsoupgroupId>
    <artifactId>jsoupartifactId>
    <version>1.8.3version>
dependency>
2)application-test.yml文件:
# Spring配置
spring:
  # 数据源配置
  datasource:
    type: com.alibaba.druid.pool.DruidDataSource
    driverClassName: com.mysql.cj.jdbc.Driver
    druid:
      # 主库数据源
      master:
        url: jdbc:mysql://localhost:3306/test?useUnicode=true&characterEncoding=utf8&useSSL=true&serverTimezone=GMT%2B8
        username: root
        password: root
      # 从库数据源
      slave:
        # 从数据源开关/默认关闭
        enabled: true
        url: jdbc:mysql://localhost:3306/test2?useUnicode=true&characterEncoding=utf8&useSSL=true&serverTimezone=GMT%2B8
        username: root
        password: root
      # 从库数据源2
      # ...省略...
      # hive数据源
      slave3:
      # 从数据源开关/默认关闭
        enabled: true
        driverClassName: org.apache.hive.jdbc.HiveDriver
        url: jdbc:hive2://master:10000/default
        username: hive
        password: hive
      # 初始连接数
      initialSize: 5
      # 最小连接池数量
      minIdle: 10
      # 最大连接池数量
      maxActive: 20
      # 配置获取连接等待超时的时间
      maxWait: 60000
      # 配置间隔多久才进行一次检测,检测需要关闭的空闲连接,单位是毫秒
      timeBetweenEvictionRunsMillis: 60000
      # 配置一个连接在池中最小生存的时间,单位是毫秒
      minEvictableIdleTimeMillis: 300000
      # 配置一个连接在池中最大生存的时间,单位是毫秒
      maxEvictableIdleTimeMillis: 900000
这里数据源配置了mysql和Hive,默认情况下是使用主库master数据源,是访问mysql的,使用的时候只需要在mapper层进行切换即可。
代码实现跟其它程序一样,都是mapper、service、controller层,套路一模一样。一共设置了实时和离线两个yarn资源队列,由于其它部门人使用可能存在队列压力过大的情况,需要对数据量按照每次查询的数据范围不超过60天来限制,和此时集群使用资源不能大于55%,这里重点说明一下controller层对数据量的预防。
实体类UserModel:
@NoArgsConstructor
@AllArgsConstructor
@Data
@ToString
public class UserModel extends BaseEntity{

    private String userId;
    private Integer count;
}
3) 集群资源使用率不大于55%
因为很多业务查询逻辑controller都要用到数据量防御过大的问题,这里使用了被Spring切面关联的注解来标识controller。
定义切面YarnResourceAspect,并且关联注解@YarnResource
@Target({ElementType.TYPE, ElementType.METHOD})
@Retention(RetentionPolicy.RUNTIME)
public @interface YarnResource {

}

@Aspect
@Component
public class YarnResourceAspect {

    private static final Logger log = LoggerFactory.getLogger(YarnResourceAspect.class);

    /**
     * 配置切入点
     */
    @Pointcut("@annotation(com.ruoyi.common.annotation.YarnResource)")
    public void yarnResourcdPointCut(){
    }

    /**
     * 检查yarn的资源是否可用
     */
    @Before("yarnResourcdPointCut()")
    public void before(){
        log.info("************************************检查yarn的资源是否可用*******************************");
        // yarn资源紧张
        if(!YarnClient.yarnResourceOk()){
            throw new InvalidStatusException();
        }
    }

}
4) 获取yarn的资源使用数据:
因为提交任务的时间是不定的,我们需要根据用户提交时候的yarn资源状态来判断当前是否能执行Hive查询,以免影响线上任务。
@Slf4j
public class YarnClient {

    /**
     * yarn资源不能超过多少
     */
    private static final int YARN_RESOURCE = 55;

    /**
     *
     * @return true : 表示资源正常, false: 资源紧张
     */
    public static boolean yarnResourceOk() {
        try {
            URL url = new URL("http://master:8088/cluster/scheduler");
            HttpURLConnection conn = null;
            conn = (HttpURLConnection) url.openConnection();
            conn.setRequestMethod("GET");
            conn.setUseCaches(false);
            // 请求超时5秒
            conn.setConnectTimeout(5000);
            // 设置HTTP头:
            conn.setRequestProperty("Accept", "*/*");
            conn.setRequestProperty("User-Agent", "Mozilla/5.0 (Windows NT 6.1; Win64; x64) AppleWebKit/537.36 (KHTML, like Gecko) Chrome/86.0.4240.111 Safari/537.36");
            // 连接并发送HTTP请求:
            conn.connect();

            // 判断HTTP响应是否200:
            if (conn.getResponseCode() != 200) {
                throw new RuntimeException("bad response");
            }
            // 获取所有响应Header:
            Map> map = conn.getHeaderFields();
            for (String key : map.keySet()) {
                System.out.println(key + ": " + map.get(key));
            }
            // 获取响应内容:
            InputStream input = conn.getInputStream();
            byte[] datas = null;

            try {
                // 从输入流中读取数据
                datas = readInputStream(input);
            } catch (Exception e) {
                e.printStackTrace();
            }
            String result = new String(datas, "UTF-8");// 将二进制流转为String

            Document document = Jsoup.parse(result);

            Elements elements = document.getElementsByClass("qstats");

            String[] ratios = elements.text().split("used");

            return Double.valueOf(ratios[3].replace("%", "")) < YARN_RESOURCE;
        } catch (IOException e) {
            log.error("yarn资源获取失败");
        }

        return false;

    }

    private static byte[] readInputStream(InputStream inStream) throws Exception {
        ByteArrayOutputStream outStream = new ByteArrayOutputStream();
        byte[] buffer = new byte[1024];
        int len = 0;
        while ((len = inStream.read(buffer)) != -1) {
            outStream.write(buffer, 0, len);
        }
        byte[] data = outStream.toByteArray();
        outStream.close();
        inStream.close();
        return data;
    }
}
5) 在controller上通过注解@YarnResource标识:
@Controller
@RequestMapping("/hero/hive")
public class HiveController {

    /**
     * html 文件地址前缀
     */
    private String prefix = "hero";

    @Autowired
    IUserService iUserService;

    @RequestMapping("")
    @RequiresPermissions("hero:hive:view")
    public String heroHive(){
        return prefix + "/hive";
    }

    @YarnResource
    @RequestMapping("/user")
    @RequiresPermissions("hero:hive:user")
    @ResponseBody
    public TableDataInfo user(UserModel userModel){
        DateCheckUtils.checkInputDate(userModel);

        PageInfo pageInfo = iUserService.queryUser(userModel);
        TableDataInfo tableDataInfo = new TableDataInfo();

        tableDataInfo.setTotal(pageInfo.getTotal());
        tableDataInfo.setRows(pageInfo.getList());

        return tableDataInfo;
    }
}
6) 查询数据跨度不超过60天检查
这样每次请求进入controller的时候就会自动检查查询的日期是否超过60天了,防止载入数据过多,引发其它任务资源不够。
public class DateCheckUtils {

    /**
     * 对前台传入过来的日期进行判断,防止查询大量数据,造成集群负载过大
     * @param o
     */
    public static void checkInputDate(BaseEntity o){
        if("".equals(o.getParams().get("beginTime")) && "".equals(o.getParams().get("endTime"))){
            throw new InvalidTaskException();
        }

        String beginTime = "2019-01-01";
        String endTime = DateUtils.getDate();

        if(!"".equals(o.getParams().get("beginTime"))){
            beginTime = String.valueOf(o.getParams().get("beginTime"));
        }

        if(!"".equals(o.getParams().get("endTime"))){
            endTime = String.valueOf(o.getParams().get("endTime"));
        }

        // 查询数据时间跨度大于两个月
        if(DateUtils.getDayBetween(beginTime, endTime) > 60){
            throw new InvalidTaskException();
        }
    }
}
这里访问hive肯定需要切换数据源的,因为其它页面还有对mysql的数据访问,需要注意一下。
7) 每次查询结果都会入mysql
前面有人查询过了,会将数据保持到mysql,再返回到页面,后面另外部门第二个人查询时候,先从mysql取数据,如果没有,就从Hive里面查询。下面这部分代码也是controller里面的,这里单独拎出来了。
// 首先从mysql查,没有再从hive查,mysql相当于一个缓存介质
PageInfo pageInfo = iToplocationService.queryToplocation(toplocationCountModel);
if(pageInfo.getList().size() > 0){
    log.info("数据exists, 直接从mysql获取...");
    tableDataInfo.setTotal(pageInfo.getTotal());
    tableDataInfo.setRows(pageInfo.getList());
}else if(iToplocationService.queryExistsToplocation(toplocationCountModel) == null){
    log.info("从hive中查询数据...");
    PageInfo pageInfo2 = iToplocationService.query(toplocationCountModel);

    // 保存到mysql
    log.info("批量保存到mysql...");
    List toplocationCountModels = pageInfo2.getList();
    int i = 0;
    while (i < toplocationCountModels.size()){
        if(toplocationCountModels.size() - i > 10000){
            iToplocationService.insertToplocation(toplocationCountModels.subList(i, i + 10000));
        }else{
            iToplocationService.insertToplocation(toplocationCountModels.subList(i, toplocationCountModels.size()));
        }

        i = i + 10000;
    }
目前功能看起来很简单,没有用到什么高大上的东西,后面慢慢完善。
