
玩出花的 Stepper 组件

老孟导读:这是在 medium 上看到的一篇文章,Stepper 组件我也写过一篇文章,但是看完这篇文章后,仍然给我一种惊艳的感觉,感叹 Stepper 还能这么玩?
废话不多说,直接上文章,文章末尾有文章的原文链接。
Flutter是Google的UI工具包,可通过单一代码库制作精美的,本机编译的iOS和Android应用程序。为了构建任何应用程序,我们从Widget 开始。Widget 描述了给定其当前配置和状态的视图应具有的外观。它包含Text、Row、Column、Container等。
在本文中,我们探索Flutter中的 Stepper 组件。我们将实现一个 Stepper 演示程序,以及如何在 flutter 应用程序中使用它。
目录:
Stepper 组件 代码实现 代码文件 结论

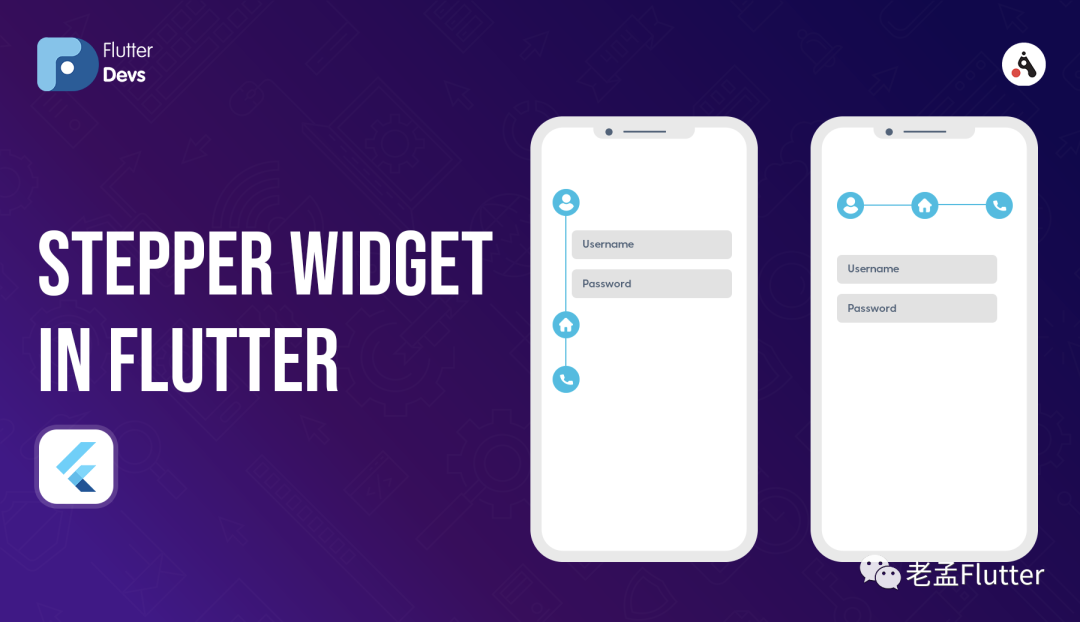
Stepper 组件
Material 风格的 Stepper 组件通过一系列步骤展示进度,Stepper 组件在如下场景中特别有用:
一步接一步的表单场景中。 完成各个步骤以显示完整的表格。
Stepper 组件是一个灵活的包装器。父类应根据其给出的三个回调设置将currentStep的值传递给此组件。
Demo Module

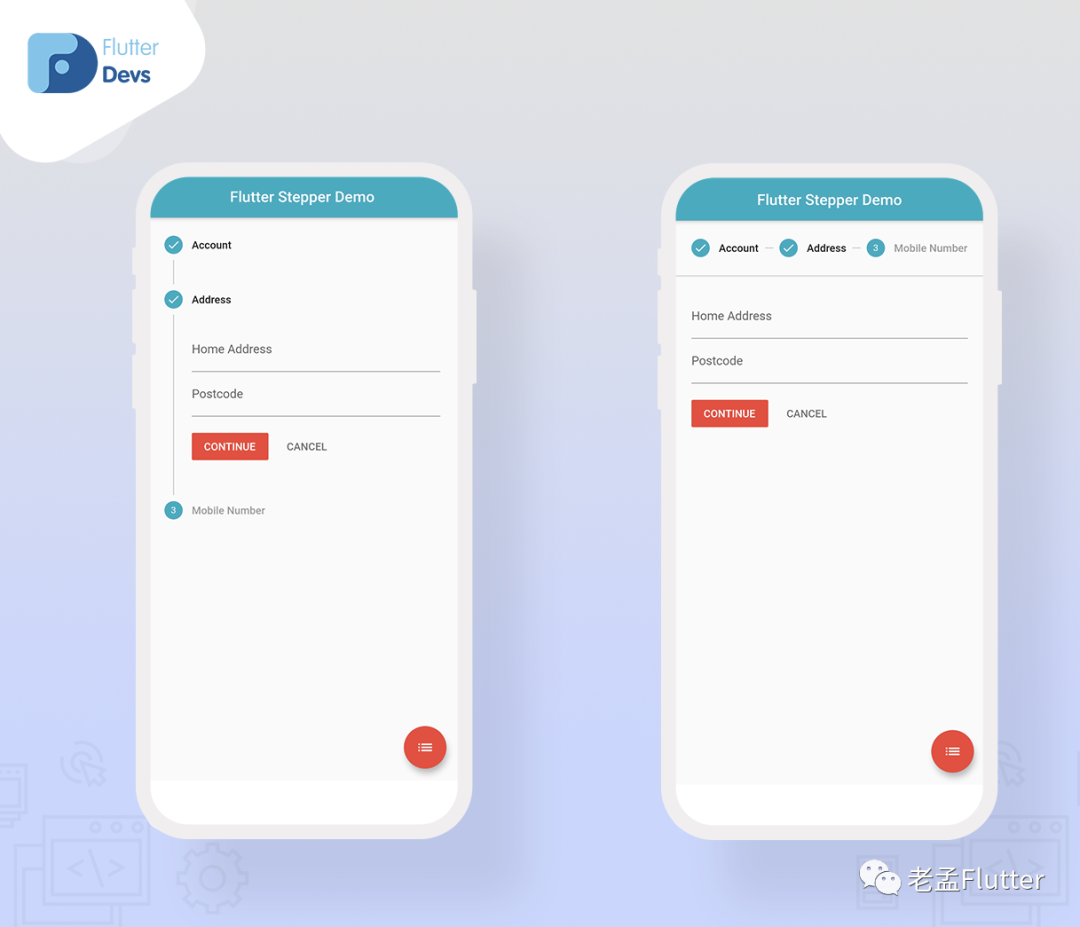
该视频演示了如何在flutter中创建stepper小部件,并展示了stepper小部件将如何在flutter应用程序中工作。当您单击浮动操作按钮时,它们将更改水平/垂直方向的类型。它们将显示在您的设备上。
代码实现
创建一个 stepper_demo.dart文件,

我们需要加入onStepContinue,onStepCancel,onStepTapped和currenStepallow,以便用户循环浏览。
现在,我们将创建一个currentStep的整数。显示其内容的当前步骤的步骤索引。
int _currentStep = 0;
现在,onStepTapped是在点击步骤时调用的回调,并将其索引作为参数传递。我们将创建一个tapped()小部件以及如下所示的代码。
tapped(int step){
  setState(() => _currentStep = step);
}
现在,onStepContinue是在点击“继续”按钮时调用的回调。如果为null,则“继续”按钮将被禁用。我们将创建一个continuous()小部件和代码,如下所示。
continued(){
  _currentStep < 2 ?
      setState(() => _currentStep += 1): null;
}
当我们按下继续按钮时,该步骤将前进到另一步骤。
现在,onStepCancel是在点击“取消”按钮时调用的回调。如果为null,则“取消”按钮将被禁用。我们将创建一个cancel()小部件和代码,如下所示。
cancel(){
  _currentStep > 0 ?
      setState(() => _currentStep -= 1) : null;
}
当我们按下取消按钮时,该步骤将退回到上一步。当我们按下取消按钮时,该步骤将退回到上一步。
我们将创建一个包含三个步骤的步进器。我们将深入定义以下三个步骤:
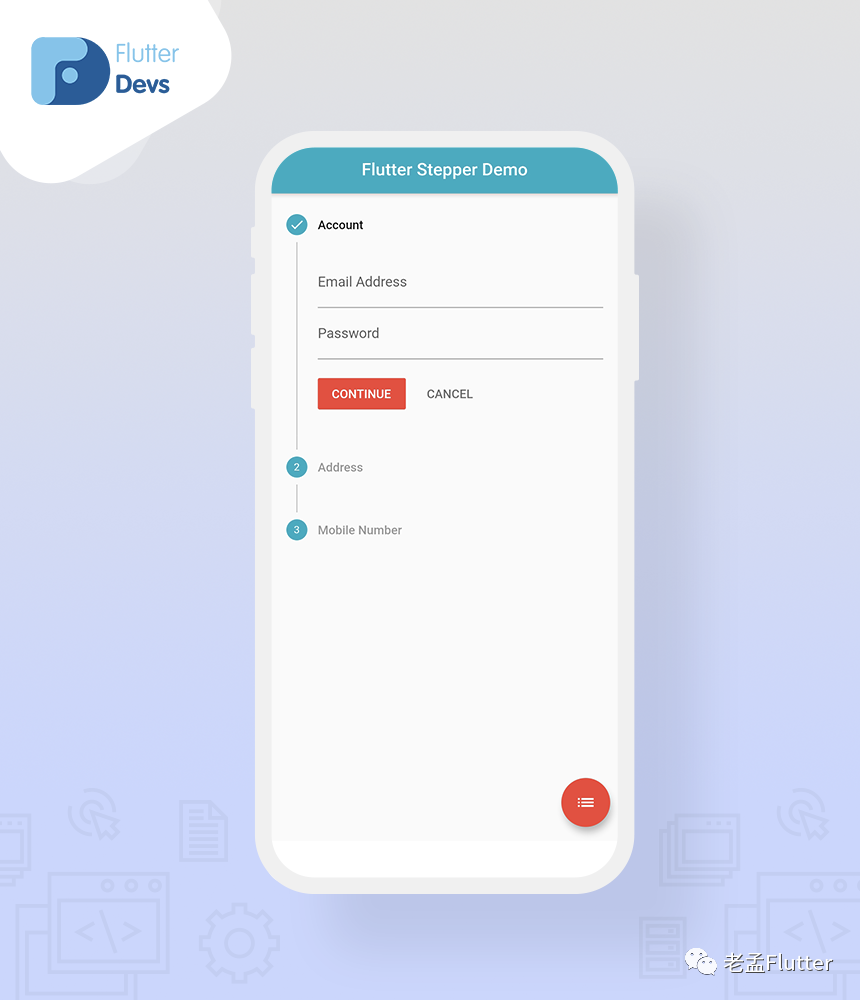
第一步,我们将其称为“Account”。在此步骤中,我们将创建两个TextFormField,分别称为Email Address和Password。
Step(
  title: new Text('Account'),
  content: Column(
    children: [
      TextFormField(
        decoration: InputDecoration(labelText: 'Email Address'),
      ),
      TextFormField(
        decoration: InputDecoration(labelText: 'Password'),
      ),
    ],
  ),
  isActive: _currentStep >= 0,
  state: _currentStep >= 0 ?
  StepState.complete : StepState.disabled,
),
当用户点击继续按钮时,该步骤将前进到下一步。该数字已更改为活动的刻度图标。在此步骤中,取消按钮将不起作用。
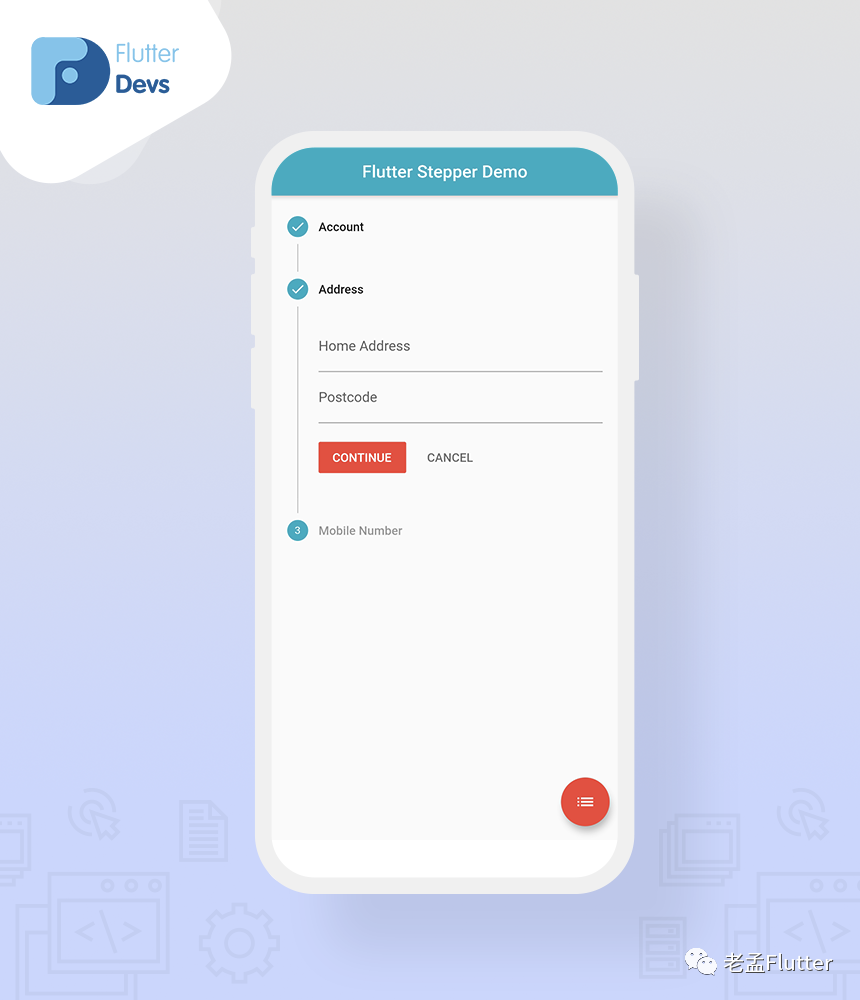
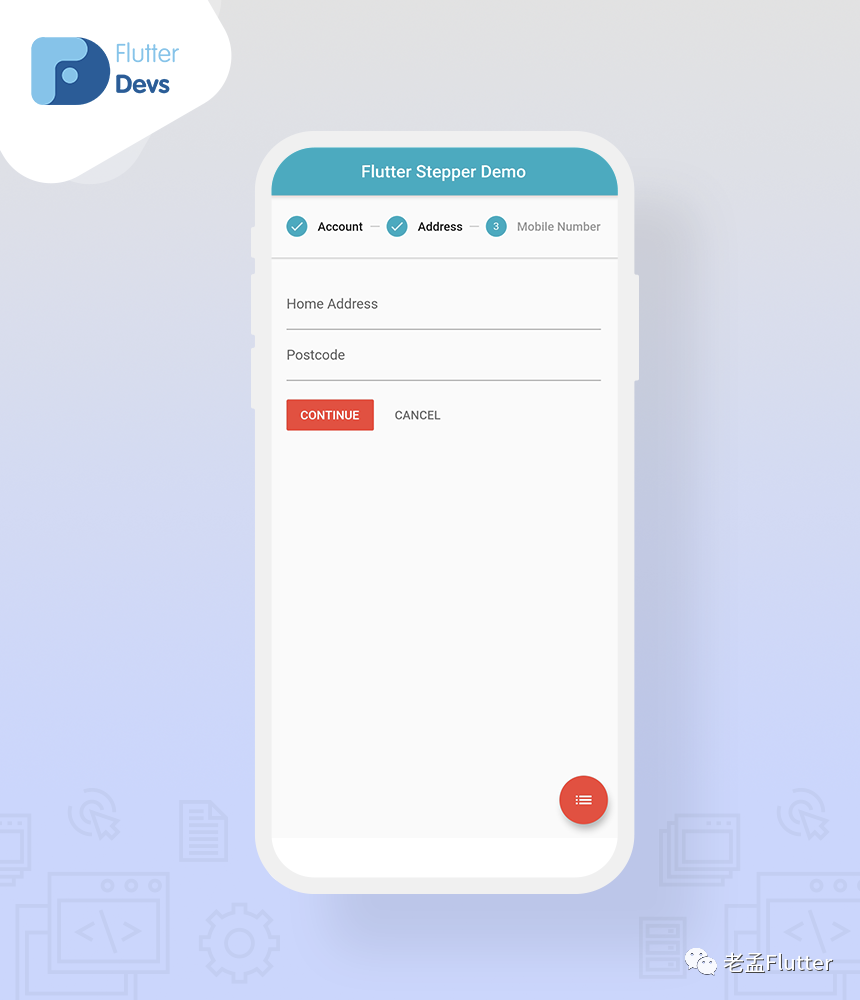
第二步,将我们称为“Address”作为标题。在这一步中,我们将创建两个名为Home Address和Postcode的TextFormField。
Step(
  title: new Text('Address'),
  content: Column(
    children: [
      TextFormField(
        decoration: InputDecoration(labelText: 'Home Address'),
      ),
      TextFormField(
        decoration: InputDecoration(labelText: 'Postcode'),
      ),
    ],
  ),
  isActive: _currentStep >= 0,
  state: _currentStep >= 1 ?
  StepState.complete : StepState.disabled,
),
在此步骤中,当用户点击继续按钮时,该步骤将前进到下一步,并且该数字已更改为活动的刻度图标。当用户点击“取消”按钮时,该步骤将退回到上一步,并且活动的勾号图标再次更改为数字。
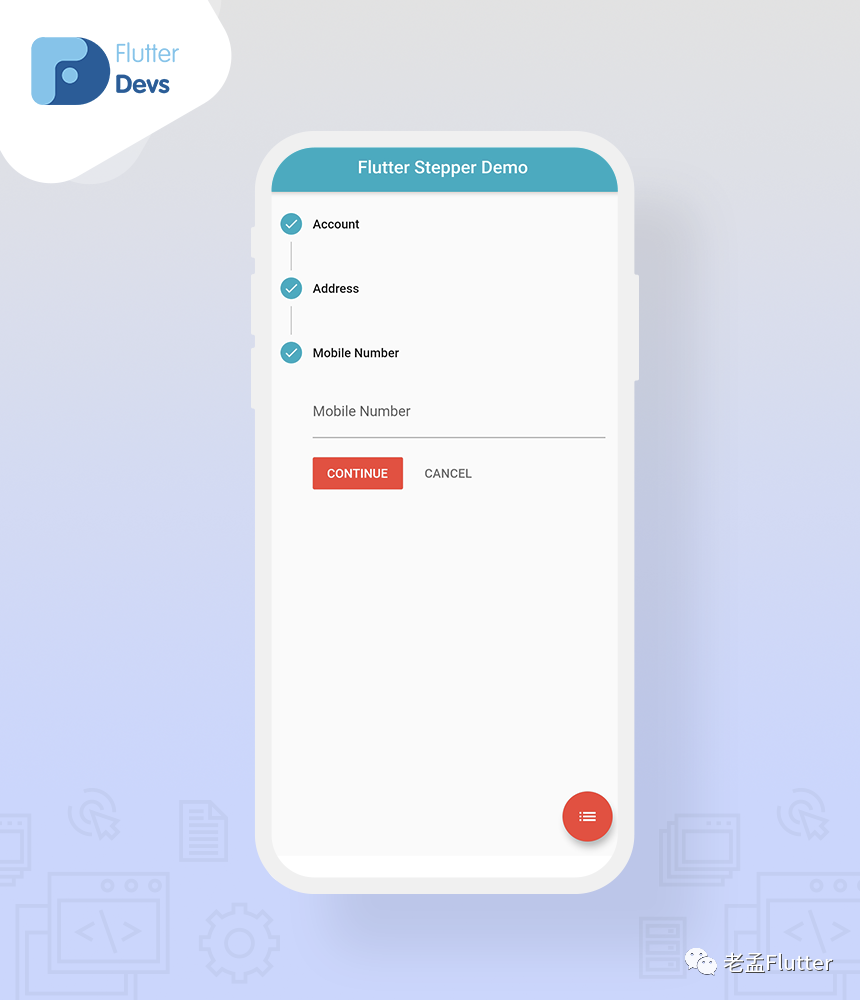
在最后一步中,我们将其称为Mobile Number。在这一步中,我们将创建一个称为“Mobile Number”的TextFormField。
Step(
  title: new Text('Mobile Number'),
  content: Column(
    children: [
      TextFormField(
        decoration: InputDecoration(labelText: 'Mobile Number'),
      ),
    ],
  ),
  isActive:_currentStep >= 0,
  state: _currentStep >= 2 ?
  StepState.complete : StepState.disabled,
),
在此步骤中,当用户点击继续按钮时,该步骤将前进到下一步,并且该数字已更改为活动的刻度图标。当用户点击“取消”按钮时,该步骤将退回到上一步,并且活动的勾号图标再次更改为数字。
我们还将在步进器中更改方向的类型,因此我们制作了一个浮动动作按钮,并在该按钮上调用了一个图标和switchStepsType()小部件。
floatingActionButton: FloatingActionButton(
  child: Icon(Icons.list),
  onPressed: switchStepsType,
),
现在我们可以深入定义switchStepsType()小部件。
switchStepsType() {
  setState(() => stepperType == StepperType.vertical
      ? stepperType = StepperType.horizontal
      : stepperType = StepperType.vertical);
}
在此小部件中,我们可以将默认的步进器类型定义为“垂直”,并且用户可以点击浮动操作按钮,然后步进器将由垂直变为水平。运行应用程序时,我们应该获得屏幕输出,如屏幕下方的截图所示。
代码文件
import 'package:flutter/material.dart';

class StepperDemo extends StatefulWidget {
  @override
  _StepperDemoState createState() => _StepperDemoState();
}

class _StepperDemoState extends State<StepperDemo> {
  int _currentStep = 0;
  StepperType stepperType = StepperType.vertical;


  @override
  Widget build(BuildContext context) {
    return  Scaffold(
        appBar: AppBar(
          automaticallyImplyLeading: false,
            title: Text('Flutter Stepper Demo'),
          centerTitle: true,
        ),
        body:  Container(
          child: Column(
            children: [
              Expanded(
                child: Stepper(
                  type: stepperType,
                  physics: ScrollPhysics(),
                  currentStep: _currentStep,
                  onStepTapped: (step) => tapped(step),
                  onStepContinue:  continued,
                  onStepCancel: cancel,
                  steps: [
                     Step(
                      title: new Text('Account'),
                      content: Column(
                        children: [
                          TextFormField(
                            decoration: InputDecoration(labelText: 'Email Address'),
                          ),
                          TextFormField(
                            decoration: InputDecoration(labelText: 'Password'),
                          ),
                        ],
                      ),
                      isActive: _currentStep >= 0,
                      state: _currentStep >= 0 ?
                      StepState.complete : StepState.disabled,
                    ),
                     Step(
                      title: new Text('Address'),
                      content: Column(
                        children: [
                          TextFormField(
                            decoration: InputDecoration(labelText: 'Home Address'),
                          ),
                          TextFormField(
                            decoration: InputDecoration(labelText: 'Postcode'),
                          ),
                        ],
                      ),
                      isActive: _currentStep >= 0,
                      state: _currentStep >= 1 ?
                      StepState.complete : StepState.disabled,
                    ),
                     Step(
                      title: new Text('Mobile Number'),
                      content: Column(
                        children: [
                          TextFormField(
                            decoration: InputDecoration(labelText: 'Mobile Number'),
                          ),
                        ],
                      ),
                      isActive:_currentStep >= 0,
                      state: _currentStep >= 2 ?
                      StepState.complete : StepState.disabled,
                    ),
                  ],
                ),
              ),
            ],
          ),
        ),
        floatingActionButton: FloatingActionButton(
          child: Icon(Icons.list),
          onPressed: switchStepsType,
        ),

    );
  }
  switchStepsType() {
    setState(() => stepperType == StepperType.vertical
        ? stepperType = StepperType.horizontal
        : stepperType = StepperType.vertical);
  }

  tapped(int step){
    setState(() => _currentStep = step);
  }

  continued(){
    _currentStep < 2 ?
        setState(() => _currentStep += 1): null;
  }
  cancel(){
    _currentStep > 0 ?
        setState(() => _currentStep -= 1) : null;
  }
}
总结
在这篇文章中,我介绍了 Stepper 组件的基本结构。您可以根据自己的选择修改此代码。这是我对 Stepper 组件的简短介绍。
我希望这个博客能够为您提供有关Flutter项目中尝试步 Stepper 组件的足够信息。我们将向您展示stepper小部件演示程序,以及当用户在flutter应用程序中按下浮动操作按钮时如何更改类型方向的水平/垂直,因此请尝试一下。
❤❤感谢您阅读本文❤❤
如果我做错了什么?在评论中让我知道。我很乐意改善。
如果本文对您有帮助请拍手👏(点赞)
原文链接:https://medium.com/flutterdevs/stepper-widget-in-flutter-37ce5b45575b
