
从集合的遍历看迭代器模式
做为后台开发人员,集合类的知识是我们必须要掌握的!因为在日常工作中使用得非常非常的多,相关的知识点在面试中也是高频出现的。我们先看下下面几个的问题:
1.有哪些方式可以对集合进行遍历?
2.迭代器的内部实现原理是什么?
3.非线程安全集合在循环遍历时删除元素有什么陷阱?
带着上面的问题,今天我们就通过ArrayList来分析分析!
遍历集合的方式
我们先创建一个ArrayList,并且放入几个元素,然后看看常用的遍历方式:
 1List list = new ArrayList<>();
 2list.add("L1");
 3list.add("L2");
 4list.add("L3");
 5
 6//1、for循环遍历
 7for (int i = 0; i < list.size(); i++) {
 8   System.out.println(list.get(i));
 9}
10
11//2、foreach循环遍历
12for (String item : list) {
13   System.out.println(item);
14}
15
16//3、Iterator遍历
17Iterator iterator = list.iterator();
18while (iterator.hasNext()) {
19   System.out.println(iterator.next());
20}
21
22//4、forEach遍历
23list.forEach(s -> System.out.println(s));
方式1不需要太多的说明,而方式2就的底层实现就是方法3!所以本文重点说下方式3、4的实现,而要弄懂方式3、4就必须得了解迭代器!
迭代器遍历
继承关系图
为什么我们可以通过 list.iterator() 的方式进行遍历呢?Iterator又是什么呢?我们先看下ArrayList的继承关系图。
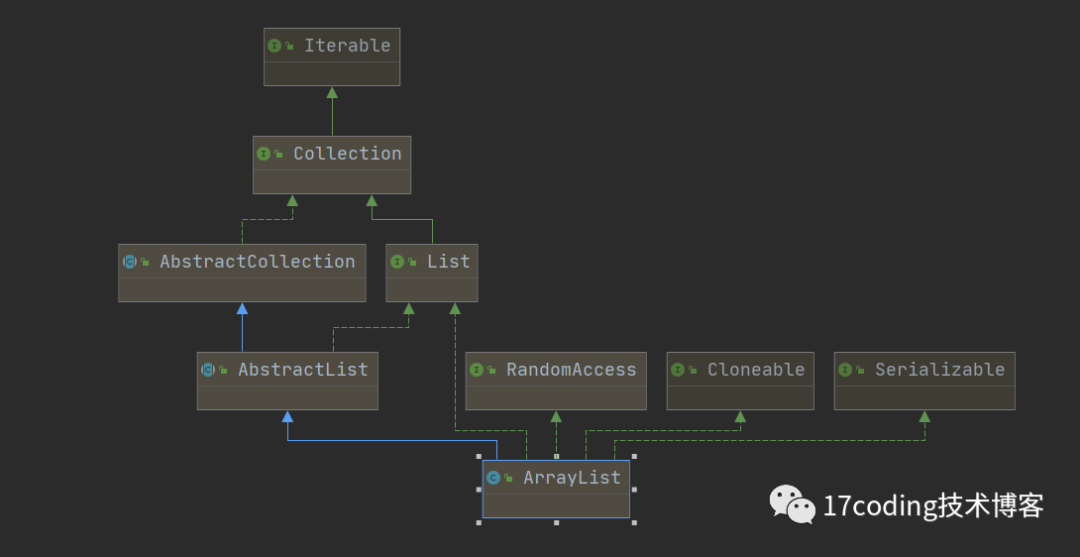
Iterable
我们能看到ArrayList最顶层的接口是Iterable,Iterable我们如果非要用中文理解那就是“可迭代的、有迭代能力的”!也就是说如果我们的类实现了Iterable接口,那这个类就具备了迭代的能力!我们看下接口定义的方法:
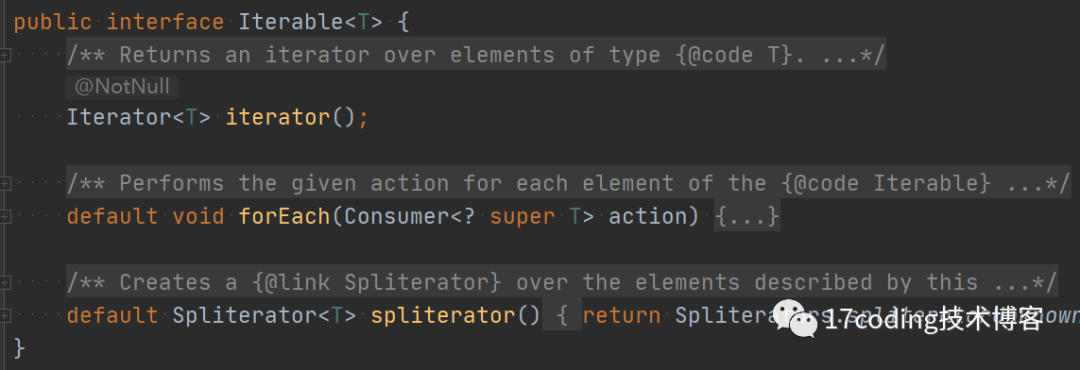
这个接口共三个方法,spliterator方法是并行遍历用的,我们今天不看!我们分析下iterato和forEach方法分别实现了什么样的功能!
iterator()方法
我们通过迭代器遍历就是先调用了list.iterator()方法,这个方法返回的是一个Iterator类型。我们看下iterator()方法的实现,其实现在抽象类AbstractList中
1public Iterator iterator() {
2        return new Itr();
3    }
这个方法返回了一个名为Itr的内部类,这个内部类是Iterator接口的实现类。也就是说我们在使用迭代器遍历list的时候调用的hasNext和next方法都是在Itr里面实现的!我们看下Itr的实现:
 1private class Itr implements Iterator<E> {
 2    /**
 3     * Index of element to be returned by subsequent call to next.
 4     */
 5    int cursor = 0;
 6
 7    /**
 8     * Index of element returned by most recent call to next or
 9     * previous.  Reset to -1 if this element is deleted by a call
10     * to remove.
11     */
12    int lastRet = -1;
13
14    /**
15     * The modCount value that the iterator believes that the backing
16     * List should have.  If this expectation is violated, the iterator
17     * has detected concurrent modification.
18     */
19    int expectedModCount = modCount;
20
21    public boolean hasNext() {
22        //只要当前指针不等于size,会返回true
23        return cursor != size();
24    }
25
26    public E next() {
27        //检查modCount
28        checkForComodification();
29        try {
30            //获取当前需要遍历的元素
31            //将lastRet指针的值设置为cursor
32            //将cursor指针值+1
33            //返回当前需要遍历的元素
34            int i = cursor;
35            E next = get(i);
36            lastRet = i;
37            cursor = i + 1;
38            return next;
39        } catch (IndexOutOfBoundsException e) {
40            checkForComodification();
41            throw new NoSuchElementException();
42        }
43    }
44
45    public void remove() {
46        if (lastRet < 0)
47            throw new IllegalStateException();
48        checkForComodification();
49
50        try {
51            AbstractList.this.remove(lastRet);
52            if (lastRet < cursor)
53                cursor--;
54            lastRet = -1;
55            expectedModCount = modCount;
56        } catch (IndexOutOfBoundsException e) {
57            throw new ConcurrentModificationException();
58        }
59    }
60
61    final void checkForComodification() {
62        if (modCount != expectedModCount)
63            throw new ConcurrentModificationException();
64    }
65}
这个类定义了一个指针变量cursor来标记随后需要遍历的对象,lastRet标记上一个已经调用的对象。每次调用next方法都会设置cursor++。并且每次遍历之前都会检查modCount,对于modeCount我们下面会细讲!总的来说,这段代码还是比较简单的,也没有太多要说明的。到这里我们就明白了迭代器的方式遍历集合对象的内部实现了!
forEach方法
我们通过list.forEach方法遍历的代码看起来是最简约的!可能很多人都没有使用过这种方式,因为这种方式是jdk1.8中才提供的,因此很多开发者习惯了for或者迭代器的方式去遍历!我们先看下forEach在ArrayList中的实现:
 1public void forEach(Consumersuper E> action) {
 2    Objects.requireNonNull(action);
 3    final int expectedModCount = modCount;
 4    @SuppressWarnings("unchecked")
 5    final E[] elementData = (E[]) this.elementData;
 6    final int size = this.size;
 7    for (int i=0; modCount == expectedModCount && i < size; i++) {
 8        action.accept(elementData[i]);
 9    }
10    if (modCount != expectedModCount) {
11        throw new ConcurrentModificationException();
12    }
13}
代码依然非常简单!forEach方法的入参是一个Consumer 类型,这个类型被@FunctionalInterface 注解标记,我们翻译为函数式接口!这也是jdk1.8新增的与Lambda表达式相关特性,有兴趣的可以自己去了解下!方法内部实现也是使用的for进行遍历,然后调用Consumer的accept方法。这里每次遍历之也会检查modCount,那modCount是什么呢?为什么每次遍历之前都需要检查modCount呢?
快速失败机制
我们先看一段代码
 1List list = new ArrayList<>();
 2list.add("L1");
 3list.add("L2");
 4list.add("L3");
 5list.add("L4");
 6
 7for (String item : list) {
 8   if ("L1".equals(item)) {
 9      list.remove(item);
10   }
11}
运行结果会是什么呢?稍有开发经验的你应该知道,这里会抛ConcurrentModificationException 异常!为什么呢?这是java中fail-fast机制(快速失败机制)!如果一个线程在遍历集合,而另外一个线程对线程进行增加或者删除元素,jdk则认为这是不合法的而抛异常,因为ArrayList是非线程安全的!虽然上面代码中只有一个线程,但是同时进行遍历和删除就会抛出异常。
fail-fast的实现就是通过modCount变量,这个变量定义在抽象类AbstractList中,每次对集合元素进行操作如添加元素、移除元素、排序时都会控制modCount++。
我们前面说过foreach的方式就是迭代器的方式实现的,因此在遍历的时候先调用Iterator的hasNext方法判断是否还有元素,再调用next方法进行遍历!在调用next方法之前会记录当前modCount的值存储到expectedModCount变量中,然后每次调用next方法的时候都会先检查modCount与expectedModCount是否一致,如果不一致直接抛出异常,相关的代码在讲Itr类的时候已经贴过了,我们这里只再看一下checkForComodification方法的实现!
1final void checkForComodification() {
2    if (modCount != expectedModCount)
3        throw new ConcurrentModificationException();
4}
那遍历集合的时候对元素操作的正确方式是什么呢?我们看代码
 1List list = new ArrayList<>();
 2list.add("L1");
 3list.add("L2");
 4list.add("L3");
 5list.add("L4");
 6
 7Iterator iterator = list.iterator();
 8while (iterator.hasNext()) {
 9   if ("L1".equals(iterator.next())) {
10      iterator.remove();
11   }
12}
注意我们调用的是Iterator的remove方法而不是ArrayList类的remove方法!那Iterator的remove方法内部是怎么做到能遍历时删除元素的呢?我们看下源码实现:
 1public void remove() {
 2    if (lastRet < 0)
 3        throw new IllegalStateException();
 4    checkForComodification();
 5
 6    try {
 7        ArrayList.this.remove(lastRet);
 8        cursor = lastRet;
 9        lastRet = -1;
10        expectedModCount = modCount;
11    } catch (IndexOutOfBoundsException ex) {
12        throw new ConcurrentModificationException();
13    }
14}
我们重点看expectedModCount = modCount;这行,每次调用remove时都会重置expectedModCount变量,因此等到下一轮循环的时候判断expectedModCount和modCount时就为true了。这也就能在遍历的同时进行元素的删除了。