
Taro3跨端跨框架原理初探
大厂技术 坚持周更 精选好文
背景
在项目中,我们用到了Taro3进行跨端开发,在这里分享下Taro3的一些跨端跨框架原理,也是希望能帮助自己更好的去理解Taro背后的事情,也能加速定位问题。此文章也是起到一个抛砖引玉的效果,让自己理解的更加深入一点。
过去的整体架构,它分为两个部分,第⼀部分是编译时,第⼆部分是运⾏时。编译时会先对⽤户的 React 代码进⾏编译,转换成各个端上的⼩程序都可以运⾏的代码,然后再在各个⼩程序端上⾯都配上⼀个对应的运⾏时框架进⾏适配,最终让这份代码运⾏在各个⼩程序端上⾯。
Taro3之前(重编译时,轻运行时):

编译时是使用 babel-parser 将 Taro 代码解析成抽象语法树,然后通过 babel-types 对抽象语法树进行一系列修改、转换操作,最后再通过 babel-generate 生成对应的目标代码。
这样的实现过程有三⼤缺点:
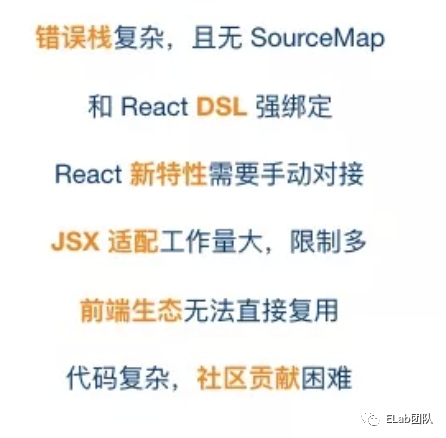
JSX ⽀持程度不完美。Taro 对 JSX 的⽀持是通过编译时的适配去实现的,但 JSX ⼜⾮常之灵活,因此还不能做到 100% ⽀持所有的 JSX 语法。 JSX 是一个 JavaScript 的语法扩展,它的写法千变万化,十分灵活。之前Taro团队是采用穷举的方式对 JSX 可能的写法进行了一一适配,这一部分工作量很大。 不⽀持 source-map。Taro 对源代码进⾏了⼀系列的转换操作之后,就不⽀持 source-map 了,⽤户 调试、使⽤这个项⽬就会不⽅便。 维护和迭代⼗分困难。Taro 编译时代码⾮常的复杂且离散,维护迭代都⾮常的困难。
再看⼀下运⾏时的缺陷。对于每个⼩程序平台,都会提供对应的⼀份运⾏时框架进⾏适配。当修改⼀些 Bug 或者新增⼀些特性的时候,需要同时去修改多份运⾏时框架。
总的来说,之前的Taro3.0之前有以下问题:
Taro3之后(重运行时):
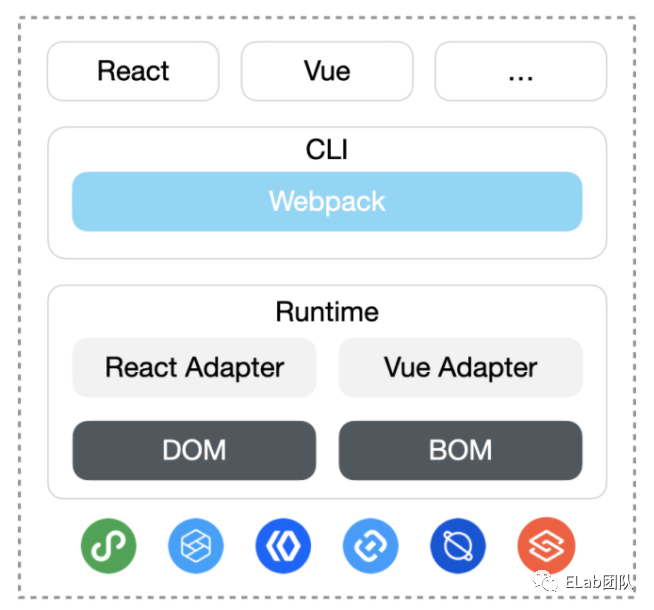
Taro 3 则可以大致理解为解释型架构(相对于 Taro 1/2 而言),主要通过在小程序端模拟实现 DOM、BOM API 来让前端框架直接运行在小程序环境中,从而达到小程序和 H5 统一的目的,而对于生命周期、组件库、API、路由等差异,依然可以通过定义统一标准,各端负责各自实现的方式来进行抹平。而正因为 Taro 3 的原理,在 Taro 3 中同时支持 React、Vue 等框架,甚至还支持了 jQuery,还能支持让开发者自定义地去拓展其他框架的支持,比如 Angular,Taro 3 整体架构如下:

Taro 小程序:
Taro 3 之后 ⼩程序端的整体架构。⾸先是⽤户的 React 或 Vue 的代码会通过 CLI 进⾏ Webpack 打包,其次在运⾏时会提供 React 和 Vue 对应的适配器进⾏适配,然后调⽤Taro提供的 DOM 和 BOM API, 最后把整个程序渲染到所有的⼩程序端上⾯。
React 有点特殊,因为 React-DOM 包含大量浏览器兼容类的代码,导致包太大,而这部分代码是不需要的,因此做了一些定制和优化。
在 React 16+ ,React 的架构如下:
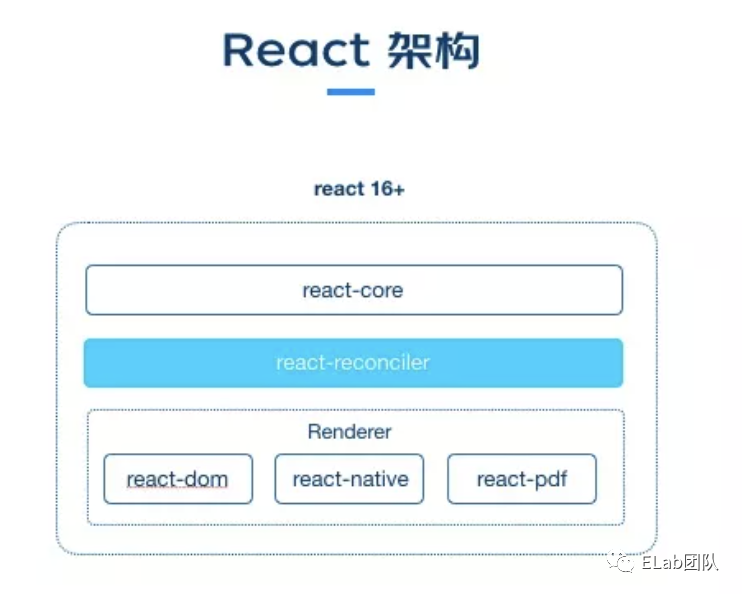
最上层是 React 的核心部分 react-core ,中间是 react-reconciler,其的职责是维护 VirtualDOM 树,内部实现了 Diff/Fiber 算法,决定什么时候更新、以及要更新什么。
而 Renderer 负责具体平台的渲染工作,它会提供宿主组件、处理事件等等。例如 React-DOM 就是一个渲染器,负责 DOM 节点的渲染和 DOM 事件处理。
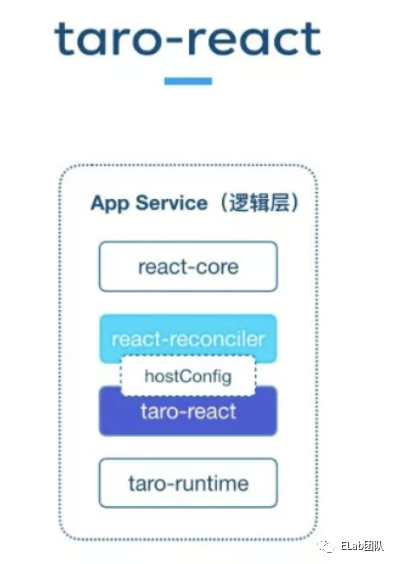
Taro实现了taro-react 包,用来连接 react-reconciler 和 taro-runtime 的 BOM/DOM API。是基于 react-reconciler 的小程序专用 React 渲染器,连接 @tarojs/runtime的DOM 实例,相当于小程序版的react-dom,暴露的 API 也和react-dom 保持一致。
创建一个自定义渲染器只需两步:具体的实现主要分为两步:
第一步: **实现宿主配置( 实现**react-reconciler 的 hostConfig**配置)这是react-reconciler要求宿主提供的一些适配器方法和配置项。这些配置项定义了如何创建节点实例、构建节点树、提交和更新等操作。即在 hostConfig 的方法中调用对应的 Taro BOM/DOM 的 API。
const Reconciler = require('react-reconciler');


const HostConfig = {

  // ... 实现适配器方法和配置项

};
# @tarojs/react reconciler.ts


/* eslint-disable @typescript-eslint/indent */

import Reconciler, { HostConfig } from 'react-reconciler'

import * as scheduler from 'scheduler'

import { TaroElement, TaroText, document } from '@tarojs/runtime'

import { noop, EMPTY_ARR } from '@tarojs/shared'

import { Props, updateProps } from './props'


const {

  unstable_scheduleCallback: scheduleDeferredCallback,

  unstable_cancelCallback: cancelDeferredCallback,

  unstable_now: now

} = scheduler


function returnFalse () {

  return false

}


const hostConfig: HostConfig<

  string, // Type

  Props, // Props

  TaroElement, // Container

  TaroElement, // Instance

  TaroText, // TextInstance

  TaroElement, // HydratableInstance

  TaroElement, // PublicInstance

  Record<string, any>, // HostContext

  string[], // UpdatePayload

  unknown, // ChildSet

  unknown, // TimeoutHandle

  unknown // NoTimeout

> & {

  hideInstance (instance: TaroElement): void

  unhideInstance (instance: TaroElement, props): void

} = {

  createInstance (type) {

    return document.createElement(type)

  },


  createTextInstance (text) {

    return document.createTextNode(text)

  },


  getPublicInstance (inst: TaroElement) {

    return inst

  },


  getRootHostContext () {

    return {}

  },


  getChildHostContext () {

    return {}

  },


  appendChild (parent, child) {

    parent.appendChild(child)

  },


  appendInitialChild (parent, child) {

    parent.appendChild(child)

  },


  appendChildToContainer (parent, child) {

    parent.appendChild(child)

  },


  removeChild (parent, child) {

    parent.removeChild(child)

  },


  removeChildFromContainer (parent, child) {

    parent.removeChild(child)

  },


  insertBefore (parent, child, refChild) {

    parent.insertBefore(child, refChild)

  },


  insertInContainerBefore (parent, child, refChild) {

    parent.insertBefore(child, refChild)

  },


  commitTextUpdate (textInst, _, newText) {

    textInst.nodeValue = newText

  },


  finalizeInitialChildren (dom, _, props) {

    updateProps(dom, {}, props)

    return false

  },


  prepareUpdate () {

    return EMPTY_ARR

  },


  commitUpdate (dom, _payload, _type, oldProps, newProps) {

    updateProps(dom, oldProps, newProps)

  },


  hideInstance (instance) {

    const style = instance.style

    style.setProperty('display', 'none')

  },


  unhideInstance (instance, props) {

    const styleProp = props.style

    let display = styleProp?.hasOwnProperty('display') ? styleProp.display : null

    display = display == null || typeof display === 'boolean' || display === '' ? '' : ('' + display).trim()

    // eslint-disable-next-line dot-notation

    instance.style['display'] = display

  },


  shouldSetTextContent: returnFalse,

  shouldDeprioritizeSubtree: returnFalse,

  prepareForCommit: noop,

  resetAfterCommit: noop,

  commitMount: noop,

  now,

  scheduleDeferredCallback,

  cancelDeferredCallback,

  clearTimeout: clearTimeout,

  setTimeout: setTimeout,

  noTimeout: -1,

  supportsMutation: true,

  supportsPersistence: false,

  isPrimaryRenderer: true,

  supportsHydration: false

}


export const TaroReconciler = Reconciler(hostConfig)
第二步:实现渲染函数,类似于ReactDOM.render() 方法。可以看成是创建 Taro DOM Tree 容器的方法。
// 创建Reconciler实例, 并将HostConfig传递给Reconciler

const MyRenderer = Reconciler(HostConfig);


/**

 * 假设和ReactDOM一样,接收三个参数

 * render(<MyComponent />, container, () => console.log('rendered'))

 */

export function render(element, container, callback) {

  // 创建根容器

  if (!container._rootContainer) {

    container._rootContainer = ReactReconcilerInst.createContainer(container, false);

  }


  // 更新根容器

  return ReactReconcilerInst.updateContainer(element, container._rootContainer, null, callback);

}
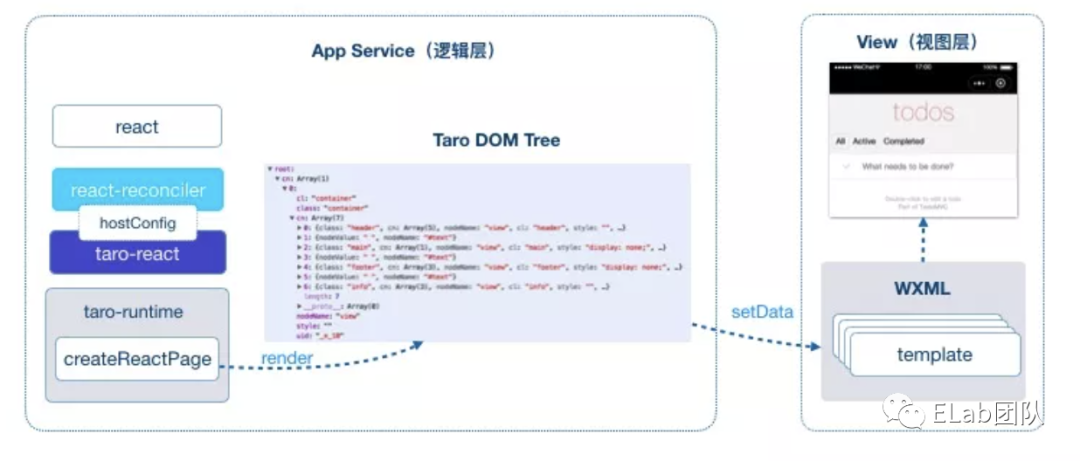
经过上面的步骤,React 代码实际上就可以在小程序的运行时正常运行了,并且会生成 Taro DOM Tree。那么偌大的 Taro DOM Tree 怎样更新到页面呢?
因为⼩程序并没有提供动态创建节点的能⼒,需要考虑如何使⽤相对静态的 wxml 来渲染相对动态的 Taro DOM 树。Taro使⽤了模板拼接的⽅式,根据运⾏时提供的 DOM 树数据结构,各 templates 递归地 相互引⽤,最终可以渲染出对应的动态 DOM 树。
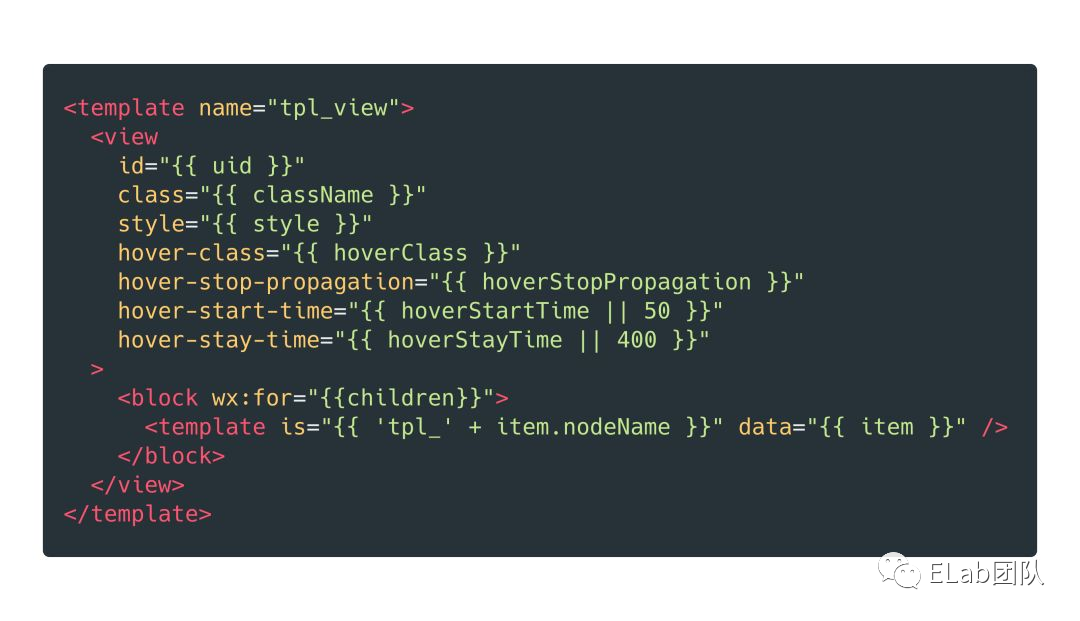
首先,将小程序的所有组件挨个进行模版化处理,从而得到小程序组件对应的模版。如下图就是小程序的 view 组件模版经过模版化处理后的样子。⾸先需要在 template ⾥⾯写⼀个 view,把它所有的属性全部列出来(把所有的属性都列出来是因为⼩程序⾥⾯不能去动态地添加属性)。
接下来是遍历渲染所有⼦节点,基于组件的 template,动态 “递归” 渲染整棵树。
具体流程为先去遍历 Taro DOM Tree 根节点的子元素,再根据每个子元素的类型选择对应的模板来渲染子元素,然后在每个模板中我们又会去遍历当前元素的子元素,以此把整个节点树递归遍历出来。
Taro H5:
Taro 这边遵循的是以微信小程序为主,其他小程序为辅的组件与 API 规范。 但浏览器并没有小程序规范的组件与 API 可供使用,我们不能在浏览器上使用小程序的 view 组件和 getSystemInfo API。因此Taro在 H5 端实现一套基于小程序规范的组件库和 API 库。
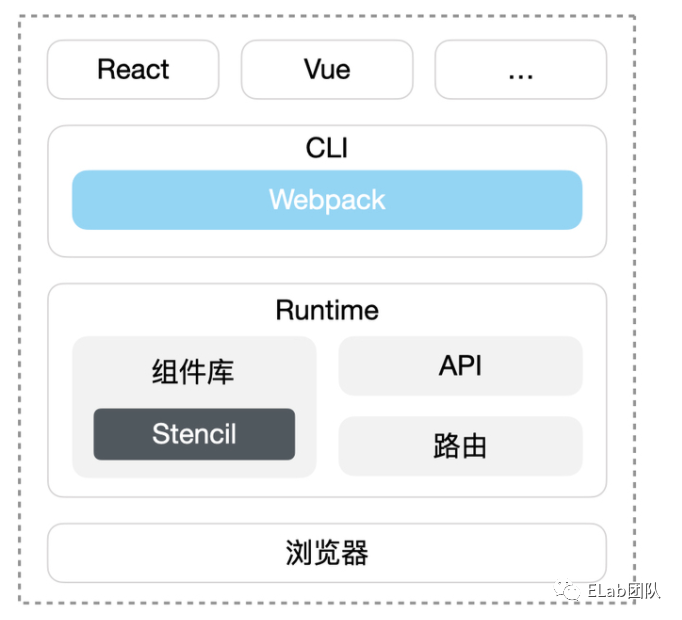
再来看⼀下 H5 端的架构,同样的也是需要把⽤户的 React 或者 Vue 代码通过 Webpack 进⾏打包。然后在运⾏时做了三件事情:第⼀件事情是实现了⼀个组件库,组件库需要同时给到 React 、Vue 甚⾄更加多的⼀些框架去使⽤,Taro使⽤了 Stencil 去实现了⼀个基于 WebComponents 且遵循微信⼩程序规范的组件库,第⼆、三件事是实现了⼀个⼩程序规范的 API 和路由机制,最终就可以把整个程序给运⾏在浏览器上⾯。下面,我们主要关注实现组件库。
实现组件库:
最先容易想到的是使用 Vue 再开发一套组件库,这样最为稳妥,工作量也没有特别大。
但考虑到以下两点,官方遂放弃了此思路:
组件库的可维护性和拓展性不足。每当有问题需要修复或新功能需要添加,需要分别对 React 和 Vue 版本的组件库进行改造。 Taro Next 的目标是支持使用任意框架开发多端应用。倘若将来支持使用 Angular 等框架进行开发,那么需要再开发对应支持 Angular 等框架的组件库。
那么是否存在着一种方案,使得只用一份代码构建的组件库能兼容所有的 web 开发框架呢?
Taro的选择是 Web Components。
Web Components
Web Components 由一系列的技术规范所组成,它让开发者可以开发出浏览器原生支持的组件。允许你创建可重用的定制元素(它们的功能封装在你的代码之外)并且在你的web应用中使用它们。
Web Components— 它由三项主要技术组成,它们可以一起使用来创建封装功能的定制元素,可以在你喜欢的任何地方重用,不必担心代码冲突。
Custom elements(自定义元素):一组JavaScript API,允许您定义custom elements及其行为,然后可以在您的用户界面中按照需要使用它们。简单来说,就是让开发者可以自定义带有特定行为的 HTML 标签。
Shadow DOM(影子DOM):一组JavaScript API,用于将封装的“影子”DOM树附加到元素(与主文档DOM分开呈现)并控制其关联的功能。通过这种方式,您可以保持元素的功能私有,这样它们就可以被脚本化和样式化,而不用担心与文档的其他部分发生冲突。简单来说,就是对标签内的结构和样式进行一层包装。
HTML templates(HTML模板):
<template>和<slot>元素使您可以编写不在呈现页面中显示的标记模板。然后它们可以作为自定义元素结构的基础被多次重用。
实现web component的基本方法通常如下所示:
创建一个类或函数来指定web组件的功能。 使用 CustomElementRegistry.define() 方法注册您的新自定义元素 ,并向其传递要定义的元素名称、指定元素功能的类、以及可选的其所继承自的元素。 如果需要的话,使用Element.attachShadow() 方法将一个shadow DOM附加到自定义元素上。使用通常的DOM方法向shadow DOM中添加子元素、事件监听器等等。 如果需要的话,使用 <template> 和 <slot>定义一个HTML模板。再次使用常规DOM方法克隆模板并将其附加到您的shadow DOM中。在页面任何您喜欢的位置使用自定义元素,就像使用常规HTML元素那样。
示例
定义模板:
<template id="template">

  <h1>Hello World!</h1>

</template>
构造 Custom Element:
class App extends HTMLElement {

  constructor () {

    super(...arguments)


    // 开启 Shadow DOM

    const shadowRoot = this.attachShadow({ mode: 'open' })


    // 复用 <template> 定义好的结构

    const template = document.querySelector('#template')

    const node = template.content.cloneNode(true)

    shadowRoot.appendChild(node)

  }

}

window.customElements.define('my-app', App)
使用:
<my-app></my-app>
使用原生语法去编写 Web Components 相当繁琐,因此需要一个框架帮助我们提高开发效率和开发体验。业界已经有很多成熟的 Web Components 框架,Taro选择的是Stencil,Stencil 是一个可以生成 Web Components 的编译器。它糅合了业界前端框架的一些优秀概念,如支持 Typescript、JSX、虚拟 DOM 等。
创建 Stencil Component:
import { Component, Prop, State, h } from '@stencil/core'


@Component({

  tag: 'my-component'

})

export class MyComponent {

  @Prop() first = ''

  @State() last = 'JS'


  componentDidLoad () {

    console.log('load')

  }


  render () {

    return (

      <div>

        Hello, my name is {this.first} {this.last}

      </div>

    )

  }

}
使用组件:
<my-component first='Taro' />
在 React 中使用 Stencil
Custom Elements Everywhere[1] 上罗列出业界前端框架对 Web Components 的兼容问题及相关 issues。在React文档中,也略微提到过在在 React 中使用 Web Components的注意事项 https://zh-hans.reactjs.org/docs/web-components.html#using-web-components-in-react
在Custom Elements Everywhere 上可以看到,React 对 Web Components 的兼容问题。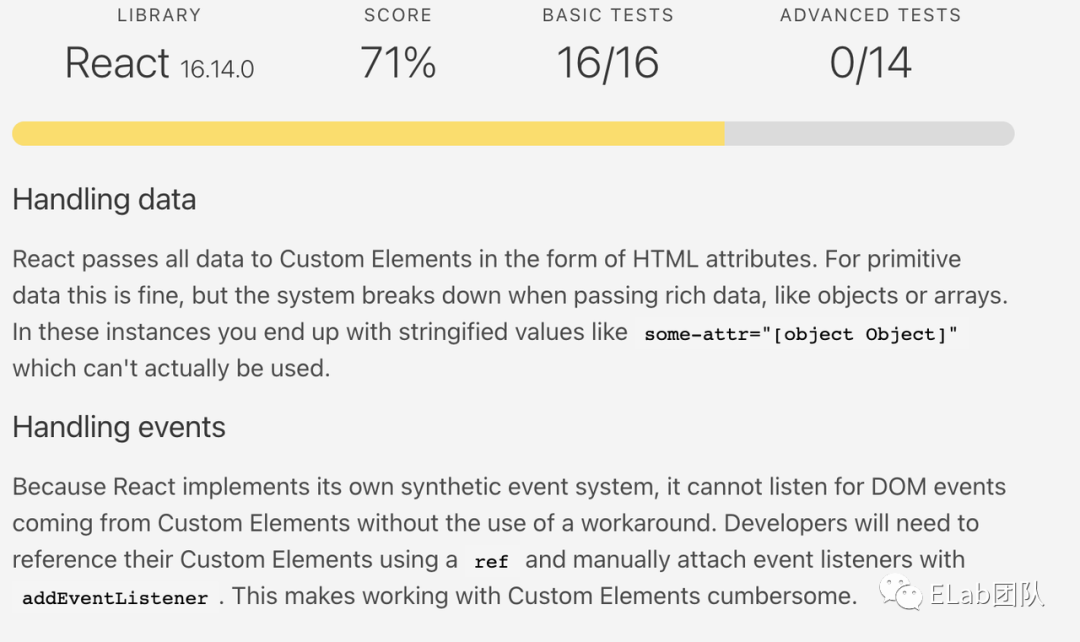
翻译过来,就是说。
React 使用 setAttribute的形式给 Web Components 传递参数。当参数为原始类型时是可以运行的,但是如果参数为对象或数组时,由于 HTML 元素的 attribute 值只能为字符串或 null,最终给 WebComponents 设置的 attribute 会是attr="[object Object]"。
attribute和property的区别:https://stackoverflow.com/questions/6003819/what-is-the-difference-between-properties-and-attributes-in-html#answer-6004028,不展开说了。
因为 React 有一套自己实现的合成事件系统,所以它不能监听到 Web Components 发出的自定义事件。
reactify-wc.js
实际上,这个高阶组件的实现是根据开源库reactify-wc修改的一个版本,reactify-wc是一个衔接 WebComponent 和 React 的库,目的是为了在React 中能够使用 WebComponent。这个修改的库就是为了解决上述所说的问题。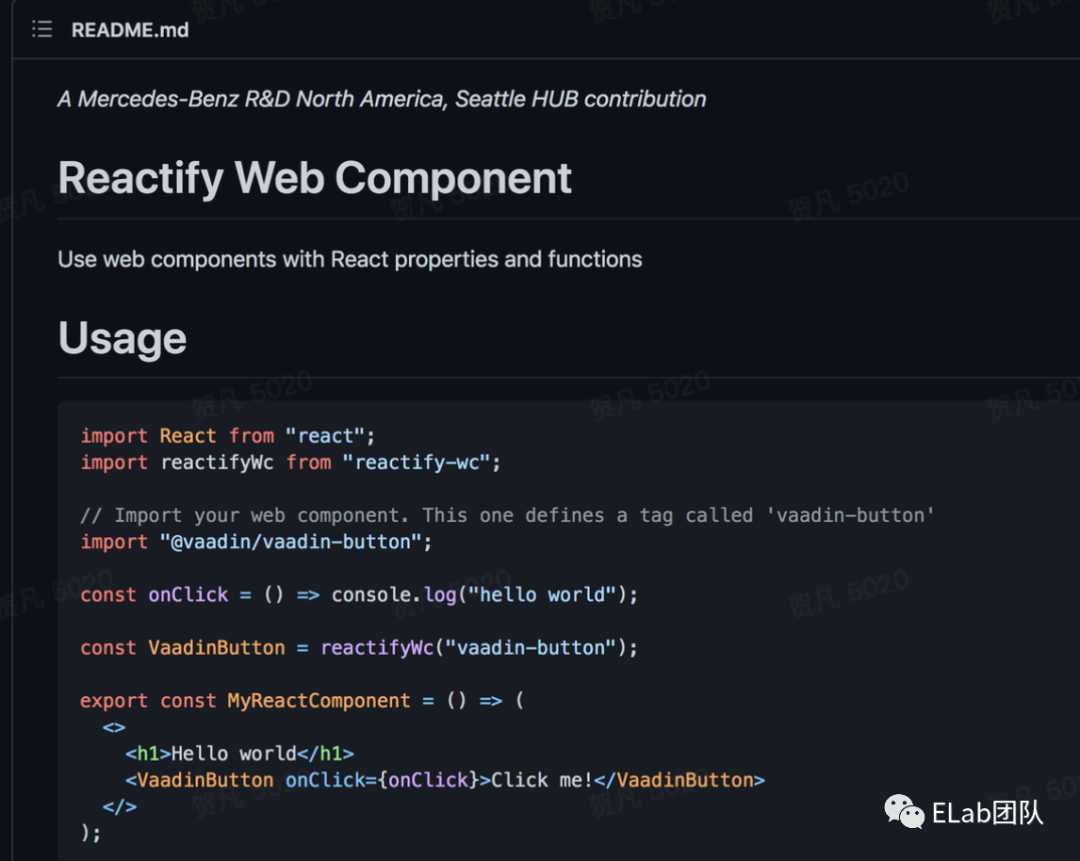
props
Taro的处理,采用 DOM Property 的方法传参。把 Web Components 包装一层高阶组件,把高阶组件上的 props 设置为 Web Components 的 property。
const reactifyWebComponent = WC => {

 return class Index extends React.Component {

  ref = React.createRef()

  update (prevProps) {

      this.clearEventHandlers()

      if (!this.ref.current) return


      Object.keys(prevProps || {}).forEach((key) => {

        if (key !== 'children' && key !== 'key' && !(key in this.props)) {

          updateProp(this, WC, key, prevProps, this.props)

        }

      })


      Object.keys(this.props).forEach((key) => {

        updateProp(this, WC, key, prevProps, this.props)

      })

  }


  componentDidUpdate () {

    this.update()

  }


  componentDidMount () {

    this.update()

  }


  render () {

    const { children, dangerouslySetInnerHTML } = this.props

    return React.createElement(WC, {

      ref: this.ref,

      dangerouslySetInnerHTML

    }, children)

}
Event
因为 React 有一套自己实现的合成事件系统,所以它不能监听到 Web Components 发出的自定义事件。以下 Web Component 的 onLongPress 回调不会被触发:
<my-view onLongPress={onLongPress}>view</my-view>
通过 ref 取得 Web Component 元素,手动 addEventListener 绑定事件。改造上述的高阶组件:
const reactifyWebComponent = WC => {

  return class Index extends React.Component {

    ref = React.createRef()

    eventHandlers = []


    update () {

      this.clearEventHandlers()


      Object.entries(this.props).forEach(([prop, val]) => {

        if (typeof val === 'function' && prop.match(/^on[A-Z]/)) {

          const event = prop.substr(2).toLowerCase()

          this.eventHandlers.push([event, val])

          return this.ref.current.addEventListener(event, val)

        }


        ...

      })

    }


    clearEventHandlers () {

      this.eventHandlers.forEach(([event, handler]) => {

        this.ref.current.removeEventListener(event, handler)

      })

      this.eventHandlers = []

    }


    componentWillUnmount () {

      this.clearEventHandlers()

    }


    ...

  }

}
ref
为了解决 Props 和 Events 的问题,引入了高阶组件。那么当开发者向高阶组件传入 ref 时,获取到的其实是高阶组件,但我们希望开发者能获取到对应的 Web Component。
domRef 会获取到 MyComponent,而不是 <my-component></my-component>
<MyComponent ref={domRef} />
使用 forwardRef[2] 传递 ref。改造上述的高阶组件为 forwardRef 形式:
const reactifyWebComponent = WC => {

  class Index extends React.Component {

    ...


    render () {

      const { children, forwardRef } = this.props

      return React.createElement(WC, {

        ref: forwardRef

      }, children)

    }

  }

  return React.forwardRef((props, ref) => (

    React.createElement(Index, { ...props, forwardRef: ref })

  ))

}
className
在 Stencil 里我们可以使用 Host 组件为 host element 添加类名。
import { Component, Host, h } from '@stencil/core';


@Component({

  tag: 'todo-list'

})

export class TodoList {

  render () {

    return (

      <Host class='todo-list'>

        <div>todo</div>

      </Host>

    )

  }

}
然后在使用 <todo-list> 元素时会展示我们内置的类名 “todo-list” 和 Stencil 自动加入的类名 “hydrated”:

关于类名 “hydrated”:
Stencil 会为所有 Web Components 加上 visibility: hidden; 的样式。然后在各 Web Component 初始化完成后加入类名 “hydrated”,将 visibility 改为 inherit。如果 “hydrated” 被抹除掉,Web Components 将不可见。
为了不要覆盖 wc 中 host 内置的 class 和 stencil 加入的 class,对对内置 class 进行合并。
function getClassName (wc, prevProps, props) {

  const classList = Array.from(wc.classList)

  const oldClassNames = (prevProps.className || prevProps.class || '').split(' ')

  let incomingClassNames = (props.className || props.class || '').split(' ')

  let finalClassNames = []


  classList.forEach(classname => {

    if (incomingClassNames.indexOf(classname) > -1) {

      finalClassNames.push(classname)

      incomingClassNames = incomingClassNames.filter(name => name !== classname)

    } else if (oldClassNames.indexOf(classname) === -1) {

      finalClassNames.push(classname)

    }

  })


  finalClassNames = [...finalClassNames, ...incomingClassNames]


  return finalClassNames.join(' ')

}
到这里,我们的reactify-wc就打造好了。我们不要忘了,Stencil是帮我们写web components的,reactify-wc 目的是为了在React 中能够使用 WebComponent。如下包装后,我们就能直接在react里面用View、Text等组件了
//packages/taro-components/h5


import reactifyWc from './utils/reactify-wc'

import ReactInput from './components/input'


export const View = reactifyWc('taro-view-core')

export const Icon = reactifyWc('taro-icon-core')

export const Progress = reactifyWc('taro-progress-core')

export const RichText = reactifyWc('taro-rich-text-core')

export const Text = reactifyWc('taro-text-core')

export const Button = reactifyWc('taro-button-core')

export const Checkbox = reactifyWc('taro-checkbox-core')

export const CheckboxGroup = reactifyWc('taro-checkbox-group-core')

export const Editor = reactifyWc('taro-editor-core')

export const Form = reactifyWc('taro-form-core')

export const Input = ReactInput

export const Label = reactifyWc('taro-label-core')

export const Picker = reactifyWc('taro-picker-core')

export const PickerView = reactifyWc('taro-picker-view-core')

export const PickerViewColumn = reactifyWc('taro-picker-view-column-core')

export const Radio = reactifyWc('taro-radio-core')

export const RadioGroup = reactifyWc('taro-radio-group-core')

export const Slider = reactifyWc('taro-slider-core')

export const Switch = reactifyWc('taro-switch-core')

export const CoverImage = reactifyWc('taro-cover-image-core')

export const Textarea = reactifyWc('taro-textarea-core')

export const CoverView = reactifyWc('taro-cover-view-core')

export const MovableArea = reactifyWc('taro-movable-area-core')

export const MovableView = reactifyWc('taro-movable-view-core')

export const ScrollView = reactifyWc('taro-scroll-view-core')

export const Swiper = reactifyWc('taro-swiper-core')

export const SwiperItem = reactifyWc('taro-swiper-item-core')

export const FunctionalPageNavigator = reactifyWc('taro-functional-page-navigator-core')

export const Navigator = reactifyWc('taro-navigator-core')

export const Audio = reactifyWc('taro-audio-core')

export const Camera = reactifyWc('taro-camera-core')

export const Image = reactifyWc('taro-image-core')

export const LivePlayer = reactifyWc('taro-live-player-core')

export const Video = reactifyWc('taro-video-core')

export const Map = reactifyWc('taro-map-core')

export const Canvas = reactifyWc('taro-canvas-core')

export const Ad = reactifyWc('taro-ad-core')

export const OfficialAccount = reactifyWc('taro-official-account-core')

export const OpenData = reactifyWc('taro-open-data-core')

export const WebView = reactifyWc('taro-web-view-core')

export const NavigationBar = reactifyWc('taro-navigation-bar-core')

export const Block = reactifyWc('taro-block-core')

export const CustomWrapper = reactifyWc('taro-custom-wrapper-core')
//packages/taro-components/src/components/view/view.tsx

//拿View组件举个例子


// eslint-disable-next-line @typescript-eslint/no-unused-vars

import { Component, Prop, h, ComponentInterface, Host, Listen, State, Event, EventEmitter } from '@stencil/core'

import classNames from 'classnames'


@Component({

  tag: 'taro-view-core',

  styleUrl: './style/index.scss'

})

export class View implements ComponentInterface {

  @Prop() hoverClass: string

  @Prop() hoverStartTime = 50

  @Prop() hoverStayTime = 400

  @State() hover = false

  @State() touch = false


  @Event({

    eventName: 'longpress'

  }) onLongPress: EventEmitter


  private timeoutEvent: NodeJS.Timeout

  private startTime = 0


  @Listen('touchstart')

  onTouchStart () {

    if (this.hoverClass) {

      this.touch = true

      setTimeout(() => {

        if (this.touch) {

          this.hover = true

        }

      }, this.hoverStartTime)

    }


    this.timeoutEvent = setTimeout(() => {

      this.onLongPress.emit()

    }, 350)

    this.startTime = Date.now()

  }


  @Listen('touchmove')

  onTouchMove () {

    clearTimeout(this.timeoutEvent)

  }


  @Listen('touchend')

  onTouchEnd () {

    const spanTime = Date.now() - this.startTime

    if (spanTime < 350) {

      clearTimeout(this.timeoutEvent)

    }

    if (this.hoverClass) {

      this.touch = false

      setTimeout(() => {

        if (!this.touch) {

          this.hover = false

        }

      }, this.hoverStayTime)

    }

  }


  render () {

    const cls = classNames({

      [`${this.hoverClass}`]: this.hover

    })

    return (

      <Host class={cls}>

        <slot></slot>

      </Host>

    )

  }

}
至此,组件库就实现好了。
Taro 3 部分使用的 NPM 包名及其具体作用。
| NPM 包 | 描述 |
|---|---|
| babel-preset-taro[3] | 给 Taro 项目使用的 babel preset |
| @tarojs/taro[4] | 暴露给应用开发者的 Taro 核心 API |
| @tarojs/shared[5] | Taro 内部使用的 utils |
| @tarojs/api[6] | 暴露给 @tarojs/taro 的所有端的公有 API |
| @tarojs/taro-h5[7] | 暴露给 @tarojs/taro 的 H5 端 API |
| @tarojs/router[8] | Taro H5 路由 |
| @tarojs/react[9] | 基于 react-reconciler 的小程序专用 React 渲染器 |
| @tarojs/cli[10] | Taro 开发工具 |
| @tarojs/extend[11] | Taro 扩展,包含 jQuery API 等 |
| @tarojs/helper[12] | 内部给 CLI 和 runner 使用辅助方法集 |
| @tarojs/service[13] | Taro 插件化内核 |
| @tarojs/taro-loader[14] | 露给 @tarojs/mini-runner 和 @tarojs/webpack-runner 使用的 Webpack loader |
| @tarojs/runner-utils[15] | 暴露给 @tarojs/mini-runner 和 @tarojs/webpack-runner 的公用工具函数 |
| @tarojs/webpack-runner[16] | Taro H5 端 Webpack 打包编译工具 |
| @tarojs/mini-runner[17] | Taro 小程序 端 Webpack 打包编译工具 |
| @tarojs/components[18] | Taro 标准组件库,H5 版 |
| @tarojs/taroize[19] | Taro 小程序反向编译器 |
| @tarojs/with-weapp[20] | 反向转换的运行时适配器 |
| eslint-config-taro[21] | Taro ESLint 规则 |
| eslint-plugin-taro[22] | Taro ESLint 插件 |
总结
Taro 3重构是为了解决架构问题,还有提供多框架的⽀持。从之前的重编译时,到现在的重运行时。
同等条件下,编译时做的工作越多,也就意味着运行时做的工作越少,性能会更好。从长远来看,计算机硬件的性能越来越冗余,如果在牺牲一点可以容忍的性能的情况下换来整个框架更大的灵活性和更好的适配性,并且能够极大的提升开发体验。
参考
https://github.com/NervJS/taro https://mp.weixin.qq.com/s?__biz=MzU3NDkzMTI3MA==&mid=2247483770&idx=1&sn=ba2cdea5256e1c4e7bb513aa4c837834 https://www.yuque.com/zaotalk/posts/cz8knq#HUlMM https://juejin.cn/post/6868099130720256007#heading-0 https://developer.mozilla.org/zh-CN/docs/Web/Web_Components https://custom-elements-everywhere.com/ https://zhuanlan.zhihu.com/p/83324871
参考资料
Custom Elements Everywhere: https://custom-elements-everywhere.com/
[2]forwardRef: https://reactjs.org/docs/forwarding-refs.html#forwarding-refs-to-dom-components
[3]babel-preset-taro: https://www.npmjs.com/package/babel-preset-taro
[4]@tarojs/taro: https://www.npmjs.com/package/@tarojs/taro
[5]@tarojs/shared: https://www.npmjs.com/package/@tarojs/shared
[6]@tarojs/api: https://www.npmjs.com/package/@tarojs/api
[7]@tarojs/taro-h5: https://www.npmjs.com/package/@tarojs/taro-h5
[8]@tarojs/router: https://www.npmjs.com/package/@tarojs/router
[9]@tarojs/react: https://www.npmjs.com/package/@tarojs/react
[10]@tarojs/cli: https://www.npmjs.com/package/@tarojs/cli
[11]@tarojs/extend: https://www.npmjs.com/package/@tarojs/extend
[12]@tarojs/helper: https://www.npmjs.com/package/@tarojs/helper
[13]@tarojs/service: https://www.npmjs.com/package/@tarojs/service
[14]@tarojs/taro-loader: https://www.npmjs.com/package/@tarojs/taro-loader
[15]@tarojs/runner-utils: https://www.npmjs.com/package/@tarojs/runner-utils
[16]@tarojs/webpack-runner: https://www.npmjs.com/package/@tarojs/webpack-runner
[17]@tarojs/mini-runner: https://www.npmjs.com/package/@tarojs/mini-runner
[18]@tarojs/components: https://www.npmjs.com/package/@tarojs/components
[19]@tarojs/taroize: https://www.npmjs.com/package/@tarojs/taroize
[20]@tarojs/with-weapp: https://www.npmjs.com/package/@tarojs/with-weapp
[21]eslint-config-taro: https://www.npmjs.com/package/eslint-config-taro
[22]eslint-plugin-taro: https://www.npmjs.com/package/eslint-plugin-taro
❤️ 谢谢支持
以上便是本次分享的全部内容,希望对你有所帮助^_^
喜欢的话别忘了 分享、点赞、收藏 三连哦~。
欢迎关注公众号 前端Sharing 收货大厂一手好文章~