
观察者模式在spring中的应用

1.1 定义
指多个对象间存在一对多的依赖关系,当一个对象的状态发生改变时,所有依赖于它的对象都得到通知并被自动更新。这种模式有时又称作发布-订阅模式、模型-视图模式,它是对象行为型模式。
1.2 角色介绍
在观察者模式中,有以下几个角色。
主题也叫被观察者(Subject):
定义被观察者必须实现的职责,
它能动态的增加取消观察者,它一般是抽象类或者是实现类,仅仅完成作为被观察者必须实现的职责:
管理观察者并通知观察者。
观察者(Observer):
观察者接收到消息后,即进行更新操作,对接收到的信息进行处理。
具体的被观察者(ConcreteSubject):
定义被观察者自己的业务逻辑,同时定义对哪些事件进行通知。
具体的观察者(ConcreteObserver):
具体的观察者,每个观察者接收到消息后的处理反应是不同的,每个观察者都有自己的处理逻辑。
1.3 观察者模式的适用场景
对象间存在一对多关系,一个对象的状态发生改变会影响其他对象。
当一个抽象模型有两个方面,其中一个方面依赖于另一方面时,可将这二者封装在独立的对象中以使它们可以各自独立地改变和复用。
实现类似广播机制的功能,不需要知道具体收听者,只需分发广播,系统中感兴趣的对象会自动接收该广播。
多层级嵌套使用,形成一种链式触发机制,使得事件具备跨域(跨越两种观察者类型)通知。
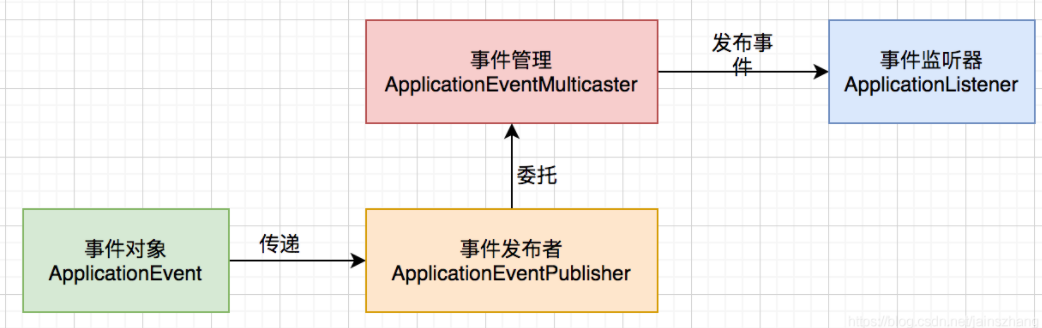
2.1 spring的事件监听机制
Spring事件机制是观察者模式的实现。ApplicationContext中事件处理是由ApplicationEvent类和ApplicationListener接口来提供的。如果一个Bean实现了ApplicationListener接口,并且已经发布到容器中去,每次ApplicationContext发布一个ApplicationEvent事件,这个Bean就会接到通知。ApplicationEvent 事件的发布需要显示触发,要么 Spring 触发,要么我们编码触发。spring内置事件由spring触发。我们先来看一下,如何自定义spring事件,并使其被监听和发布。
2.1.1 事件
事件,ApplicationEvent,该抽象类继承了EventObject,EventObject是JDK中的类,并建议所有的事件都应该继承自EventObject。

public abstract class ApplicationEvent extends EventObject {private static final long serialVersionUID = 7099057708183571937L;private final long timestamp = System.currentTimeMillis();public ApplicationEvent(Object source) {super(source);}public final long getTimestamp() {return this.timestamp;}}
2.1.2 监听器
ApplicationListener,是一个接口,该接口继承了EventListener接口。EventListener接口是JDK中的,建议所有的事件监听器都应该继承EventListener。
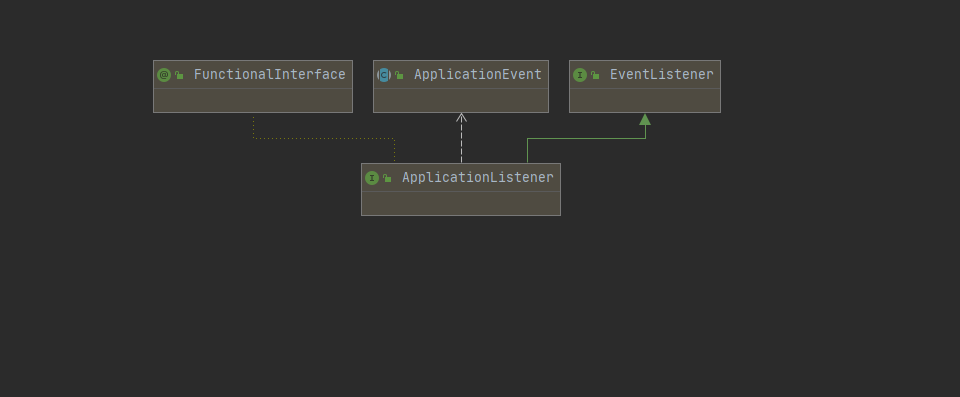
public interface ApplicationListener<E extends ApplicationEvent> extends EventListener {void onApplicationEvent(E var1);}
2.1.3 事件发布器
ApplicationEventPublisher,ApplicationContext继承了该接口,在ApplicationContext的抽象实现类AbstractApplicationContext中做了实现下面我们来看一下
org.springframework.context.support.AbstractApplicationContext#publishEvent(java.lang.Object, org.springframework.core.ResolvableType)
protected void publishEvent(Object event, @Nullable ResolvableType eventType) {Assert.notNull(event, "Event must not be null");ApplicationEvent applicationEvent;if (event instanceof ApplicationEvent) {applicationEvent = (ApplicationEvent) event;}else {applicationEvent = new PayloadApplicationEvent<>(this, event);if (eventType == null) {eventType = ((PayloadApplicationEvent<?>) applicationEvent).getResolvableType();}}if (this.earlyApplicationEvents != null) {this.earlyApplicationEvents.add(applicationEvent);}else {//获取当前注入的发布器,执行发布方法getApplicationEventMulticaster().multicastEvent(applicationEvent, eventType);}if (this.parent != null) {if (this.parent instanceof AbstractApplicationContext) {((AbstractApplicationContext) this.parent).publishEvent(event, eventType);}else {this.parent.publishEvent(event);}}}
我们可以看到,AbstractApplicationContext中publishEvent方法最终执行发布事件的是ApplicationEventMulticaster#multicastEvent方法,下面我们再来一起看一下multicastEvent方法:
public void multicastEvent(final ApplicationEvent event, @Nullable ResolvableType eventType) {ResolvableType type = (eventType != null ? eventType : resolveDefaultEventType(event));Executor executor = getTaskExecutor();//拿到所有的监听器,如果异步执行器不为空,异步执行for (ApplicationListener<?> listener : getApplicationListeners(event, type)) {if (executor != null) {executor.execute(() -> invokeListener(listener, event));}else {//执行监听方法invokeListener(listener, event);}}}protected void invokeListener(ApplicationListener<?> listener, ApplicationEvent event) {ErrorHandler errorHandler = getErrorHandler();if (errorHandler != null) {try {doInvokeListener(listener, event);}catch (Throwable err) {errorHandler.handleError(err);}}else {doInvokeListener(listener, event);}}private void doInvokeListener(ApplicationListener listener, ApplicationEvent event) {try {listener.onApplicationEvent(event);}catch (ClassCastException ex) {String msg = ex.getMessage();if (msg == null || matchesClassCastMessage(msg, event.getClass())) {Log logger = LogFactory.getLog(getClass());if (logger.isTraceEnabled()) {logger.trace("Non-matching event type for listener: " + listener, ex);}}else {throw ex;}}}
上面介绍了非spring内置的事件发布和监听执行流程。总结一下
定义一个事件,该事件继承ApplicationEvent
定义一个监听器,实现ApplicationListener接口
定义一个事件发布器,实现ApplicationEventPublisherAware接口
调用ApplicationEventPublisher#publishEvent方法
2.2 spring事件实现原理
上面我们讲到了spring事件的发布,那么spring事件发布之后,spring是如何根据事件找到事件对应的监听器呢?我们一起来探究一下。
spring的容器初始化过程想必大家都已十分了解,这里就不过多赘述,我们直接看refresh方法在refresh方法中,有这样两个方法,initApplicationEventMulticaster()和registerListeners()
我们先来看initApplicationEventMulticaster()方法
2.2.1 initApplicationEventMulticaster()
org.springframework.context.support.AbstractApplicationContext#initApplicationEventMulticaster
public static final String APPLICATION_EVENT_MULTICASTER_BEAN_NAME = "applicationEventMulticaster";protected void initApplicationEventMulticaster() {//获得beanFactoryConfigurableListableBeanFactory beanFactory = getBeanFactory();//BeanFactory中是否有ApplicationEventMulticasterif (beanFactory.containsLocalBean(APPLICATION_EVENT_MULTICASTER_BEAN_NAME)) {this.applicationEventMulticaster =beanFactory.getBean(APPLICATION_EVENT_MULTICASTER_BEAN_NAME, ApplicationEventMulticaster.class);if (logger.isTraceEnabled()) {logger.trace("Using ApplicationEventMulticaster [" + this.applicationEventMulticaster + "]");}}else {//如果BeanFactory中不存在,就创建一个SimpleApplicationEventMulticasterthis.applicationEventMulticaster = new SimpleApplicationEventMulticaster(beanFactory);beanFactory.registerSingleton(APPLICATION_EVENT_MULTICASTER_BEAN_NAME, this.applicationEventMulticaster);if (logger.isTraceEnabled()) {logger.trace("No '" + APPLICATION_EVENT_MULTICASTER_BEAN_NAME + "' bean, using " +"[" + this.applicationEventMulticaster.getClass().getSimpleName() + "]");}}}
上述代码我们可以看出,spring先从BeanFactory中获取applicationEventMulticaster如果为空,则直接创建SimpleApplicationEventMulticaster

2.2.2 registerListeners()
org.springframework.context.support.AbstractApplicationContext#registerListeners
registerListeners 是将各种实现了 ApplicationListener 的监听器注册到 ApplicationEventMulticaster 事件广播器中
protected void registerListeners() {for (ApplicationListener<?> listener : getApplicationListeners()) {getApplicationEventMulticaster().addApplicationListener(listener);}String[] listenerBeanNames = getBeanNamesForType(ApplicationListener.class, true, false);for (String listenerBeanName : listenerBeanNames) {//把监听器注册到事件发布器上getApplicationEventMulticaster().addApplicationListenerBean(listenerBeanName);}Set<ApplicationEvent> earlyEventsToProcess = this.earlyApplicationEvents;this.earlyApplicationEvents = null;if (!CollectionUtils.isEmpty(earlyEventsToProcess)) {//如果内置监听事件集合不为空for (ApplicationEvent earlyEvent : earlyEventsToProcess) {//执行spring内置的监听方法getApplicationEventMulticaster().multicastEvent(earlyEvent);}}}
这里解释一下earlyApplicationListeners
earlyApplicationListeners的本质还是ApplicationListener。Spring单例Ban的实例化是在Refresh阶段实例化的,那么用户自定义的一些ApplicationListener组件自然也是在这个阶段才初始化,但是Spring容器启动过程中,在Refresh完成之前还有很多事件:如Spring上下文环境准备等事件,这些事件又是Spring容器启动必须要监听的。所以Spring定义了一个earlyApplicationListeners集合,这个集合中的Listener在factories文件中定义好,在容器Refresh之前预先实例化好,然后就可以监听Spring容器启动过程中的所有事件。
当registerListeners方法执行完成,我们的监听器已经添加到多播器SimpleApplicationEventMulticaster中了,并且earlyEvent 早期事件也已经执行完毕。但是我们发现,如果自定义了一个监听器去监听spring内置的事件,此时并没有被执行,那我们注册的监听器是如何被执行的呢?答案在finishRefresh方法中。
2.2.3 finishRefresh
org.springframework.context.support.AbstractApplicationContext#finishRefresh
protected void finishRefresh() {clearResourceCaches();initLifecycleProcessor();getLifecycleProcessor().onRefresh();//容器中的类全部初始化完毕后,触发刷新事件publishEvent(new ContextRefreshedEvent(this));LiveBeansView.registerApplicationContext(this);}
如果我们想要实现在spring容器中所有bean创建完成后做一些扩展功能,我们就可以实现ApplicationListener
2.2.4 spring中异步的监听执行机制
我们回过头来看一下ApplicationEventMulticaster#pushEvent方法
protected void publishEvent(Object event, @Nullable ResolvableType eventType) {Assert.notNull(event, "Event must not be null");ApplicationEvent applicationEvent;if (event instanceof ApplicationEvent) {applicationEvent = (ApplicationEvent) event;}else {applicationEvent = new PayloadApplicationEvent<>(this, event);if (eventType == null) {eventType = ((PayloadApplicationEvent<?>) applicationEvent).getResolvableType();}}if (this.earlyApplicationEvents != null) {this.earlyApplicationEvents.add(applicationEvent);}else {//获取当前注入的发布器,执行发布方法getApplicationEventMulticaster().multicastEvent(applicationEvent, eventType);}if (this.parent != null) {if (this.parent instanceof AbstractApplicationContext) {((AbstractApplicationContext) this.parent).publishEvent(event, eventType);}else {this.parent.publishEvent(event);}}
最终执行发布事件的是ApplicationEventMulticaster#multicastEvent方法,下面我们再来一起看一下multicastEvent方法
public void multicastEvent(final ApplicationEvent event, @Nullable ResolvableType eventType) {ResolvableType type = (eventType != null ? eventType : resolveDefaultEventType(event));Executor executor = getTaskExecutor();//拿到所有的监听器,如果异步执行器不为空,异步执行for (ApplicationListener<?> listener : getApplicationListeners(event, type)) {if (executor != null) {executor.execute(() -> invokeListener(listener, event));}else {//执行监听方法invokeListener(listener, event);}}}
可以看到,异步事件通知主要依靠SimpleApplicationEventMulticaster 类中的Executor去实现的,如果这个变量不配置的话默认事件通知是同步的, 否则就是异步通知了,要实现同时支持同步通知和异步通知就得从这里下手;我们上文已经分析过了在initApplicationEventMulticaster方法中有这样一段代码
if (beanFactory.containsLocalBean(APPLICATION_EVENT_MULTICASTER_BEAN_NAME)) {this.applicationEventMulticaster =beanFactory.getBean(APPLICATION_EVENT_MULTICASTER_BEAN_NAME, ApplicationEventMulticaster.class);if (logger.isTraceEnabled()) {logger.trace("Using ApplicationEventMulticaster [" + this.applicationEventMulticaster + "]");}}
如果BeanFactory中已经有了SimpleApplicationEventMulticaster则不会重新创建,那么我们可以在spring中注册一个SimpleApplicationEventMulticaster并且向其中注入对应的Executor这样我们就可以得到一个异步执行监听的SimpleApplicationEventMulticaster了,我们的通知就会通过Executor异步执行。这样可以大大提高事件发布的效率。
在springboot项目中我们可以增加一个配置类来实现
public class Config {(AbstractApplicationContext.APPLICATION_EVENT_MULTICASTER_BEAN_NAME)public SimpleApplicationEventMulticaster simpleApplicationEventMulticaster(){SimpleApplicationEventMulticaster simpleApplicationEventMulticaster = new SimpleApplicationEventMulticaster();simpleApplicationEventMulticaster.setTaskExecutor(taskExecutor());return simpleApplicationEventMulticaster;}public TaskExecutor taskExecutor() {ThreadPoolTaskExecutor executor = new ThreadPoolTaskExecutor();executor.setCorePoolSize(5);executor.setMaxPoolSize(20);executor.setQueueCapacity(100);executor.setKeepAliveSeconds(300);executor.setThreadNamePrefix("thread-");executor.setRejectedExecutionHandler(new ThreadPoolExecutor.DiscardPolicy());executor.setWaitForTasksToCompleteOnShutdown(true);return executor;}}
spring项目中我们也可以增加如下xml配置
<!--定义事件异步处理--><bean id="commonTaskExecutor"class="org.springframework.scheduling.concurrent.ThreadPoolTaskExecutor"><!-- 线程池维持处于Keep-alive状态的线程数量。如果设置了allowCoreThreadTimeOut为true,该值可能为0。并发线程数,想达到真正的并发效果,最好对应CPU的线程数及核心数 --><property name="corePoolSize" value="5" /><!-- 最大线程池容量 --><property name="maxPoolSize" value="20" /><!-- 超过最大线程池容量后,允许的线程队列数 --><property name="queueCapacity" value="100" /><!-- 线程池维护线程所允许的空闲时间 .单位毫秒,默认为60s,超过这个时间后会将大于corePoolSize的线程关闭,保持corePoolSize的个数 --><property name="keepAliveSeconds" value="300" /><!-- 允许核心线程超时: false(默认值)不允许超时,哪怕空闲;true则使用keepAliveSeconds来控制等待超时时间,最终corePoolSize的个数可能为0 --><property name="allowCoreThreadTimeOut" value="true" /><!-- 线程池对拒绝任务(无线程可用)的处理策略 --><property name="rejectedExecutionHandler"><bean class="java.util.concurrent.ThreadPoolExecutor$CallerRunsPolicy" /><!-- java.util.concurrent.ThreadPoolExecutor$CallerRunsPolicy:主线程直接执行该任务,执行完之后尝试添加下一个任务到线程池中 --><!-- java.util.concurrent.ThreadPoolExecutor$AbortPolicy:直接抛出java.util.concurrent.RejectedExecutionException异常 --></property></bean><!--名字必须是applicationEventMulticaster,因为AbstractApplicationContext默认找个--><bean id="applicationEventMulticaster" class="org.springframework.context.event.SimpleApplicationEventMulticaster"><!--注入任务执行器 这样就实现了异步调用--><property name="taskExecutor" ref="commonTaskExecutor"></property></bean>
本文主要讲解了观察者模式在spring中的应用及事件监听机制,JDK 也有实现提供事件监听机制Spring 的事件机制也是基于JDK 来扩展的。Spring 的事件机制默认是同步阻塞的,想要提升对应的效率要考虑异步事件。
-end-