
2021最新版Shiro安全框架快速入门
汪伟俊 | 作者
Java技术迷 | 出品
初识 Shiro
何为 Shiro?Shiro 是一个强大且易用的 Java 安全框架,执行身份验证、授权、密码和会话管理。使用 Shiro 的易于理解的 API,您可以快速、轻松地获得任何应用程序,从最小的移动应用程序到最大的网络和企业应用程序。
啥意思呢?我们知道,任何一个系统都需要有权限控制,你不可能在没有登录的情况下能够访问到系统的内部页面,这就是权限控制的功劳,权限控制会限制每个角色的系统权限,只有当你有权限时才能够做权限对应的事情,而 Shiro 就是帮助我们实现这一过程的一个安全框架。
入门案例
在开始编写案例之前,我们先来了解几个 Shiro 中的常用对象:
•Subject(主体):指访问系统的用户或程序•Principal(身份信息):指主体进行身份认证的标识•Credential(凭证信息):主体进行认证的安全信息,比如密码、证书等
下面来编写一个入门案例来感受一下 Shiro 框架的妙用,首先引用依赖:
<dependency><groupId>org.apache.shiro</groupId><artifactId>shiro-core</artifactId><version>1.5.3</version></dependency>
然后编写 Shiro 的配置文件,Shiro 对配置文件名没有太多的要求,只需要后缀名为 .ini 即可:
[users]zhangsan=123456lisi=654321
事实上当我们将 Shiro 整合到其它框架诸如 Spring Boot,是不需要这个配置文件的,Shiro 提供给我们这个配置文件是方便开发者进行学习的,通过该配置文件可以配置一些固定的数据,使得开发者无需连接数据库即可进行权限认证的开发。
下面编写认证代码:
import org.apache.shiro.SecurityUtils;import org.apache.shiro.authc.UsernamePasswordToken;import org.apache.shiro.mgt.DefaultSecurityManager;import org.apache.shiro.realm.text.IniRealm;import org.apache.shiro.subject.Subject;public class AuthenticatorTest {public static void main(String[] args) {//创建安全管理器DefaultSecurityManager securityManager = new DefaultSecurityManager();//设置 RealmssecurityManager.setRealm(new IniRealm("classpath:shiro-config.ini"));//借助安全工具类实现认证SecurityUtils.setSecurityManager(securityManager);//获取主体Subject subject = SecurityUtils.getSubject();//创建令牌UsernamePasswordToken token = new UsernamePasswordToken("zhangsan","123456");try {//用户认证subject.login(token);}catch (Exception e){e.printStackTrace();}}}
首先创建安全管理器,并设置 Realms,Realms 设置的是认证数据,后期整合的话 Realms 的数据肯定是要从数据库中读取的,然后借助安全工具类进行认证,并获取主体,创建安全令牌,最后执行 login 方法;Shiro 就会去 Relams 指定的数据中匹配与令牌匹配的用户信息,若匹配成功,则认证成功;否则,认证失败。
这里因为 Relams 数据中有 zhangsan 和 123456 的账户,所以会认证成功,但是 login 方法是没有返回值的,所以我们通过 try...catch 抓取异常,当认证成功时控制台不会有任何输出;而当认证失败时,控制台会抛出异常:
org.apache.shiro.authc.UnknownAccountException: Realm [org.apache.shiro.realm.text.IniRealm@32a1bec0] was unable to find account data for the submitted AuthenticationToken [org.apache.shiro.authc.UsernamePasswordToken - zhanan, rememberMe=false].at org.apache.shiro.authc.pam.ModularRealmAuthenticator.doSingleRealmAuthentication(ModularRealmAuthenticator.java:184)at org.apache.shiro.authc.pam.ModularRealmAuthenticator.doAuthenticate(ModularRealmAuthenticator.java:273)at org.apache.shiro.authc.AbstractAuthenticator.authenticate(AbstractAuthenticator.java:198)at org.apache.shiro.mgt.AuthenticatingSecurityManager.authenticate(AuthenticatingSecurityManager.java:106)at org.apache.shiro.mgt.DefaultSecurityManager.login(DefaultSecurityManager.java:275)at org.apache.shiro.subject.support.DelegatingSubject.login(DelegatingSubject.java:260)at com.wwj.AuthenticatorTest.main(AuthenticatorTest.java:24)
当然,你其实也可以通过 subject.isAuthenticated() 方法获取认证状态,比如:
......try {//用户认证System.out.println(subject.isAuthenticated());subject.login(token);System.out.println(subject.isAuthenticated());}catch (Exception e){e.printStackTrace();}......
运行结果:
falsetrue
而且通过测试可以发现,当用户名错误时:
......//创建令牌UsernamePasswordToken token = new UsernamePasswordToken("zhang","123456");try {//用户认证subject.login(token);}catch (Exception e){e.printStackTrace();}
会抛出如下异常:
org.apache.shiro.authc.UnknownAccountException: Realm [org.apache.shiro.realm.text.IniRealm@722c41f4] was unable to find account data for the submitted AuthenticationToken [org.apache.shiro.authc.UsernamePasswordToken - zhang, rememberMe=false].......
而当密码错误时:
//创建令牌UsernamePasswordToken token = new UsernamePasswordToken("zhangsan","111");try {//用户认证subject.login(token);}catch (Exception e){e.printStackTrace();}
会抛出如下异常:
org.apache.shiro.authc.IncorrectCredentialsException: Submitted credentials for token [org.apache.shiro.authc.UsernamePasswordToken - zhangsan, rememberMe=false] did not match the expected credentials.......
所以我们可以改进一下这个程序:
import org.apache.shiro.SecurityUtils;import org.apache.shiro.authc.IncorrectCredentialsException;import org.apache.shiro.authc.UnknownAccountException;import org.apache.shiro.authc.UsernamePasswordToken;import org.apache.shiro.mgt.DefaultSecurityManager;import org.apache.shiro.realm.text.IniRealm;import org.apache.shiro.subject.Subject;public class AuthenticatorTest {public static void main(String[] args) {//创建安全管理器DefaultSecurityManager securityManager = new DefaultSecurityManager();//设置 RealmssecurityManager.setRealm(new IniRealm("classpath:shiro-config.ini"));//借助安全工具类实现认证SecurityUtils.setSecurityManager(securityManager);//获取主体Subject subject = SecurityUtils.getSubject();//创建令牌UsernamePasswordToken token = new UsernamePasswordToken("zhang","123456");try {//用户认证subject.login(token);}catch (UnknownAccountException e){System.out.println("用户名错误!");}catch (IncorrectCredentialsException e){System.out.println("密码错误!");}}}
运行结果:
用户名错误!源码分析
下面来看看 Shiro 究竟是如何实现权限的控制的。
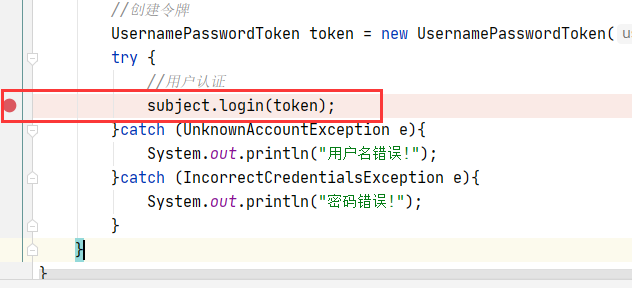
在 login 方法处打一个断点,调试运行:
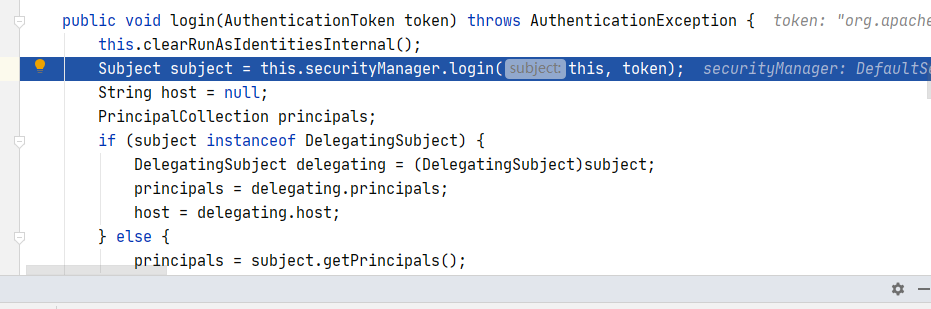
可以看到虽然外部我们是用的 Subject 主体对象调用的 login 方法啊,但内部其实用的还是 SecurityManager 对象调用 login,SecurityManager 就是 Shiro 的核心架构。
我们进入 SecurityManager 类的 login 方法看看它做了什么:
public Subject login(Subject subject, AuthenticationToken token) throws AuthenticationException{AuthenticationInfo info;try {//注意这个方法info = this.authenticate(token);} catch (AuthenticationException var7) {AuthenticationException ae = var7;try {this.onFailedLogin(token, ae, subject);} catch (Exception var6) {if (log.isInfoEnabled()) {log.info("onFailedLogin method threw an exception. Logging and propagating original AuthenticationException.", var6);}}throw var7;}Subject loggedIn = this.createSubject(token, info, subject);this.onSuccessfulLogin(token, info, loggedIn);return loggedIn;}
可以看到该方法再最开始调用了一个 authenticate 方法,并将 token 令牌作为参数传递进去,所以我们进去看看这个方法:
public AuthenticationInfo authenticate(AuthenticationToken token) throws AuthenticationException {return this.authenticator.authenticate(token);}
该方法又继续调用了一个方法,同样地,我们查看该 authenticate 方法的源码:
public final AuthenticationInfo authenticate(AuthenticationToken token) throws AuthenticationException {if (token == null) {throw new IllegalArgumentException("Method argument (authentication token) cannot be null.");} else {log.trace("Authentication attempt received for token [{}]", token);AuthenticationInfo info;try {//注意这个方法info = this.doAuthenticate(token);if (info == null) {String msg = "No account information found for authentication token [" + token + "] by this Authenticator instance. Please check that it is configured correctly.";throw new AuthenticationException(msg);}} catch (Throwable var8) {AuthenticationException ae = null;if (var8 instanceof AuthenticationException) {ae = (AuthenticationException)var8;}if (ae == null) {String msg = "Authentication failed for token submission [" + token + "]. Possible unexpected error? (Typical or expected login exceptions should extend from AuthenticationException).";ae = new AuthenticationException(msg, var8);if (log.isWarnEnabled()) {log.warn(msg, var8);}}try {this.notifyFailure(token, ae);} catch (Throwable var7) {if (log.isWarnEnabled()) {String msg = "Unable to send notification for failed authentication attempt - listener error?. Please check your AuthenticationListener implementation(s). Logging sending exception and propagating original AuthenticationException instead...";log.warn(msg, var7);}}throw ae;}log.debug("Authentication successful for token [{}]. Returned account [{}]", token, info);this.notifySuccess(token, info);return info;}}
该方法除了抓取一些异常外,最关键的代码还是调用了一个 doAuthenticate 方法,继续查看该方法的源码:
protected AuthenticationInfo doAuthenticate(AuthenticationToken authenticationToken) throws AuthenticationException {this.assertRealmsConfigured();Collection<Realm> realms = this.getRealms();return realms.size() == 1 ? this.doSingleRealmAuthentication((Realm)realms.iterator().next(), authenticationToken) : this.doMultiRealmAuthentication(realms, authenticationToken);}
该方法会去判断项目中是否配置了 Realms,这里我们当然是配置了的,且只配置了一个文件,所以它会执行 doSingleRealmAuthentication((Realm)realms.iterator().next(), authenticationToken) 方法,查看该方法:
protected AuthenticationInfo doSingleRealmAuthentication(Realm realm, AuthenticationToken token) {if (!realm.supports(token)) {String msg = "Realm [" + realm + "] does not support authentication token [" + token + "]. Please ensure that the appropriate Realm implementation is configured correctly or that the realm accepts AuthenticationTokens of this type.";throw new UnsupportedTokenException(msg);} else {//注意这个方法AuthenticationInfo info = realm.getAuthenticationInfo(token);if (info == null) {String msg = "Realm [" + realm + "] was unable to find account data for the submitted AuthenticationToken [" + token + "].";throw new UnknownAccountException(msg);} else {return info;}}}
该方法继续调用 getAuthenticationInfo 方法,查看该方法:
public final AuthenticationInfo getAuthenticationInfo(AuthenticationToken token) throws AuthenticationException {AuthenticationInfo info = this.getCachedAuthenticationInfo(token);if (info == null) {//注意这个方法info = this.doGetAuthenticationInfo(token);log.debug("Looked up AuthenticationInfo [{}] from doGetAuthenticationInfo", info);if (token != null && info != null) {this.cacheAuthenticationInfoIfPossible(token, info);}} else {log.debug("Using cached authentication info [{}] to perform credentials matching.", info);}if (info != null) {//注意这个方法this.assertCredentialsMatch(token, info);} else {log.debug("No AuthenticationInfo found for submitted AuthenticationToken [{}]. Returning null.", token);}return info;}
这里首先获取缓存中的认证信息,因为我们没有配置缓存管理器,所以 info 肯定为 null,程序会执行第一个 if 语句块,也就是执行 doGetAuthenticationInfo 方法,来看这个方法:
protected AuthenticationInfo doGetAuthenticationInfo(AuthenticationToken token) throws AuthenticationException {UsernamePasswordToken upToken = (UsernamePasswordToken)token;SimpleAccount account = this.getUser(upToken.getUsername());if (account != null) {if (account.isLocked()) {throw new LockedAccountException("Account [" + account + "] is locked.");}if (account.isCredentialsExpired()) {String msg = "The credentials for account [" + account + "] are expired";throw new ExpiredCredentialsException(msg);}}return account;}
该方法将我们传递过去的 token 强转为 UsernamePasswordToken 对象,并调用了 getUser 方法:
protected SimpleAccount getUser(String username) {this.USERS_LOCK.readLock().lock();SimpleAccount var2;try {var2 = (SimpleAccount)this.users.get(username);} finally {this.USERS_LOCK.readLock().unlock();}return var2;}
该方法会利用 username 封装一个 SimpleAccount 对象,因为这里的依据只是 username,所以 doGetAuthenticationInfo 方法只是对用户名的一个认证,之后,程序调用 assertCredentialsMatch 方法,会对密码作一个认证:
protected void assertCredentialsMatch(AuthenticationToken token, AuthenticationInfo info) throws AuthenticationException {CredentialsMatcher cm = this.getCredentialsMatcher();if (cm != null) {if (!cm.doCredentialsMatch(token, info)) {String msg = "Submitted credentials for token [" + token + "] did not match the expected credentials.";//密码错误异常throw new IncorrectCredentialsException(msg);}} else {throw new AuthenticationException("A CredentialsMatcher must be configured in order to verify credentials during authentication. If you do not wish for credentials to be examined, you can configure an " + AllowAllCredentialsMatcher.class.getName() + " instance.");}}
看到这段异常应该很熟悉吧,没错,这就是一开始密码错误时运行抛出的异常。
以上就是入门案例程序的权限认证流程。
自定义 Realm
入门案例中使用的 .ini 配置文件的方式生成 Realm,而在后续的整合需求中,我们的 Realm 数据往往都是从数据库中读取的,为此,我们需要自定义实现 Realm。通过刚才的源码分析,我们也能够知道,若是想要自定义 Realm,则需要继承 AuthorizingRealm:
public class SimpleAccountRealm extends AuthorizingRealm {......}
下面创建一个类并继承该类:
import org.apache.shiro.authc.AuthenticationException;import org.apache.shiro.authc.AuthenticationInfo;import org.apache.shiro.authc.AuthenticationToken;import org.apache.shiro.authc.SimpleAuthenticationInfo;import org.apache.shiro.authz.AuthorizationInfo;import org.apache.shiro.realm.AuthorizingRealm;import org.apache.shiro.subject.PrincipalCollection;public class MyRealm extends AuthorizingRealm {/*** 授权方法* @param principalCollection* @return*/@Overrideprotected AuthorizationInfo doGetAuthorizationInfo(PrincipalCollection principalCollection) {return null;}/*** 认证方法* @param authenticationToken* @return* @throws AuthenticationException*/@Overrideprotected AuthenticationInfo doGetAuthenticationInfo(AuthenticationToken authenticationToken) throws AuthenticationException {//从 token 中获取用户名String principal = (String) authenticationToken.getPrincipal();//若是用户名为 zhangsan,则认证成功if("zhangsan".equals(principal)){SimpleAuthenticationInfo info = new SimpleAuthenticationInfo("zhangsan","123456",this.getName());return info;}return null;}}
需要实现两个方法,分别用于授权和认证,授权我们先跳过,直接实现一下认证,从 Token 中获取前面传递过来的用户名,并与真实用户名进行校验,这一环节一般需要从数据库中查询是否有与之匹配的用户名,若没有则认证失败,这里为了方便演示,就直接用死数据了。
若是匹配成功,则认证就成功了,此时需要返回一个 SimpleAuthenticationInfo 对象,并封装一些信息,下面介绍一下该对象的构造方法参数:
•参数 1:数据库中正确的用户名•参数 2:数据库中正确的密码•参数 3:提供当前 Realm 的名字,可直接调用 this.getName() 获取
下面测试一下:
import org.apache.shiro.SecurityUtils;import org.apache.shiro.authc.UsernamePasswordToken;import org.apache.shiro.mgt.DefaultSecurityManager;import org.apache.shiro.subject.Subject;public class MyRealmTest {public static void main(String[] args) {//创建 SecurityManagerDefaultSecurityManager securityManager = new DefaultSecurityManager();//设置自定义的 RealmsecurityManager.setRealm(new MyRealm());//借助安全工具类实现认证SecurityUtils.setSecurityManager(securityManager);//获取主体Subject subject = SecurityUtils.getSubject();//创建令牌UsernamePasswordToken token = new UsernamePasswordToken("zhangsan","123456");try {//认证subject.login(token);}catch (Exception e){e.printStackTrace();}}}
密码正确时,控制台无输出,密码错误时,控制台抛出异常:
org.apache.shiro.authc.IncorrectCredentialsException: Submitted credentials for token [org.apache.shiro.authc.UsernamePasswordToken - zhangsan, rememberMe=false] did not match the expected credentials.MD5 加密
关于 MD5 加密,这里不作具体讲解,只需要知道 MD5 是用来加密的,其生成结果是一个 16 进制的 32 位长度字符串,且该加密算法是不可逆的。
Shiro 中提供了非常简单的 API 用于实现 MD5 加密,比如:
import org.apache.shiro.crypto.hash.Md5Hash;public class MD5Test {public static void main(String[] args) {String password = "123456";//创建 Md5Hash 对象Md5Hash md5Hash = new Md5Hash(password);String str = md5Hash.toHex();System.out.println(str);}}
运行结果:
e10adc3949ba59abbe56e057f20f883e而有时候这种加密并不是绝对安全的,如果你百度搜索一下,你可以找到很多 MD5 解密的网站:
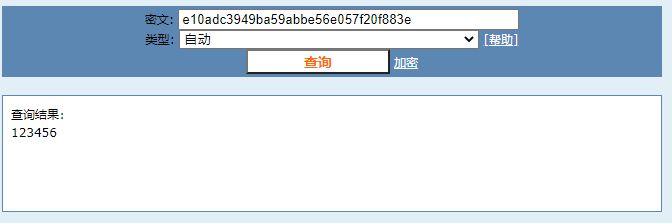
我们将运行后得到的密文在网站中进行解密,发现密码竟然被查询出来了,而前面不是说 MD5 是不可逆的吗?
MD5 确实是不可逆的,但这些网站为什么能够查询出来呢?其实它只是用的穷举法,这些网站会将一些常见的比较简单的密码密文保存到数据库,当你用一个密文去解密的时候,网站就会用你提供的密文去撞库,一旦碰撞成功,密码就被查询出来了,所以只要你的密码足够复杂,就不可能解密出来,至少现在是这样的。
所以,为了让 MD5 加密后的密文更加安全,我们需要对用户设置的密码进行加盐操作,使得用户即使在设置了诸如 123456 这样简单的密码时,解密工具也无法破解出来:
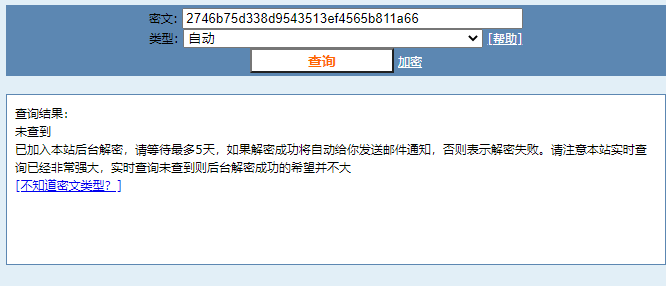
import org.apache.shiro.crypto.hash.Md5Hash;public class MD5Test {public static void main(String[] args) {String password = "123456";//给密码加盐String salt = "ls.g*y";//创建 Md5Hash 对象Md5Hash md5Hash = new Md5Hash(password,salt);String str = md5Hash.toHex();System.out.println(str);}}
运行结果:
08be5e130b57ba0dac206e6e900f76f4现在拿着这段密文去解密网站试试:
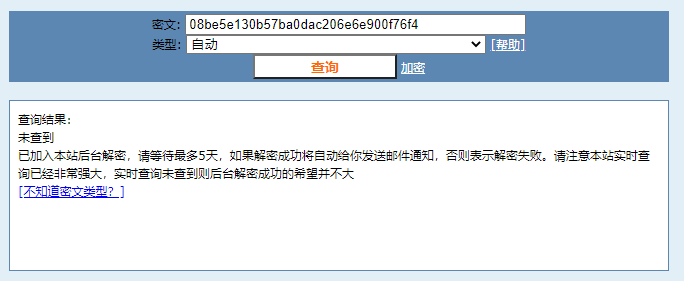
显然它已经“无能为力”了。
掌握了如何通过 Md5Hash 对密码进行加密后,我们可以将其运用到注册中,当用户注册一个账户后,对密码进行加密再存入数据库;然而此时新的问题产生了,当密码被加密后,现在 Shiro 的权限认证将永远无法通过,因为你获取的是用户输入的密码,但数据库中存放的显然已经不是这样一段明文了,为此,我们需要修改一下认证的代码,让其也对用户登录时输入的密码进行 MD5 加密并加盐,然后与数据库中的密文进行比较,若匹配,才认证成功。
接下来实现一下,同样编写一个类继承 AuthorizingRealm:
import org.apache.shiro.authc.AuthenticationException;import org.apache.shiro.authc.AuthenticationInfo;import org.apache.shiro.authc.AuthenticationToken;import org.apache.shiro.authc.SimpleAuthenticationInfo;import org.apache.shiro.authz.AuthorizationInfo;import org.apache.shiro.realm.AuthorizingRealm;import org.apache.shiro.subject.PrincipalCollection;public class MyMD5Realm extends AuthorizingRealm {/*** 授权方法* @param principalCollection* @return*/@Overrideprotected AuthorizationInfo doGetAuthorizationInfo(PrincipalCollection principalCollection) {return null;}/*** 认证方法* @param authenticationToken* @return* @throws AuthenticationException*/@Overrideprotected AuthenticationInfo doGetAuthenticationInfo(AuthenticationToken authenticationToken) throws AuthenticationException {//获取 usernameString username = (String) authenticationToken.getPrincipal();//模拟查询数据库if("zhangsan".equals(username)){return new SimpleAuthenticationInfo(username,"e10adc3949ba59abbe56e057f20f883e",this.getName());}return null;}}
这里模拟从数据中获取了一段密文,那么在认证的时候我们就需要将用户输入的密码也进行 MD5 加密:
public static void main(String[] args) {DefaultSecurityManager securityManager = new DefaultSecurityManager();//创建 RealmMyMD5Realm realm = new MyMD5Realm();//设置 Realm 使用 hash 匹配器HashedCredentialsMatcher matcher = new HashedCredentialsMatcher();matcher.setHashAlgorithmName("md5");realm.setCredentialsMatcher(matcher);securityManager.setRealm(realm);SecurityUtils.setSecurityManager(securityManager);Subject subject = SecurityUtils.getSubject();UsernamePasswordToken token = new UsernamePasswordToken("zhangsan", "123456");try {subject.login(token);System.out.println("认证成功!");}catch (UnknownAccountException e){e.printStackTrace();System.out.println("用户名错误!");}catch (IncorrectCredentialsException e){e.printStackTrace();System.out.println("密码错误!");}}
运行结果:
认证成功!还可以对其加盐处理:
import org.apache.shiro.authc.AuthenticationException;import org.apache.shiro.authc.AuthenticationInfo;import org.apache.shiro.authc.AuthenticationToken;import org.apache.shiro.authc.SimpleAuthenticationInfo;import org.apache.shiro.authz.AuthorizationInfo;import org.apache.shiro.realm.AuthorizingRealm;import org.apache.shiro.subject.PrincipalCollection;import org.apache.shiro.util.ByteSource;public class MyMD5Realm extends AuthorizingRealm {/*** 授权方法* @param principalCollection* @return*/@Overrideprotected AuthorizationInfo doGetAuthorizationInfo(PrincipalCollection principalCollection) {return null;}/*** 认证方法* @param authenticationToken* @return* @throws AuthenticationException*/@Overrideprotected AuthenticationInfo doGetAuthenticationInfo(AuthenticationToken authenticationToken) throws AuthenticationException {//获取 usernameString username = (String) authenticationToken.getPrincipal();//模拟查询数据库if("zhangsan".equals(username)){//盐值String salt = "ls.g*y";//加盐后的密文 08be5e130b57ba0dac206e6e900f76f4return new SimpleAuthenticationInfo(username,"08be5e130b57ba0dac206e6e900f76f4", ByteSource.Util.bytes(salt),this.getName());}return null;}}
为了使前端页面能够匹配密文,我们需要将盐值作为参数进行传递,使用 ByteSource.Util.bytes() 方法,然后直接运行测试代码,得到结果:
认证成功!需要注意的是,只要你将盐值作为参数传递进去了,Shiro 将会自动地对前端传递过来的密码加盐处理,然后与数据库查询得到的密文进行比较。
授权
授权指的是对认证后的用户授予对应的权限,对于没有权限的一些资源,比如页面,用户将无法访问。
授权一般分为两种:
•基于角色的访问控制•基于资源的访问控制
而这其中都是通过权限字符串去限定权限范围的,权限字符串的规则是 资源标识符:操作:资源实例标识符。比如:
•user:create:用户的创建权限•user:update:test:用户更新 test 资源的权限
下面在原程序的基础上进行授权的开发:
public class MyMD5Realm extends AuthorizingRealm {/*** 授权方法* @param principalCollection* @return*/@Overrideprotected AuthorizationInfo doGetAuthorizationInfo(PrincipalCollection principalCollection) {//获取身份信息String primaryPrincipal = (String) principalCollection.getPrimaryPrincipal();//获取当前用户的角色信息、权限信息SimpleAuthorizationInfo info = new SimpleAuthorizationInfo();//模拟查询数据库,添加用户的角色信息info.addRole("admin");info.addRole("user");//现在登录用户拥有管理员和普通用户的双重角色return info;}/*** 认证方法* @param authenticationToken* @return* @throws AuthenticationException*/@Overrideprotected AuthenticationInfo doGetAuthenticationInfo(AuthenticationToken authenticationToken) throws AuthenticationException {//获取 usernameString username = (String) authenticationToken.getPrincipal();//模拟查询数据库if("zhangsan".equals(username)){//盐值String salt = "ls.g*y";//加盐后的密文 08be5e130b57ba0dac206e6e900f76f4return new SimpleAuthenticationInfo(username,"08be5e130b57ba0dac206e6e900f76f4", ByteSource.Util.bytes(salt),this.getName());}return null;}}
编写测试代码:
public static void main(String[] args) {DefaultSecurityManager securityManager = new DefaultSecurityManager();//创建 RealmMyMD5Realm realm = new MyMD5Realm();//设置 Realm 使用 hash 匹配器HashedCredentialsMatcher matcher = new HashedCredentialsMatcher();matcher.setHashAlgorithmName("md5");realm.setCredentialsMatcher(matcher);securityManager.setRealm(realm);SecurityUtils.setSecurityManager(securityManager);Subject subject = SecurityUtils.getSubject();UsernamePasswordToken token = new UsernamePasswordToken("zhangsan", "123456");try {subject.login(token);System.out.println("认证成功!");}catch (UnknownAccountException e){e.printStackTrace();System.out.println("用户名错误!");}catch (IncorrectCredentialsException e){e.printStackTrace();System.out.println("密码错误!");}//判断用户是否认证通过if(subject.isAuthenticated()){//认证用户进行授权//基于角色的权限控制boolean flag = subject.hasRole("admin");System.out.println(flag);}}
此时登录的用户 zhangsan 具有 admin 和 user 角色,所以运行结果应该为 true:
认证成功!true
还有基于多角色的权限控制:
//判断用户是否认证通过if(subject.isAuthenticated()){//认证用户进行授权//基于多角色的权限控制boolean flag = subject.hasAllRoles(Arrays.asList("admin", "user"));System.out.println(flag);}
此时用户需同时满足这两个角色信息。
对于管理员角色,它是系统的最高权限,所以只要用户具有 admin 权限,它就能够去操作系统中的所有资源:
//判断用户是否认证通过if(subject.isAuthenticated()){boolean[] flags = subject.hasRoles(Arrays.asList("admin", "user"));System.out.println(flags);}
该方法的返回值是一个数组,也就是说,如果用户具有两个角色,则数组值均为 true。
还有诸如权限字符串的权限控制:
//基于权限字符串的权限控制boolean permitted = subject.isPermitted("user:*:*");
本文作者:汪伟俊 为Java技术迷专栏作者 投稿,未经允许请勿转载。

往 期 推 荐 1、Intellij IDEA这样 配置注释模板,让你瞬间高出一个逼格!
2、Spring+SpringMVC+Mybatis实现校园二手交易平台【实战项目】
5、惊呆了,Spring Boot居然这么耗内存!你知道吗?
7、Spring中毒太深,离开Spring我居然连最基本的接口都不会写了 点分享
点收藏
点点赞
点在看


