Springboot进行Http接口交互实现邮件告警
一个努力中的公众号
长的好看的人都关注了

本项目采用idea编辑器,依赖maven环境,相关搭建请自行百度
一、引入相关依赖
本文Http接口交互使用hutool工具类与阿里FastJson解析报文。
<dependencies>
    <dependency>
        <groupId>org.springframework.boot</groupId>
        <artifactId>spring-boot-starter</artifactId>
    </dependency>
    <dependency>
        <groupId>org.springframework.boot</groupId>
        <artifactId>spring-boot-starter-web</artifactId>
    </dependency>
    <dependency>
        <groupId>org.springframework.boot</groupId>
        <artifactId>spring-boot-starter-test</artifactId>
        <scope>test</scope>
    </dependency>
    <dependency>
        <groupId>org.projectlombok</groupId>
        <artifactId>lombok</artifactId>
        <version>RELEASE</version>
        <scope>compile</scope>
    </dependency>
    <!-- json -->
    <dependency>
        <groupId>com.alibaba</groupId>
        <artifactId>fastjson</artifactId>
        <version>1.2.75</version>
    </dependency>
    <!-- hutool工具类-->
    <dependency>
        <groupId>cn.hutool</groupId>
        <artifactId>hutool-all</artifactId>
        <version>5.3.8</version>
    </dependency>
    <!-- https://mvnrepository.com/artifact/com.sun.mail/javax.mail -->
    <dependency>
        <groupId>com.sun.mail</groupId>
        <artifactId>javax.mail</artifactId>
        <version>1.6.2</version>
    </dependency>
</dependencies>
二、编写相关配置
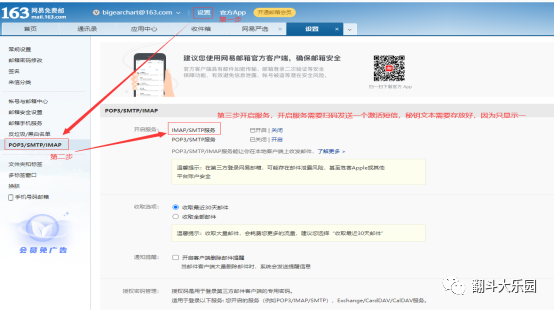
#本文使用163邮箱演示,邮箱需要开启IMAP/SMTP服务
#在yml文件中配置相关参数
server:
  port: 8080
spring:
  mail:
    host: smtp.163.com
    port: 465
    username: @163.com
    password:
    properties:
      mail:
        smtp:
          auth: true
          starttls:
            enable: true
            required: true
scripturl:
  url[0]:
    sort: 0
    url: https://gitee.com/login
    type: post
    params:
      account: 123456
      password: 123456
emailParams: @163.com
三、编写工具类
#编写发送邮件工具类SendEmailUtils
#邮件发送方法最好使用异步方式,这样可以保证调用方法执行后及时回馈
package com.auto.script.util;
import org.springframework.beans.factory.annotation.Value;
import org.springframework.scheduling.annotation.Async;
import org.springframework.stereotype.Service;
import javax.mail.*;
import javax.mail.internet.InternetAddress;
import javax.mail.internet.MimeMessage;
import java.security.Security;
import java.util.Date;
import java.util.Properties;
/**
 * @Description: 发送邮件
 * @Author: bigearchart
 * @Date: 2021/4/2
 * @return
 */
@Service
public class SendEmailUtils {
    /** yml中配置的地址 */
    @Value(value = "${spring.mail.host}")
    private  String host;
    /** yml中配置的端口 */
    @Value(value = "${spring.mail.port}")
    private  String port;
    /** yml中配置的发件邮箱 */
    @Value(value = "${spring.mail.username}")
    private  String userName;
    /** yml中配置的发件邮箱密码 */
    @Value(value = "${spring.mail.password}")
    private  String passWord;
    /**
     * 使用加密的方式,利用465端口进行传输邮件,开启ssl
     * @param to    为收件人邮箱
     * @param message    发送的消息
     */
    @Async
    public  void sendEmil(String to,String subject, String message) {
        try {
            Security.addProvider(new com.sun.net.ssl.internal.ssl.Provider());
            final String SSL_FACTORY = "javax.net.ssl.SSLSocketFactory";
            //设置邮件会话参数
            Properties props = new Properties();
            //邮箱的发送服务器地址
            props.setProperty("mail.smtp.host", host);
            props.setProperty("mail.smtp.socketFactory.class", SSL_FACTORY);
            props.setProperty("mail.smtp.socketFactory.fallback", "false");
            //邮箱发送服务器端口,这里设置为465端口
            props.setProperty("mail.smtp.port", port);
            props.setProperty("mail.smtp.socketFactory.port", port);
            props.put("mail.smtp.auth", "true");
            final String username = userName;
            final String password = passWord;
            //获取到邮箱会话,利用匿名内部类的方式,将发送者邮箱用户名和密码授权给jvm
            Session session = Session.getDefaultInstance(props, new Authenticator() {
                @Override
                protected PasswordAuthentication getPasswordAuthentication() {
                    return new PasswordAuthentication(username, password);
                }
            });
            //通过会话,得到一个邮件,用于发送
            Message msg = new MimeMessage(session);
            //设置发件人
            msg.setFrom(new InternetAddress(userName));
            //设置收件人
            msg.setRecipients(Message.RecipientType.TO, InternetAddress.parse(to, false));
            //设置邮件消息
            msg.setContent(message, "text/html; charset=utf-8");
            //设置邮件标题
            msg.setSubject(subject);
            //设置发送的日期
            msg.setSentDate(new Date());
            //调用Transport的send方法去发送邮件
            Transport.send(msg);
        } catch (Exception e) {
            e.printStackTrace();
        }

    }
}
四、业务代码实现
#编写接口接收类ScriptUrl 需要注意字段名与yml中配置的字段名必须一致,不然会
#自动解析失败
package com.auto.script.entity;
import java.util.Map;
/**
 * @author :bigearchart
 * @date :Created in 2021/4/1 16:31
 * @description:脚本检查接口类
 * @version: 1.0
 */
public class ScriptUrl {
    /** 排序字段*/
    public int sort;
    /** 请求路径*/
    public String url;
    /** 请求类型*/
    public String type;
    /** 请求参数*/
    public Map<String, Object> params;
    public int getSort() {
        return sort;
    }

    public void setSort(int sort) {
        this.sort = sort;
    }

    public String getUrl() {
        return url;
    }

    public void setUrl(String url) {
        this.url = url;
    }

    public String getType() {
        return type;
    }

    public void setType(String type) {
        this.type = type;
    }

    public Map<String, Object> getParams() {
        return params;
    }

    public void setParams(Map<String, Object> params) {
        this.params = params;
    }
}
#编写参数注入类
package com.auto.script.util;
import com.auto.script.entity.ScriptUrl;
import org.springframework.boot.context.properties.ConfigurationProperties;
import org.springframework.boot.context.properties.EnableConfigurationProperties;
import org.springframework.context.annotation.Configuration;
import java.util.List;
/**
 * @Description: 脚本检查接口参数注入类
 * @Author: bigearchart
 * @Date: 2021/4/1
 * @return
 */
@Configuration
@ConfigurationProperties(prefix = "scripturl")
@EnableConfigurationProperties(ScriptUrlEnum.class)
public class ScriptUrlEnum {

    private List<ScriptUrl> url;
    public List<ScriptUrl> getUrl() {
        return url;
    }

    public void setUrl(List<ScriptUrl> url) {
        this.url = url;
    }
}
#定义接口
package com.auto.script.service;
/**
 * @author :bigearchart
 * @date :Created in 2021/4/1 15:53
 * @description:定时任务配置类
 * @version: 1.0
 */
public interface QuazrtAutoService {

    /**
     * 定时任务每隔一分钟执行验证接口服务是否正常
     */
    public void autoCrontab();
}
#编写接口实现类
package com.auto.script.service.impl;
import cn.hutool.core.util.StrUtil;
import cn.hutool.http.HttpUtil;
import com.alibaba.fastjson.JSONObject;
import com.auto.script.entity.ScriptUrl;
import com.auto.script.service.QuazrtAutoService;
import com.auto.script.util.ScriptUrlEnum;
import com.auto.script.util.SendEmailUtils;
import lombok.extern.slf4j.Slf4j;
import org.springframework.beans.factory.annotation.Value;
import org.springframework.scheduling.annotation.Scheduled;
import org.springframework.stereotype.Component;
import javax.annotation.Resource;
import java.util.List;
/**
 * @author :bigearchart
 * @date :Created in 2021/4/1 15:53
 * @description:定时任务配置实现类
 * @version: 1.0
 */
@Slf4j
@Component
public class QuazrtAutoServiceImpl implements QuazrtAutoService {

    @Value(value = "${emailParams:}")
    private String[] emailParams;
    @Resource
    private ScriptUrlEnum scriptUrlEnum;
    @Resource
    private SendEmailUtils sendEmailUtils;
    /**
     * 定时任务每隔一分钟执行验证接口服务是否正常
     */
    @Override
    @Scheduled(cron = "0 */1 * * * ?")
    public void autoCrontab() {
        try{
            //读取配置接口参数
            List<ScriptUrl> url = scriptUrlEnum.getUrl();
            //循环测试接口
            for (ScriptUrl scriptUrl: url) {
                String urlStr = scriptUrl.getUrl();
                String type = scriptUrl.getType();
                //验证参数非空
                if(StrUtil.hasEmpty(urlStr, type)){
                    throw new RuntimeException("接口路径、请求类型不能为空,返回结果为空");
                }

                log.info("============================本次测试接口【" + urlStr +"】==================");
                //参数转json字符串
                String paramsStr = JSONObject.toJSONString(scriptUrl.getParams());
                String jsonStr = null;
                //验证请求类型
                if(type.equals("post")){
                    //进行接口交互
                    jsonStr = HttpUtil.post(scriptUrl.getUrl(), paramsStr);
                }else{
                    //验证参数是否为空
                    if(scriptUrl.getParams().isEmpty() || scriptUrl.getParams().size() <= 0){
                        //进行接口交互
                        jsonStr = HttpUtil.get(scriptUrl.getUrl()).toString();
                    }else {
                        //进行接口交互
                        jsonStr = HttpUtil.get(scriptUrl.getUrl(), scriptUrl.getParams());
                    }

                }

                log.info("=============================接口返回结果为:" );
                log.info(jsonStr);
                //验证返回结果是否为空
                if(StrUtil.isEmpty(jsonStr)){
                    throw new RuntimeException("接口路径为【" + urlStr + "】的接口,返回结果为空");
                }

                //解析返回结果
                JSONObject jsonObject = JSONObject.parseObject(jsonStr);
                //获取响应码
                String code = jsonObject.get("code").toString();
                //判断响应码是否正确
                if(StrUtil.isEmpty(code) || ! code.equals("200")){
                    throw new RuntimeException("接口路径为【" + urlStr + "】的接口请求错误,接口返回结果为:" + jsonStr);
                }

            }

        }catch (Exception e){
            //发送邮件
            sendEmail(e.getMessage());
            //控制台输出
            log.info(e.toString());
        }


    }

    /**
     * 封装邮件参数方法
     * @param msg --- 发送文本
     */
    public void sendEmail(String msg){
        //循环待发送邮件集合
        for (String email: emailParams ) {
            //非空情况再执行
            if(StrUtil.isNotEmpty(email)){
                sendEmailUtils.sendEmil(email, "接口测试告警邮件", msg);
            }
        }

    }
}
五、启动类配置
#在启动类添加相关配置
# @EnableScheduling --- 开启对定时任务支持
# @EnableAsync --- 开启异步注解支持
package com.auto.script;
import org.springframework.boot.SpringApplication;
import org.springframework.boot.autoconfigure.SpringBootApplication;
import org.springframework.scheduling.annotation.EnableAsync;
import org.springframework.scheduling.annotation.EnableScheduling;
/**
 * @Description: 定时任务实现自动执行接口测试项目启动类
 * @Author: bigearchart
 * @Date: 2021/4/1
 * @return
 */
@SpringBootApplication
@EnableScheduling
@EnableAsync
public class ScriptApplication {

    public static void main(String[] args) {
        SpringApplication.run(ScriptApplication.class, args);
    }

}
六、启动项目
#项目启动后,查看控制台输出结果
#静等一分钟就可以看到接口请求的输出信息
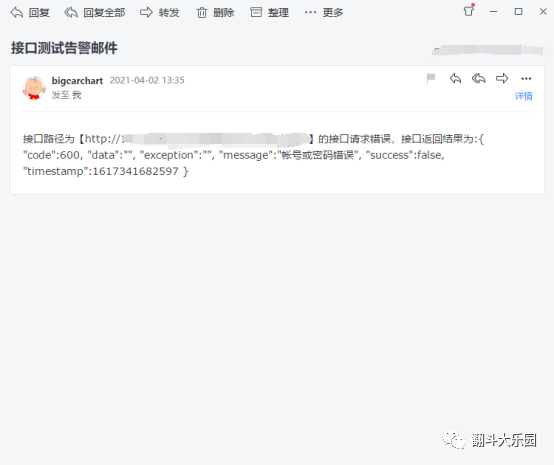
#然后查看邮箱会收到一封告警邮件
项目源码地址:
https://gitee.com/bigearchart_admin/script.git
本次的学习到这里就结束了,会根据实际使用更新文章。
如果对您有帮助 请点个关注,万分感谢
(QQ招聘群 710566091
微信招聘群 请加图图微信)
评论
