跨平台播放器开发 (四) 开发一个播放器需要用到哪些 FFmpeg 知识
前言
咱们前面三篇文章主要介绍了如何在各个主流平台下配置开发环境,那么从该篇开始就真正进入编码了。由于该系列定义为「从 0 到 1 「写一个跨平台播放器,所以我打算」从浅到深」,从「基础到进阶」的路线来进行。
咱们先来看一个流程图:
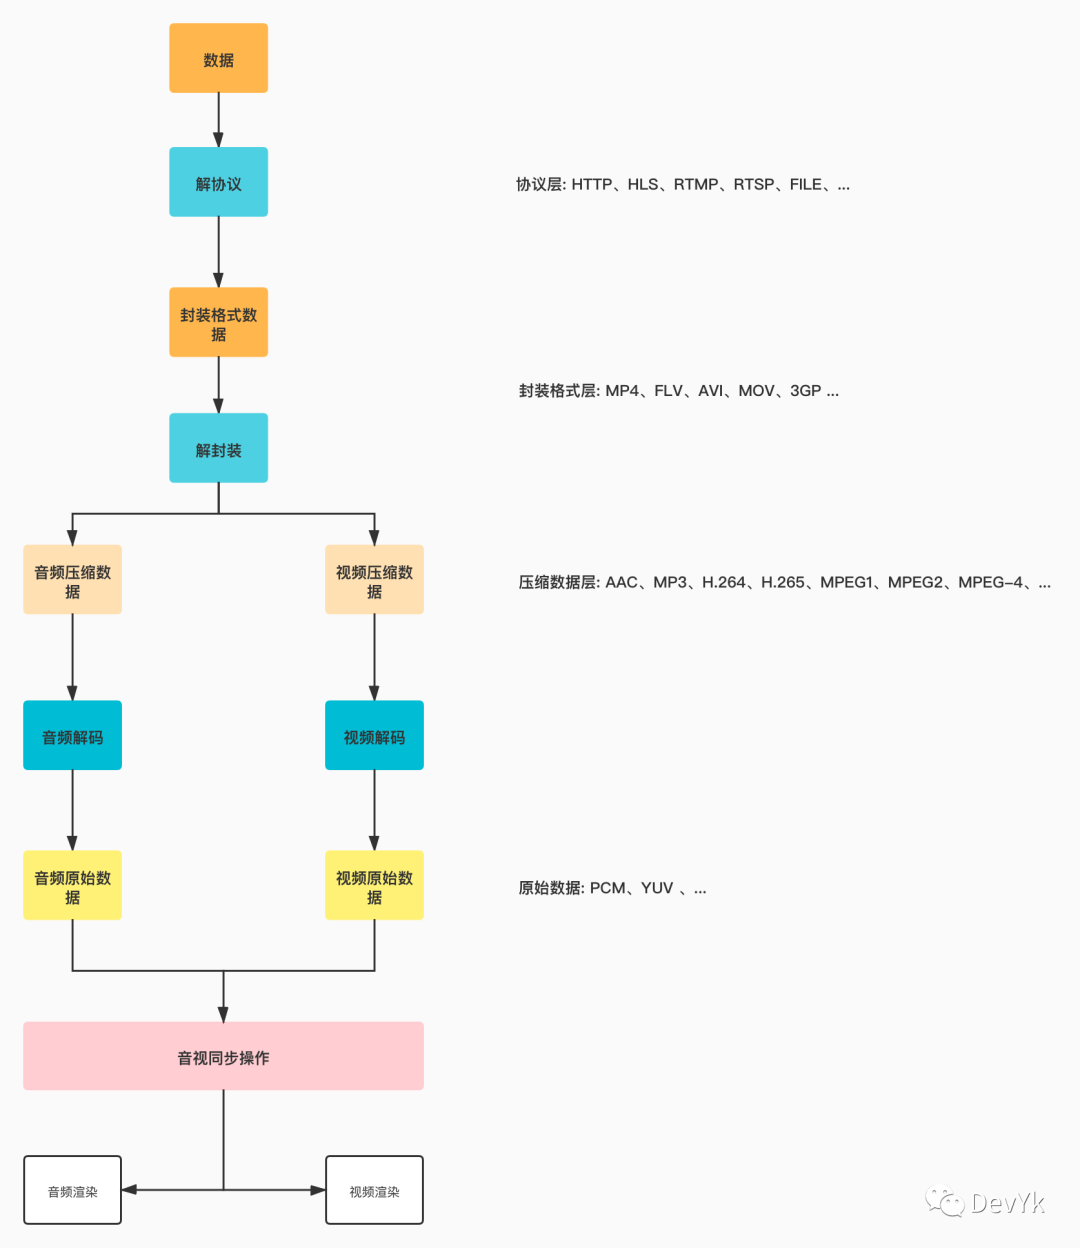
该系列文章就是将上图拆分为具体的代码模块,那么该篇咱们主要讲解如何利用FFmpeg API 来对一个输入数据进行解封装,读取原始音频视频信息,然后对音频视频做一些基本操作。基本上在播放器模块中用到的FFmpeg API 咱们都要对它有一个了解。
❝ps: 如果对 Mac OS 、Windows 、Linux 下不知道怎么配置 QT & FFmpeg 环境的可以参考下面文章
跨平台播放器开发 (一) QT for MAC OS & FFmpeg 环境搭建
跨平台播放器开发 (二) QT for Linux & FFmpeg 环境搭建
跨平台播放器开发 (三) QT for Windows & FFmpeg 环境搭建
❞
FFmpeg 基础
解封装
利用 FFmpeg api 来对输入视频进行解封装,先来看一下使用 api 的流程
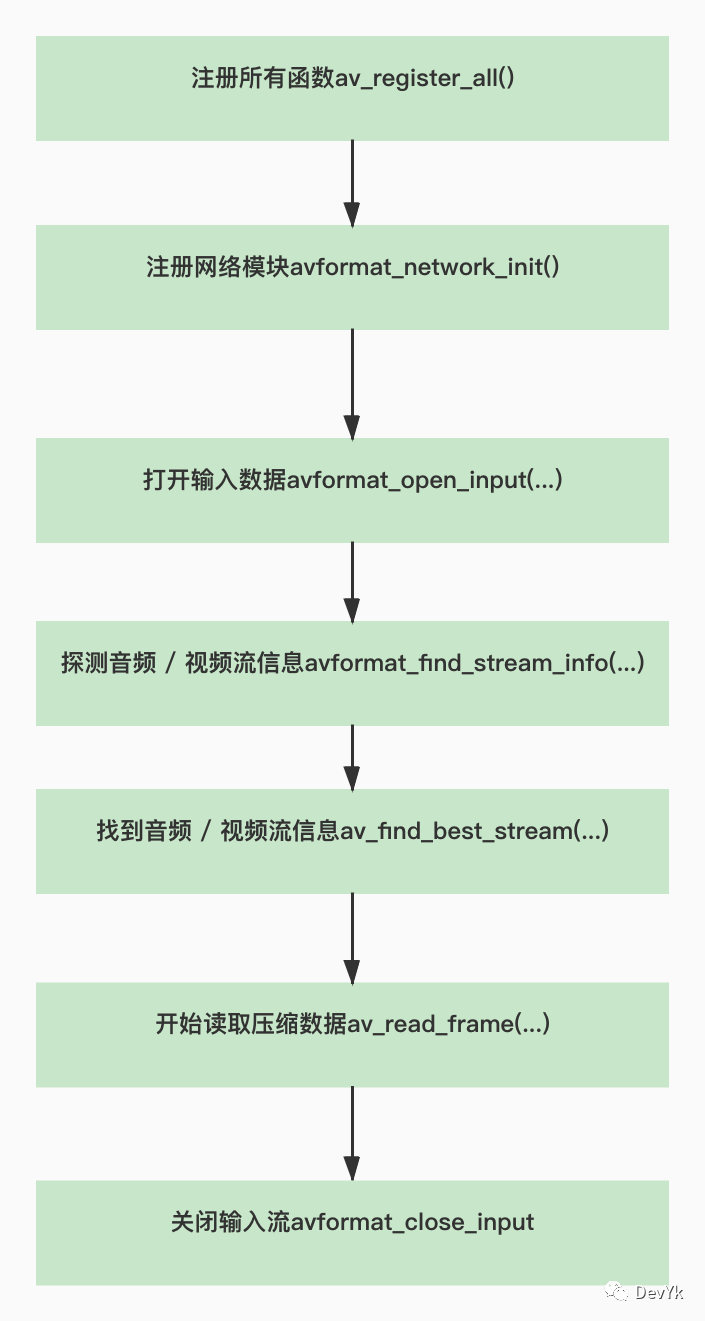
看完上图是不是对解封装的 API 有一个大概的了解? 从一个 输入 URL到读取到 「压缩数据流」 就这么几步,很简单的,下面我们用代码实际演示一下:
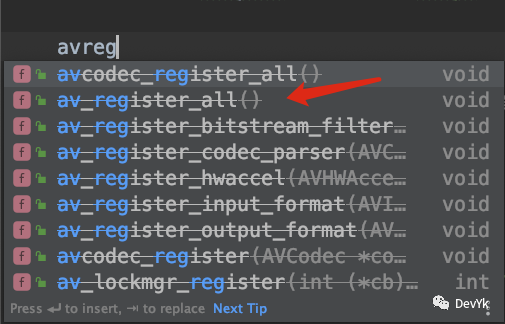
1.注册所有函数
av_register_all()
其实在最新的版本中该函数已经过时了,在最低的版本中还是必须调用该函数的。
2.注册网络模块
//初始化网络库(可以打开 rtmp、rtsp、http 等协议的流媒体视频)
avformat_network_init();
3.打开输入流并读取头信息
  //参数设置
    AVDictionary *opts = NULL;
    //设置rtsp流以tcp协议打开
    av_dict_set(&opts, "rtsp_transport", "tcp", 0);
    //网络延时时间
    av_dict_set(&opts, "max_delay", "1000", 0);

    //解封装上下文
    AVFormatContext *ic = NULL;
    int re = avformat_open_input(
            &ic,
            inpath,
            0,  // 0表示自动选择解封器
            &opts //参数设置,比如rtsp的延时时间
    );
  //返回值 0 成功
    if (re != 0) {
        char buf[1024] = {0};
        av_strerror(re, buf, sizeof(buf) - 1);
        cout << "open " << inpath << " failed! :" << buf << endl;
        getchar();
        return -1;
    }
这里要注意,调用该函数那么在结尾处一定要调用 avformat_close_input()
4.读取媒体文件数据包
//return >=0 if OK, AVERROR_xxx on error
re = avformat_find_stream_info(ic, 0);

//打印视频流详细信息
av_dump_format(ic, 0, inpath, 0);
5.获取音视频流信息
- 通过遍历的方式获取
    //获取音视频流信息 (遍历,函数获取)
    for (int i = 0; i < ic->nb_streams; i++) {
        AVStream *as = ic->streams[i];
        cout << "codec_id = " << as->codecpar->codec_id << endl;
        cout << "format = " << as->codecpar->format << endl;

        //音频 AVMEDIA_TYPE_AUDIO
        if (as->codecpar->codec_type == AVMEDIA_TYPE_AUDIO) {
            audioStream = i;
            cout << i << "音频信息" << endl;
            cout << "sample_rate = " << as->codecpar->sample_rate << endl;
            //AVSampleFormat;
            cout << "channels = " << as->codecpar->channels << endl;
            //一帧数据?? 单通道样本数
            cout << "frame_size = " << as->codecpar->frame_size << endl;
            //1024 * 2 * 2 = 4096  fps = sample_rate/frame_size

        }
            //视频 AVMEDIA_TYPE_VIDEO
        else if (as->codecpar->codec_type == AVMEDIA_TYPE_VIDEO) {
            videoStream = i;
            cout << i << "视频信息" << endl;
            cout << "width=" << as->codecpar->width << endl;
            cout << "height=" << as->codecpar->height << endl;
            //帧率 fps 分数转换
            cout << "video fps = " << r2d(as->avg_frame_rate) << endl;
        }
    }
- 通过 API 方式获取
//获取视频流
videoStream = av_find_best_stream(ic, AVMEDIA_TYPE_VIDEO, -1, -1, NULL, 0);
AVStream *as = ic->streams[videoStream];
cout << i << "视频信息" << endl;
cout << "width=" << as->codecpar->width << endl;
cout << "height=" << as->codecpar->height << endl;
//帧率 fps 分数转换
cout << "video fps = " << r2d(as->avg_frame_rate) << endl;
6.读取压缩数据包
    AVPacket *pkt = av_packet_alloc();

    for (;;) {
        int re = av_read_frame(ic, pkt);
        if (re != 0) {
            //循环播放
            cout << "==============================end==============================" << endl;
            break;
        }
        cout << "pkt->size = " << pkt->size << endl;
        //显示的时间
        cout << "pkt->pts = " << pkt->pts << endl;

        //转换为毫秒,方便做同步
        cout << "pkt->pts ms = " << pkt->pts * (r2d(ic->streams[pkt->stream_index]->time_base) * 1000) << endl;

        //解码时间
        cout << "pkt->dts = " << pkt->dts << endl;
        if (pkt->stream_index == videoStream) {
            cout << "图像" << endl;
        }
        if (pkt->stream_index == audioStream) {
            cout << "音频" << endl;
        }
        //释放,引用计数-1 为0释放空间
        av_packet_unref(pkt);
    }
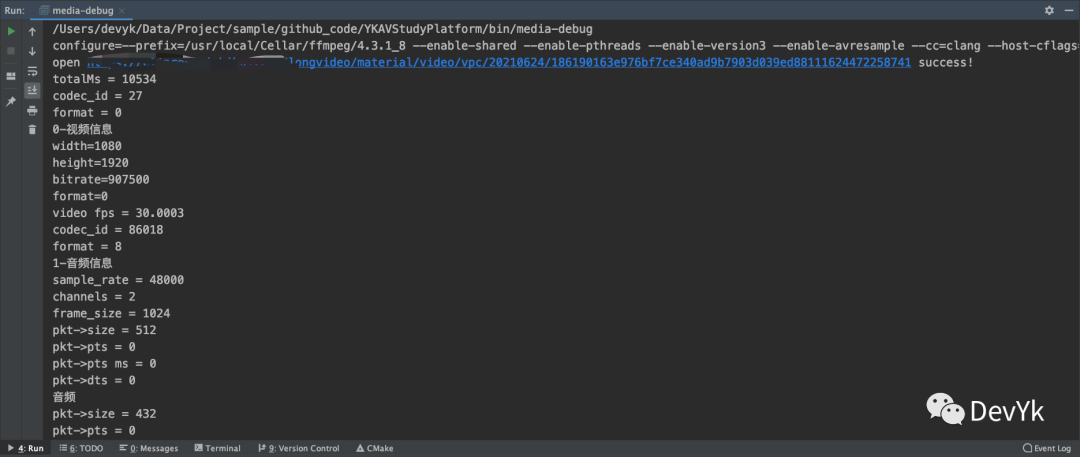
调试之后的 log
解码
调用 ffmpeg api 来对音视频压缩数据解码的话,其实也很简单,主要使用如下几个 api ,见下图:
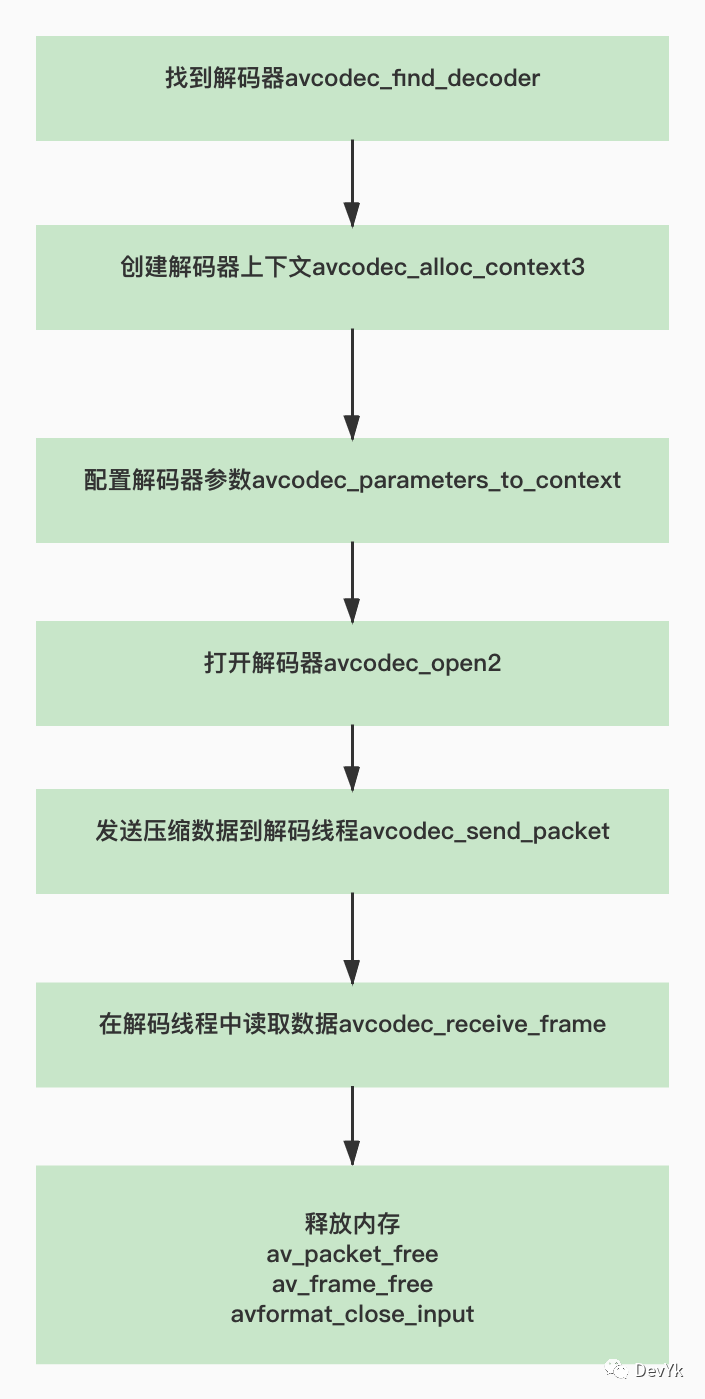
我们接着在解封装的代码基础上进行添加,代码如下:
    //找到视频解码器
    AVCodec *vcodec = avcodec_find_decoder(ic->streams[videoStream]->codecpar->codec_id);
    if (!vcodec) {
        cout << "can't find the codec id" << ic->streams[videoStream]->codecpar->codec_id << endl;
        getchar();
        return -1;
    }
    //创建视频解码器上下文
    AVCodecContext *vctx = avcodec_alloc_context3(vcodec);
    //配置解码器上下文参数
    avcodec_parameters_to_context(vctx, ic->streams[videoStream]->codecpar);
    //配置解码线程
    vctx->thread_count = 8;
    //打开解码器上下文
    re = avcodec_open2(vctx, 0, 0);
    if (re != 0) {
        char buf[1024] = {0};
        av_strerror(re, buf, sizeof(buf) - 1);
        cout << "video avcodec_open2 failed!" << buf << endl;
        getchar();
        return -1;
    }
    cout << "video avcodec_open2 success!" << endl;
找解码器也可以通过如下 API 形式进行:
AVCodec *avcodec_find_decoder_by_name(const char *name);
如果想要打开音频解码器,代码一样,换下参数即可,下面进行真正解码:
    //malloc AVPacket并初始化
    AVPacket *pkt = av_packet_alloc();
    //接收解码的原始数据
    AVFrame *frame = av_frame_alloc();
    for (;;) {
        int re = av_read_frame(ic, pkt);
        if (re != 0) {
            break;
        }

        //解码视频
        //发送 packet 到解码线程
        re = avcodec_send_packet(avcc, pkt);
        //释放,引用计数-1 为0释放空间
        av_packet_unref(pkt);

        //一次 send 可能对于多次 receive
        for (;;) {
            re = avcodec_receive_frame(avcc, frame);
            if (re != 0)break;
            //释放,引用计数-1 为0释放空间
           av_frame_unref(frame);
    }
这样就可以进行解码了,现在我们添加一些打印参数,比如音频采样信息,视频宽高信息:

❝总时长:totalMs = 10534 ms
视频信息:
bitrate=907_500
fps = 30.0003
codec_id = 86018
format = AV_PIX_FMT_YUV420P 1152
1080 - 1920
pict_type= AV_PICTURE_TYPE_I
音频信息:
sample_rate = 48000
channels = 2
❞
视频像素格式转换
视频像素格式其实就是 YUV 转 RGB 的一个过程, FFmpeg 也提供了对应的 API ,它是使用 CPU 运算能力来转换,效率是比较低的。咱们播放器使用 OpenGL GPU 来转,效率比较高。虽然 FFmpeg API 转换效率比较低,但是我们还是可以学习一下的。使用流程如下:
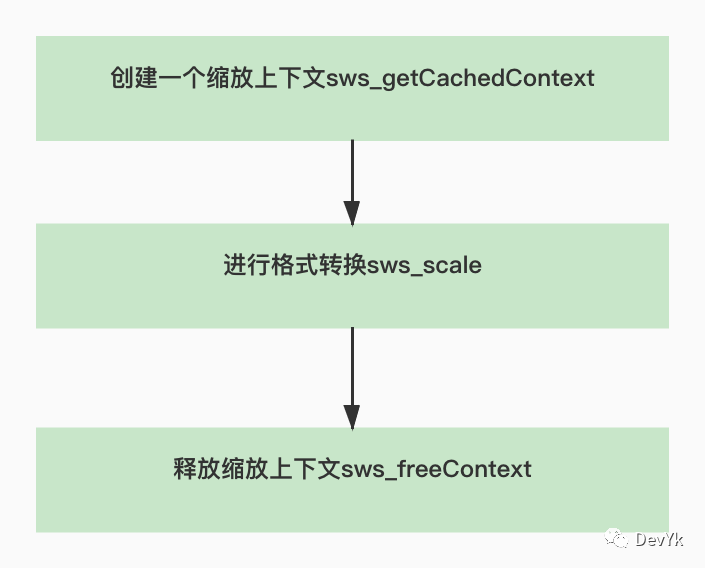
仅仅 2 个 API 就可以达到对 YUV 的转换或者裁剪,代码示例:
                const int in_width = frame->width;
                const int in_height = frame->height;
                const int out_width = in_width / 2;
                const int out_height = in_height / 2;

       /**
                 * @param context   : 缩放上下文,如果为 NULL,那么内部会进行创建,
                 *            如果已经存在,参数也没有发生变化,那么就直接返回当前,否者释放缩放上下文,重新创建。
                 * @param srcW      : 输入的宽
                 * @param srcH      : 输入的高
                 * @param srcFormat : 输入的格式
                 * @param dstW    : 输出的宽
                 * @param dstH    : 输出的高
                 * @param dstFormat : 输出的格式
                 * @param flags   : 提供了一系列的算法,快速线性,差值,矩阵,不同的算法性能也不同,
                            快速线性算法性能相对较高。总时长只针对尺寸的变换。
                 * @param srcFilter : 输入过滤器
                 * @param dstFilter : 输出过滤器
                 * @param param   : 这个跟 flags 算法相关,一般传入 O
                 * @return          : 缩放的上下文
                 */
                vsctx = sws_getCachedContext(
                        vsctx,//传入NULL 会新创建
                        in_width, in_height, (AVPixelFormat) frame->format, //输入的宽高,格式
                        out_width, out_height, AV_PIX_FMT_RGBA, //输出的宽高,格式
                        SWS_BILINEAR, //尺寸变换的算法
                        0, 0, 0
                );


                    /**
                     * @param c         缩放上下文
                     * @param srcSlice  YUV 切换数据可以是指针,也可以是数组
                     * @param srcStride 对应 YUV 一行的大小
                     * @param srcSliceY 这个用不到传入 0 即可
                     * @param srcSliceH YUV 的高
                     * @param dst       输出的像素格式数据
                     * @param dstStride 输出的像素格式数据的大小
                     * @return          返回转换后的高
                     */
                    re = sws_scale(vsctx,
                                   frame->data, //输入数据
                                   frame->linesize,//输入行大小
                                   0,
                                   frame->height,//输出高度
                                   (uint8_t *const *) (data), //输出数据
                                   lines//输出大小
                    );
上面的注释都很详细,相信大家也能看的明白,最后我们看下调试后的log,如下:
❝像素格式尺寸转换上下文创建或者获取成功!
in_width=1080
in_height=1920
out_width=540
out_height=960
sws_scale success! return height of the output slice =960 =============== end =================
❞
重采样
重采样的意思就是将音频的输入参数统一输出某个特定的值,这样做的好处就是归一化播放器的声音输出。那么怎么使用 FFmpeg API 来进行重采样呢? 先来看一张流程图:
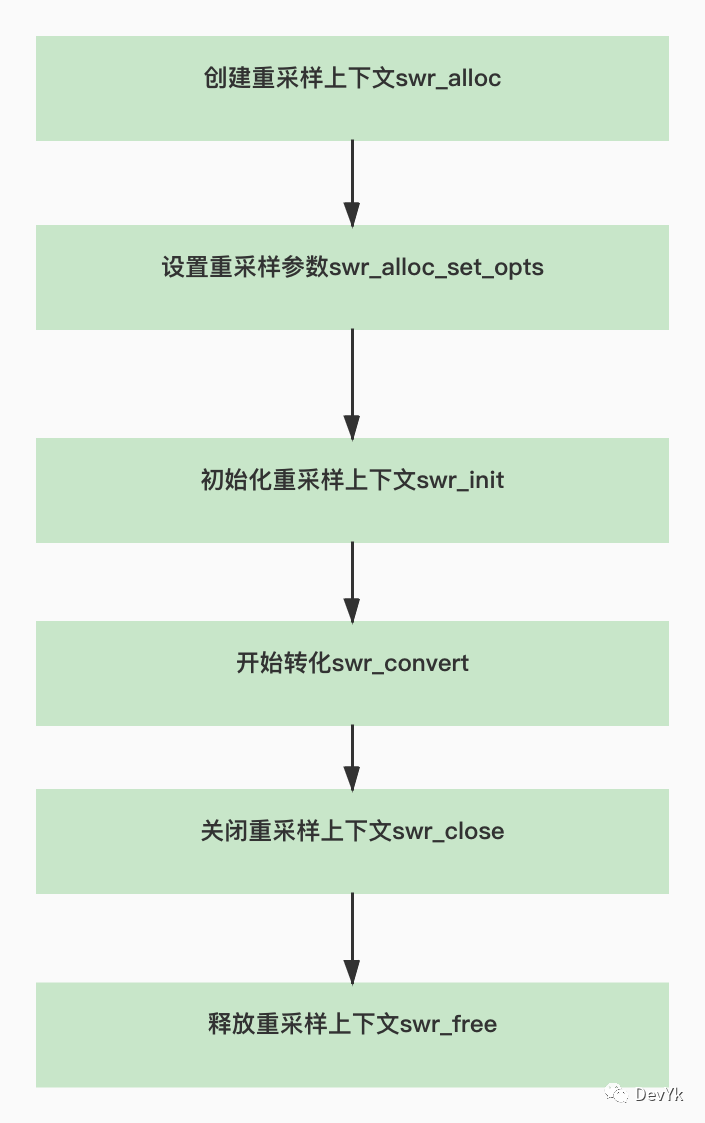
我们还是以之前的代码继续写,
「我们统一输出的参数为 sample_rate=48000,sample_channel=2,sample_fml=AV_SAMPLE_FMT_S16」
    ...
  //音频重采样
    SwrContext *asctx = swr_alloc();
    //设置重采样参数
    asctx = swr_alloc_set_opts(asctx //重采样上下文
            , av_get_default_channel_layout(2)//输出声道格式
            , AV_SAMPLE_FMT_S16 //输出声音样本格式
            , 48000 //输出采样率
            , av_get_default_channel_layout(actx->channels)//输入通道数
            , actx->sample_fmt                            //输入声音样本格式
            , actx->sample_rate, 0, 0  //输入音频采样率
    );
    //初始化采样上下文
    re = swr_init(asctx);
    if (re != 0) {
        char buf[1024] = {0};
        av_strerror(re, buf, sizeof(buf) - 1);
        cout << "audio swr_init failed!" << buf << endl;
        return -1;
    }

  ...
    //重采样之后存入的数据
    unsigned char *pcm = NULL;
    for (;;) {
        int re = av_read_frame(ic, pkt);
        if (re != 0) {
            //循环播放
            cout << "==============================end==============================" << endl;
//            int ms = 3000; //三秒位置 根据时间基数(分数)转换
//            long long pos = (double) ms / (double) 1000 * r2d(ic->streams[pkt->stream_index]->time_base);
//            av_seek_frame(ic, videoStream, pos, AVSEEK_FLAG_BACKWARD | AVSEEK_FLAG_FRAME);
//            continue;
            break;
        }

        cout << "pkt->size = " << pkt->size << endl;
        //显示的时间
        cout << "pkt->pts = " << pkt->pts << endl;

        //转换为毫秒,方便做同步
        cout << "pkt->pts ms = " << pkt->pts * (r2d(ic->streams[pkt->stream_index]->time_base) * 1000) << endl;

        //解码时间
        cout << "pkt->dts = " << pkt->dts << endl;
        AVCodecContext *avcc = NULL;
        if (pkt->stream_index == videoStream) {
            cout << "图像" << endl;
            avcc = vctx;
        }
        if (pkt->stream_index == audioStream) {
            cout << "音频" << endl;
            avcc = actx;
        }

        //解码视频
        //发送 packet 到解码线程
        re = avcodec_send_packet(avcc, pkt);
        //释放,引用计数-1 为0释放空间
        av_packet_unref(pkt);
        if (re != 0) {
            char buf[1024] = {0};
            av_strerror(re, buf, sizeof(buf) - 1);
            cout << "video avcodec_send_packet failed!" << buf << endl;
            continue;
        }

        //一次 send 可能对于多次 receive
        for (;;) {
            re = avcodec_receive_frame(avcc, frame);
            if (re != 0)break;

              ...

              if (avcc == actx) {//音频
                uint8_t *data[2] = {0};
                if (!pcm) pcm = new uint8_t[frame->nb_samples * 16/8 * 2];
                data[0] = {pcm};
                int len = swr_convert(asctx, data, frame->nb_samples //输出
                        , (const uint8_t **) frame->data, frame->nb_samples //输入
                );
                if (len >= 0) {
                    cout << "swr_convert success return len = " << len << endl;
                } else {
                    cout << "swr_convert failed return len = " << len << endl;
                }
            }
        }
  ...
    }

    if (asctx)swr_close(asctx);
    if (asctx)swr_free(&asctx);
转换后的log:
❝swr_convert success return len = 1024
❞
seek 操作
我们如果想要指定某个时间看某段画面的话就需要对视频做 seek 操作,FFmpeg 提供了 「av_seek_frame」 函数来对视频的跳转,它有 4 个输入参数,含义如下:
/**
 * 根据时间戳和音频或视频的索引 seek 到关键帧的操作
 *
 * @param s 媒体格式上下文
 * @param stream_index 流索引,传入 -1 为默认
 * @param timestamp 需要跳转到时间戳的位置
 * @param flags seek 的模式
 * @return >= 0 on success
 */
int av_seek_frame(AVFormatContext *s, int stream_index, int64_t timestamp,
                  int flags);
我们着重看下最后一个 「flags」 参数
❝//AVSEEK_FLAG_BACKWARD
seek 到后面的关键帧
//AVSEEK_FLAG_BYTE
基于以字节为单位的位置查找
//AVSEEK_FLAG_ANY
Seek 到任意一帧,注意不是关键帧,那么会有花屏的可能。
//AVSEEK_FLAG_FRAME
seek 到关键帧的位置
❞
我们一般以这样的形式来进行 seek 操作:
int ms = 3000; //三秒位置 根据时间基数(分数)转换
long long pos = (double) ms / (double) 1000 * r2d(ic->streams[pkt->stream_index]->time_base);
av_seek_frame(ic, videoStream, pos, AVSEEK_FLAG_BACKWARD | AVSEEK_FLAG_FRAME);
上面的含义就是定位到 3000 ms 位置后面的关键帧处开始播放。后面播放器 seek 功能我们会介绍如何精准 seek 操作
该篇文章对于 FFmpeg 的知识我们就介绍到这里,后面在开发中如果有新遇见的我会再详细介绍一下。
总结
播放器要用到的 FFmpeg 知识 大概就这么多,可以发现这些 API 其实都比较简单。此刻我相信你已经对这些 API 有一定的印象和了解了吧。
下一篇文章将带来 QT 如何渲染 PCM 和 YUV 的数据。
「以上代码可以通过该地址访问」:https://github.com/yangkun19921001/YKAVStudyPlatform
