
Gitlab + Jenkins + k8s 实现企业 CI/CD 落地
gitlab-pipeline
Gitlab + Jenkins + k8s 实现企业 CI/CD 落地
1、启动 docker、kubernetes(docker-desktop Mac本地环境)
2、使用K8s集群启动 jenkins
      apiVersion: v1
kind: ServiceAccount
metadata:
name: jenkins
---
kind: Role
apiVersion: rbac.authorization.k8s.io/v1
metadata:
name: jenkins
rules:
- apiGroups: [""]
resources: ["pods"]
  verbs: ["create","delete","get","list","patch","update","watch"]
- apiGroups: [""]
resources: ["pods/exec"]
  verbs: ["create","delete","get","list","patch","update","watch"]
- apiGroups: [""]
resources: ["pods/log"]
  verbs: ["get","list","watch"]
- apiGroups: [""]
resources: ["secrets"]
verbs: ["get"]
---
apiVersion: rbac.authorization.k8s.io/v1
kind: RoleBinding
metadata:
name: jenkins
roleRef:
apiGroup: rbac.authorization.k8s.io
kind: Role
name: jenkins
subjects:
- kind: ServiceAccount
name: jenkins
---
apiVersion: v1
kind: Service
metadata:
name: jenkins
spec:
  selector:
app: jenkins
type: NodePort
  ports:
  - name: http
port: 8080
targetPort: 8080
protocol: TCP
  - name: agent
port: 50000
protocol: TCP
targetPort: 50000
---
apiVersion: apps/v1
kind: Deployment
metadata:
name: jenkins
spec:
replicas: 1
selector:
    matchLabels:
app: jenkins
strategy:
type: RollingUpdate
rollingUpdate:
maxSurge: 2
maxUnavailable: 0
template:
metadata:
labels:
app: jenkins
    spec:
      securityContext:
fsGroup: 1000
serviceAccountName: jenkins
containers:
      - name: jenkins
image: jenkinsci/blueocean:latest
imagePullPolicy: IfNotPresent
ports:
        - containerPort: 8080
name: web
protocol: TCP
        - containerPort: 50000
name: agent
protocol: TCP
volumeMounts:
        - name: jenkins-home
          mountPath: /var/jenkins_home
env:
        - name: LIMITS_MEMORY
          valueFrom:
            resourceFieldRef:
resource: limits.memory
divisor: 1Mi
        - name: JAVA_OPTS
# 解决jenkins 2.2以上版本无法关闭跨站请求伪造保护  -Dhudson.security.csrf.GlobalCrumbIssuerConfiguration.DISABLE_CSRF_PROTECTION=true
value: -Xmx$(LIMITS_MEMORY)m -XshowSettings:vm -Dhudson.slaves.NodeProvisioner.initialDelay=0 -Dhudson.slaves.NodeProvisioner.MARGIN=50 -Dhudson.slaves.NodeProvisioner.MARGIN0=0.85 -Duser.timezone=Asia/Shanghai -Dhudson.security.csrf.GlobalCrumbIssuerConfiguration.DISABLE_CSRF_PROTECTION=true
volumes:
      - name: jenkins-home
        hostPath:
path: "/home/jenkins"
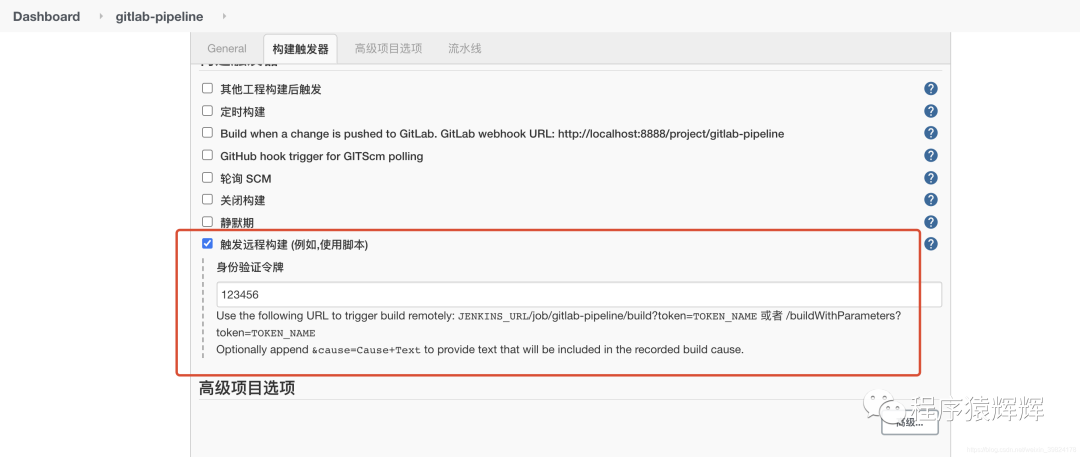
配置触发远程构建,也可以不配置手动构建,配置的作用就是,git提交代码后,会向jenkins发送webhook,通知jenkins开始构建项目(jenkins 安装 gitlab 的插件,可以使用secret token的方式配置令牌)
3、启动 gitlab(本地docker跑的)
      docker pull registry.cn-hangzhou.aliyuncs.com/imooc/gitlab-ce:latest

# 编写启动脚本,并配置 hosts

cat <<EOF > start.sh
#!/bin/bash
HOST_NAME=gitlab.localhost.com
GITLAB_DIR=`pwd`
docker stop gitlab
docker rm gitlab
docker run -d \\
    --hostname \${HOST_NAME} \\
-p 8443:443 -p 8080:80 -p 2222:22 \\
--name gitlab \\
    -v \${GITLAB_DIR}/config:/etc/gitlab \\
    -v \${GITLAB_DIR}/logs:/var/log/gitlab \\
    -v \${GITLAB_DIR}/data:/var/opt/gitlab \\
    registry.cn-hangzhou.aliyuncs.com/imooc/gitlab-ce:latest
EOF

# 给 start.sh 执行权限
chmod + x start.sh
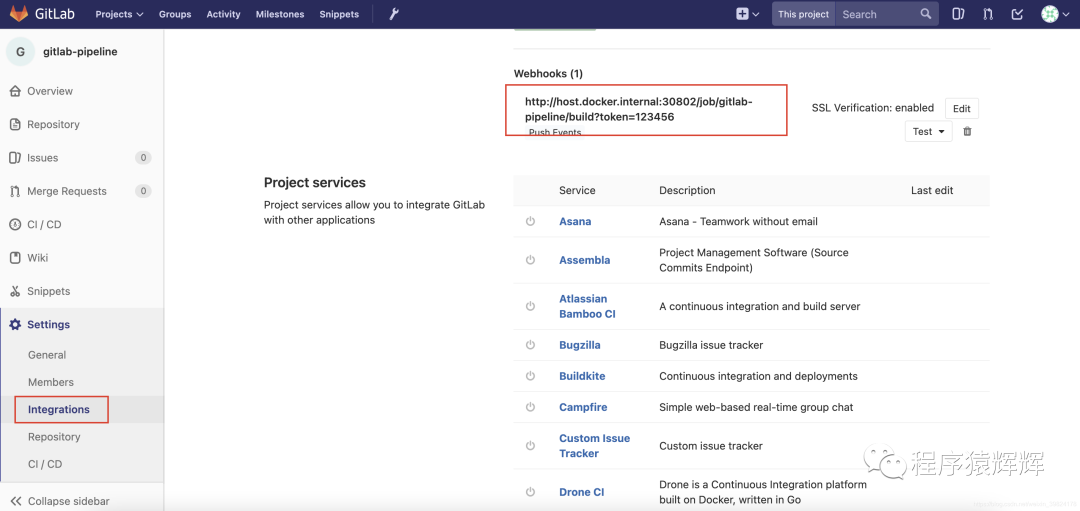
把 gitlab-pipeline 的代码丢到你本地的 gitlab 仓库,然后配置 webhook,由于 gitlab 是从 docker 启动的,需要访问宿主机的IP http://host.docker.internal,所以应该是http://host.docker.internal:30802/job/gitlab-pipeline/build?token=123456
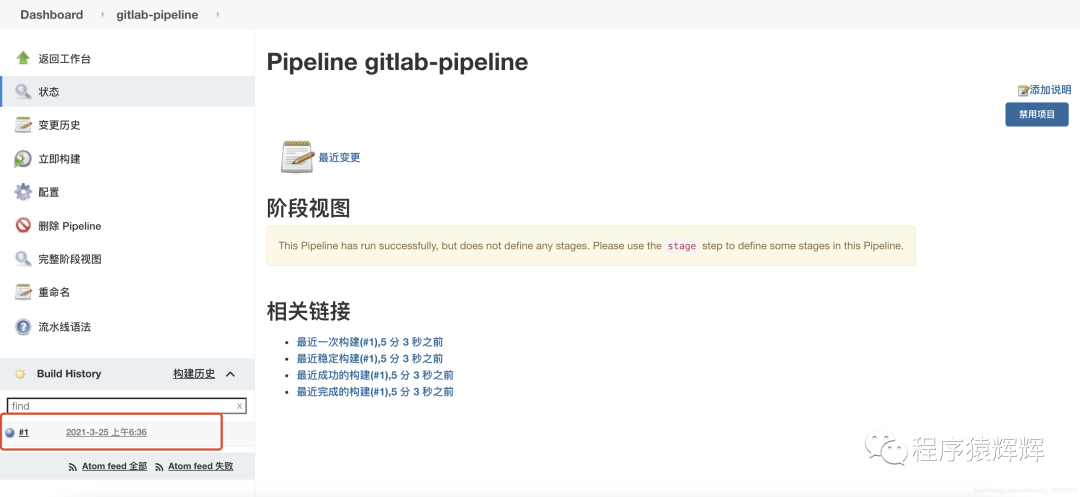
4、jenkins 收到 gitlab 的 webhook 请求,开始构建(gitlab 提交代码 jenkins 就会收到 webhook 请求)
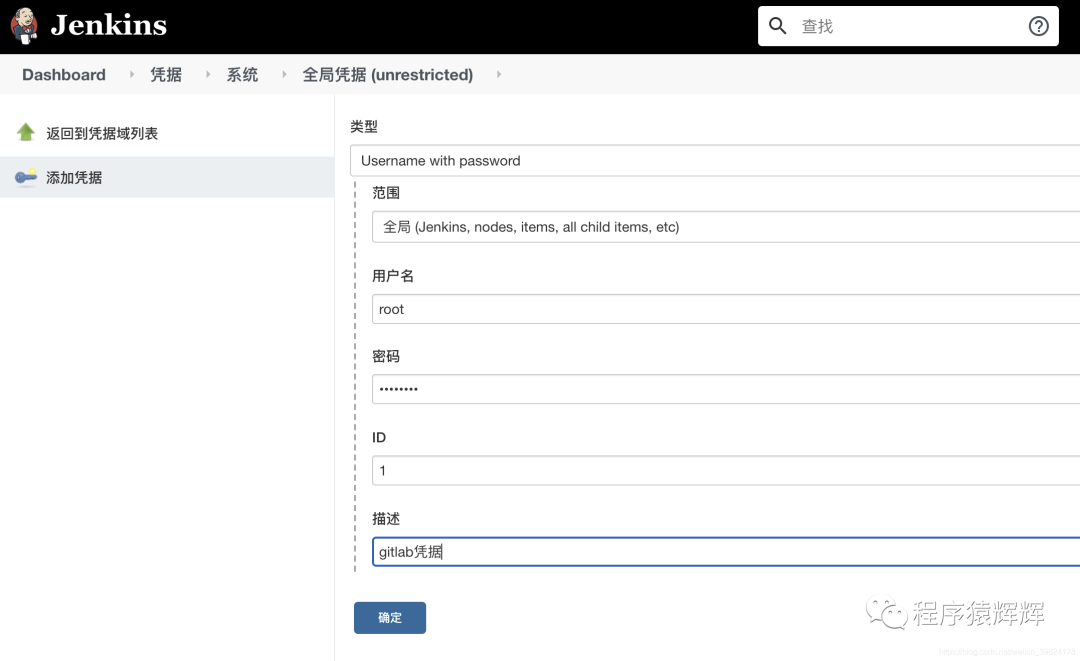
5、为 jenkins 配置 gitlab 凭据
6、为 jenkins 配置阿里云镜像仓库(registry.cn-beijing.aliyuncs.com)的凭据
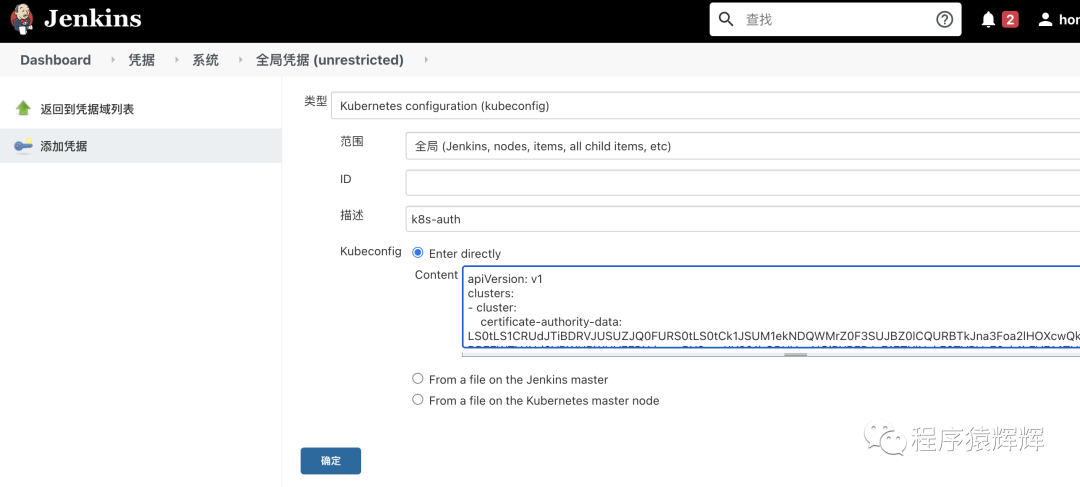
7、给 jenkins 配置 k8s 凭据
先安装 Kubernetes Continuous Deploy 插件,然后创建对应的凭据(就是把 .kube/config 的内容粘贴过来)
8、生成三个凭据如下
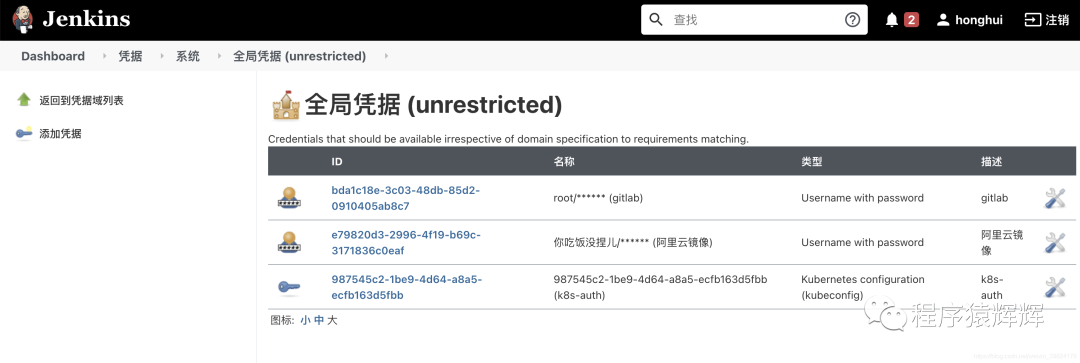
9、记录凭据的ID后面会在写 Jenkinsfile 用到
      gitlab -> bda1c18e-3c03-48db-85d2-0910405ab8c7
阿里云镜像 -> e79820d3-2996-4f19-b69c-3171836c0eaf
k8s -> 987545c2-1be9-4d64-a8a5-ecfb163d5fbb
10、k8s 添加 aliyun 仓库 secret
      kubectl create secret docker-registry aliyun-pull-secret --docker-username=用户名 \
--docker-password=密码 \
--docker-email=邮箱 \
--docker-server=registry.cn-beijing.aliyuncs.com
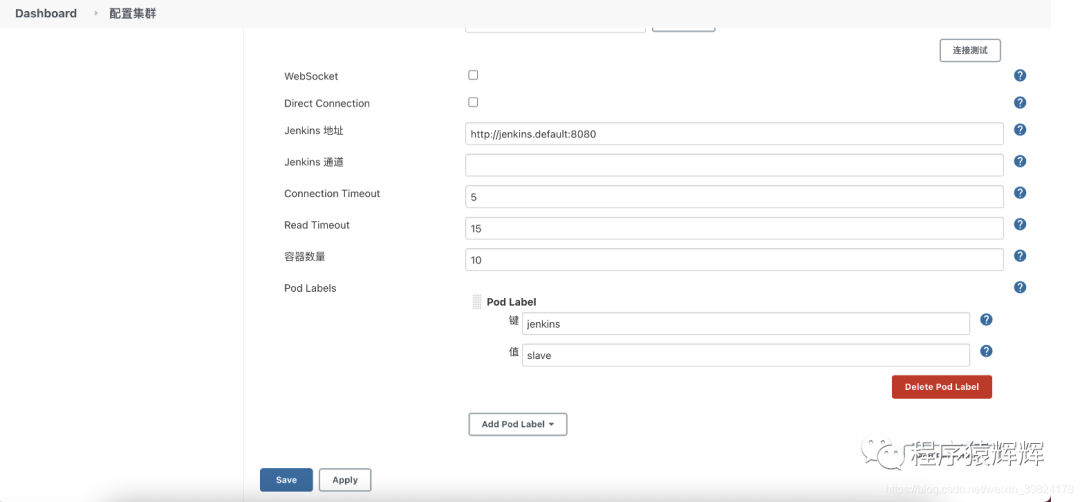
11、创建一个 kubernetes 云,安装 kubernetes plugin
kubernetes 云配置,如果 jenkins 是安装到k8s内部 https://kubernetes.default.svc.cluster.local ,如果是安装到 k8s 外部,使用kubectl cluster-info查看 k8s 地址
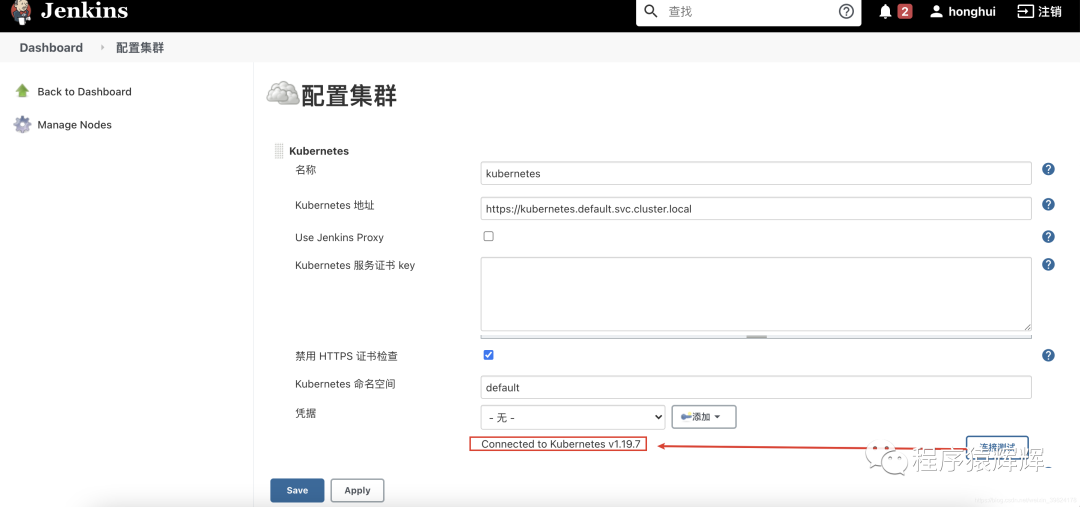
jenkins地址: http://jenkins.default:8080
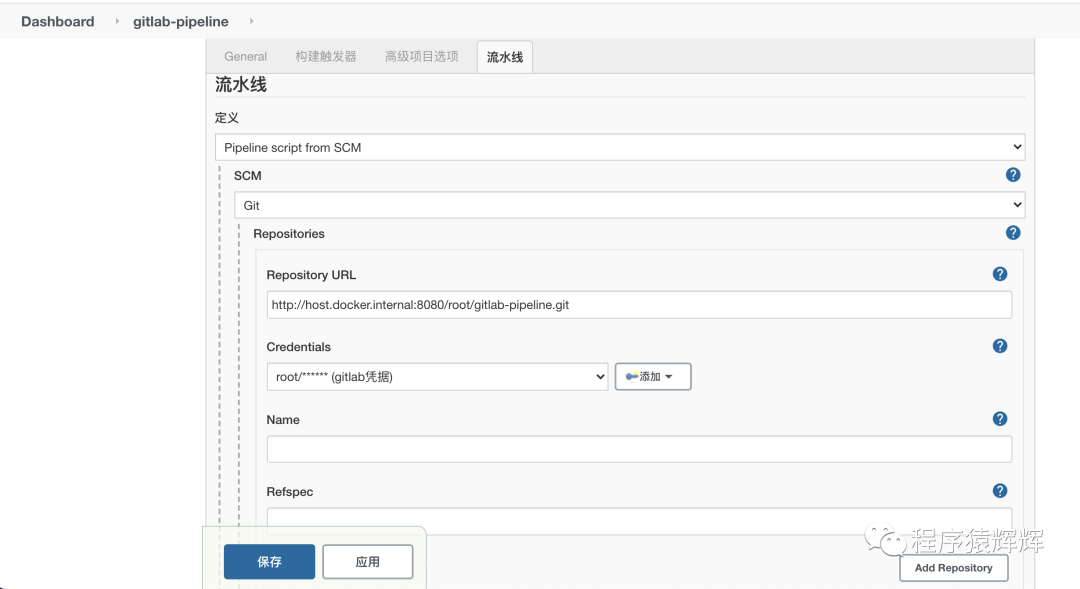
12、为 job 添加 pipeline 脚本,这里使用 git 的方式
git 地址:http://host.docker.internal:8080/root/gitlab-pipeline.git
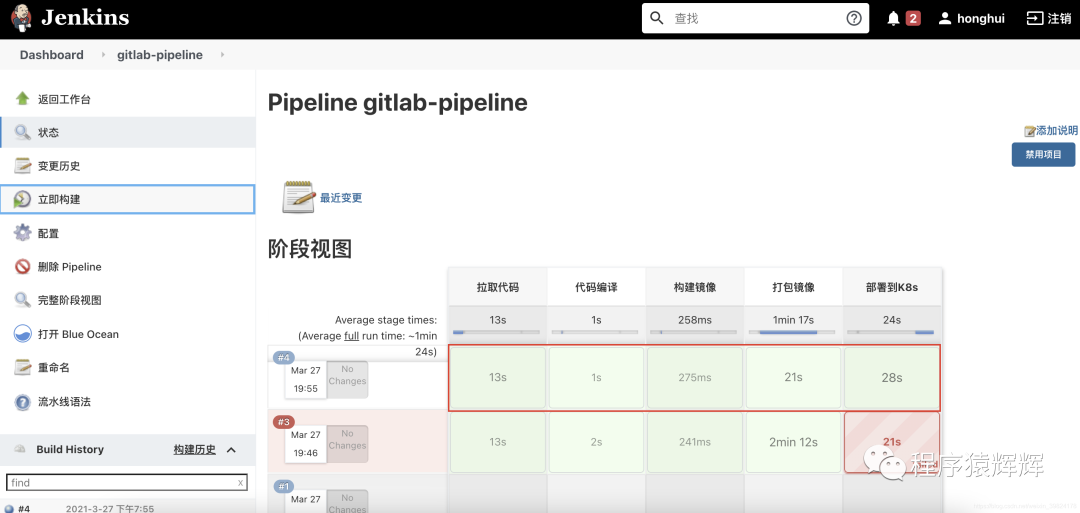
13、点击立即构建
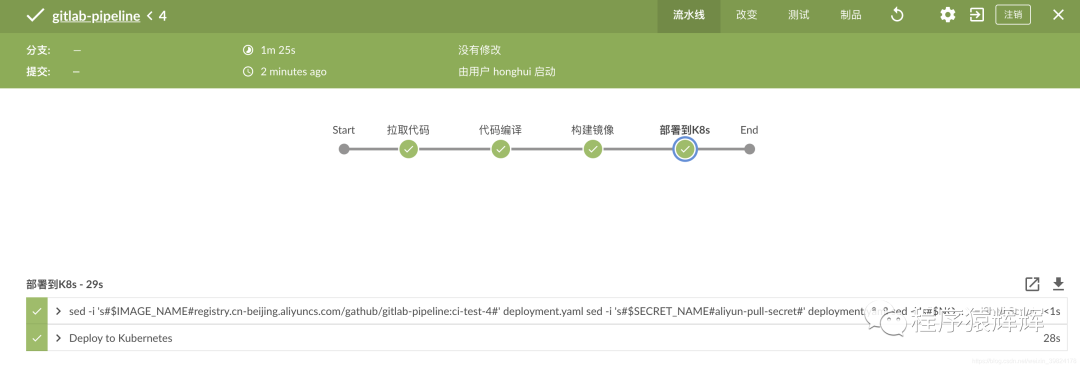
14、pod启动成功

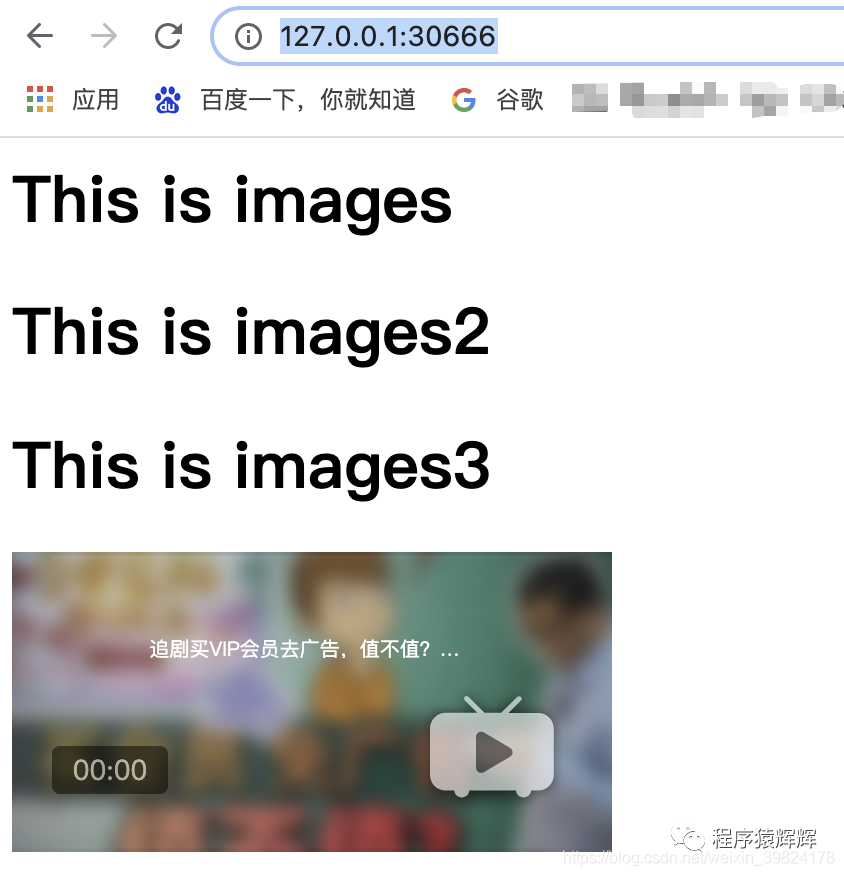
15、访问测试 http://127.0.0.1:30666/

项目源码地址
https://github.com/it-wwh/gitlab-pipeline