Java多线程之阻塞队列
这里对Java中的阻塞队列及其常见实现进行介绍

楔子
在多线程环境下实现一个线程安全的队列,大体可分为两种思路:基于阻塞机制的、基于非阻塞机制的。后者通过CAS算法等手段以避免发生阻塞,典型地实现有ConcurrentLinkedQueue、ConcurrentLinkedDeque;前者则是通过锁的方式来保证线程安全,其会在队列已满、队列为空时分别阻塞生产者、消费者。具体地,Java中则是提供了一个BlockingQueue阻塞队列接口并提供相应的实现类
BlockingQueue接口
BlockingQueue接口通过继承Queue接口,实现了对传统队列操作方式的补充、增强。新增了阻塞、超时两种形式的队列操作方式。如下表所示
| 队列操作 | 抛异常 | 返回特殊值 | 阻塞 | 支持超时 |
|---|---|---|---|---|
| 入队 | add(e) | offer(e) | put(e) | offer(e, time, unit) |
| 出队 | remove() | poll() | take() | poll(time, unit) |
| 查看队首元素 | element() | peek() | N/A | N/A |
前两种形式(抛异常、返回特殊值)与Queue接口一致,当队列已满添加元素失败时,会分别抛出异常、返回特殊值false;当队列为空时,进行移除元素或查看队首元素时,则会分别抛出异常、返回特殊值null。对于阻塞形式而言,其针对入队、出队操作分别定义了put、take方法。当生产者线程向一个已满队列通过put方法添加元素时,则其自身将会被阻塞直到队列不为满;类似地,对于消费者的task方法而言同理,此处不再赘述。对于支持超时形式而言,其重载了原有的offer、poll方法,增加了对超时参数的支持。最后对于Java阻塞队列来说,即BlockingQueue接口的实现类均不支持null值元素
ArrayBlockingQueue
其是一个基于数组的阻塞队列,底层使用数组进行元素的存储。创建该阻塞队列实例需要指定队列容量,故其是一个有界队列。在并发控制层面,无论是入队还是出队操作,均使用同一个ReentrantLock可重入锁进行控制,换言之生产者线程与消费者线程间无法同时操作
LinkedBlockingQueue
其是一个基于链表的阻塞队列,底层使用链表进行元素的存储。该阻塞队列容量默认为 Integer.MAX_VALUE,即如果未显式设置队列容量时可以视为是一个无界队列;反之构建实例过程中指定队列容量,则其就是一个有界队列。在并发控制层面,其使用了两个ReentrantLock可重入锁来分别控制对入队、出队这两种类型的操作。使得生产者线程与消费者线程间可以同时操作提高效率。特别地对于链表这种结构而言,Java还提供了一个实现BlockingDeque接口的LinkedBlockingDeque类——其是一个基于链表的双向阻塞队列
PriorityBlockingQueue
提到优先级队列,我们会想到PriorityQueue,但其由于不是线程安全的,故无法在多线程环境下使用。为此Java提供了一个线程安全版本的优先级队列PriorityBlockingQueue,其是一个支持优先级的无界阻塞队列。底层使用数组实现元素的存储、最小堆的表示。默认使用元素的自然排序,即要求元素实现Comparable接口;或者显式指定比较器Comparator。在并发控制层面,无论是入队还是出队操作,均使用同一个ReentrantLock可重入锁进行控制。值得一提的是,在创建该队列实例时虽然可以指定容量。但这并不是队列的最终容量,而只是该队列实例的初始容量。一旦后续过程队列容量不足,其会自动进行扩容。值得一提的是,为了保证同时只有一个线程进行扩容,其内部是通过CAS方式来实现的,而不是利用ReentrantLock可重入锁来控制。故PriorityBlockingQueue是一个无界队列。示例代码如下所示
@Test
public void test1() {
    BlockingQueue blockingQueue = new PriorityBlockingQueue<>(2);
    blockingQueue.offer(13);
    blockingQueue.offer(5);
    blockingQueue.offer(7);

    Integer size = blockingQueue.size();
    System.out.println("blockingQueue: " + blockingQueue + ", size: " + size);

    Integer e1 = blockingQueue.poll();
    System.out.println("e1: " + e1);

    Integer e2 = blockingQueue.poll();
    System.out.println("e2: " + e2);

    Integer e3 = blockingQueue.poll();
    System.out.println("e3: " + e3);
}
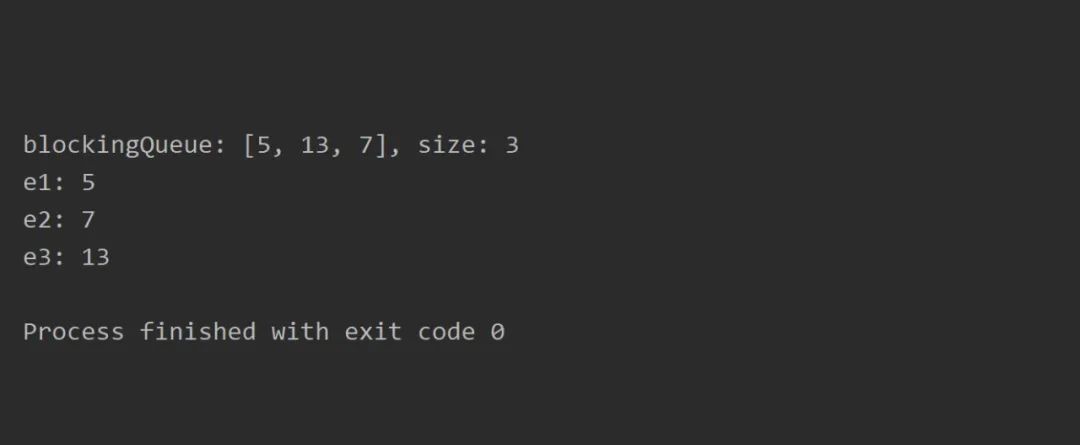
测试结果如下所示
DelayQueue
延迟队列,一个无界的阻塞队列。顾名思义,元素只有到了其指定的延迟时间才能出队,否则消费者线程调用take方法会被一直阻塞。其底层使用PriorityQueue实现元素的存储,使用ReentrantLock实现线程同步。该队列中的元素在实现Delayed接口时需要同时实现getDelay、compareTo方法。前者用于计算元素当前剩余的延迟时间;后者用于实现延迟时间按从小到大进行排序,以保证队头元素是延迟时间最小的。这里我们以缓存数据为场景进行实践,当缓存到期后即可被从队列中移除。示例代码如下所示
public class BlockingQueueTest {

    private static DateTimeFormatter formatter = DateTimeFormatter.ofPattern("HH:mm:ss");

    @Test
    public void test2() throws Exception {
        BlockingQueue blockingQueue = new DelayQueue<>();

        new Thread(() -> {
            while (true) {
                try {
                    Cache cache = blockingQueue.take();
                    info("消费者: " + cache.toString());
                } catch (Exception e) {
                    System.out.println("Happen Exception: " + e.getMessage());
                }
            }
        }).start();

        Long timeStamp = System.currentTimeMillis();
        Cache cache1 = new Cache("name", "Aaron", timeStamp + 15 * 1000);
        blockingQueue.put(cache1);

        Cache cache2 = new Cache("age", "18", timeStamp + 27 * 1000);
        blockingQueue.put(cache2);

        Cache cache3 = new Cache("country", "China", timeStamp + 7 * 1000);
        blockingQueue.put(cache3);

        Thread.sleep(120 * 1000);
    }

    /**
     * 打印信息
     */
    private static void info(String msg) {
        String time = formatter.format(LocalTime.now());
        String thread = Thread.currentThread().getName();
        String log = "[" + time + "] " + msg;
        System.out.println(log);
    }

    @AllArgsConstructor
    @Data
    private static class Cache implements Delayed {
        // 缓存 Key
        private String key;

        // 缓存 Value
        private String value;

        // 缓存到期时间
        private Long expire;

        /**
         * 计算当前延迟时间
         * @param unit
         * @return
         */
        @Override
        public long getDelay(TimeUnit unit) {
            // 缓存有效的剩余毫秒数
            long delta = expire - System.currentTimeMillis();
            return unit.convert(delta, TimeUnit.MILLISECONDS);
        }

        /**
         * 定义比较规则, 延迟时间按从小到大进行排序
         * @param o
         * @return
         */
        @Override
        public int compareTo(Delayed o) {
            Cache other = (Cache) o;
            return this.getExpire().compareTo(other.getExpire());
        }

        @Override
        public String toString() {
            Date time = new Date(expire);
            SimpleDateFormat formatter = new SimpleDateFormat("yyyy-MM-dd HH:mm:ss.SSS");
            String timeStr = formatter.format(time);
            return "Cache, key: " + key + ", expire: " + timeStr;
        }
    }

}
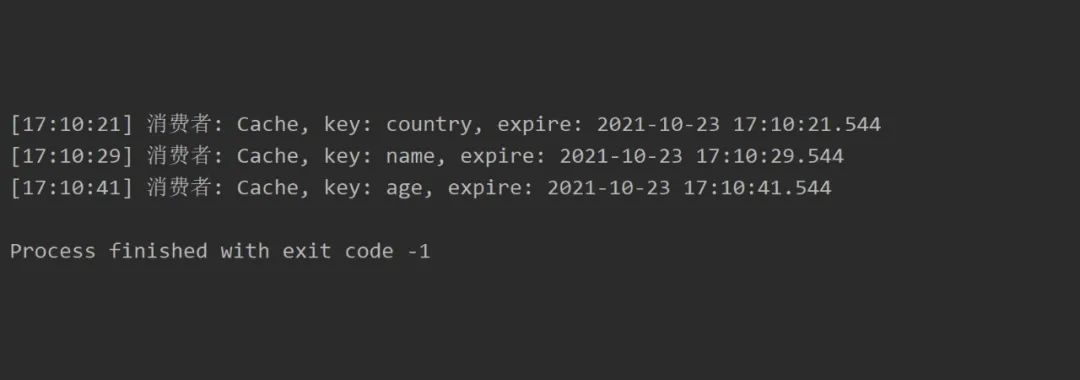
测试结果如下所示
SynchronousQueue
其是一个同步队列。特别地是由于该队列没有容量无法存储元素,故生产者添加的数据会直接被消费者获取并且立刻消费。所以当生产者线程添加数据时,如果此时恰好有一个消费者已经准备好获取队头元素了,则会添加成功;否则要么添加失败返回false要么被阻塞。通过Executors.newCachedThreadPool()创建的线程池实例,其内部任务队列使用的就是SynchronousQueue,故offer方法添加任务到队列失败后则会开启新的线程来进行处理。关于同步队列的这一特性,通过下面的示例可以帮助我们更好的理解
@Test
public void test3() {
    BlockingQueue blockingQueue = new SynchronousQueue<>();
    Boolean b1 = blockingQueue.offer(237);
    info("生产者 b1: " + b1);

    // 消费者线程
    new Thread( ()->{
        try{
            Integer e = blockingQueue.take();
            info("消费者:" + e);
        } catch (Exception e) {
            info("Happen Exception: " + e.getMessage());
        }
    } ).start();

    // 确保消费者线程已经准备完毕
    try { Thread.sleep(2000); } catch (Exception e) {}
    Boolean b2 = blockingQueue.offer(996);
    info("生产者 b2: " + b2);

    try { Thread.sleep(120*1000); } catch (Exception e) {}
}
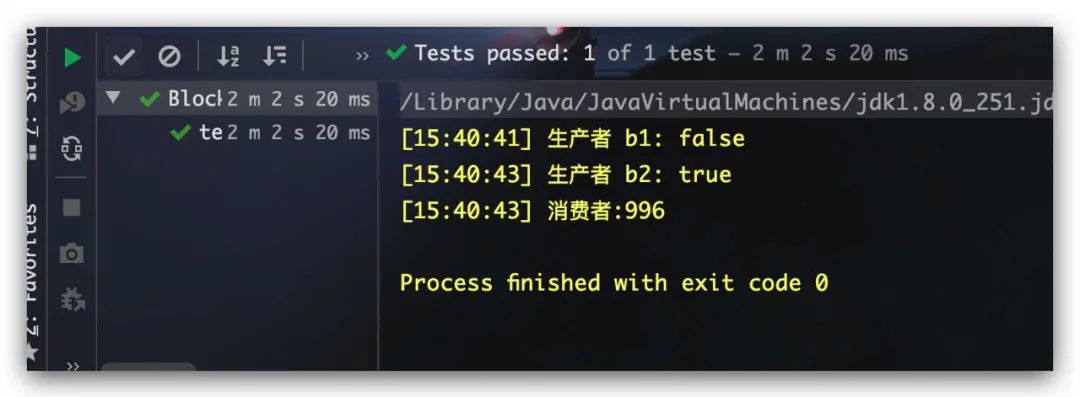
测试结果如下,符合预期。生产者第一次添加元素结果失败,原因很简单。因为同步队列没有存储元素的能力,故如果没有消费者直接取走,则生产者即会添加失败;第二次添加时,消费者线程已经在阻塞等待了,故添加成功
下面我们利用阻塞的put方法来添加元素,示例代码如下所示
@Test
public void test4() {
    BlockingQueue blockingQueue = new SynchronousQueue<>();

    // 生产者线程
    new Thread(() -> {
        try {
            info("生产者: Start");
            while (true) {
                Integer num = RandomUtil.randomInt(1, 100);
                info("生产者: put " + num);
                blockingQueue.put(num);
            }
        } catch (Exception e) {
            info("Happen Exception: " + e.getMessage());
        }
    }).start();

    // 消费者线程
    new Thread(() -> {
        try {
            info("消费者: Start");
            while (true) {
                try {
                    Thread.sleep(5000);
                } catch (Exception e) {
                }
                Integer e = blockingQueue.take();
                info("消费者: " + e);
            }
        } catch (Exception e) {
            info("Happen Exception: " + e.getMessage());
        }
    }).start();

    try { Thread.sleep(120 * 1000); } catch (Exception e) {}
}
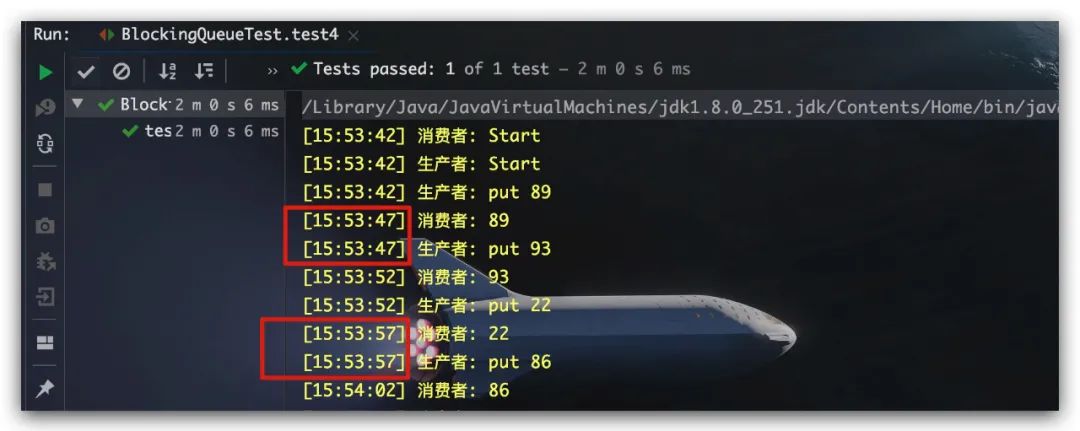
从测试结果中的时间戳,可以很明显看出只有当消费者取出元素,生产者线程的put方法才会结束阻塞
参考文献
Java并发编程之美 翟陆续、薛宾田著
