Android高仿蘑菇街欢迎页功能
蘑菇街欢迎页:

高仿效果:

前言
本文将介绍如何对蘑菇街欢迎页效果进行分析,拆分,并一步步实现1个高仿版本,最重要的设计思路包括以下2点:
1.ViewPager切换时,通过offset偏移量动态修改View元素属性
2.canvas上精细化的控制旋,移,缩,透明等view属性变化,进行动态绘制
效果拆解
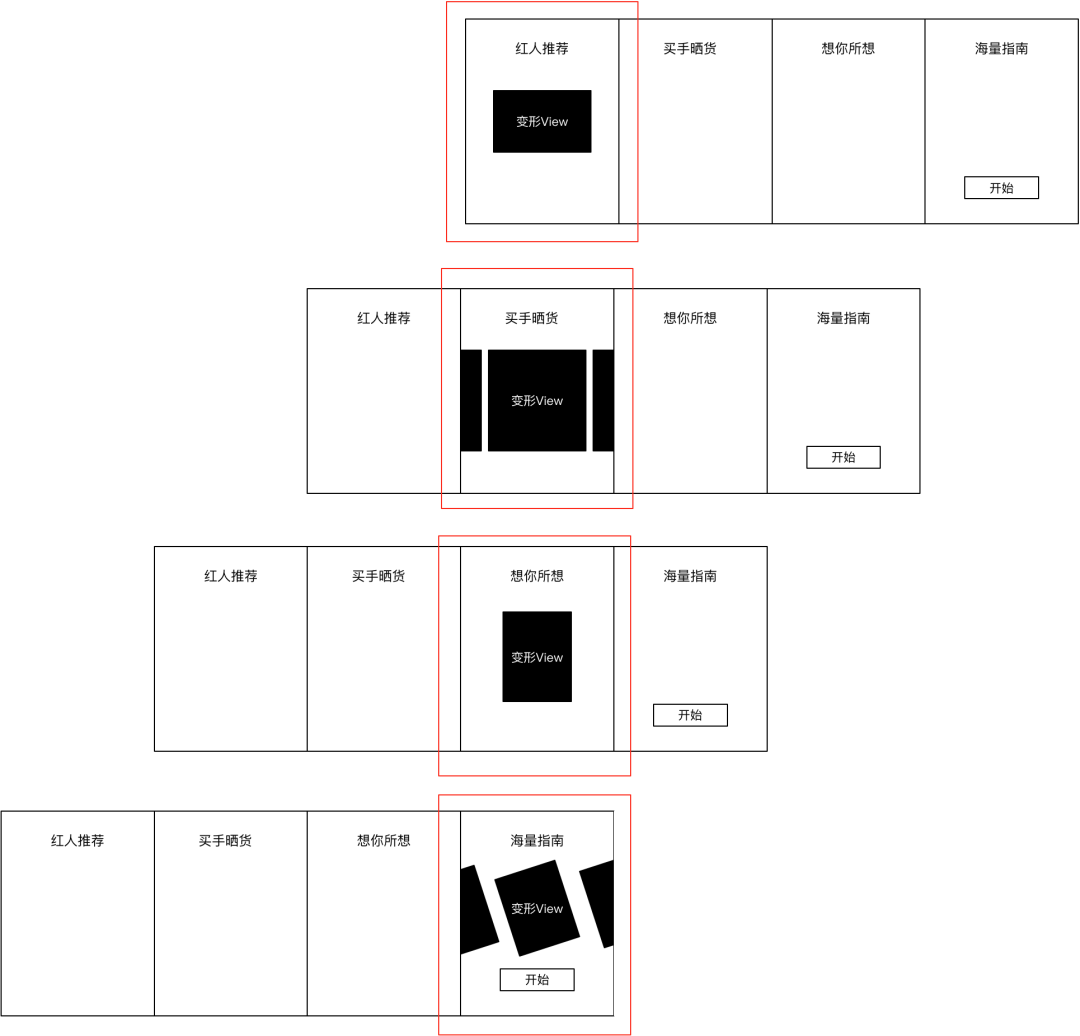
首先可以把整体效果拆分为静态,动态2部分。

静态:1个支持4个页面的ViewPager,每个页面的展示相对固定,不会根据offset进行改变。
第1-4页的顶部文案
第4页的开始按钮
动态:摆放在viewPager上会变形的自定义View,根据offset动态调整需要绘制的元素的宽高,left,top,透明度等。
0%->50%,矩形背景宽度,高度减少,并逆时针进行旋转
0%->50%,6张模特图缩小,渐变消失
50%->100%,左右裂变出2张背景图,并左右移开
50%->100%,顶部模特,文案,渐变显示
50%->100%,底部3长模特图逐步放大,渐变显示
0%->50%,矩形背景宽度减少,上移
0%->50%,顶部,底部图,3张模特图渐变消失
0%->50%,2张裂变背景图跟随向左偏移,并消失
50%->100%,第3页,6张模特图逐步放大,渐变显示
0%->50%,矩形背景高度增加,先上移,再下移
0%->50%,模特图,文案,下移,渐变消失
50%-100%,左右裂变出2张背景图,并左右移开
50%->100%,第2页,顶部,底部图,渐变显示
50%->100%,第2页,3张模特图逐步放大显示
0%->100%,底部背景图跟随向左偏移,并消失
第1页->第2页
第2页->第3页
第3页->第4页
以上是对部分实现细节的分析,抽取;本文demo会全部实现以上变化效果。
实现步骤
1.实现静态的ViewPager
2.根据offset实现矩形背景变化
3.根据offset实现第1页底部背景,第2,4页裂变背景图变化
4.根据offset实现页面切换时,每个页面图片元素的隐藏,显示,变形等效果
1、实现静态的ViewPager
自定义ViewPager,每个页面是一个独立layout,可以自由实现每个页面的顶部文案,和第4个页面的Button
public class MoguViewPager extends RelativeLayout {private MoguViewPagerAdapter mAdapter;private ViewPager mViewPager;private List<View> mViewList = new ArrayList<>();/** 每个页面都是一个layout */private int[] mLayouts = new int[] {R.layout.guide_view_one, R.layout.guide_view_two, R.layout.guide_view_three,R.layout.guide_view_four};public MoguViewPager(Context context) {super(context);init();}public MoguViewPager(Context context, AttributeSet attrs) {super(context, attrs);init();}private void init() {inflate(getContext(), R.layout.layout_mogu_viewpager, this);mViewPager = (ViewPager) this.findViewById(R.id.viewpager);{/** 初始化4个页面 */for (int i = 0; i < mLayouts.length; i++) {View view = View.inflate(getContext(), mLayouts[i], null);mViewList.add(view);}}mAdapter = new MoguViewPagerAdapter(mViewList, getContext());mViewPager.setAdapter(mAdapter);}}
<RelativeLayout xmlns:android="http://schemas.android.com/apk/res/android"android:layout_width="match_parent"android:layout_height="match_parent"><android.support.v4.view.ViewPagerandroid:id="@+id/viewpager"android:layout_width="match_parent"android:layout_height="match_parent"android:layout_centerHorizontal="true"android:clipChildren="false"/><!--这里准备放个自定义View--></RelativeLayout>
第一步完成,实现代码还是比较简单的,直接看效果:

2、根据offset实现矩形背景变化
自定义会变形的TransforView,在xml布局中摆放在ViewPager之上
<RelativeLayout xmlns:android="http://schemas.android.com/apk/res/android"android:layout_width="match_parent"android:layout_height="match_parent"><android.support.v4.view.ViewPagerandroid:id="@+id/viewpager"android:layout_width="match_parent"android:layout_height="match_parent"android:layout_centerHorizontal="true"android:clipChildren="false"/><com.listen.test_mogu_viewpager.viewpager.TransforViewandroid:id="@+id/transfor_view" android:layout_width="match_parent"android:layout_height="450dp"android:layout_centerInParent="true"/></RelativeLayout>
给ViewPager添加addOnPageChangeListener()监听,在onPageScrolled()的时候将position,positionOffset,positionOffsetPixels传递给TransforView。
mViewPager.addOnPageChangeListener(new ViewPager.OnPageChangeListener() {@Overridepublic void onPageScrolled(int position, float positionOffset, int positionOffsetPixels) {mTransforView.transfor(position, positionOffset, positionOffsetPixels);}});
在TransforView中,首先定义页面切换时变化的参数,比如第1页->第2页切换时,第1页的矩形背景高度放大40%,上移30dp,下移60dp,则只需要定义FIRST_HEIGHT=0.4,FIRST_TOP1=-30dp,FIRST_TOP2 =60dp三个参数即可。
/*** 第1页->第2页* 0%->50%,矩形背景高度增加40%,先上移30dp,再下移60dp*/public static final float FIRST_HEIGHT = 0.4f;// 第1个页面高度缩放比例,正:放大,负:缩小public final int FIRST_TOP1 = -dp2px(30);// 第1个页面top移动距离,正:下移,负:上移public final int FIRST_TOP2 = dp2px(60);// 第1个页面top移动距离,正:下移,负:上移public static final float FIRST_RATE = 0.5f;// 在偏移50%处,进行下一页的显示/*** 第2页->第3页* 0%->50%,矩形背景宽度减少15%,上移20dp*/public static final float SECOND_WIDTH = -0.15f;// 第2个页面宽度缩放比例,正:放大,负:缩小public final int SECOND_TOP = -dp2px(20);// 第2个页面top移动距离比例,正:下移,负:上移public static final float SECOND_RATE = 0.5f;// 在偏移50%处,进行下一页的显示/*** 第3页->第4页* 0%->50%,矩形背景宽度,高度减少10%,并逆时针进行旋转10度*/public static final float THIRD_WIDTH = -0.1f;// 第3个页面宽度缩放比例,正:放大,负:缩小public static final float THIRD_HEIGHT = -0.1f;// 第3个页面高度缩放比例,正:放大,负:缩小public static final int THIRD_DEGREE = -10;// 第3个页面角度调整,正:顺时针,负:逆时针public static final float THIRD_RATE = 0.5f;// 在偏移50%处,进行下一页的显示/*** 第1页初始化矩形背景的宽,高,left,top*/private float mPage1RectBgDefaultWidth = dp2px(260);private float mPage1RectBgDefaultHeight = dp2px(230);private float mPage1RectBgDefaultLeft = getScreenWidth() / 2 - mPage1RectBgDefaultWidth / 2;//left=屏幕宽度/2-矩形宽度/2private float mPage1RectBgDefaultTop = dp2px(80);/*** 第1页->第2页* 在第1页的基础上进行变化* 1.height放大* 2.top先上移n,在下移n*2*/private float mPage2RectBgDefaultWidth = mPage1RectBgDefaultWidth;private float mPage2RectBgDefaultHeight = mPage1RectBgDefaultHeight * (1 + FIRST_HEIGHT);// 第2页的高度=第一页高度*1.4private float mPage2RectBgDefaultLeft = mPage1RectBgDefaultLeft;private float mPage2RectBgDefaultTop = mPage1RectBgDefaultTop + FIRST_TOP1 + FIRST_TOP2;//第2页的top=第一页的top-30dp+60dp/*** 第2页->第3页* 在第2页的基础上进行变化* 1.宽度缩小* 2.top上移*/private float mPage3RectBgDefaultWidth = mPage2RectBgDefaultWidth * (1 + SECOND_WIDTH);private float mPage3RectBgDefaultHeight = mPage2RectBgDefaultHeight;private float mPage3RectBgDefaultLeft = getScreenWidth() / 2 - mPage3RectBgDefaultWidth / 2;//第3页的left=屏幕的宽度/2-矩形背景宽度/2private float mPage3RectBgDefaultTop = mPage2RectBgDefaultTop + SECOND_TOP;/*** 第3页->第4页* 在第3页的基础上进行变化* 1.宽度缩小* 2.高度缩小* 2.逆时针旋转*/private float mPage4RectBgDefaultWidth = mPage3RectBgDefaultWidth * (1 + THIRD_WIDTH);private float mPage4RectBgDefaultHeight = mPage3RectBgDefaultHeight * (1 + THIRD_HEIGHT);private float mPage4RectBgDefaultLeft = getScreenWidth() / 2 - mPage4RectBgDefaultWidth / 2;private float mPage4RectBgDefaultTop = mPage3RectBgDefaultTop;private float mPage4ModelDefaultWidth = (mPage4RectBgDefaultWidth - padding() * 4) / 3;
TransforView的transfor()方法负责接收position,positionOffset,
positionOffsetPixels,并根据position判断当前第几页,从而决定要实现哪些效果。比如在第1页->第2页的0%-50区间时,需要将高度放大40%:
mRectBgCurrentHeight =(int) (mPage1RectBgDefaultHeight * (1 + FIRST_HEIGHT * positionOffset * (1 / FIRST_RATE)))mRectBgCurrentHeight是矩形背景当前的高度,是个动态值,mPage1RectBgDefaultHeight是屏幕处于第1页时矩形背景的初始值,只要基于这个初始值,根据positionOffset计算偏移的比例,就可以知道当前动态的高度值应该是多少。
public void transfor(int position, float positionOffset, int positionOffsetPixels) {mCurrentPageIndex = position;if (fromPage1ToPage2(position)) {if (positionOffset < FIRST_RATE) {/** 第1页,在0->50%区间偏移 *//** 矩形背景,高度放大40% *//*** 偏移到50%的时候height需要放大40%,defaultHeight=400,targetHeight=400*1.4=560** offset=0* 400 * (1 + 0.4 * 0 * (1 / 0.5)) = 400** offset=0.25* 400 * (1 + 0.4 * 0.25 * (1 / 0.5)) = 400 * 1.2 = 480** offset=0.5* 400 * (1 + 0.4 * 0.5 * (1 / 0.5)) = 400 * 1.4 = 560**/mRectBgCurrentHeight =(int) (mPage1RectBgDefaultHeight * (1 + FIRST_HEIGHT * positionOffset * (1 / FIRST_RATE)));/** 矩形背景,向上移动30dp */mRectBgCurrentTop = (int) (mPage1RectBgDefaultTop + (FIRST_TOP1 * positionOffset * (1 / FIRST_RATE)));} else {/** 第1页,在50%->100%区间偏移 *//** 矩形背景,上移30dp后,向下偏移60dp */mRectBgCurrentTop =(int) (mPage1RectBgDefaultTop + FIRST_TOP1 + (FIRST_TOP2 * (positionOffset - FIRST_RATE) * 1.0 / (1 - FIRST_RATE)));}} else if (fromPage2ToPage3(position)) {/** 矩形背景,宽度缩小15% */mRectBgCurrentWidth = (int) (mPage2RectBgDefaultWidth * (1 + SECOND_WIDTH * positionOffset));mRectBgCurrentLeft = getScreenWidth() / 2 - mRectBgCurrentWidth / 2;/** 矩形背景,上移20dp */mRectBgCurrentTop = (int) (mPage2RectBgDefaultTop + (SECOND_TOP * positionOffset));} else if (fromPage3ToPage4(position)) {/** 背景矩形的宽度,减少10% */mRectBgCurrentWidth = mPage3RectBgDefaultWidth * (1 + THIRD_WIDTH * positionOffset);mRectBgCurrentLeft = getScreenWidth() / 2 - mRectBgCurrentWidth / 2;/** 背景矩形的高度,减少10% */mRectBgCurrentHeight = mPage3RectBgDefaultHeight * (1 + THIRD_HEIGHT * positionOffset);/** 逆时针旋转10度 */mRectBgCurrentDegree = THIRD_DEGREE * positionOffset;}/** 请求重新绘制 */postInvalidate();}
最后在onDraw方法中,调用canvas.drawRoundRect()将计算好宽,高,left,top的圆角矩形在绘制在canvas上即可。
protected void onDraw(Canvas canvas) {super.onDraw(canvas);RectF rect = new RectF();rect.left = mRectBgCurrentLeft;rect.top = mRectBgCurrentTop;rect.right = rect.left + mRectBgCurrentWidth;rect.bottom = rect.top + mRectBgCurrentHeight;canvas.rotate(mRectBgCurrentDegree, rect.left + mRectBgCurrentWidth / 2, rect.top + mRectBgCurrentHeight / 2);canvas.drawRoundRect(rect, mRectBgDefaultCorner, mRectBgDefaultCorner, mRectBgPaint);}
第2步:通过ViewPager的偏移offset,实现了矩形背景在页面间切换时的变化效果,如下:

3、根据offset实现第1页底部背景,第2,4页裂变图背景图变化
在TransforView的init()初始化方法中,获取并设置图片的默认宽,高,left,top。这里封装了1个ViewModel,里面记录了在canvas上绘制图形需要的bitmap,paint,matrix,width,height,left,top等属性。在调用ViewModel.create()的时候,通过matrix.postScale()将Bitmap缩放一定比例,以便在矩形背景上进行精确的绘制,比如:矩形背景的200,要在1排展示3张图,则每张图的宽度=(200-矩形左边距-矩形右边距-中间2张图的左右边距)/3。
public ViewModel create() {/** 缩放图片尺寸到合适的比例 */matrix.postScale(currentWidth / bitmap.getWidth(), currentHeight / bitmap.getHeight());bitmap = Bitmap.createBitmap(bitmap, 0, 0, bitmap.getWidth(), bitmap.getHeight(), matrix, true);return this;}private void init() {/** 第1页,底部背景图 */mPage1BottomBg =new ViewModel(getContext(), R.drawable.one_bottom_bg).alpha(255).width(mPage1RectBgDefaultWidth - padding() * 2).left(mPage1RectBgDefaultLeft + padding())// top距离=矩形背景top+height+5dp边距.top(mPage1RectBgDefaultTop + mPage1RectBgDefaultHeight + padding()).create();/** 第2页,裂变背景图 */for (int i = 0; i < 2; i++) {mPage2Split[i] =new ViewModel(getContext(), R.drawable.two_bg).width(mPage2RectBgDefaultWidth).height(mPage2RectBgDefaultHeight).left(mPage2RectBgDefaultLeft).top(mPage2RectBgDefaultTop).create();}/** 第4页,2张裂变背景图 */for (int i = 0; i < mPage4Split.length; i++) {mPage4Split[i] =new ViewModel(getContext(), R.drawable.four_bg).width(mPage4RectBgDefaultWidth).height(mPage4RectBgDefaultHeight).left(mPage4RectBgDefaultLeft).top(mPage4RectBgDefaultTop);}}
在transfor()中修改图片left,top,实现移动;第1页的底部背景图,根据viewPager向左滑动的距离,跟随左移,直到消失不可见。在第1页滑动到50%时,显示第2页裂变背景图,根据offset分别左右平移,第4页裂变图原理一致,只是绘制前需要通过Matrix.postRotate()将图进行旋转。
private void transfor(int position, float positionOffset, int positionOffsetPixels) {if (fromPage1ToPage2(position)) {/** 第1页,底部背景图,根据页面pian yi偏移offset向左偏移 */mPage1BottomBg.currentLeft = mPage1BottomBg.defaultLeft - positionOffsetPixels;if (positionOffset < FIRST_RATE) {} else {/** 第2页,计算裂变背景图的偏移px,并修改透明度渐变显示 */float offset = (mPage1RectBgDefaultWidth + dp2px(15)) * ((positionOffset - FIRST_RATE) * (1 / (1 - FIRST_RATE)));mPage2Split[0].currentLeft = mPage2Split[0].defaultLeft - offset;mPage2Split[1].currentLeft = mPage2Split[0].defaultLeft + offset;/*** 偏移到50%的时候alpha需要为0,偏移到100%,alpha需要为255,不过此时positionOffset的取值=0.5~1** offset=0.5* 255 * (0.5 - 0.5) * (1 / (1 - 0.5)))=255 * 0 = 0** offset=0.75* 255 * (0.75 - 0.5) * (1 / (1 - 0.5)))=255 * 0.5 = 127.5** offset=1* 255 * (1 - 0.5) * (1 / (1 - 0.5)))=255 * 1 = 255*/mPage2Split[0].alpha((int) (255 * (positionOffset - FIRST_RATE) * (1 / (1 - FIRST_RATE))));mPage2Split[1].alpha((int) (255 * (positionOffset - FIRST_RATE) * (1 / (1 - FIRST_RATE))));}} else if (fromPage2ToPage3(position)) {if (positionOffset < SECOND_RATE) {}} else if (fromPage3ToPage4(position)) {if (positionOffset < THIRD_RATE) {} else {/** 显示第4页,裂变背景图,并向左右平移 */float offset = (mPage4RectBgDefaultWidth + dp2px(40)) * ((positionOffset - THIRD_RATE) * (1 / (1 - THIRD_RATE)));for (int i = 0; i < mPage4Split.length; i++) {mPage4Split[i].matrix.reset();mPage4Split[i].matrix.postScale(mPage4RectBgDefaultWidth / mPage4Split[i].bitmap.getWidth(), mPage4RectBgDefaultHeight / mPage4Split[i].bitmap.getHeight());float currentLeft = 0;if (i == 0) {// 左移currentLeft = mPage4RectBgDefaultLeft - offset;} else if (i == 1) {// 右移currentLeft = mPage4RectBgDefaultLeft + offset;}// 平移mPage4Split[i].matrix.postTranslate(currentLeft, mPage4RectBgDefaultTop);// 旋转角度mPage4Split[i].matrix.postRotate(THIRD_DEGREE, currentLeft + mPage4RectBgDefaultWidth/2,mPage4RectBgDefaultTop + mPage4RectBgDefaultHeight/2);mPage4Split[i].alpha((int) (255 * ((positionOffset - THIRD_RATE) * (1 / (1 - THIRD_RATE)))));}}}}
效果如下:

4、4个页面切换时,实现每个页面图片元素的隐藏,显示,变形等效果
在transfor()中,根据position判断当前页数,才知道当前是从第几页滑动到第几页,该隐藏,或显示哪些view。
private void transfor(int position, float positionOffset, int positionOffsetPixels) {if (fromPage1ToPage2(position)) {/** 第1页,底部背景图,根据页面向左偏移 */mPage1BottomBg.currentLeft = mPage1BottomBg.defaultLeft - positionOffsetPixels;if (positionOffset < FIRST_RATE) {/** 第1页,在0->50%区间偏移 *//** 矩形背景,高度放大40%,向上移动30dp */transformRectBgFrom1To2Before(positionOffset);/** 第1页,渐渐隐顶部图,底部图;透明度渐变消失,偏移到50%时完全消失 */stepByHidePage1Views(positionOffset);} else {/** 第1页,在50%->100%区间偏移 *//** 矩形背景,上移30dp后,向下偏移60dp */transformRectBgFrom1To2After(positionOffset);/** 第2页,渐渐显示顶部,3张模特图,底部图 */stepByShowPage2Views(positionOffset);}} else if (fromPage2ToPage3(position)) {/** 矩形背景,宽度缩小15%,上移20dp */transformRectBgFrom2To3(positionOffset);if (positionOffset < SECOND_RATE) {/** 第2页,在0->50%区间偏移,渐渐隐藏顶部,中间,底部,裂变背景图 */stepByHidePage2Views(positionOffset, positionOffsetPixels);} else {/** 第2页,在50->100%区间偏移,渐渐显示第3页,6张模特图 */stepByShowPage3Views(positionOffset);}} else if (fromPage3ToPage4(position)) {/** 背景矩形的宽度,高度减少10%,逆时针旋转10度 */transformRectBgFrom3To4(positionOffset);if (positionOffset < THIRD_RATE) {/** 渐渐缩放,隐藏第3页,6张模特图 */stepByHidePage3Views(positionOffset);} else {/** 渐渐显示第4页,顶部图,底部3张模特图,分裂背景图 */stepByShowPage4Views(positionOffset);}}}
第1页->第2页,偏移区间0%-50%时
矩形背景,高度放大40%,向上移动30dp
渐渐隐藏第1页顶部,底部图;透明度渐变消失,偏移到50%时完全消失
private void transformRectBgFrom1To2Before(float positionOffset) {/** 矩形背景,高度放大40% *//*** 偏移到50%的时候height需要放大40%,defaultHeight=400,targetHeight=400*1.4=560** offset=0* 400 * (1 + 0.4 * 0 * (1 / 0.5)) = 400** offset=0.25* 400 * (1 + 0.4 * 0.25 * (1 / 0.5)) = 400 * 1.2 = 480** offset=0.5* 400 * (1 + 0.4 * 0.5 * (1 / 0.5)) = 400 * 1.4 = 560**/mRectBgCurrentHeight =(int) (mPage1RectBgDefaultHeight * (1 + FIRST_HEIGHT * positionOffset * (1 / FIRST_RATE)));/** 矩形背景,向上移动30dp */mRectBgCurrentTop = (int) (mPage1RectBgDefaultTop + (FIRST_TOP1 * positionOffset * (1 / FIRST_RATE)));
private void stepByHidePage1Views(float positionOffset) {/*** 偏移到50%的时候alpha需要为0,view不可见** offset=0* 255-(255*0.0*(1/0.5)) = 0** offset=0.25* 255-(255*0.25*(1/0.5)) = 127** offset=0.5* 255-(255*0.5*(1/0.5)) = 255*/mPage1Top.alpha((int) (255 - (255 * positionOffset * (1 / FIRST_RATE))));mPage1Bottom.alpha((int) (255 - (255 * positionOffset * (1 / FIRST_RATE))));/** 第1页,顶部图向下移动 */mPage1Top.currentTop = mPage1Top.defaultTop + (FIRST_TOP2 + FIRST_TOP1) * positionOffset * (1 / FIRST_RATE);/** 第1页,底部图跟随顶部图向下移动 */mPage1Bottom.currentTop = mPage1Top.currentTop + mPage1Top.defaultHeight + padding();}
第1页->第2页,偏移区间50%-100%时
矩形背景,向下移动60dp
显示第2页裂变背景图,并左右平移
逐渐显示第2页,顶部,底部图,3张模特图
private void transformRectBgFrom1To2After(float positionOffset) {/** 快速滑动的时候,可能丢失最后一次绘制,所以需要在这里调重新设置一次,保证变化完成 */mRectBgCurrentHeight = mPage2RectBgDefaultHeight;mRectBgCurrentTop = mPage1RectBgDefaultTop + FIRST_TOP1;/** 第1页,在50%->100%区间偏移 *//** 矩形背景,在上上偏移30dp后,向下偏移60dp */mRectBgCurrentTop =(int) (mPage1RectBgDefaultTop + FIRST_TOP1 + (FIRST_TOP2 * (positionOffset - FIRST_RATE) * 1.0 / (1 - FIRST_RATE)));}
private void stepByShowPage2Views(float positionOffset) {/** 第2页,顶部图,跟随矩形背景下移 */mPage2Top.currentTop = mRectBgCurrentTop + padding();/** 第2页,底部图,跟随矩形背景下移 */mPage2Bottom.currentTop = mPage2Center[0].currentTop + mPage2Center[0].defaultHeight + padding();/** 第2页,计算裂变背景图的偏移px,并修改透明度渐变显示 */float offset =(mPage1RectBgDefaultWidth + dp2px(15)) * ((positionOffset - FIRST_RATE) * (1 / (1 - FIRST_RATE)));mPage2Split[0].currentLeft = mPage2Split[0].defaultLeft - offset;mPage2Split[1].currentLeft = mPage2Split[0].defaultLeft + offset;/*** 偏移到50%的时候alpha需要为0,偏移到100%,alpha需要为255,不过此时positionOffset的取值=0.5~1** offset=0.5* 255 * (0.5 - 0.5) * (1 / (1 - 0.5)))=255 * 0 = 0** offset=0.75* 255 * (0.75 - 0.5) * (1 / (1 - 0.5)))=255 * 0.5 = 127.5** offset=1* 255 * (1 - 0.5) * (1 / (1 - 0.5)))=255 * 1 = 255*/mPage2Split[0].alpha((int) (255 * (positionOffset - FIRST_RATE) * (1 / (1 - FIRST_RATE))));mPage2Split[1].alpha((int) (255 * (positionOffset - FIRST_RATE) * (1 / (1 - FIRST_RATE))));/** 第2页,顶部,底部图,透明度渐变显示,偏移量达到100%,完成显示 */mPage2Top.alpha((int) (255 * (positionOffset - FIRST_RATE) * (1 / (1 - FIRST_RATE))));mPage2Bottom.alpha((int) (255 * (positionOffset - FIRST_RATE) * (1 / (1 - FIRST_RATE))));/** 第2页,显示中间3张模特图 */for (int i = 0; i < mPage2Center.length; i++) {if (i == 0) {/** 第2页,显示第1张模特图 */mPage2Center[i].currentWidth =mPage2Center[i].defaultWidth * (positionOffset - FIRST_RATE) * 1 / (1 - FIRST_RATE);mPage2Center[i].currentHeight =mPage2Center[i].defaultHeight * (positionOffset - FIRST_RATE) * 1 / (1 - FIRST_RATE);mPage2Center[i].alpha((int) (255 * (positionOffset - FIRST_RATE) * (1 / (1 - FIRST_RATE))));mPage2Center[i].currentTop = mPage2Top.currentTop + mPage2Top.currentHeight + padding();} else {/** 第2,3张模特图,在前1张显示到一半时才显示 */if (mPage2Center[i - 1].currentWidth >= mPage2Center[i - 1].defaultWidth / 2) {float rate = mPage2Center[i - 1].widthRate() - 0.5f;mPage2Center[i].currentWidth = mPage2Center[i].defaultWidth * (rate * 2);mPage2Center[i].currentHeight = mPage2Center[i].defaultHeight * (rate * 2);/** 第2,3张模特图,需要根据第1张图计算left */mPage2Center[i].currentLeft =mPage2Center[0].currentLeft + mPage2Center[0].currentWidth + padding();mPage2Center[i].currentTop = mPage2Top.currentTop + mPage2Top.currentHeight + padding();if (i == 2) {/** 第3张模特图,根据第2张图计算top */mPage2Center[i].currentTop =mPage2Center[1].currentTop + mPage2Center[1].currentHeight + padding();}mPage2Center[i].alpha((int) (255 * (positionOffset * rate * 2)));} else {mPage2Center[i].alpha(0);}}}}
第2页->第3页,偏移区间0%-100%时
矩形背景,宽度缩小15%
矩形背景,上移20dp
private void transformRectBgFrom2To3(float positionOffset) {/** 快速滑动的时候,可能丢失最后一次绘制,所以需要在这里调重新设置一次,保证变化完成 */mRectBgCurrentHeight = mPage2RectBgDefaultHeight;mRectBgCurrentTop = mPage2RectBgDefaultTop;/** 矩形背景,宽度缩小15% */mRectBgCurrentWidth = (int) (mPage2RectBgDefaultWidth * (1 + SECOND_WIDTH * positionOffset));mRectBgCurrentLeft = getScreenWidth() / 2 - mRectBgCurrentWidth / 2;/** 矩形背景,上移20dp */mRectBgCurrentTop = (int) (mPage2RectBgDefaultTop + (SECOND_TOP * positionOffset));}
第2页->第3页,偏移区间0%-50%时
裂变背景图跟随滑动,向左偏移至消失
渐渐减少透明度,隐藏第2页的顶部图,3张模特图,底部图
private void stepByHidePage2Views(float positionOffset, int positionOffsetPixels) {/** 裂变背景图,跟随滑动,向左偏移至消失 */mPage2Split[0].currentLeft =(mPage2Split[0].defaultLeft - mPage1RectBgDefaultWidth - dp2px(15)) - positionOffsetPixels* (1 / SECOND_RATE);mPage2Split[1].currentLeft =(mPage2Split[1].defaultLeft + mPage1RectBgDefaultWidth + dp2px(15)) - positionOffsetPixels* (1 / SECOND_RATE);mPage2Split[0].alpha((int) (255 - (255 * positionOffset * (1 / SECOND_RATE))));mPage2Split[1].alpha((int) (255 - (255 * positionOffset * (1 / SECOND_RATE))));/** 顶部图,3张模特图,底部图,跟随矩形背景上移 */mPage2Top.currentTop = mRectBgCurrentTop + padding();mPage2Center[0].currentTop = mPage2Top.currentTop + mPage2Top.currentHeight + padding();mPage2Center[1].currentTop = mPage2Center[0].currentTop;mPage2Center[2].currentTop = mPage2Center[1].currentTop + mPage2Center[1].currentHeight;mPage2Bottom.currentTop = mPage2Center[0].currentTop + mPage2Center[0].currentHeight + padding();/** 渐渐减少透明度,隐藏第2页的顶部图,3张模特图,底部图 */mPage2Top.alpha((int) (255 - (255 * positionOffset * (1 / SECOND_RATE))));mPage2Bottom.alpha((int) (255 - (255 * positionOffset * (1 / SECOND_RATE))));for (ViewModel viewModel : mPage2Center) {viewModel.alpha((int) (255 - (255 * positionOffset * (1 / SECOND_RATE))));}/** 因为矩形背景变窄了,所以渐渐减少第2页顶部图,底部图的宽度,实现跟随矩形背景宽度变化 */mPage2Top.currentWidth = mRectBgCurrentWidth - padding() * 2;mPage2Top.currentLeft = mRectBgCurrentLeft + padding();mPage2Bottom.currentWidth = mRectBgCurrentWidth - padding() * 2;mPage2Bottom.currentLeft = mRectBgCurrentLeft + padding();mPage2Bottom.currentLeft = mRectBgCurrentLeft + padding();/** 因为矩形背景变窄了,所以渐渐减少第2,3张模特图的宽高,left和top,实现跟随矩形背景宽度变化 */mPage2Center[0].currentLeft = mRectBgCurrentLeft + padding();mPage2Center[1].currentWidth = mRectBgCurrentWidth - padding() * 3 - mPage2Center[0].defaultWidth;mPage2Center[1].currentHeight = mPage2Center[1].currentWidth;mPage2Center[1].currentLeft = mPage2Center[0].currentLeft + mPage2Center[0].defaultWidth + padding();mPage2Center[2].currentWidth = mRectBgCurrentWidth - padding() * 3 - mPage2Center[0].defaultWidth;mPage2Center[2].currentHeight = mPage2Center[2].currentWidth;mPage2Center[2].currentLeft = mPage2Center[0].currentLeft + mPage2Center[0].defaultWidth + padding();mPage2Center[2].currentTop = mPage2Center[1].currentTop + mPage2Center[1].currentHeight + padding();}
第2页->第3页,偏移区间50%-100%时
依次显示第3页,6张模特图
private void stepByShowPage3Views(float positionOffset) {/** 第2页,在50->100%区间偏移,显示第3页,6张模特图 */for (int i = 0; i < mPage3Model.length; i++) {if (i == 0) {/** 第1张模特图先显示 */if (mPage3Model[i].paint.getAlpha() < 255) {mPage3Model[i].alpha((int) (255 * (positionOffset - SECOND_RATE) * (1 / (1 - SECOND_RATE))));}} else {/** 其他模特图在前1张显示50%透明度的时候再依次展示 */if (mPage3Model[i - 1].paint.getAlpha() >= 255 / 2) {float rate = mPage3Model[i - 1].paint.getAlpha() / 255.0f - 0.5f;mPage3Model[i].alpha((int) (255 * (rate * 2)));} else {mPage3Model[i].alpha(0);}}/** 6张模特图,跟随矩形背景上移 */if (i < mPage3ModelResources.length / 2) {/** 第1排,3张模特图的top计算 */mPage3Model[i].currentTop = mRectBgCurrentTop + padding();} else {/** 第1排,3张模特图的top,需要加上第一排的height */mPage3Model[i].currentTop = mRectBgCurrentTop + mPage3ModelDefaultHeight + padding() * 2;}}}
第3页->第4页,偏移区间0%-100%时
矩形背景,宽度缩小10%
矩形背景,高度缩小10%
矩形背景,逆时针旋转10度
private void transformRectBgFrom3To4(float positionOffset) {/** 快速滑动的时候,可能丢失最后一次绘制,所以需要在这里调重新设置一次,保证变化完成 */mRectBgCurrentWidth = mPage3RectBgDefaultWidth;mRectBgCurrentTop = mPage3RectBgDefaultTop;/** 调整第4页,背景矩形的宽高和角度 *//** 背景矩形的宽度,在第3页调整宽度的基础上进行缩小 */mRectBgCurrentWidth = mPage3RectBgDefaultWidth * (1 + THIRD_WIDTH * positionOffset);mRectBgCurrentLeft = getScreenWidth() / 2 - mRectBgCurrentWidth / 2;/** 背景矩形的高度,在第2页调整高度的基础上进行缩小 */mRectBgCurrentHeight = mPage3RectBgDefaultHeight * (1 + THIRD_HEIGHT * positionOffset);/** 背景矩形逆时针旋转 */mRectBgCurrentDegree = THIRD_DEGREE * positionOffset;}
第3页->第4页,偏移区间0%-50%时
渐渐缩放,隐藏6张模特图
private void stepByHidePage3Views(float positionOffset) {/** 隐藏第3页6张模特图 *//** 从第1排,第3-1张开始,依次缩放 */for (int i = mPage3ModelResources.length / 2 - 1; i >= 0; i--) {if (i == mPage3ModelResources.length / 2 - 1) {/** 如果是第1排,第3张,则开始缩放 */mPage3Model[i].currentHeight =mPage3Model[i].defaultHeight * (1 - positionOffset * (1 / (1 - THIRD_RATE)));mPage3Model[i].currentWidth =mPage3Model[i].defaultWidth * (1 - positionOffset * (1 / (1 - THIRD_RATE)));} else {/** 如果是第1排,第1/2张,则判断后1张缩放到一半的时候开始自己的缩放 */if (mPage3Model[i + 1].currentHeight <= mPage3Model[i + 1].defaultHeight / 2) {mPage3Model[i].currentHeight = mPage3Model[i].defaultHeight * mPage3Model[i + 1].heightRate() * 2;mPage3Model[i].currentWidth = mPage3Model[i].defaultWidth * mPage3Model[i + 1].heightRate() * 2;} else {mPage3Model[i].currentHeight = mPage3Model[i].defaultHeight;mPage3Model[i].currentWidth = mPage3Model[i].defaultWidth;}}/** 跳转left,top,实现居中缩放 */mPage3Model[i].currentLeft =mPage3Model[i].defaultLeft + mPage3Model[i].defaultWidth / 2 - mPage3Model[i].currentWidth / 2;mPage3Model[i].currentTop =mPage3Model[i].defaultTop + mPage3Model[i].defaultHeight / 2 - mPage3Model[i].currentHeight / 2;}/** 从第1排,第4-6张开始,依次缩放 */for (int i = mPage3ModelResources.length / 2; i < mPage3ModelResources.length; i++) {if (i == mPage3ModelResources.length / 2) {/** 如果是第2排,第1张,则开始缩放 */mPage3Model[i].currentHeight =mPage3Model[i].defaultHeight * (1 - positionOffset * (1 / (1 - THIRD_RATE)));mPage3Model[i].currentWidth =mPage3Model[i].defaultWidth * (1 - positionOffset * (1 / (1 - THIRD_RATE)));} else {/** 如果是第2排,第5/6张,则判断前1张缩放到一半的时候开始自己的缩放 */if (mPage3Model[i - 1].currentHeight <= mPage3Model[i - 1].defaultHeight / 2) {mPage3Model[i].currentHeight = mPage3Model[i].defaultHeight * mPage3Model[i - 1].heightRate() * 2;mPage3Model[i].currentWidth = mPage3Model[i].defaultWidth * mPage3Model[i - 1].heightRate() * 2;} else {mPage3Model[i].currentHeight = mPage3Model[i].defaultHeight;mPage3Model[i].currentWidth = mPage3Model[i].defaultWidth;}}/** 跳转left,top,实现居中缩放 */mPage3Model[i].currentLeft =mPage3Model[i].defaultLeft + mPage3Model[i].defaultWidth / 2 - mPage3Model[i].currentWidth / 2;mPage3Model[i].currentTop =mPage3Model[i].defaultTop + mPage3Model[i].defaultHeight / 2 - mPage3Model[i].currentHeight / 2;}}
第3页->第4页,偏移区间50%-100%时
渐渐显示顶部图,底部3张模特图
显示第4页裂变背景图,并左右平移
private void stepByShowPage4Views(float positionOffset) {/** 显示第4页,裂变背景图,并向左右平移 */float offset = (mPage4RectBgDefaultWidth + dp2px(40)) * ((positionOffset - THIRD_RATE) * (1 / (1 - THIRD_RATE)));for (int i = 0; i < mPage4Split.length; i++) {mPage4Split[i].matrix.reset();mPage4Split[i].matrix.postScale(mPage4RectBgDefaultWidth / mPage4Split[i].bitmap.getWidth(), mPage4RectBgDefaultHeight / mPage4Split[i].bitmap.getHeight());float currentLeft = 0;if (i == 0) {// 左移currentLeft = mPage4RectBgDefaultLeft - offset;} else if (i == 1) {// 右移currentLeft = mPage4RectBgDefaultLeft + offset;}// 平移mPage4Split[i].matrix.postTranslate(currentLeft, mPage4RectBgDefaultTop);// 旋转角度mPage4Split[i].matrix.postRotate(THIRD_DEGREE, currentLeft + mPage4RectBgDefaultWidth/2,mPage4RectBgDefaultTop + mPage4RectBgDefaultHeight/2);mPage4Split[i].alpha((int) (255 * ((positionOffset - THIRD_RATE) * (1 / (1 - THIRD_RATE)))));}/** 显示第4页,顶部模特图 */mPage4Top.alpha((int) (255 * ((positionOffset - THIRD_RATE) * (1 / (1 - THIRD_RATE)))));/** 显示第4页,底部3张模特图 */for (int i = 0; i < mPage4Model.length; i++) {if (i == 0) {mPage4Model[i].currentWidth =mPage4Model[i].defaultWidth * ((positionOffset - THIRD_RATE) * (1 / (1 - THIRD_RATE)));mPage4Model[i].currentHeight =mPage4Model[i].defaultHeight * ((positionOffset - THIRD_RATE) * (1 / (1 - THIRD_RATE)));mPage4Model[i].alpha((int) (255 * (positionOffset - THIRD_RATE) * (1 / (1 - THIRD_RATE))));} else {if (mPage4Model[i - 1].currentWidth >= mPage4ModelDefaultWidth / 2) {mPage4Model[i].currentWidth =mPage4Model[i].defaultWidth * ((mPage4Model[i - 1].widthRate() - 0.5f) * 2);mPage4Model[i].currentHeight =mPage4Model[i].defaultHeight * ((mPage4Model[i - 1].widthRate() - 0.5f) * 2);mPage4Model[i].currentLeft =mPage4Model[i - 1].currentLeft + mPage4Model[i - 1].currentWidth + padding();mPage4Model[i].alpha((int) (255 * (mPage4Model[i - 1].widthRate() - 0.5f) * 2));}}}}
最后在onDraw(),将计算好偏移值的view都绘制出来。
protected void onDraw(Canvas canvas) {super.onDraw(canvas);/** 按重叠顺序绘制 */if (fromPage1ToPage2(mCurrentPageIndex)) {/** 绘制第1页,底部背景图 */drawBitmap(canvas, mPage1BottomBg);/** 绘制第2页,裂变背景图 */drawBitmap(canvas, mPage2Split[0]);drawBitmap(canvas, mPage2Split[1]);/** 绘制白色矩形背景 */drawWhiteRectBackgroud(canvas);drawPage1InCanvas(canvas);drawPage2InCanvas(canvas);} else if (fromPage2ToPage3(mCurrentPageIndex)) {/** 绘制第2页,裂变背景图 */drawBitmap(canvas, mPage2Split[0]);drawBitmap(canvas, mPage2Split[1]);/** 绘制矩形背景 */drawWhiteRectBackgroud(canvas);drawPage2InCanvas(canvas);drawPage3InCanvas(canvas);} else if (fromPage3ToPage4(mCurrentPageIndex)) {/** 绘制第4页,裂变背景图 */drawBitmapMatrix(canvas, mPage4Split[0]);drawBitmapMatrix(canvas, mPage4Split[1]);/** 绘制矩形背景 */drawWhiteRectBackgroud(canvas);drawPage3InCanvas(canvas);drawPage4InCanvas(canvas);} else if (isPage4(mCurrentPageIndex)) {/** 绘制第4页,裂变背景图 */drawBitmapMatrix(canvas, mPage4Split[0]);drawBitmapMatrix(canvas, mPage4Split[1]);/** 绘制矩形背景 */drawWhiteRectBackgroud(canvas);drawPage4InCanvas(canvas);}}
最终效果:

目前还有一些细节的效果,以及适配,性能调优还没实现。虽然原理不难,不过要真正完整的实现以上效果,也算呕心沥血吧!难点就在于如何精细化的控制每个view的属性,因为页面中每个图片的位置,大小都是在参照其他view的基础上进行计算后得出的。现在市场上很多APP的欢迎页都有类似比较动态的效果,原理就是ViewPager+Canvas绘制,掌握了本文的demo,其他实现原理应该是一样样的。
源码地址:
https://github.com/listen2code/Test_Mogu_View
到这里就结束啦。
