加密与解密


1
简单加密
   10010011 ^
   00111101
----------------
= 10101110
A ^ B == B ^ A
A ^ B ^ C == (A ^ B) ^ C == A ^ (B ^ C)
A ^ B = C  -->  A = B ^ C  -->  B = A ^ C
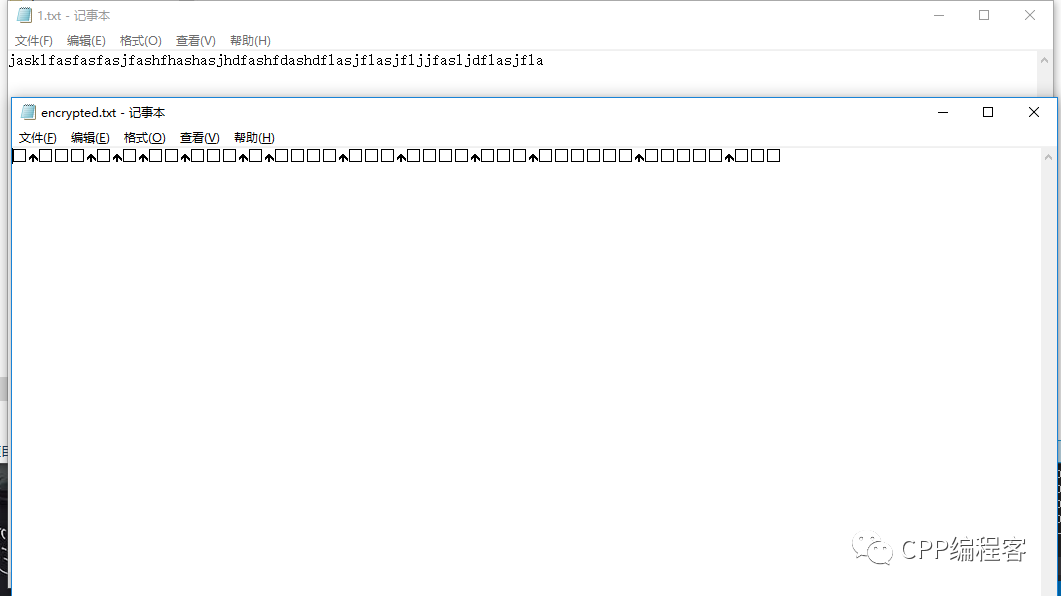
 1void EncrytFile(const char* plain_file, const char* cipher_file)
 2{
 3    if (nullptr == plain_file || nullptr == cipher_file)
 4        throw std::runtime_error("名称为空");
 5
 6    // 打开欲加密文件
 7    std::ifstream fsPlainFile(plain_file,
 8        std::ios_base::in | std::ios_base::binary);
 9    if (!fsPlainFile.is_open())
10        throw std::runtime_error("打开文件失败");
11
12    // 打开输出文件
13    std::ofstream fsCipherFile(cipher_file, std::ios_base::out | std::ios_base::binary);
14    if (!fsCipherFile)
15    {
16        fsPlainFile.close();
17        throw std::runtime_error("打开文件失败");
18    }
19
20    const int key = 0x7F;
21
22    // 加密
23    char temp = fsPlainFile.get() ^ key;
24    while (!fsPlainFile.eof())
25    {
26        fsCipherFile.put(temp);
27        temp = fsPlainFile.get() ^ key;
28    }
29
30    fsPlainFile.close();
31    fsCipherFile.close();
32}
1try {
2    EncrytFile(".//1.txt", ".//encrypted.txt");
3}
4catch (const std::exception& e)
5{
6    std::cerr << e.what() << std::endl;
7}
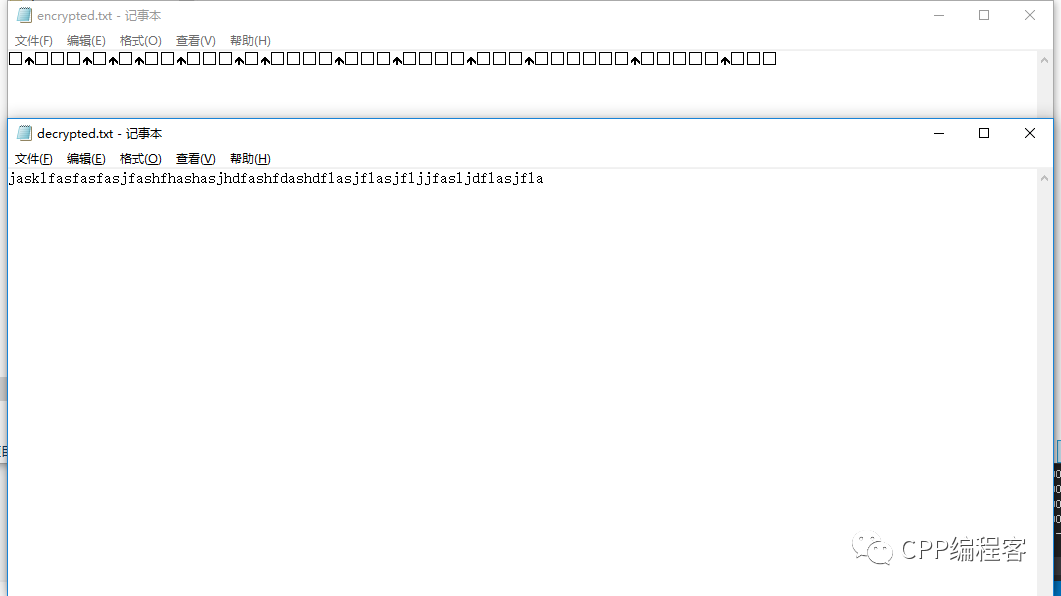
1try {
2    EncrytFile(".//encrypted.txt", ".//decrypted.txt");
3}
4catch (const std::exception& e)
5{
6    std::cerr << e.what() << std::endl;
7}
2
对称密码
2.1
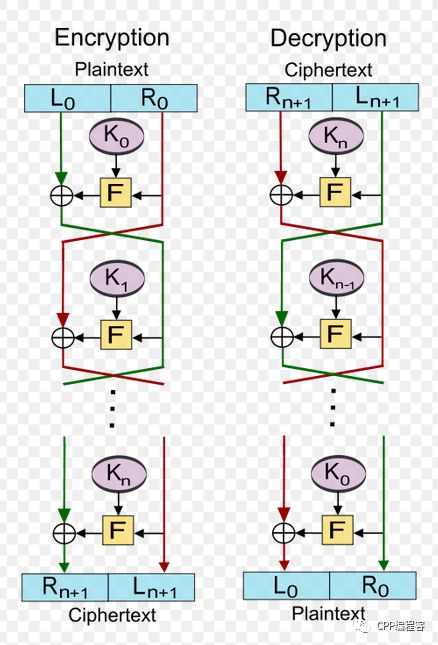
DES
2.2
AES
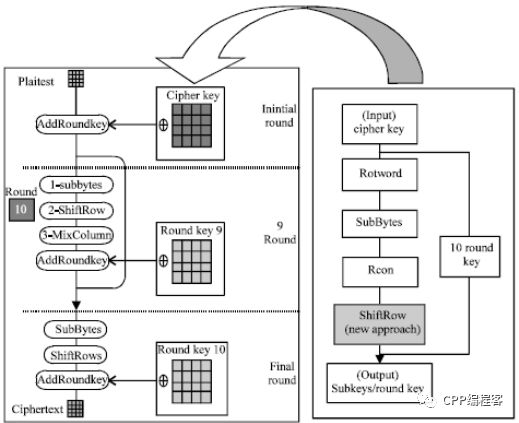
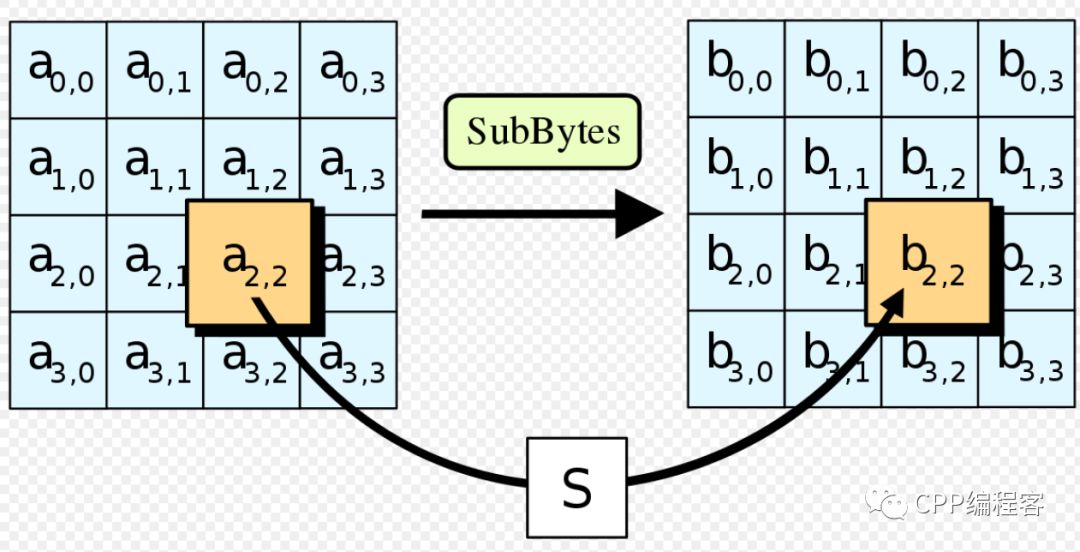
SubBytes(字节替换)
ShiftRow(平移行)
MixColumn(混合列)
AddRoundKey(与轮密钥进行异或运算)
3
非对称密码
3.1
RSA
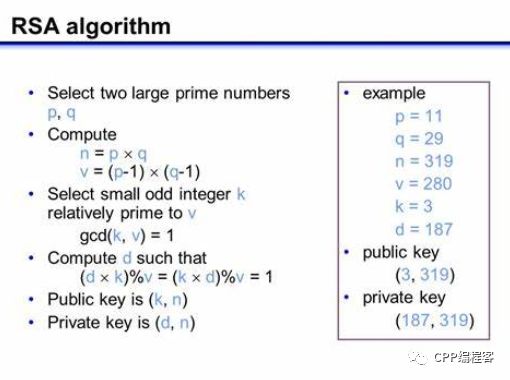
选择两个很大的质数p和q
根据p和q,计算出n,再求出p-1和q-1的最小公倍数v
找出一个数k,这个数要满足:1 < k < v,并且k和v的最大公约数要为1
找出一个数d,这个数要满足:1 < d < v,并且(d * k) % v要等于1
4
单向散列函数
5
基于Cryptopp加密库的加密组件
5.1
MD5
 1const std::string okcrypt::EncryptMD5(std::string const& msg)
 2{
 3    std::string digest;
 4    Weak1::MD5 hash;
 5    hash.Update((const byte*)msg.data(), msg.size());
 6    digest.resize(hash.DigestSize());
 7    hash.Final((byte*)&digest[0]);
 8
 9    return ToHex(digest);
10}
1static const std::string ToHex(std::string const& digest) {
2    std::stringstream ss;
3    HexEncoder encoder(new FileSink(ss));
4    (void)StringSource(digest, true, new Redirector(encoder));
5    return ss.str();
6}
5.2
Base64
 1const std::string okcrypt::EncryptBase64(std::string const& plainData)
 2{
 3    std::string encoded;
 4
 5    StringSource ss((const byte*)plainData.data(), plainData.size(),
 6        true, new Base64Encoder(new StringSink(encoded))
 7    );
 8
 9    return encoded;
10}
5.3
SHA
 1// SHA2
 2static const std::string EncryptSHA224(std::string const& msg);
 3static const std::string EncryptSHA256(std::string const& msg);
 4static const std::string EncryptSHA384(std::string const& msg);
 5static const std::string EncryptSHA512(std::string const& msg);
 6
 7// SHA3
 8static const std::string EncryptSHA3_224(std::string const& msg);
 9static const std::string EncryptSHA3_256(std::string const& msg);
10static const std::string EncryptSHA3_384(std::string const& msg);
11static const std::string EncryptSHA3_512(std::string const& msg);
 1template<class SHAType>
 2static const std::string EncryptSHA(std::string const& msg) {
 3    SHAType hash;
 4    std::string digest;
 5    hash.Update((const byte*)msg.data(), msg.size());
 6    digest.resize(hash.DigestSize());
 7    hash.Final((byte*)&digest[0]);
 8
 9    return ToHex(digest);
10}
 1const std::string okcrypt::EncryptSHA224(std::string const& msg)
 2{
 3    return EncryptSHA(msg);
 4}
 5
 6const std::string okcrypt::EncryptSHA256(std::string const& msg)
 7{
 8    return EncryptSHA(msg);
 9}
10
11const std::string okcrypt::EncryptSHA384(std::string const& msg)
12{
13    return EncryptSHA(msg);
14}
15
16const std::string okcrypt::EncryptSHA512(std::string const& msg)
17{
18    return EncryptSHA(msg);
19}
20
21const std::string okcrypt::EncryptSHA3_224(std::string const& msg)
22{
23    return EncryptSHA(msg);
24}
25
26const std::string okcrypt::EncryptSHA3_256(std::string const& msg)
27{
28    return EncryptSHA(msg);
29}
30
31const std::string okcrypt::EncryptSHA3_384(std::string const& msg)
32{
33    return EncryptSHA(msg);
34}
35
36const std::string okcrypt::EncryptSHA3_512(std::string const& msg)
37{
38    return EncryptSHA(msg);
39}
5.4
DES
 1// DES
 2static void InitalizeDESKey();
 3static const std::string GetDESKey();
 4static void SetDESKey(std::string const& key);
 5static void EncryptDES(std::string const& plainData, std::string& cipherData);
 6static void DecryptDES(std::string const& cipherData, std::string& recoveredData);
 7
 8// 3DES
 9static void Initalize3DESKey();
10static const std::string Get3DESKey();
11static void Set3DESKey(std::string const& key);
12static void Encrypt3DES(std::string const& plainData, std::string& cipherData);
13static void Decrypt3DES(std::string const& cipherData, std::string& recoveredData);
1static SecByteBlock m_desKey;
2static byte m_desIV[DES_EDE2::BLOCKSIZE];
3
4static SecByteBlock m_3desKey;
5static byte m_3desIV[DES_EDE3::BLOCKSIZE];
1SecByteBlock        okcrypt::m_desKey(0x00, DES_EDE2::DEFAULT_KEYLENGTH);
2byte                       okcrypt::m_desIV[DES_EDE2::BLOCKSIZE];
3
4SecByteBlock        okcrypt::m_3desKey(0x00, DES_EDE3::DEFAULT_KEYLENGTH);
5byte                       okcrypt::m_3desIV[DES_EDE3::BLOCKSIZE];
1void okcrypt::Initalize3DESKey()
2{
3    AutoSeededRandomPool rng;
4
5    rng.GenerateBlock(m_3desKey, m_3desKey.size());
6    rng.GenerateBlock(m_3desIV, sizeof(m_3desIV));
7}
 1const std::string okcrypt::Get3DESKey()
 2{
 3    std::string key((char *)m_3desKey.data(), m_3desKey.size());
 4    return key;
 5}
 6
 7void okcrypt::Set3DESKey(std::string const& key)
 8{
 9    SecByteBlock s((const byte*)key.data(), key.size());
10    m_3desKey = s;
11}
 1void okcrypt::Encrypt3DES(std::string const& plainData, std::string &cipherData)
 2{
 3    try {
 4        CBC_Mode::Encryption e;
 5        e.SetKeyWithIV(m_3desKey, m_3desKey.size(), m_3desIV);
 6
 7        StringSource ss(plainData, true,
 8            new StreamTransformationFilter(e, new StringSink(cipherData))
 9        );
10    }
11    catch (const CryptoPP::Exception& e)
12    {
13        throw e;
14    }
15}
16
17void okcrypt::Decrypt3DES(std::string const& cipherData, std::string &recoveredData)
18{
19    try {
20        CBC_Mode::Decryption d;
21        d.SetKeyWithIV(m_3desKey, m_3desKey.size(), m_3desIV);
22
23        StringSource ss(cipherData, true,
24            new StreamTransformationFilter(d, new StringSink(recoveredData))
25        );
26    }
27    catch (const CryptoPP::Exception& e)
28    {
29        throw e;
30    }
31}
5.5
AES
1// AES
2static void InitalizeAESKey();
3static const std::string GetAESKey();
4static void SetAESKey(std::string const& key);
5static void EncryptAES(std::string const& plainData, std::string& cipherData);
6static void DecryptAES(std::string const& cipherData, std::string& recoveredData);
1static SecByteBlock m_aesKey;
2static SecByteBlock m_aesIV;
1SecByteBlock        okcrypt::m_aesKey(0x00, AES::DEFAULT_KEYLENGTH);
2SecByteBlock        okcrypt::m_aesIV(AES::BLOCKSIZE);
 1void okcrypt::InitalizeAESKey()
 2{
 3    AutoSeededRandomPool rng;
 4
 5    // 生成随机密钥
 6    rng.GenerateBlock(m_aesKey, m_aesKey.size());
 7
 8    // 生成随机IV
 9    rng.GenerateBlock(m_aesIV, m_aesIV.size());
10}
 1void okcrypt::EncryptAES(std::string const& plainData, std::string &cipherData)
 2{
 3    // 加密
 4    CFB_Mode::Encryption e(m_aesKey, m_aesKey.size(), m_aesIV);
 5    cipherData.resize(plainData.size());
 6    e.ProcessData((byte*)&cipherData[0], (byte*)plainData.data(), plainData.size());
 7}
 8
 9void okcrypt::DecryptAES(std::string const& cipherData, std::string &recoveredData)
10{
11    // 解密
12    CFB_Mode::Decryption d(m_aesKey, m_aesKey.size(), m_aesIV);
13    recoveredData.resize(cipherData.size());
14    d.ProcessData((byte*)&recoveredData[0], (byte*)cipherData.data(), cipherData.size());
15}
5.6
RSA
1// RSA
2static void InitalizeRSAKeys(size_t bits = 1024);
3static const std::string GetRSAPublicKey();
4static void SetRSAPublicKey(std::string& key);
5static void EncryptRSA(std::string const& plainData, std::string& cipherData);
6static void DecryptRSA(std::string const& cipherData, std::string& recoveredData);
1static RSA::PublicKey m_rsaPublicKey;
2static RSA::PrivateKey m_rsaPrivateKey;
1RSA::PublicKey      okcrypt::m_rsaPublicKey;
2RSA::PrivateKey     okcrypt::m_rsaPrivateKey;
 1void okcrypt::InitalizeRSAKeys(size_t bits)
 2{
 3    // 伪随机数生成器
 4    AutoSeededRandomPool rng;
 5
 6    // 生成参数
 7    InvertibleRSAFunction params;
 8    params.GenerateRandomWithKeySize(rng, bits);
 9
10    // 创建密钥对
11    m_rsaPrivateKey = params;
12    m_rsaPublicKey = params;
13}
 1const std::string okcrypt::GetRSAPublicKey()
 2{
 3    std::string pubKey;
 4    StringSink ss(pubKey);
 5    m_rsaPublicKey.Save(ss);
 6
 7    return pubKey;
 8}
 9
10void okcrypt::SetRSAPublicKey(std::string& key)
11{
12    StringSink ss(key);
13    m_rsaPublicKey.Load(ss);
14}
 1void okcrypt::EncryptRSA(std::string const& plainData, std::string &cipherData)
 2{
 3    // 伪随机数生成器
 4    AutoSeededRandomPool rng;
 5
 6    // 加密器
 7    RSAES_OAEP_SHA_Encryptor e(m_rsaPublicKey);
 8
 9    StringSource ss(plainData, true,
10        new PK_EncryptorFilter(rng, e, new StringSink(cipherData))
11    );
12}
13
14void okcrypt::DecryptRSA(std::string const& cipherData, std::string &recoveredData)
15{
16    // 伪随机数生成器
17    AutoSeededRandomPool rng;
18
19    // 解密器
20    RSAES_OAEP_SHA_Decryptor d(m_rsaPrivateKey);
21
22    StringSource ss(cipherData, true,
23        new PK_DecryptorFilter(rng, d, new StringSink(recoveredData))
24    );
25}
6
okcrypt的使用
git clone https://github.com/gxkey/okcrypt.git
1#include
2#include "okcrypt.h"
3
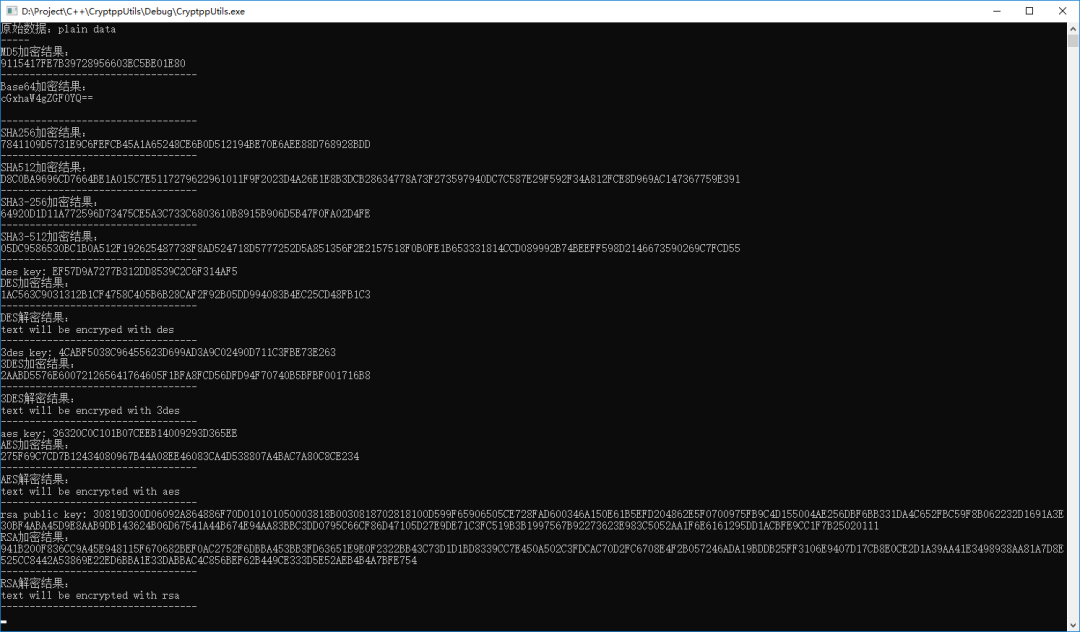
4void PrintEncrypt(const char* algo, const std::string& hexCipherData) {
5 std::cout << algo << "加密结果:\n" << hexCipherData << std::endl;
6 std::cout << "----------------------------------\n";
7}
8
9void PrintDecrypt(const char* algo, const std::string& hexCipherData) {
10 std::cout << algo << "解密结果:\n" << hexCipherData << std::endl;
11 std::cout << "----------------------------------\n";
12}
13
14int main()
15{
16 std::string plain{ "plain data" };
17
18 std::cout << "原始数据:" << plain << "\n-----\n";
19
20 PrintEncrypt("MD5", okcrypt::EncryptMD5(plain));
21 PrintEncrypt("Base64", okcrypt::EncryptBase64(plain));
22 PrintEncrypt("SHA256", okcrypt::EncryptSHA256(plain));
23 PrintEncrypt("SHA512", okcrypt::EncryptSHA512(plain));
24 PrintEncrypt("SHA3-256", okcrypt::EncryptSHA3_256(plain));
25 PrintEncrypt("SHA3-512", okcrypt::EncryptSHA3_512(plain));
26
27 try {
28 // DES
29 std::string cipher;
30 std::string recovered;
31 okcrypt::InitalizeDESKey();
32 std::cout << "des key: " << okcrypt::ToHex(okcrypt::GetDESKey()) << std::endl;
33 okcrypt::EncryptDES("text will be encryped with des", cipher);
34 PrintEncrypt("DES", okcrypt::ToHex(cipher));
35 okcrypt::DecryptDES(cipher, recovered);
36 PrintDecrypt("DES", recovered);
37
38 cipher.clear();
39 recovered.clear();
40
41 // 3DES
42 okcrypt::Initalize3DESKey();
43 std::cout << "3des key: " << okcrypt::ToHex(okcrypt::Get3DESKey()) << std::endl;
44 okcrypt::Encrypt3DES("text will be encryped with 3des", cipher);
45 PrintEncrypt("3DES", okcrypt::ToHex(cipher));
46 okcrypt::Decrypt3DES(cipher, recovered);
47 PrintDecrypt("3DES", recovered);
48
49 cipher.clear();
50 recovered.clear();
51
52 // AES
53 okcrypt::InitalizeAESKey();
54 std::cout << "aes key: " << okcrypt::ToHex(okcrypt::GetAESKey()) << std::endl;
55 okcrypt::EncryptAES("text will be encrypted with aes", cipher);
56 PrintEncrypt("AES", okcrypt::ToHex(cipher));
57 okcrypt::DecryptAES(cipher, recovered);
58 PrintDecrypt("AES", recovered);
59
60 cipher.clear();
61 recovered.clear();
62
63 // RSA
64 okcrypt::InitalizeRSAKeys();
65 std::cout << "rsa public key: " << okcrypt::ToHex(okcrypt::GetRSAPublicKey()) << std::endl;
66 okcrypt::EncryptRSA("text will be encrypted with rsa", cipher);
67 PrintEncrypt("RSA", okcrypt::ToHex(cipher));
68 okcrypt::DecryptRSA(cipher, recovered);
69 PrintDecrypt("RSA", recovered);
70 }
71 catch (const CryptoPP::Exception& e)
72 {
73 std::cerr << "Error: " << e.what() << std::endl;
74 }
75
76
77 std::cin.get();
78 return 0;
79}