
音视频开发之旅(34) - 基于FFmpeg实现简单的视频解码器
共 11087字,需浏览 23分钟
·
2022-02-09 17:35
目录
- FFmpeg解码过程流程图和关键的数据结构
- mp4通过FFmpeg解码YUV裸视频数据
- 遇到的问题
- 资料
- 收获
一、FFmpeg解码过程流程图和关键的数据结构
FFmpeg解码涉及的知识点比较多,很容易被函数和结构体搞定不知所错,我们先从整体上对解码流程有个认知,画了张图把解码流程图,如下

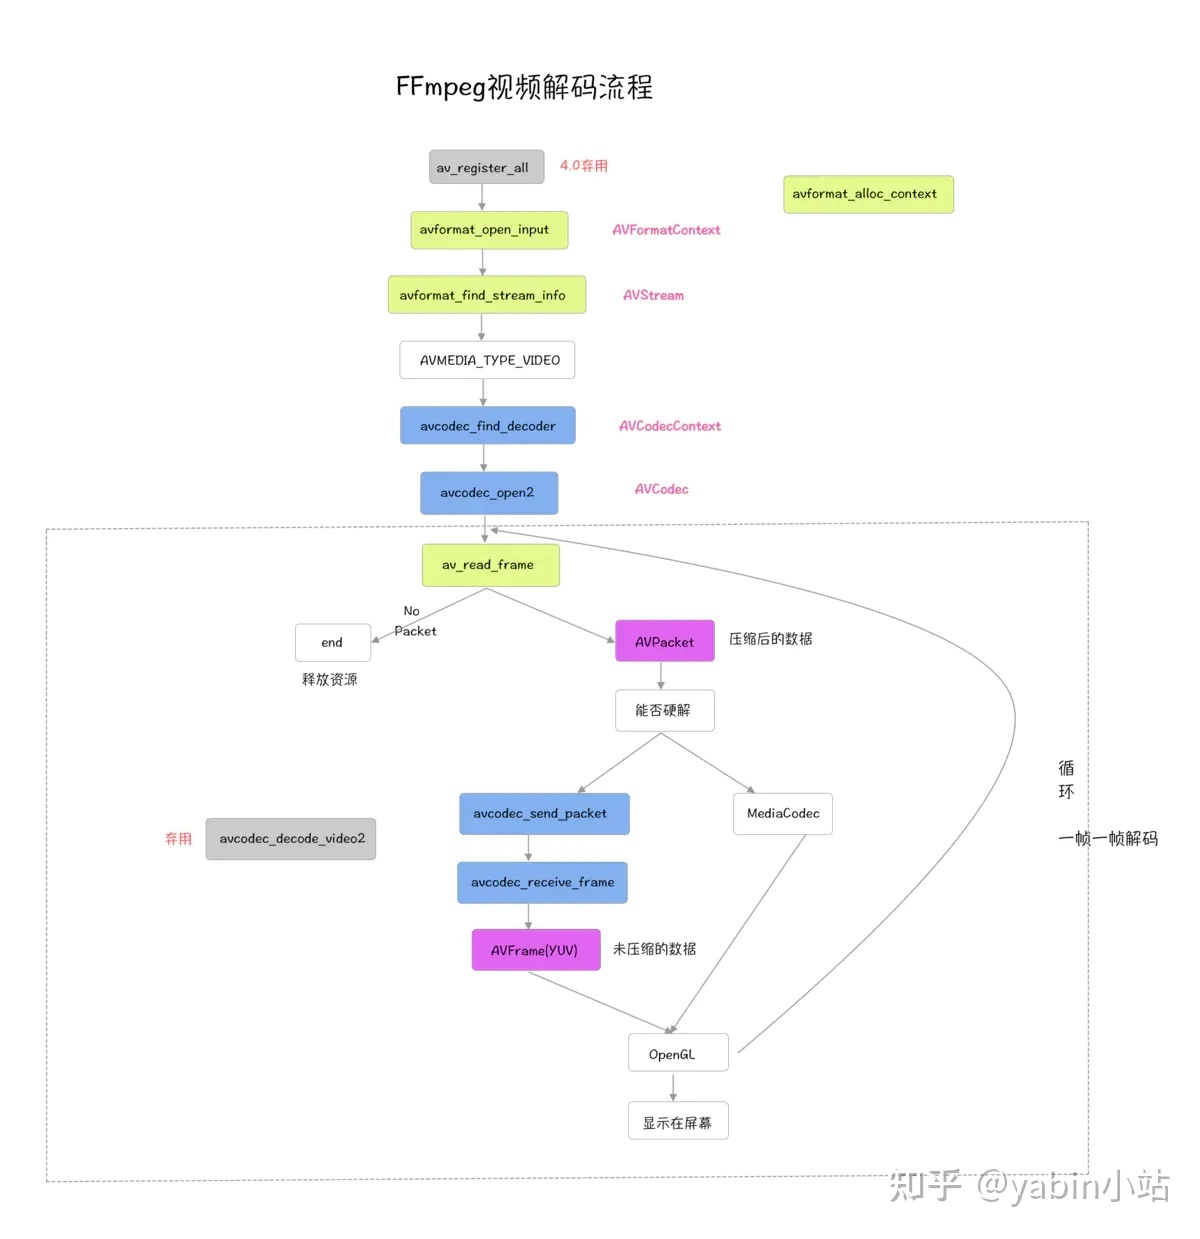
1.1 解码流程如下
- avformat_open_input 打开媒体文件
- avformat_find_stream_info 初始化AVFormatContext_
- 匹配到视频流的index
- avcodec_find_decoder 根据视频流信息的codec_id找到对应的解码器_
- avcodec_open2 使用给定的AVCodec初始化AVCodecContext_
- 初始化输出文件、解码AVPacket和AVFrame结构体
- av_read_frame 开始一帧一帧读取
- avcodec_send_packet
- avcodec_receive_frame
- 格式转换 、分别写入YUV文件
- Opengl渲染(本篇不涉及,放到后面单独篇学习实践)
- 释放资源
1.2 关键函数
下面我们来看下解码流程中的关键函数
1. av_register_all
在3.x或者以前的版本在使用ffmpeg的复用/解复用器或者编解码器之前一定要先调用该函数。但是4.x之后ffmpeg修了了内部实现,该函数可以省略不写。
2. avformat_open_input
attribute_deprecated int av_open_input_file(AVFormatContext **ic_ptr,constchar *filename, AVInputFormat *fmt, int buf_size, AVFormatParameters *ap);
以输入方式打开一个媒体文件,codecs并没有打开,只读取了文件的头信息.
3. avformat_find_stream_info
Read packets of a media file to get stream information int avformat_find_stream_info(AVFormatContext *ic, AVDictionary **options);
获取多媒体信息
4. avcodec_find_decoder
Find a registered decoder with a matching codec ID AVCodec *avcodec_find_decoder(enum AVCodecID id);
根据codecID找到一个注册过的解码器
5. avcodec_open2
Initialize the AVCodecContext to use the given AVCodec int avcodec_open2(AVCodecContext *avctx, const AVCodec *codec, AVDictionary **options);
使用给定的AVCodec初始化AVCodecContext_
6. av_read_frame
Return the next frame of a stream. @return 0 if OK, < 0 on error or end of file int av_read_frame(AVFormatContext *s, AVPacket *pkt);
读取一帧数据,读到的是AVPacket
7. avcodec_send_packet
Supply raw packet data as input to a decoder. @return 0 on success, otherwise negative error code int avcodec_send_packet(AVCodecContext *avctx, const AVPacket *avpkt);
给解码器发送一帧压缩的AVPacket 数据
8. avcodec_receive_frame
Return decoded output data from a decoder. @return 0 on success int avcodec_receive_frame(AVCodecContext *avctx, AVFrame *frame);
接收解码器解码的一帧AVFrame数据
9. sws_scale
int sws_scale(struct SwsContext *c, const uint8_t *const srcSlice[], const int srcStride[], int srcSliceY, int srcSliceH, uint8_t *const dst[], const int dstStride[]);
解码后YUV格式的视频像素数据保存在AVFrame的data 0-3中。但这些像素并不是连续存储的,每行有效像素之后存储了一些无效像素,经过该函数处理,去掉无效数据。否则会出现花屏。
10. 资源释放相关函数
av_packet_unref(packet); sws_freeContext(img_convert_ctx); fclose(pYUVFile); av_frame_free(&pFrameYUV); av_frame_free(&pFrame); avcodec_close(pCodecContext); avformat_close_input(&avFormatContext);
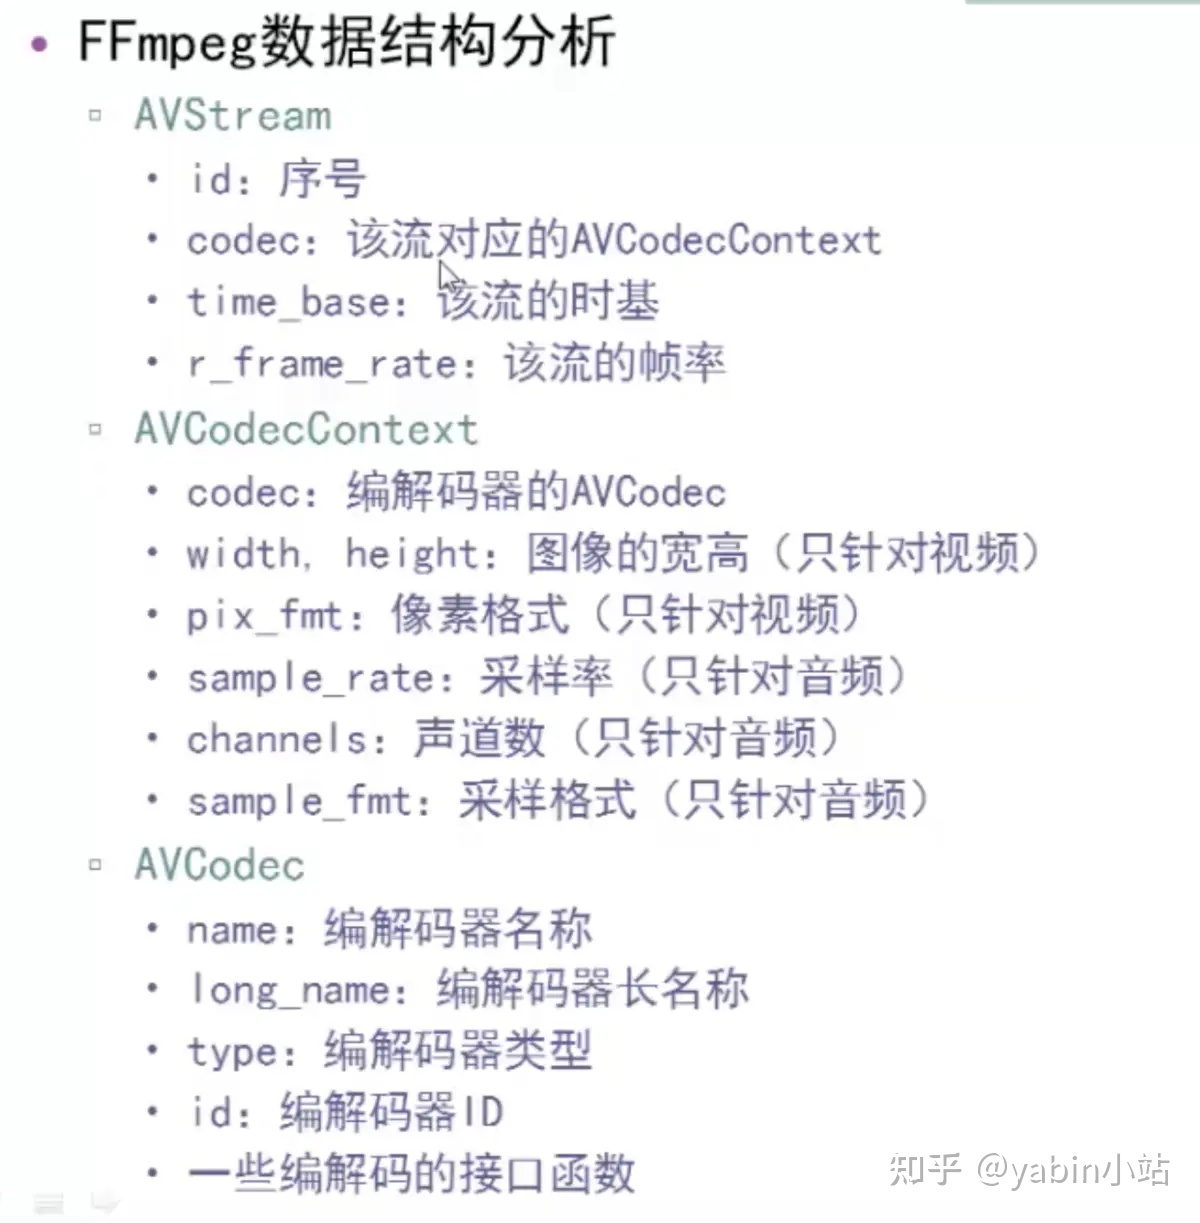
1.3 关键结构体
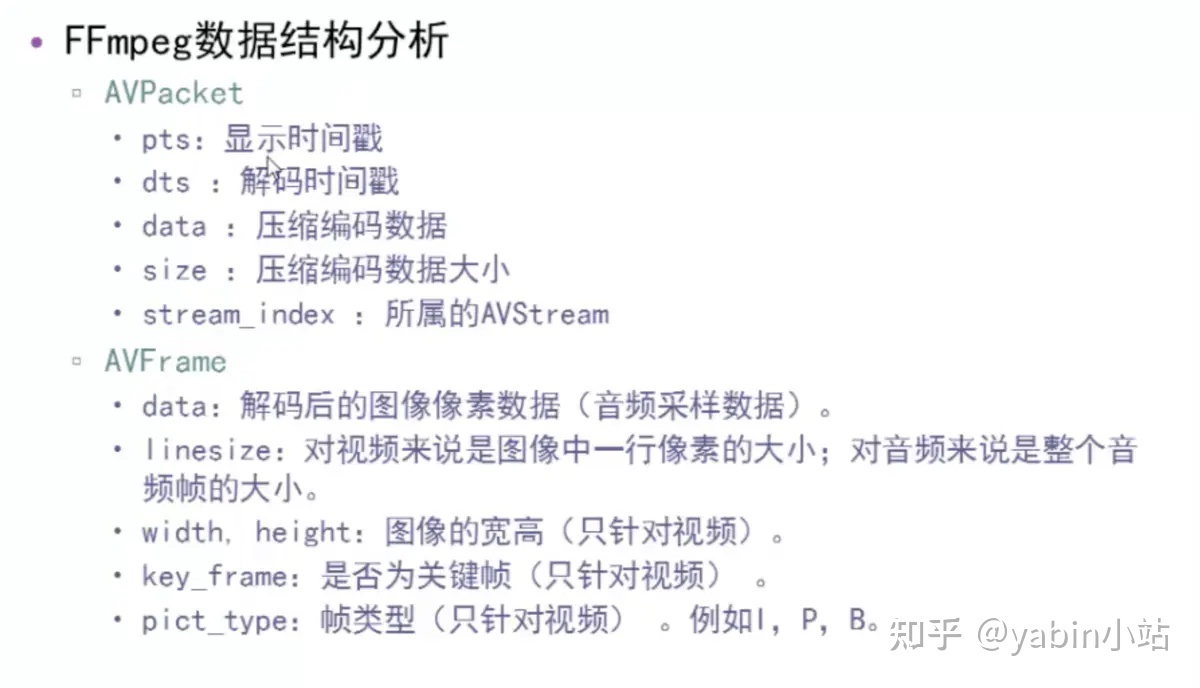
关键结构体包括AVFormatContext、AVStream、AVCodecContext、AVCodec、AVCodecParameters、AVPacket、AVFrame等
下面4张图片来自雷神

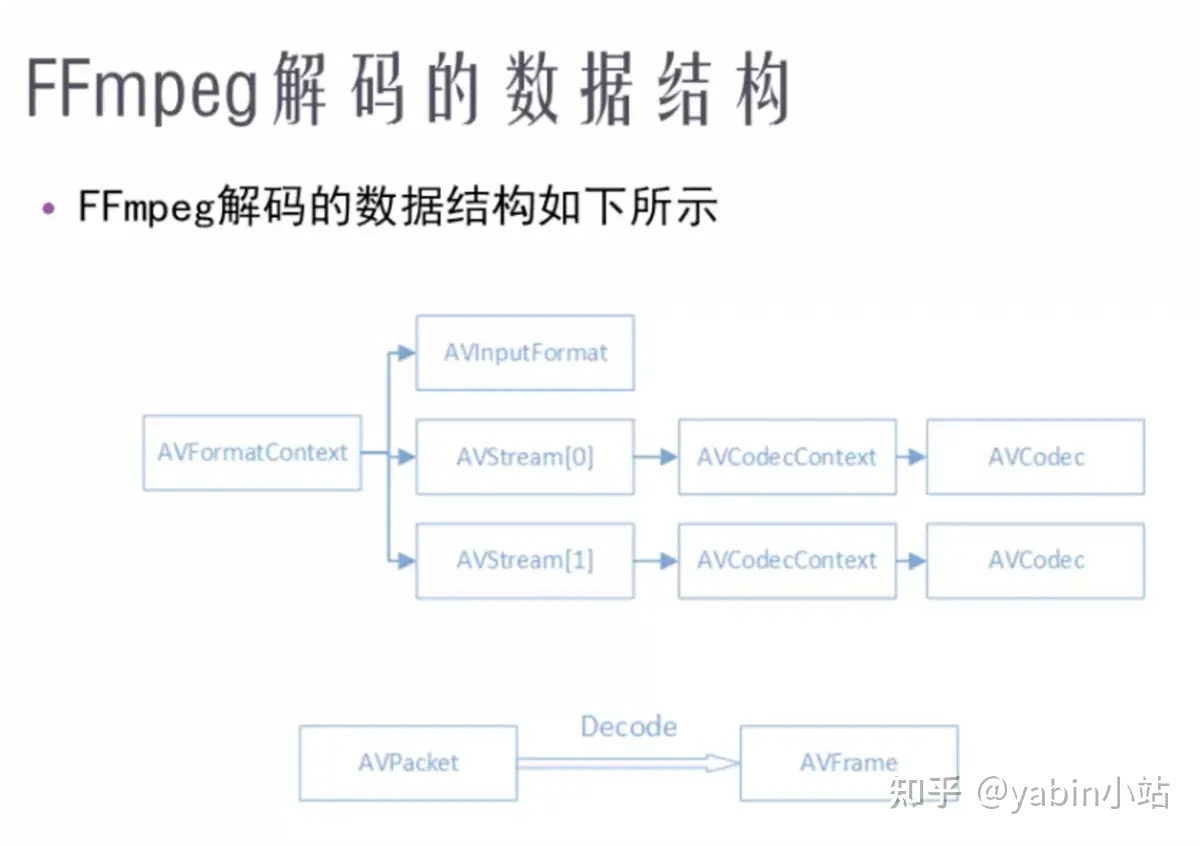
AVFormatCotext和AVInputFormat是和封装格式相关的结构体


AVStream、AVCodecContex、AVCodec是和编解码相关的结构体

AVPacket 与 AVFrame

1.4 补充知识
1. 宏定义define里面的##
宏定义define里面的##可能不太常见,它的含义就是拼接两个字符串,比如 #define Conn(x,y) x##y 那么 int n = Conn(123,456); 结果就是n=123456;
2. 文件的打开方式
File * fp = fopen(info.txt,"wb+") fprintf() 或者fwirte fclose(fp);
关于打开方式的说明如下
. r+ 以可读写方式打开文件,该文件必须存在。 rb+ 读写打开一个二进制文件,只允许读写数据。 rt+ 读写打开一个文本文件,允许读和写。 w 打开只写文件,若文件存在则文件长度清0,若文件不存在则建立该文件。 w+ 打开可读写文件,若文件存在则文件长度清为零,若文件不存在则建立该文件。 a 以附加的方式打开只写文件 a+ 以附加方式打开可读写的文件。若文件不存在,则会建立该文件,如果文件存在,写入的数据会被加到文件尾后 wb 只写打开或新建一个二进制文件;只允许写数据。 wb+ 读写打开或建立一个二进制文件,允许读和写。 wt+ 读写打开或着建立一个文本文件;允许读写。 at+ 读写打开一个文本文件,允许读或在文本末追加数据。 ab+ 读写打开一个二进制文件,允许读或在文件末追加数据。
3. YUV数据类型
输出解码前的h264码流、输出解码后的YUV信息
使用Elecard StreamEye Tools查看输出的h264数据
视频显示的流程,就是将像素数据“画”在屏幕上的过程。
例如显示YUV,就是将YUV“画”在系统的窗口中。
YUV 4:4:4采样,每一个Y对应一组UV分量。 YUV 4:2:2采样,每两个Y共用一组UV分量。 YUV 4:2:0采样,每四个Y共用一组UV分量。 YUV420P,Y,U,V三个分量都是平面格式,分为I420和YV12。I420格式和YV12格式的不同处在U平面和V平面的位置不同。在I420格式中,U平面紧跟在Y平面之后,然后才是V平面(即:YUV);但YV12则是相反(即:YVU)。 YUV420SP, Y分量平面格式,UV打包格式, 即NV12。 NV12与NV21类似,U 和 V 交错排列,不同在于UV顺序。 I420: YYYYYYYY UU VV =>YUV420P (最常见的) YV12: YYYYYYYY VV UU =>YUV420P NV12: YYYYYYYY UVUV =>YUV420SP NV21: YYYYYYYY VUVU =>YUV420SP
二、mp4通过FFmpeg解码成YUV裸数据
通过上一小节,我们了解了FFmpeg解码流程和关键的结构体,这一小节我们来实践。
具体步骤说明和代码实现如下:
#include
解码后的数据使用ffplayer进行播放。注意参数设置, 比如格式和分辨率等
eg: ffplay /Users/yabin/Desktop/tmp/ffmpeg/output8.yuv -pix_fmt yuv420p -s 784x480
代码已上传至 github
https://github.com/ayyb1988/ffmpegvideodecodedemo
三、遇到的问题
- avformat_open_input -13
原因: 没有读写权限导致,-13是权限相关的错误,
在AndroidManifest.xml中加入以下权限 然后在代码上添加动态权限检查
- 生成的yuv导出来后用ffplay或者yuvplayer播放 出现花屏
Stream #0:0(und): Video: h264 (High) (avc1 / 0x31637661), yuv420p, 784x480, 338 kb/s, 25 fps, 25 tbr, 16k tbn, 50 tbc (default) ffplay /Users/yabin/Desktop/tmp/ffmpeg/output.yuv -pix_fmt yuv420p -s 784x480


原因:没有对YUV数据设置格式和分辨率等信息
uint8_t *out_buffer = (unsigned char *) av_malloc( av_image_get_buffer_size(AV_PIX_FMT_YUV420P, pCodecContext->width, pCodecContext->height, 1)); av_image_fill_arrays(pFrameYUV->data, pFrameYUV->linesize, out_buffer, AV_PIX_FMT_YUV420P, pCodecContext->width, pCodecContext->height, 1); struct SwsContext *img_convert_ctx = sws_getContext(pCodecContext->width, pCodecContext->height, pCodecContext->pix_fmt, pCodecContext->width, pCodecContext->height, AV_PIX_FMT_YUV420P, SWS_BICUBIC, NULL, NULL, NULL); ... sws_scale(img_convert_ctx, (const uint8_t *const *) pFrame->data, pFrame->linesize, 0, pCodecContext->height, pFrameYUV->data, pFrameYUV->linesize);


- 第一帧出现绿屏
原因: 如果接收到的fame不等于0,要忽略这次receiver否则会出现绿屏帧
int sendPacket = avcodec_send_packet(pCodecContext, packet); //return 0 on success, otherwise negative error code: if (sendPacket != 0) { LOGE("avodec send packet error %d", sendPacket); continue; } // 0: success, a frame was returned int receiveFrame = avcodec_receive_frame(pCodecContext, pFrame); if (receiveFrame != 0) { //如果接收到的fame不等于0,忽略这次receiver否则会出现绿屏帧 LOGE("avcodec_receive_frame error %d", receiveFrame); continue; }
四、 资料
- 《音视频开发进阶》
- FFMPEG中最关键的结构体之间的关系
- ffmpeg函数介绍
- 100行代码实现最简单的基于FFMPEG+SDL的视频播放器(SDL1.x)
- 最简单的基于FFmpeg的移动端例子:Android 视频解码器-单个库版
- 图文详解YUV420数据格式
- ffmpeg flv转MP4 一点心得
- FFmpeg编解码处理1-转码全流程简介
- FFmpeg源代码简单分析:常见结构体的初始化和销毁(AVFormatContext,AVFrame等)
测试视频来自:FFmpeg编解码处理1-转码全流程简介
下载测试文件(右键另存为):tnmil2.flv
五、收获
- 了解ffmpeg解码流程
- 了解ffmpeg关键的结构以及之间的关系
- 解码mp4为视频裸数据YUV
- 花屏、录屏问题分析解决
与Mediacodec解码对比、YUV渲染播放等内容,我们后续章节来学习实践。
感谢你的阅读
下一篇我们学习实践使用FFmpeg解码音频,欢迎关注公众号“音视频开发之旅”,一起学习成长。
欢迎交流