避坑指南!手把手带你解读html2canvas的实现原理

导语 | html2canvas在前端通常用于合成海报、生成截图等场景。本文从一次蒙层截图失败对html2canvas的实现原理展开详细探讨,带你完美避坑!
一、问题背景
在一个前端项目中,有对当前页面进行截屏并上传的需求。安装了html2canvas的npm包后,实现页面截图时,发现html2canvas将原本有透明度的蒙层截图为了没有透明度的蒙层,如下面两张图所示:
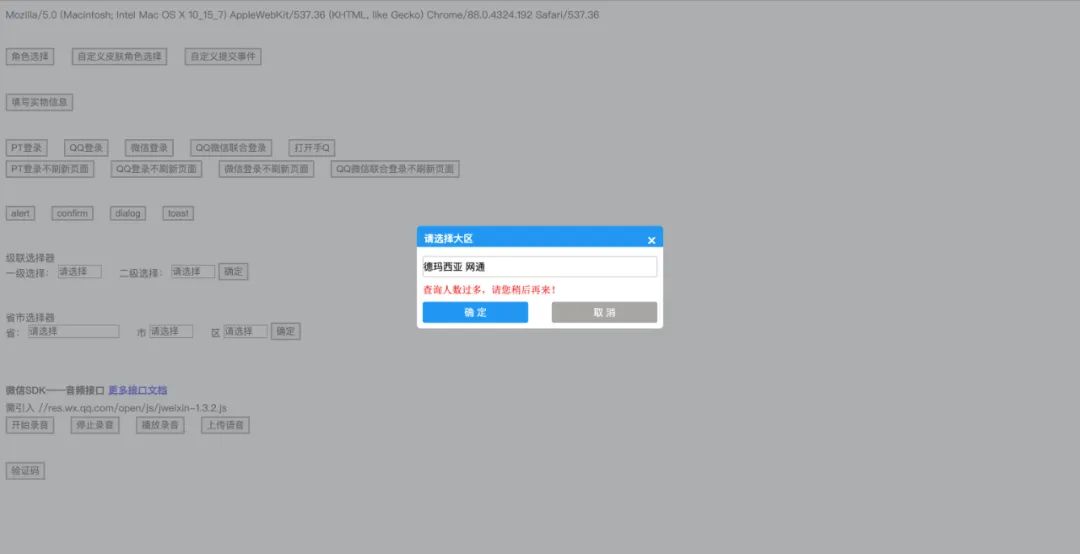

显然这并不能满足前端截屏的需求,于是进行google,终于查到了相关问题。原来html2canvas渲染opacity失败的问题自2015年起就已存在,虽然niklasvh在2020年12月修复了该问题,但是并没有合并入npm包中。所以当使用html2canvas的npm包实现截图时,仍然存在opacity渲染失败的问题。
为了彻底搞明白html2canvas渲染opacity失败的问题,我们先对html2canvas的实现原理进行剖析。
二、html2canvas原理剖析
(一)流程图
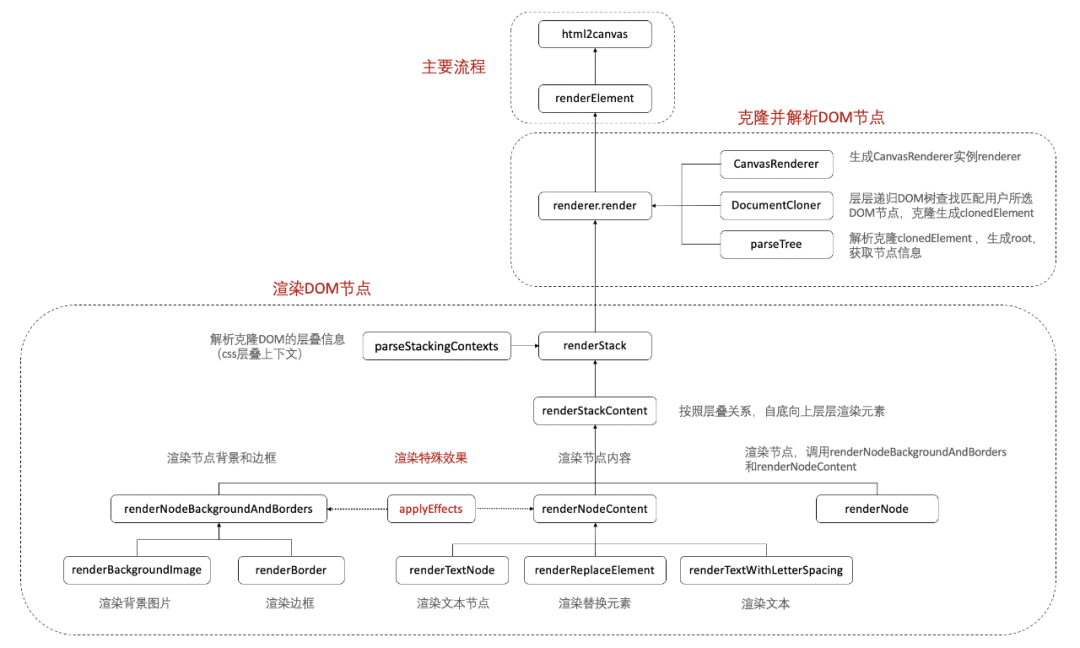
如下图所示,将html2canvas原理图形化,主要分成出口供用户使用的主要流程和两部分核心逻辑:克隆并解析DOM节点、渲染DOM节点。
(二)html2canvas方法
html2canvas是出口方法,主要将用户选择的DOM节点和自定义配置项传递给renderElement方法。简要逻辑代码如下:
const html2canvas = (element: HTMLElement, options: Partial<Options> = {}): Promise<HTMLCanvasElement> => {return renderElement(element, options);};
renderElement方法,主要把用户自定义配置与默认配置进行合并,生成CanvasRenderer实例,克隆、解析并渲染用户选择的DOM节点。简要逻辑代码如下:
const renderElement = async (element: HTMLElement, opts: Partial<Options>): Promise<HTMLCanvasElement> => {const renderOptions = {...defaultOptions, ...opts}; // 合并默认配置与用户自定义配置const renderer = new CanvasRenderer(renderOptions); // 根据渲染配置数据生成CanvasRenderer实例const documentCloner = new DocumentCloner(element, options); // 生成DocumentCloner实例const clonedElement = documentCloner.clonedReferenceElement; // createNewHtml层层递归查找用户选择的DOM元素,并克隆const root = parseTree(clonedElement); // 解析克隆的DOM元素,获取节点信息const canvas = await renderer.render(root); // CanvasRenderer实例将克隆的DOM元素内容渲染到离屏canvas中return canvas;};
(三)克隆并解析DOM节点
CanvasRenderer是canvas渲染类,后续使用的渲染方法均是该类的方法。在克隆并解析DOM节点部分,主要是将renderOptions传给canvasRenderer实例,调用render方法来绘制canvas。
DocumentCloner是DOM克隆类,主要是生成documentCloner实例,克隆用户所选择的DOM节点。其核心方法cloneNode通过递归整个DOM结构树,匹配查询用户选择的DOM节点并进行克隆,简要逻辑代码如下:
cloneNode(node: Node): Node {const window = node.ownerDocument.defaultView;if (window && isElementNode(node) && (isHTMLElementNode(node) || isSVGElementNode(node))) {const clone = this.createElementClone(node);if (this.referenceElement === node && isHTMLElementNode(clone)) {this.clonedReferenceElement = clone;}...for (let child = node.firstChild; child; child = child.nextSibling) {if (!isElementNode(child) || (!isScriptElement(child) && !child.hasAttribute(IGNORE_ATTRIBUTE) && (typeof this.options.ignoreElements !== 'function' || !this.options.ignoreElements(child)))) {if (!this.options.copyStyles || !isElementNode(child) || !isStyleElement(child)) {clone.appendChild(this.cloneNode(child));}}} // 层层递归DOM树,查找匹配并克隆用户所选择的DOM节点...return clone;}return node.cloneNode(false);} // 输出格式为DOM节点格式
parseTree方法是解析克隆DOM节点,获取节点的相关信息。parseTree层层递归克隆DOM节点,获取DOM节点的位置、宽高、样式等信息,简要逻辑代码如下:
export const parseTree = (element: HTMLElement): ElementContainer => {const container = createContainer(element);container.flags |= FLAGS.CREATES_REAL_STACKING_CONTEXT;parseNodeTree(element, container, container);return container;};const parseNodeTree = (node: Node, parent: ElementContainer, root: ElementContainer) => {for (let childNode = node.firstChild, nextNode; childNode; childNode = nextNode) {nextNode = childNode.nextSibling;if (isTextNode(childNode) && childNode.data.trim().length > 0) {parent.textNodes.push(new TextContainer(childNode, parent.styles));} else if (isElementNode(childNode)) {const container = createContainer(childNode);if (container.styles.isVisible()) {...parent.elements.push(container);if (!isTextareaElement(childNode) && !isSVGElement(childNode) && !isSelectElement(childNode)) {parseNodeTree(childNode, container, root);}}}}// 层层递归克隆DOM节点,解析获取节点信息};
parseTree输出的格式如下:
const ElementContainer = {bounds: Bounds {left: 8, top: 8, width: 389, height: 313.34375},elements: [{bounds: Bounds {left: 33, top: 33, width: 339, height: 263.34375}elements: [],flags: 0,style: CSSParsedDeclaration {backgroundClip: Array(1), backgroundColor: 4289003775, …},textNodes: [],},...],flags: 4,style: styles: CSSParsedDeclaration {backgroundClip: Array(1), backgroundColor: 4278190335, …},textNodes: [],}bounds:位置、宽高elements:子元素flags:如何渲染的标志style:样式textNodes:文本节点
(四)层叠上下文
在探讨html2canvas渲染DOM节点的实现原理之前,先来阐明一下什么是层叠上下文。
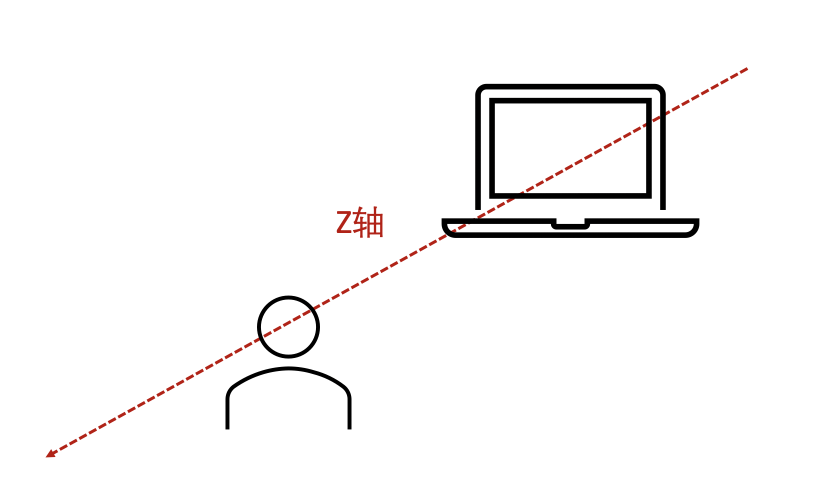
层叠上下文(stacking content),是HTML中的一种三维概念。如果一个节点含有层叠上下文,那么在下图的Z轴中距离用户更近。
当一个节点满足以下条件中的任意一个,则该节点含有层叠上下文。
文档根元素<html>
position为absolute或relative,且z-index不为auto
position为fixed或sticky
flex容器的子元素,且z-index不为auto
grid容器的子元素,且z-index不为auto
opacity小于1
mix-blend-mode不为normal
transform、filter、perspective、clip-path、mask/mask-imag/mask-border不为none
isolation为isolate
-webkit-overflow-scrolling为touch
will-change为任意属性值
contain为layout、paint、strict、content
著名的7阶层叠水平对DOM节点进行分层,如下图所示:
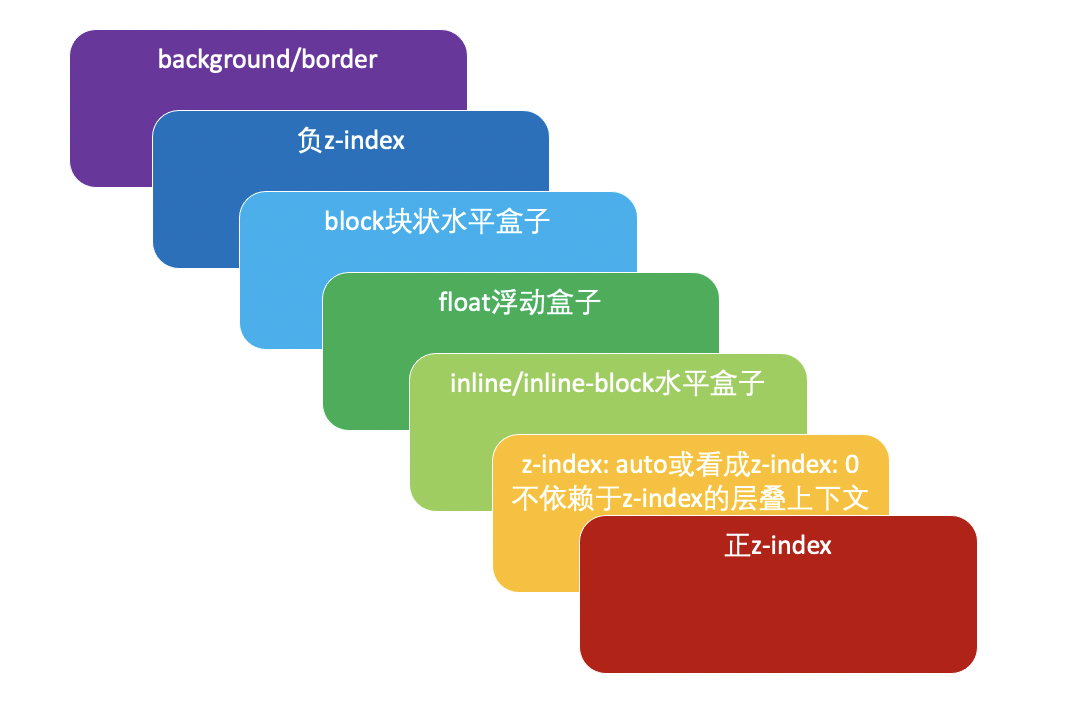
通过以下html结构对7阶层叠水平进行验证时,发现层叠水平为:z-index为负的节点在background/border的下面,与7阶层叠水平有所出入。
<div style="width: 300px; height: 120px;background: #ccc; border: 20px solid #F56C6C"><span style="color: #fff;margin-left: -20px;">内联元素内联元素内联元素内联元素内联元素</span><div style="width: 200px;height: 100px;background: #67C23A; margin-left: -20px; margin-top: -10px;"></div><div style="float: left; width: 150px; height: 100px; background: #409EFF; margin-top: -110px;"></div><div style="position: relative; background: #E6A23C; width: 100px; height: 100px; margin-top: -100px;"></div><div style="position: absolute; z-index: 1; background: yellow; width: 50px; height: 50px; top: 110px;"></div><div style="position: absolute; z-index: -1; background: #000; height: 200px; width: 100px; top: 90px"></div></div>
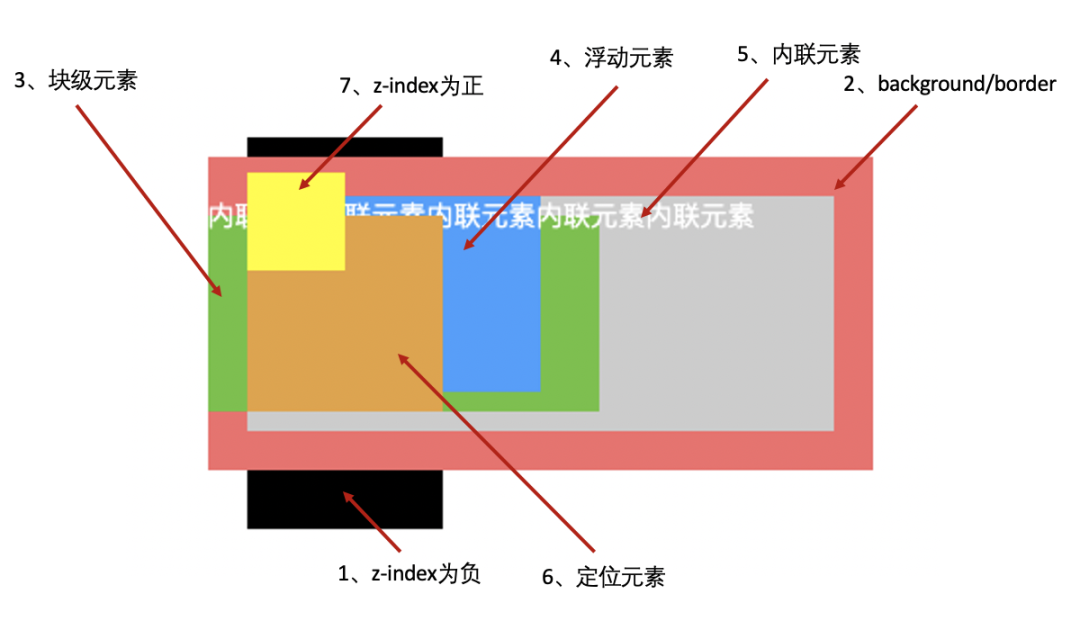
但是,当父元素具有定位和z-index属性时,z-index为负的节点在background/border上面,与7阶层叠水平相印证。
<div style="width: 300px; height: 120px; background: #ccc; border: 20px solid #F56C6C; position: relative; z-index: 0; "><span style="color: #fff; margin-left: -20px;">内联元素内联元素内联元素内联元素内联元素</span><div style="width: 200px; height: 100px; background: #67C23A; margin-left: -20px; margin-top: -10px;"></div><div style="float: left; width: 150px; height: 100px; background: #409EFF; margin-top: -110px;"></div><div style="position: relative; width: 100px; height: 100px; background: #E6A23C; margin-top: -100px;"></div><div style="position: absolute; width: 50px; height: 50px; z-index: 1; background: yellow; top: -10px;"></div><div style="position: absolute; height: 200px; width: 100px; z-index: -1; background: #000; top: -30px"></div></div>
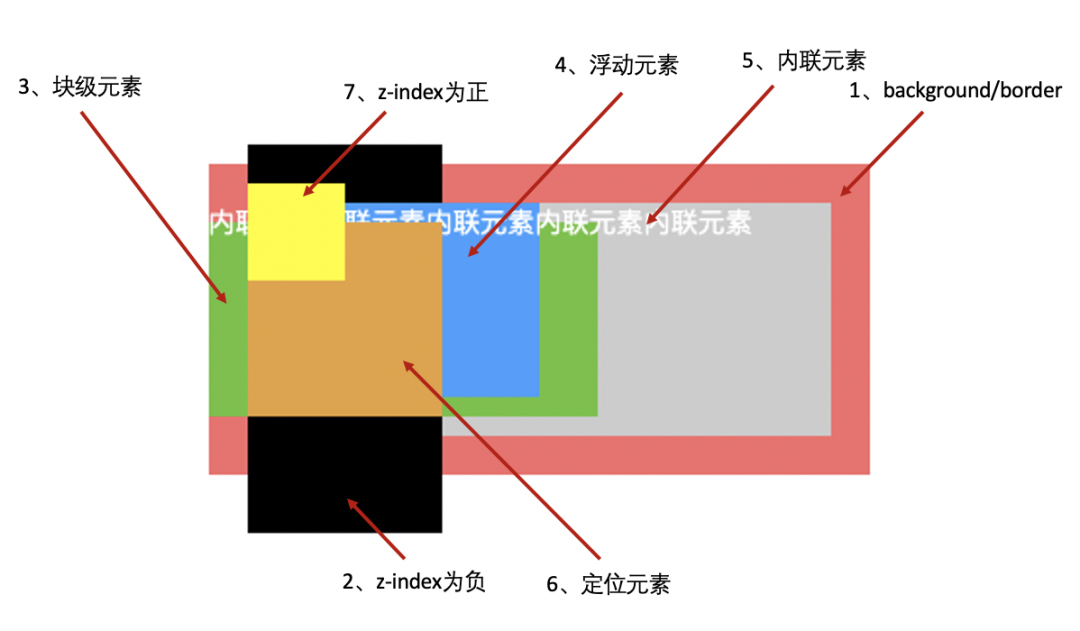
(五)渲染DOM节点
html2canvas是依据层叠上下文对DOM节点进行渲染。所以,在渲染DOM节点之前,需要先获取DOM节点的层叠上下文。parseStackingContexts方法对克隆的DOM节点进行解析,获取了克隆DOM节点的层叠上下文关系,其输出的格式如下:
const StackingContext = {element: ElementPaint {container: ElementContainer, effects: Array(0), curves: BoundCurves},inlineLevel: [],negativeZIndex: [],nonInlineLevel: [ElementPaint],nonPositionedFloats: [],nonPositionedInlineLevel: [],positiveZIndex: [],zeroOrAutoZIndexOrTransformedOrOpacity: [],};// element: parseTree输出的ElementContainer、DOM节点边界信息、特殊渲染效果// inlineLevel:内联元素// negativeZIndex:z-index为负的元素// nonInlineLevel:非内联元素// nonPositionedFloats:未定位的浮动元素// nonPositionedInlineLevel:未定位的内联元素// positiveZIndex:z-index为正的元素// zeroOrAutoZIndexOrTransformedOrOpacity:z-index: auto|0、opacity小于1,transform不为none的元素
然后,renderStack方法调用renderStackContent方法遵循层叠上下文,自底层向上层层渲染DOM节点,简要逻辑代码如下:
async renderStackContent(stack: StackingContext) {// 1. 第一层background/border.await this.renderNodeBackgroundAndBorders(stack.element);// 2. 第二层负z-index.for (const child of stack.negativeZIndex) {await this.renderStack(child);}// 3. 第三层block块状水平盒子await this.renderNodeContent(stack.element);for (const child of stack.nonInlineLevel) {await this.renderNode(child);}// 4. 第四层float浮动盒子.for (const child of stack.nonPositionedFloats) {await this.renderStack(child);}// 5. 第五层inline/inline-block水平盒子.for (const child of stack.nonPositionedInlineLevel) {await this.renderStack(child);}for (const child of stack.inlineLevel) {await this.renderNode(child);}// 6. 第六层z-index: auto 或 z-index: 0, transform: none, opacity < 1for (const child of stack.zeroOrAutoZIndexOrTransformedOrOpacity) {await this.renderStack(child);}// 7. 第七层正z-index.for (const child of stack.positiveZIndex) {await this.renderStack(child);}}
最后,在方法renderNodeBackgroundAndBorders和方法renderNodeContent内部,调用了方法applyeffects的特殊效果进行渲染。而html2canvas的npm包中,缺少了透明度渲染效果的处理逻辑。这正是文章开头出现的透明蒙层截图失败的根源所在。
三、问题定位与解决
通过对比niklasvh提交的版本记录fix: opacity with overflow hidden #2450,发现新增了一个透明度渲染效果的处理逻辑,简要代码逻辑如下:
export class OpacityEffect implements IElementEffect {readonly type: EffectType = EffectType.OPACITY;readonly target: number = EffectTarget.BACKGROUND_BORDERS | EffectTarget.CONTENT;readonly opacity: number;constructor(opacity: number) {this.opacity = opacity;}}export const isOpacityEffect = (effect: IElementEffect): effect is OpacityEffect => effect.type === EffectType.OPACITY;
在parseStackingContexts解析DOM节点层叠上下文,输出StackingContext时,在element的ElementContainer中新增了记录节点透明度的逻辑,简要代码逻辑如下:
if (element.styles.opacity < 1) {this.effects.push(new OpacityEffect(element.styles.opacity));}
最后在applyEffects方法中,对DOM节点的透明度进行渲染,简要代码逻辑如下:
if (isOpacityEffect(effect)) {this.ctx.globalAlpha = effect.opacity;}
至此,将上述逻辑融合进html2canvas的npm包后,可解决透明蒙层截图失败的问题。
参考资料
1.深入理解CSS中的层叠上下文和层叠顺序
2.css的层叠上下文
3.html2canvas实现浏览器截图的原理(包含源码分析的通用方法)
作者简介
刘孟
腾讯前端开发工程师
刘孟,腾讯前端开发工程师,毕业于上海大学。目前负责腾讯优联项目的前端开发工作,有丰富的系统平台及游戏营销活动前端开发经验。
推荐阅读
如何在C++20中实现Coroutine及相关任务调度器?(实例教学)


