Spring Cache 缓存原理与 Redis 实践
说到Spring Boot缓存,那就不得不提JSR-107规范,它告诉我们在Java中如何规范地使用缓存。
JSR是Java Specification Requests的简称,通常译为”Java 规范提案“。具体而言,是指向JCP(Java Community Process,Java标准制定组织)提出新增一个标准化技术规范的正式请求。任何人都可以提交JSR,通过一定的标准测试后,就可以向Java平台增添新的API和服务。JSR已成为Java界的一个重要标准。
JSR-107规范即JCache API,JCache规范定义了一种对Java对象临时在内存中进行缓存的方法,包括对象的创建、共享访问、假脱机(spooling)、失效、各JVM的一致性等,可被用于缓存JSP内最经常读取的数据,如产品目录和价格列表。利用JCache的缓存数据,可以加快大多数查询的反应时间(内部测试表明反应时间大约快15倍)。
一、JCache
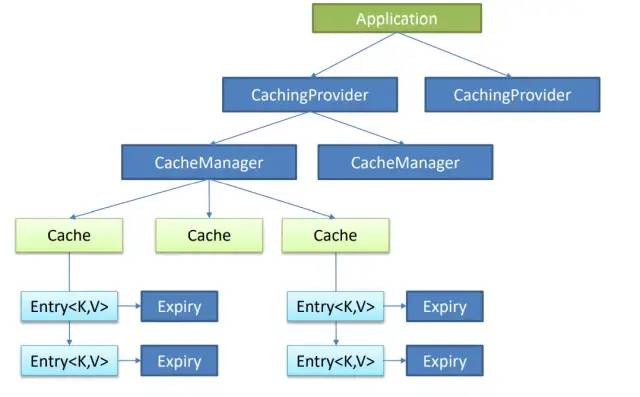
在Spring Boot中使用缓存之前,我们有必要了解一下JCache。JCache定义了五个核心接口,分别是CachingProvider,CacheManager,Cache,Entry和Expiry。
一个CachingProvider可以创建和管理多个CacheManager,并且一个CacheManager只能被一个CachingProvider所拥有,而一个应用可以在运行期间访问多个CachingProvider。
一个CacheManager可以创建和管理多个唯一命名的Cache,且一个Cache只能被一个CacheManager所拥有,这些Cache存在于CacheManager的上下文中。
Cache是一个类似Map的数据结构
Entry是一个存储在Cache中的key-value对
Expiry是指存储在Cache中的Entry的有效期,一旦超过这个时间,Entry将处于过期状态,即不可访问、更新和删除。缓存有效期可以通过ExpiryPolicy设置。
二、Spring Cache原理
Spring 3.1开始,引入了Spring Cache,即Spring 缓存抽象。通过定义org.springframework.cache.Cache和org.springframework.cache.CacheManager接口来统一不同的缓存技术,并支持使用JCache注解简化开发过程。
Cache接口为缓存的组件规范定义,包含缓存的各种操作集合。Spring中为Cache接口提供了各种xxxCache的实现:RedisCache,EhCacheCache,ConcurrentMapCache等。
我们通过部分源码详细了解一下Cache接口和CacheManager接口。
Cache接口
public interface Cache {//Cache名称String getName();//Cache负责缓存的对象Object getNativeCache();/*** 获取key对应的ValueWrapper* 没有对应的key,则返回null* key对应的value是null,则返回null对应的ValueWrapper*/Cache.ValueWrapper get(Object key);//返回key对应type类型的value<T> T get(Object key, Class<T> type);//返回key对应的value,没有则缓存Callable::call,并返回<T> T get(Object key, Callable<T> valueLoader);//缓存目标key-value(替换旧值),不保证实时性void put(Object key, Object value);//插入缓存,并返回该key对应的value;先调用get,不存在则用put实现default Cache.ValueWrapper putIfAbsent(Object key, Object value) {Cache.ValueWrapper existingValue = this.get(key);if (existingValue == null) {this.put(key, value);}return existingValue;}//删除缓存,不保证实时性void evict(Object key);//立即删除缓存:返回false表示剔除前不存在制定key活不确定是否存在;返回true,表示该key之前存在default boolean evictIfPresent(Object key) {this.evict(key);return false;}//清除所有缓存,不保证实时性void clear();//立即清楚所有缓存,返回false表示清除前没有缓存或不能确定是否有;返回true表示清除前有缓存default boolean invalidate() {this.clear();return false;}public static class ValueRetrievalException extends RuntimeException {private final Object key;public ValueRetrievalException( Object key, Callable<?> loader, Throwable ex) {super(String.format("Value for key '%s' could not be loaded using '%s'", key, loader), ex);this.key = key;}public Object getKey() {return this.key;}}//缓存值的一个包装器接口,实现类为SimpleValueWrapperpublic interface ValueWrapper {Object get();}}
可以看出,Cache接口抽象了缓存的 get put evict 等相关操作。
AbstractValueAdaptingCache
public abstract class AbstractValueAdaptingCache implements Cache {//是否允许Null值private final boolean allowNullValues;protected AbstractValueAdaptingCache(boolean allowNullValues) {this.allowNullValues = allowNullValues;}public final boolean isAllowNullValues() {return this.allowNullValues;}public ValueWrapper get(Object key) {return this.toValueWrapper(this.lookup(key));}public <T> T get(Object key, Class<T> type) {//查询到的缓存值做fromStoreValue转换Object value = this.fromStoreValue(this.lookup(key));//转换后非null值且无法转换为type类型则抛出异常if (value != null && type != null && !type.isInstance(value)) {throw new IllegalStateException("Cached value is not of required type [" + type.getName() + "]: " + value);} else {return value;}}//从缓存中获取key对应的value,子类实现protected abstract Object lookup(Object key);//对于从缓存中获取的值,允许为空且值为NullValue时,处理为nullprotected Object fromStoreValue( Object storeValue) {return this.allowNullValues && storeValue == NullValue.INSTANCE ? null : storeValue;}//对于要插入缓存的null值,在允许null值的情况下处理为NullValue;否则抛出异常IllegalArgumentExceptionprotected Object toStoreValue( Object userValue) {if (userValue == null) {if (this.allowNullValues) {return NullValue.INSTANCE;} else {throw new IllegalArgumentException("Cache '" + this.getName() + "' is configured to not allow null values but null was provided");}} else {return userValue;}}//get操作依据,查询到缓存值非null,则fromStoreValue转换后包装成SimpleValueWrapper返回protected ValueWrapper toValueWrapper( Object storeValue) {return storeValue != null ? new SimpleValueWrapper(this.fromStoreValue(storeValue)) : null;}}
抽象类AbstractValueAdaptingCache实现了Cache接口,主要抽象了对NULL值的处理逻辑。
allowNullValues属性表示是否允许处理NULL值的缓存
fromStoreValue方法处理NULL值的get操作,在属性allowNullValues为true的情况下,将NullValue处理为NULL
toStoreValue方法处理NULL值得put操作,在属性allowNullValues为true的情况下,将NULL处理为NullValue,否则抛出异常
toValueWrapper方法提供Cache接口中get方法的默认实现,从缓存中读取值,再通过fromStoreValue转化,最后包装为SimpleValueWrapper返回
ValueWrapper get(Object key)和T get(Object key, @Nullable Class<T> type)方法基于上述方法实现
ValueWrapper get(Object key)和@Nullable Class<T> type)方法基于上述方法实现
lookup抽象方法用于给子类获取真正的缓存值
ConcurrentMapCache
public class ConcurrentMapCache extends AbstractValueAdaptingCache { private final String name;//定义ConcurrentMap缓存private final ConcurrentMap<Object, Object> store;//如果要缓存的是值对象的copy,则由此序列化代理类处理private final SerializationDelegate serialization;public ConcurrentMapCache(String name) {this(name, new ConcurrentHashMap(256), true);}//默认允许处理nullpublic ConcurrentMapCache(String name, boolean allowNullValues) {this(name, new ConcurrentHashMap(256), allowNullValues);}//默认serialization = nullpublic ConcurrentMapCache(String name, ConcurrentMap<Object, Object> store, boolean allowNullValues) {this(name, store, allowNullValues, (SerializationDelegate)null);}protected ConcurrentMapCache(String name, ConcurrentMap<Object, Object> store, boolean allowNullValues, SerializationDelegate serialization) {super(allowNullValues);Assert.notNull(name, "Name must not be null");Assert.notNull(store, "Store must not be null");this.name = name;this.store = store;this.serialization = serialization;}//serialization不为空,缓存值对象的copypublic final boolean isStoreByValue() {return this.serialization != null;}public final String getName() {return this.name;}public final ConcurrentMap<Object, Object> getNativeCache() {return this.store;}//实现lookup:store#getprotected Object lookup(Object key) {return this.store.get(key);}//基于ConcurrentMap::computeIfAbsent方法实现;get和put的值由fromStoreValue和toStoreValue处理Nullpublic <T> T get(Object key, Callable<T> valueLoader) {return this.fromStoreValue(this.store.computeIfAbsent(key, (k) -> {try {return this.toStoreValue(valueLoader.call());} catch (Throwable var5) {throw new ValueRetrievalException(key, valueLoader, var5);}}));}public void put(Object key, Object value) {this.store.put(key, this.toStoreValue(value));}public ValueWrapper putIfAbsent(Object key, Object value) {Object existing = this.store.putIfAbsent(key, this.toStoreValue(value));return this.toValueWrapper(existing);}public void evict(Object key) {this.store.remove(key);}public boolean evictIfPresent(Object key) {return this.store.remove(key) != null;}public void clear() {this.store.clear();}public boolean invalidate() {boolean notEmpty = !this.store.isEmpty();this.store.clear();return notEmpty;}protected Object toStoreValue( Object userValue) {Object storeValue = super.toStoreValue(userValue);if (this.serialization != null) {try {return this.serialization.serializeToByteArray(storeValue);} catch (Throwable var4) {throw new IllegalArgumentException("Failed to serialize cache value '" + userValue + "'. Does it implement Serializable?", var4);}} else {return storeValue;}}protected Object fromStoreValue( Object storeValue) {if (storeValue != null && this.serialization != null) {try {return super.fromStoreValue(this.serialization.deserializeFromByteArray((byte[])((byte[])storeValue)));} catch (Throwable var3) {throw new IllegalArgumentException("Failed to deserialize cache value '" + storeValue + "'", var3);}} else {return super.fromStoreValue(storeValue);}}}
ConcurrentMapCache继承了抽象类AbstractValueAdaptingCache,是Spring的默认缓存实现。它支持对缓存对象copy的缓存,由SerializationDelegate serialization 处理序列化,默认为 null 即基于引用的缓存。缓存相关操作基于基类 AbstractValueAdaptingCache 的 null 值处理,默认允许为 null。
CacheManager
public interface CacheManager {//获取指定name的Cache,可能延迟创建Cache getCache(String name);//获取当前CacheManager下的Cache name集合Collection<String> getCacheNames();}
CacheManager 基于 name 管理一组 Cache。当然,CacheManager也有很多实现类,如ConcurrentMapCacheManager、AbstractCacheManager及SimpleCacheManager,这些xxxCacheManager类都是为了制定Cache的管理规则,这里就不再深入探讨了。
三、Spring Cache实践
除了第二章中提到的Cache接口和CacheManager接口,在使用Spring 缓存抽象时,我们还会用到一些JCache注解。
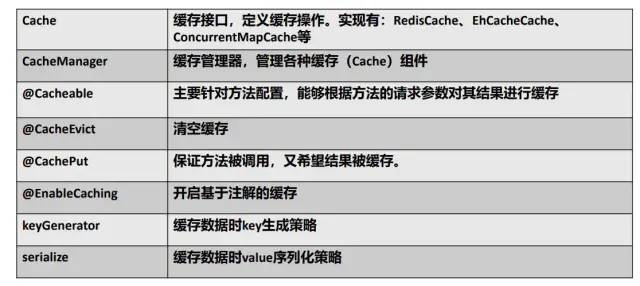
Spring Cache中一些概念和注解
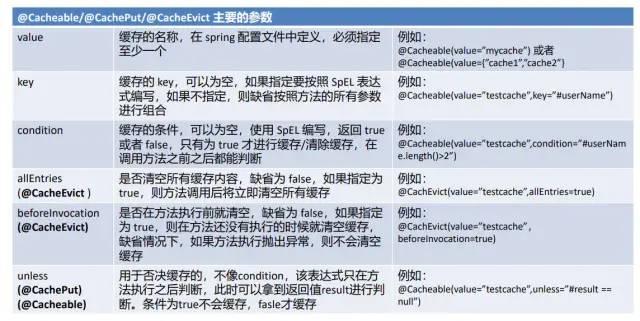
@Cacheable、@CacheEvict和@CachePut三个注解都是对方法进行配置,主要参数如下图所示:
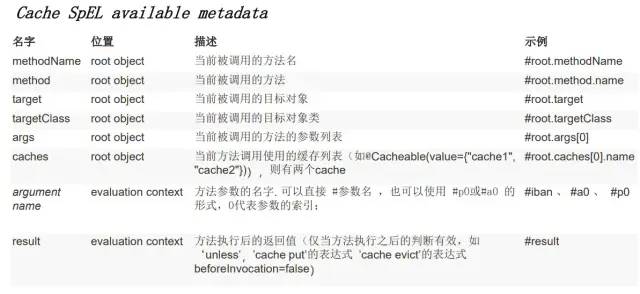
Cache中可用的SpEL表达式如下图所示:
@EnableCaching
这个注解表示开启基于注解的缓存,一般放在主程序类前面,如下所示:
public class SpringBootCacheApplication {public static void main(String[] args) {SpringApplication.run(SpringBootCacheApplication.class, args);}}
@Cacheable
这个注解放在方法前,可以将方法的运行结果进行缓存,之后就不用调用方法了,直接从缓存中取值即可。常用属性可以见上图。以下是常见用法:
public Employee getEmp(Integer id) {Employee emp = employeeMapper.getEmpById(id);return emp;}}
@Cacheable注解中常用的参数有cacheNames/value(指定缓存组件的名字,可以指定多个)、key(缓存数据时使用的key,默认使用方法参数的值,也可以自定义)、keyGenerator(key的生成器,可以自定义,key与keyGenerator二选一)、cacheManager(指定缓存管理器,或者使用cacheResolver指定获取解析器)、condition(符合条件才缓存)、unless(符合条件则不缓存,可以获取方法运行结果进行判断)、sync(是否使用异步模式,不可与unless一起使用)。@Cacheable的运行原理:
方法运行前,程序会使用cacheManager根据cacheNames获取Cache,如果没有对应名称的Cache,则自动创建一个Cache。
使用key去Cache中查找对应的缓存内容。key默认使用SimpleKeyGenerator生成,其生成策略如下:
如果没有参数,key=new SimpleKey()
如果只有一个参数,key=参数值
如果有多个参数,key=new SimpleKey(params)
没有查到缓存值,则调用目标方法
以步骤二中返回的key,目标方法返回的结果为value,存入缓存
@CachePut
@CachePut注解先调用目标方法,然后再缓存目标方法的结果。
public Employee updateEmp(Employee employee) {employeeMapper.updateEmp(employee);return employee;}
@CacheEvict
@CacheEvict用于清除缓存,可以通过key指定需要清除的缓存,allEntries置为true表示删除所有缓存。
@CacheEvict(value = "emp", key = "#id", allEntries = true)public void deleteEmp(Integer id) {employeeMapper.deleteEmpById(id);}
默认删除缓存行为在方法执行之后(beforeInvocation=false),如果方法运行异常,则该缓存不会被删除。但可以通过设置beforeInvocation = true,将删除缓存行为在方法执行之前。
@Caching&@CacheConfig
@Caching注解中包含了@Cacheable、@CachePut和@CacheEvict注解,可以同时指定多个缓存规则。示例如下所示:
@Caching(cacheable = {@Cacheable(value = "emp", key = "#lastName")}, put = {@CachePut(value = "emp", key = "#result.id")@CachePut(value = "emp", key = "#result.email")})
@CacheConfig注解放在类上,抽取缓存的公共配置,如cacheNames、cacheManager等,这样就不用在每个缓存注解中重复配置了。
四、Redis测试
Spring Boot里面默认使用的Cache和CacheManager分别是ConcurrentMapCache和ConcurrentMapCacheManager,将数据存储在ConcurrentMap<Object,Object>中。
然而,在实际开发过程中,一般会使用一些缓存中间件,如Redis、Memcached和Encache等。接下来,演示一下Redis环境搭建与测试。
Redis环境搭建
Redis是一个开源的、内存中的数据结构存储系统,可以作为数据库、缓存和消息中间件。这里选择用Docker搭建Redis环境。首先需要下载镜像,然后启动,具体命令如下:
// 默认拉取最新的Redis镜像docker pull redis// 启动Redis容器docker run -d -p 6379:6379 --name myredis redis
接下来,我们使用Redis Desktop Manager软件连接Redis,Redis的端口号默认为6379。

RedisAutoConfiguration.java文件里面定义了StringRedisTemplate(操作字符串)和RedisTemplate组件,将组件自动注入代码中,即可使用。两个组件都有针对Redis不同数据类型的处理方法。Redis常见的五大数据类型:
String(字符串)、List(列表)、Set(集合)、Hash(散列)、ZSet(有序集合)
stringRedisTemplate.opsForValue()[字符串]stringRedisTemplate.opsForList()[列表]stringRedisTemplate.opsForSet()[集合]stringRedisTemplate.opsForHash()[散列]stringRedisTemplate.opsForZSet()[有序集合]
下面是使用示例:
public class RedisTest {@AutowiredStringRedisTemplate stringRedisTemplate;@AutowiredRedisTemplate redisTemplate;// 测试保存数据public void test01 {stringRedisTemplate.opsForValue().append("msg","hello");//存入数据String s = stringRedisTemplate.opsForValue().get("msg");//获取数据stringRedisTemplate.opsForList().leftPush("mylist","1");}//测试保存对象public void test02 {Employee emp = new Employee();//默认使用jdk序列化机制,将对象序列化后的数据保存至Redis中redisTemplate.opsForValue().set("emp-01", empById);}}
如果想将对象以json的方式保存,可将对象转换为json或改变RedisTemplate中的默认序列化规则。后者的参考代码如下,首先找到Redis的自动加载类RedisAutoConfiguration,自定义一个RedisTemplate,然后放入容器中。
public class MyRedisConfig {@Beanpublic RedisTemplate<Object, Employee> empRedisTemplate(RedisConnectionFactory redisConnectionFactory) throws UnknownHostException {RedisTemplate<Object, Employee> template = new RedisTemplate<Object, Employee>();template.setConnectionFactory(redisConnectionFactory);Jackson2JsonRedisSerializer<Employee> ser = new Jackson2JsonRedisSerializer<Employee>(Employee.class);template.setDefaultSerizlizer(ser);return template;}}
自定义CacheManager
当Spring Boot项目中引入Redis的starter依赖时,会将RedisCacheManager作为默认的CacheManager。RedisCacheManager管理RedisCache,后者使用RedisTemplate<Object,Object>操作Redis,默认序列化机制是jdk。如果需要改变Redis序列化机制,可以自定义CacheManager。参考代码如下:
public RedisCacheManager employeeCacheManager(RedisTemplate<Object,Object> employeeRedisTemplate) {RedisCacheManager cacheManager = new RedisCacheManager(employeeRedisTemplate);// 将cacheNames作为key的前缀cacheManager.setUserPrefix(true);return cacheManager;}
自定义RedisCache和CacheManager都可以更改缓存方式,两者区别在于:前者用于自定义缓存层,后者将缓存交给spring管理(spring cache中不止Redis)。
作者:lynnnnyl链接:https://www.jianshu.com/p/0865248ddd74
记得点「赞」和「在看」↓
爱你们
