
SpringBoot整合反爬虫接口防刷组件kk-anti-reptile
kk-anti-reptile
是适用于基于 spring-boot 开发的分布式系统的开源反爬虫接口防刷组件。其开源地址在:
Gitee: https://gitee.com/kekingcn/kk-anti-reptile
Github: https://github.com/kekingcn/kk-anti-reptile
Part1
使用场景
1. 网站某个页面被狂刷,刷到服务宕机!
2. 网站短时间被同一ip 频繁爬取!
Part2
环境要求
基于 spring-boot 开发(spring-boot1.x, spring-boot2.x 均可)
需要使用 redis
Part3
工作原理
kk-anti-reptile 使用
SpringMVC拦截器
对请求进行过滤,通过 spring-boot 的扩展点机制,实例化一个Spring HandlerInterceptor Bean,通过 Spring 注入到 Servlet 容器中,从而实现对请求的过滤。
在 kk-anti-reptile 的过滤 Interceptor 内部,又通过责任链模式,将各种不同的过滤规则织入,并提供抽象接口,可由调用方进行规则扩展。
Interceptor 调用则链进行请求过滤,如过滤不通过,则拦截请求,返回状态码509,并输出验证码输入页面,输出验证码正确后,调用过滤规则链对规则进行重置。
目前规则链中有如下两个规则:
ip-rule
ip-rule 通过时间窗口统计当前时间窗口内请求数,小于规定的最大请求数则可通过,否则不通过。时间窗口、最大请求数、ip 白名单等均可配置
ua-rule
ua-rule 通过判断请求携带的 User-Agent,得到操作系统、设备信息、浏览器信息等,可配置各种维度对请求进行过滤
Part4
使用与配置
kk-anti-reptile使用十分方便,只需在springboot项目中引用 kk-anti-reptile 的 maven 依赖,并在yml配置启用 kk-anti-reptile 即可。
在`pom.xml`中引入依赖:
    cn.keking.project


    kk-anti-reptile


    1.0.0-RELEASE
在`application.yml`中自定义配置:
# redisspring:
redisson:
address: redis://192.168.10.1:6379password: yourpasswd
# 反爬取配置
reptile:
manager:
enabled: true
global-filter-mode: true
# include-urls: "^/network/.*$"
ip-rule:
enabled: true
expiration-time: 5000
request-max-size: 15
ignore-ip: "192.168.*,127.0.0.1"
lock-expire: 30*24*60*60
ua-rule:
enabled: true
allowed-linux: false
allowed-mobile: true
allowed-pc: true
allowed-iot: false
allowed-proxy: false
所有配置都以anti.reptile.manager为前缀,如下为所有配置项及说明:
NAME | 描述 | 默认值 | 示例 |
|---|---|---|---|
enabled | 是否启用反爬虫插件 | true | true |
globalFilterMode | 是否启用全局拦截模式 | false | true |
include-urls | 局部拦截时,需要反爬的接口列表,以','分隔,支持正则匹配。全局拦截模式下无需配置 | 空 | /client,/user,^/admin/.*$ |
ip-rule.enabled | 是否启用 IP Rule | true | true |
ip-rule.expiration-time | 时间窗口长度(ms) | 5000 | 5000 |
ip-rule.request-max-size | 单个时间窗口内,最大请求数 | 20 | 20 |
ip-rule.lock-expire | 命中规则后自动解除时间(单位:s) | 10天 | 20 |
ip-rule.ignore-ip | IP 白名单,支持后缀'*'通配,以','分隔 | 空 | 192.168.*,127.0.0.1 |
ua-rule.enabled | 是否启用 User-Agent Rule | true | true |
ua-rule.allowed-linux | 是否允许 Linux 系统访问 | false | false |
ua-rule.allowed-mobile | 是否允许移动端设备访问 | true | true |
ua-rule.allowed-pc | 是否允许移 PC 设备访问 | true | true |
ua-rule.allowed-iot | 是否允许物联网设备访问 | false | false |
ua-rule.allowed-proxy | 是否允许代理访问 | false | false |
Part5
验证码页面
命中爬虫和防盗刷规则后,会阻断请求,并生成解除阻断的验证码,验证码有多种组合方式,如果客户端可以正确输入验证码,则可以继续访问。
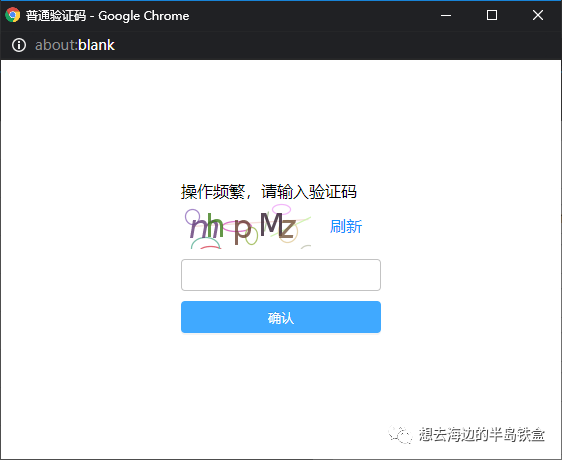
验证码有中文、英文字母+数字、简单算术三种形式,每种形式又有静态图片和 GIF 动图两种图片格式,即目前共有如下六种,所有类型的验证码会随机出现,目前技术手段识别难度极高,可有效阻止防止爬虫大规模爬取数据。


前端统一处理验证码页面:
前端需要在统一发送请求的 ajax 处加入拦截,拦截到请求返回状态码509后弹出一个新页面,并把响应内容转出到页面中,然后向页面中传入后端接口baseUrl参数即可,以使用 axios 请求为例:
    import axios from 'axios';


import {baseUrl} from './config';


      axios

      .

      interceptors

      .

      response

      .

      use

      (


  data => {


    return data;


  },


  error => {


    if (error.response.status === 509) {


      let html = error.response.data;


      let verifyWindow = window.open("","_blank","height=400,width=560");


      verifyWindow.document.write(html);


      verifyWindow.document.getElementById("baseUrl").value = baseUrl;


    }


  }


      );


export default axios;
Part6
注意事项
1. apollo-client 需启用 bootstrap
使用 apollo 配置中心的用户,由于组件内部用到@ConditionalOnProperty,要在 application.properties/bootstrap.properties 中加入如下样例配置,(apollo-client 需要 0.10.0 及以上版本)详见apollo bootstrap 说明
apollo.bootstrap.enabled = true
2. 需要有 Redisson 连接
如果项目中有用到 Redisson,kk-anti-reptile 会自动获取 RedissonClient 实例对象; 如果没用到,需要在配置文件加入如下 Redisson 连接相关配置
    spring.redisson.address = redis://192.168.1.204:6379


spring.redisson.password = xxx
END
点赞👍关注

如何查找物种间对应的同源基因?
一文了解并入门Docker
一文看懂环境变量、CPU、核、多线程与并发
半岛铁盒机器人+Python推导式
WeRobot+Django配置微信公众号功能
Python的宝藏函数