
HarmonyOS学习路之开发篇—Java UI框架(Position和AdaptiveBox Layout)

1
Position Layout
在PositionLayout中,子组件通过指定准确的x/y坐标值在屏幕上显示。(0, 0)为左上角,当向下或向右移动时,坐标值变大;允许组件之间互相重叠。
PositionLayout示意图:
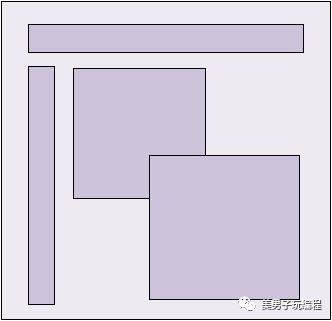
PositionLayout以坐标的形式控制组件的显示位置,允许组件相互重叠。
在layout目录下的XML文件中创建PositionLayout并添加多个组件,并通过position_x和position_y属性设置子组件的坐标。
使用PositionLayout的布局效果:
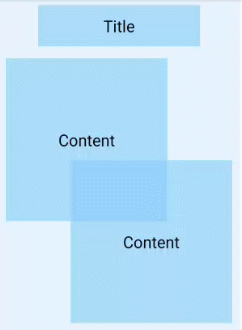
示例代码:
xmlns:ohos="http://schemas.huawei.com/res/ohos"ohos:id="$+id:position"ohos:height="match_parent"ohos:width="300vp"ohos:background_element="#3387CEFA">ohos:id="$+id:position_text_1"ohos:height="50vp"ohos:width="200vp"ohos:background_element="#9987CEFA"ohos:position_x="50vp"ohos:position_y="8vp"ohos:text="Title"ohos:text_alignment="center"ohos:text_size="20fp"/><textohos:id="$+id:position_text_2"ohos:height="200vp"ohos:width="200vp"ohos:background_element="#9987CEFA"ohos:position_x="8vp"ohos:position_y="64vp"ohos:text="Content"ohos:text_alignment="center"ohos:text_size="20fp"/><textohos:id="$+id:position_text_3"ohos:height="200vp"ohos:width="200vp"ohos:background_element="#9987CEFA"ohos:position_x="92vp"ohos:position_y="188vp"ohos:text="Content"ohos:text_alignment="center"ohos:text_size="20fp"/></text</text<positionlayout<text<text<text</text</text</text</positionlayout
设置子组件的坐标时(position_x和position_y属性),除了上述示例中的XML方式,还可以在对应的AbilitySlice中通过setPosition(int x, int y)接口设置,Java示例代码如下:
Text title = (Text)findComponentById(ResourceTable.Id_position_text_1);Text content1 = (Text)findComponentById(ResourceTable.Id_position_text_2);Text content2 = (Text)findComponentById(ResourceTable.Id_position_text_3);vp2px(8));vp2px(64));vp2px(188));
单位转换的方法如下:
private int vp2px(float vp){return AttrHelper.vp2px(vp,this);}
对于超过布局本身大小的组件,超出部分将不显示。
Right组件右侧超出部分将不显示:
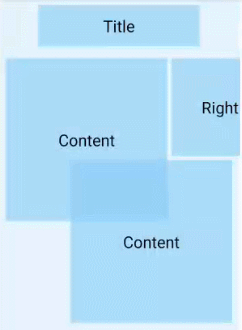
示例代码:
<positionlayout</positionlayout...>...ohos:id="$+id:position_text_4"ohos:height="120vp"ohos:width="120vp"ohos:background_element="#9987CEFA"ohos:position_x="212vp"ohos:position_y="64vp"ohos:text="Right"ohos:text_alignment="center"ohos:text_size="20fp"/>
2
AdaptiveBox Layout
AdaptiveBox Layout是自适应盒子布局,该布局提供了在不同屏幕尺寸设备上的自适应布局能力,主要用于相同级别的多个组件需要在不同屏幕尺寸设备上自动调整列数的场景。
该布局中的每个子组件都用一个单独的“盒子”装起来,子组件设置的布局参数都是以盒子作为父布局生效,不以整个自适应布局为生效范围。
该布局中每个盒子的宽度固定为布局总宽度除以自适应得到的列数,高度为match_content,每一行中的所有盒子按高度最高的进行对齐。
该布局水平方向是自动分块,因此水平方向不支持match_content,布局水平宽度仅支持match_parent或固定宽度。
自适应仅在水平方向进行了自动分块,纵向没有做限制,因此如果某个子组件的高设置为match_parent类型,可能导致后续行无法显示。
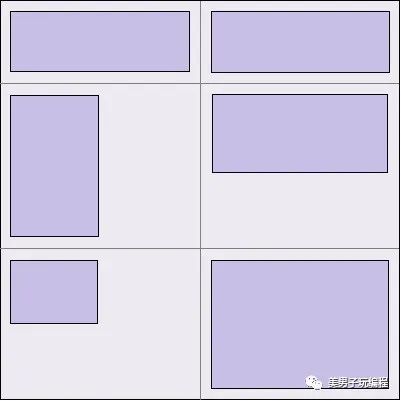
AdaptiveBox Layout示意图:
AdaptiveBox Layout布局常用方法如下:
| 方法 | 功能 |
|---|---|
| addAdaptiveRule(int minWidth, int maxWidth, int columns) | 添加一个自适应盒子布局规则。 |
| removeAdaptiveRule(int minWidth, int maxWidth, int columns) | 移除一个自适应盒子布局规则。 |
| clearAdaptiveRules() | 移除所有自适应盒子布局规则。 |
在AdaptiveBox Layout中添加和删除自适应盒子布局规则的效果对比如下。

XML布局示例代码:
xmlns:ohos="http://schemas.huawei.com/res/ohos"ohos:height="match_parent"ohos:width="match_parent"ohos:orientation="vertical">xmlns:ohos="http://schemas.huawei.com/res/ohos"ohos:height="0vp"ohos:width="match_parent"ohos:weight="1"ohos:id="$+id:adaptive_box_layout"></button</button</text</text</text</text</text</text</text<directionallayout<adaptiveboxlayout<text<text<text<text<text<text<text<button<button</button</button</text</text</text</text</text</text</text</adaptiveboxlayout</directionallayout
Java关键代码:
AdaptiveBoxLayout adaptiveBoxLayout = (AdaptiveBoxLayout)findComponentById(ResourceTable.Id_adaptive_box_layout);findComponentById(ResourceTable.Id_add_rule_btn).setClickedListener((component-> {// 添加规则adaptiveBoxLayout.addAdaptiveRule(100, 2000, 3);// 更新布局adaptiveBoxLayout.postLayout();}));findComponentById(ResourceTable.Id_remove_rule_btn).setClickedListener((component-> {// 移除规则adaptiveBoxLayout.removeAdaptiveRule(100, 2000, 3);// 更新布局adaptiveBoxLayout.postLayout();}));
 往期推荐
往期推荐
点击阅读原文,更精彩~