
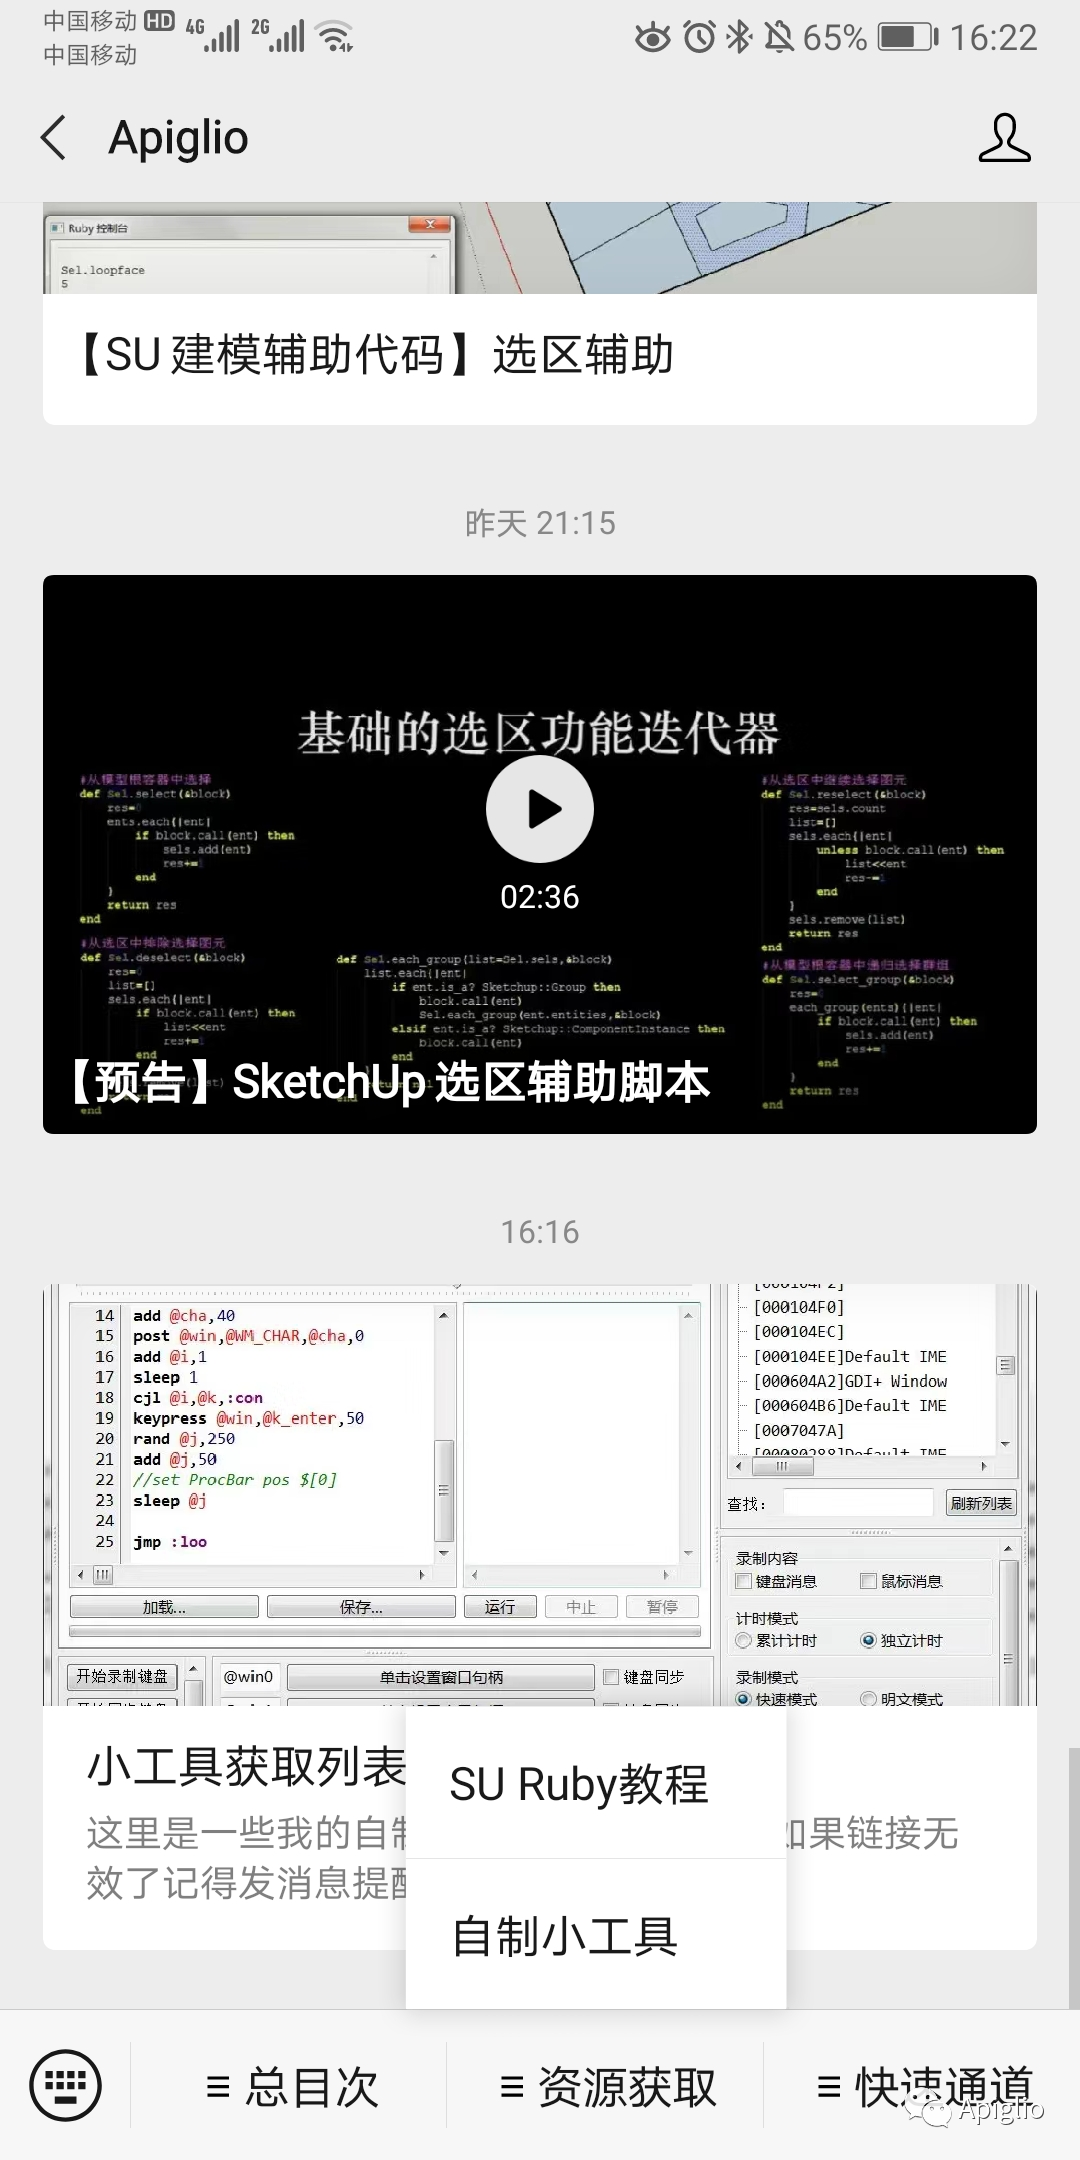
【SU建模辅助代码】选区辅助
此系列所谓“辅助代码”,指的是在 SketchUp 建模过程中,不依赖点选工具栏按键或者定义快捷键而使用的辅助功能。从表现上来看,是在预加载一些脚本的前提下,直接在ruby控制台中输入指令,从而进行简易的方法调用的过程。
(保留70%的随机选择,这是一个比较繁琐的例子)
(可以个性化地简化为“Sel::Rand<0.7”或者“Sel.rand 0.7”)
关于对这种辅助方式的操作理解,详见此系列的序言。
| 【本期目录】 | |
一、选区辅助的设想 二、选区辅助的实现 三、选区辅助的获取方式 | 第一部分简要介绍“选区辅助”的构想与需要的功能;第二部分用于分段展示和解释代码的实现方法;第三部分是完整获取这个脚本的途径。 |
一、选区辅助的设想
选区辅助的想法主要来自与 AutoCAD 中的“快速选择”功能,这个功能的主要目的是根据特定的要求,对选区进行扩大或缩小。例如选择已选择图元中的个别类型,又或者选择模型中的所有高度在某个范围之内的图元。这些功能由于具体的需求十分复杂丰富,不能够通过特定的一两样工具来概括。因此需要一些复杂的操作方式。
例如 AutoCAD 中采用对话框的方式来操作复杂的选择,不过这种操作需要操作鼠标进行一系列点选操作,个人并不是很喜欢这种风格。用简易的指令来完成,才是最好的。
那么这个选区工具应该包括哪些功能呢,这是目前的一些设想:
①选择或取消选择特定类型的图元;
②选择或取消选择特定尺寸范围的图元;
③识别选区中特定的结构;
④识别选区中特定属性的群组或元组;
⑤统计选区的图元;
⑥隐藏选择的图元并记录以便恢复;
⑦批量修改选中图元的某些属性;
⑧缩放到所选图元等。
二、选区辅助的实现
(01) 模块定义与常量定义
首先脚本如果要在控制台中调用需要将其封装在模块当中:
module Sel#文中除特殊注明的控制台举例或原理举例以外#所有代码都包含在此处end
使用“Sel”表示SelectionTool,如果在载入脚本之前已经有 Sel 模块,则需要考虑是否有定义上的冲突。
### ruby控制台中:Sel.class# 如果有定义,会返回Sel的类型#>> ModuleSel.class# 如果没有定义,就会报错#>> Error: #<NameError: uninitialized constant Sel>#>> <main>:in `<main>'#>> SketchUp:1:in `eval'
如果需要在代码中检验是否有冲突,可以用以下的方法:
### 代码举例:unless ObjectSpace.each_object.grep(::Module).map(&:to_s).include?("Sel") then#如果没有定义则执行end
首先是一些常用的SketchUp接口的定义,以便于在模块中便捷地使用。
def Sel.model() Sketchup.active_model enddef Sel.ents() Sketchup.active_model.entities enddef Sel.sels() Sketchup.active_model.selection enddef Sel.lyrs() Sketchup.active_model.layers end
然后是一些常量定义,这些常量也可以在命令行中通过以 “Sel::” 开头的方式调用。这里主要是包括几种图元类,这样就可以通过像 “ Sel::F ” 这样的较简短代码来表示 “Sketchup:: Face” 了。
E=Sketchup::EdgeF=Sketchup::FaceC=Sketchup::ComponentInstanceG=Sketchup::GroupCD=Sketchup::ComponentDefinitionCL=Sketchup::ConstructionLineCP=Sketchup::ConstructionPointD=Sketchup::Dimension if Sketchup.version_number > 14000000I=Sketchup::ImageSP=Sketchup::SectionPlaneT=Sketchup::TextError=Exception.new("~BlockError")ProcTypename=Proc.new{|i|i.typename}ProcTrue=Proc.new{true}ProcHashReport=Proc.new{}#具体定义在下文中,此处暂略ProcCircum=Proc.new{}#具体定义在下文中,此处暂略ProcSI=Proc.new{}#具体定义在下文中,此处暂略
当然以上也包括了 Error 这种自定义的异常类常量和 ProcTypename 这类Proc实例常量。前者用于定义模块中特定的某些报错方式,后者则作为匿名方法来使用。
Error 作为描述 "~BlockError" 的异常类,其使用方法如下:
### 代码举例:def Sel.edges_map(&block)res=[]Sel.ents.grep(Sel::E).each{|e|beginres<<block.call(e)rescueraise Sel::Errorend}return resend
当 edges_map 方法的块参数执行出错时,就会返回以下的错误信息,其中 ~BlockError 就是模块设计时特地提供的额外信息:
### 错误信息:#>> main.rb:12:in `rescue in block in edges_map': ~BlockError (Exception)#>> from main.rb:9:in `block in edges_map'#>> from main.rb:8:in `each'#>> from main.rb:8:in `edges_map'#>> from main.rb:20:in `
至于诸如 ProcHashReport 的匿名方法的用法会在稍后再展开,较为复杂的定义在此处也暂时略过。
(02) 数据对接部分
这是一个目前还比较简易的部分,主要的作用是沟通选区和ruby数组,定义如下:
#======数据对接部======#导出选中的图元def Sel.to_asels.to_aend#选择数组中的图元def Sel.<<(arr)unless arr.is_a?(::Array) thenputs "\"Array\" expected but \"#{arr.class}\" found."return nilendsels.clearsels.add arrnilend
当选择一定数量图元之后,在控制台中输入如下代码,就可以将选区中的图元保存到控制台中的一个具体变量中:
### ruby控制台中:list=Sel.to_a;nil#>> (此处什么都不会输出)list.count#>> 18 (此处返回具体选择了多少个图元)puts list.to_a#>> [#<Sketchup::Face ??...>,#<Sketchup::Edge ??...>,...]
如果需要反向操作,可以用 <<() 方法将数组 list 应用到选区:
### ruby控制台中:puts Sketchup.active_model.selection.to_a#>> [] (未选择任何图元)Sel << list#>> (此处什么都不会输出)puts Sketchup.active_model.selection.to_a#>> [#<Sketchup::Face ??...>,#<Sketchup::Edge ??...>,...]
(03) 基础迭代部分
这个部分主要定义几种略有区别的选区图元迭代方式。作为通用性的方法,这些迭代方法将用于之后更具体功能的实现。不过也可以在控制台中直接使用这些迭代器,以实现模块中未曾定义的特殊功能。
该部分目前有六个迭代器,分别是 each、 map 和 flat_map,以及它们的 _group 版本。分别用于迭代“所有选中的图元”或者“选区中的群组和组件”。其中 each 只负责迭代执行块参数。 map 将块参数的结果返回成一个数组,如果其中包含群组,群组中所有图元的块参数返回值将以数组的形式作为上一层次数组的元素。flat_map 类似于 map,但是相当于对其结果额外做一个 .flatten 方法。
_group 版本仅迭代群组和组件,但是对于群组,会同时枚举 Group 类图元及其包含的群组或组件,并且 Group 类图元与其包含的图元被列举在一个数组内。
定义如下:
#======基础迭代部======def Sel.each(list=Sel.sels,&block)list.each{|ent|if ent.is_a? Sketchup::Group thenSel.each(ent.entities,&block)elseblock.call(ent)end}return nilenddef Sel.map(list=Sel.sels,&block)res=[]list.each{|ent|if ent.is_a? Sketchup::Group thenres<<Sel.map(ent.entities,&block)elseres<<block.call(ent)end}return resenddef Sel.flat_map(list=Sel.sels,&block)res=[]list.each{|ent|if ent.is_a? Sketchup::Group thenres+=Sel.flat_map(ent.entities,&block)elseres<<block.call(ent)end}return resenddef Sel.each_group(list=Sel.sels,&block)list.each{|ent|if ent.is_a? Sketchup::Group thenblock.call(ent)Sel.each_group(ent.entities,&block)elsif ent.is_a? Sketchup::ComponentInstance thenblock.call(ent)end}return nilenddef Sel.map_group(list=Sel.sels,&block)res=[]list.each{|ent|if ent.is_a? Sketchup::Group thenres<<([block.call(ent)]+Sel.map_group(ent.entities,&block))elsif ent.is_a? Sketchup::ComponentInstance thenres<<block.call(ent)end}return resenddef Sel.flat_map_group(list=Sel.sels,&block)res=[]list.each{|ent|if ent.is_a? Sketchup::Group thenres<<block.call(ent)res+=Sel.flat_map_group(ent.entities,&block)elsif ent.is_a? Sketchup::ComponentInstance thenres<<block.call(ent)end}return resend
这六种迭代器的设计意图在于弥补 Selection 类没有的层次枚举,相关的内容和原理在往期 [SU-2020-08] 中有所介绍。以下是一些使用例子:
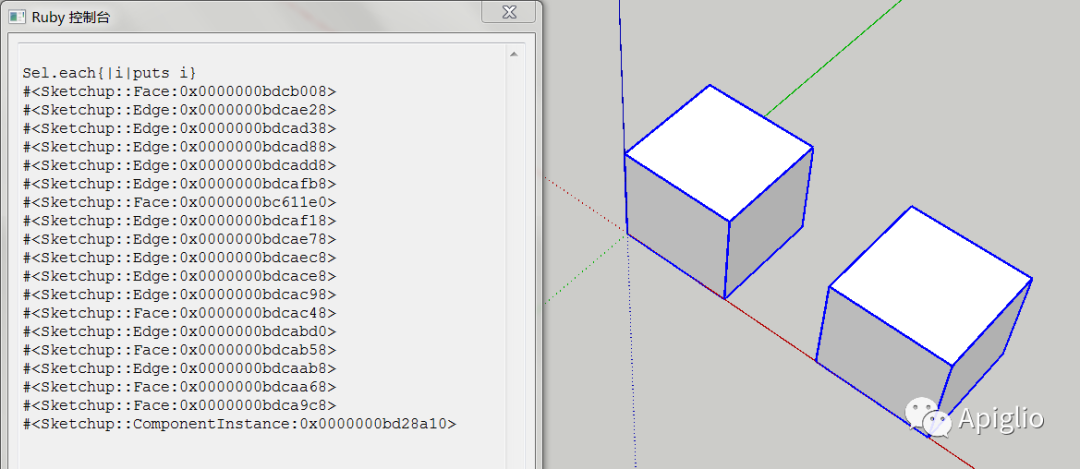
模型中为一个群组和一个组件
(each 方法中 Group 类展开枚举,其本身不枚举)
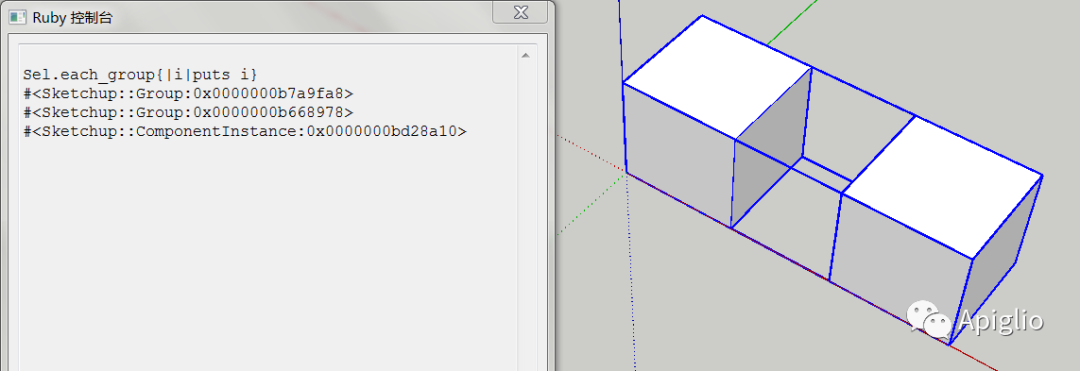
在上图的基础上创建包括二者的群组
(each_group 方法中 Group 类展开枚举,同时枚举其自身。只枚举群组和组件)
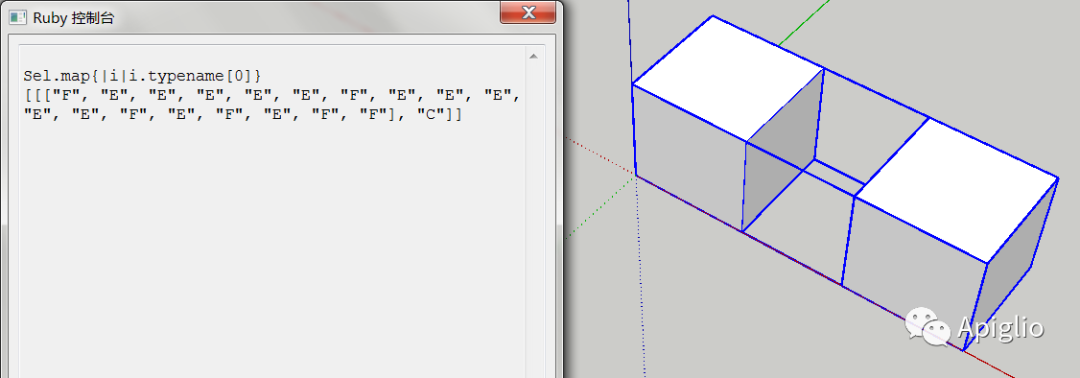
(map 方法按照 each 的规则返回带层次的数组)

(也可以使用 if 来限定部分结果,不符合要求的情况将返回 nil)
(flat_map 方法类似于 map, .flat_map 相当于 .map.flatten)
(04) 基础选区部分
这个部分同样定义有一系列迭代器,上一部分中对应的是可枚举类型中的 .each 和 .map 方法,对于选区而言是描述性的动作,不涉及选区图元范围的变化;而这一部分类似于 .reject 和 .select,需要根据块参数的返回结果修改选区的范围。
不过 .reject 和 .select 方法其实是相似的方法,因为其中的 .reject 方法可以用如下方式用 .select 来替代:
### 代码举例:class Arraydef reject2(&block)select{|i|not block.call(i)}endend#定义后 [1,2,3,4,5].reject{|i|i>3}#和 [1,2,3,4,5].reject2{|i|i>3}结果相同
而选区容器不同于数组,它还包括一个全集(也就是模型中的所有图元)。因此还需要有一个从全集中新增选择图元的方法。考虑到从全集中选取图元的情况相对更适用于“select”这个单词,因此就不能使用“reject”这个词作为其他选区功能的方法名,以免因为其是ruby风格中select的反义词,而造成不必要的误解。因此选择 “reselect” 和 “deselect” 分别表示数组实例中的 “select” 和 “reject” 两个方法,分别表示“在选区中继续选择符合特定条件的图元”和“在选区中排除符合特定条件的图元”两个功能。而“select”方法则指“从模型中选取符合条件的图元到选区”。
#======基础选区部I======def Sel.select(&block)res=0ents.each{|ent|if block.call(ent) thensels.add(ent)res+=1end}return resenddef Sel.reselect(&block)res=sels.countlist=[]sels.each{|ent|unless block.call(ent) thenlist<<entres-=1end}sels.remove(list)return resenddef Sel.deselect(&block)res=0list=[]sels.each{|ent|if block.call(ent) thenlist<<entres+=1end}sels.remove(list)return resend
另外,像数组这样的可枚举类型,其 .reject 和 .select 方法的定义是通过引入 Enumerable 模块实现的,属于实例方法;而此处定义的这些方法则是定义在模块中的,属于类方法:需要加以区别。
需要特别说明一点,通过 SU 自带的选择工具,是不能选择分属于不同 Entities 容器中的图元的,但是这并不意味着选区不能同时选取一个群组和其内部的图元。
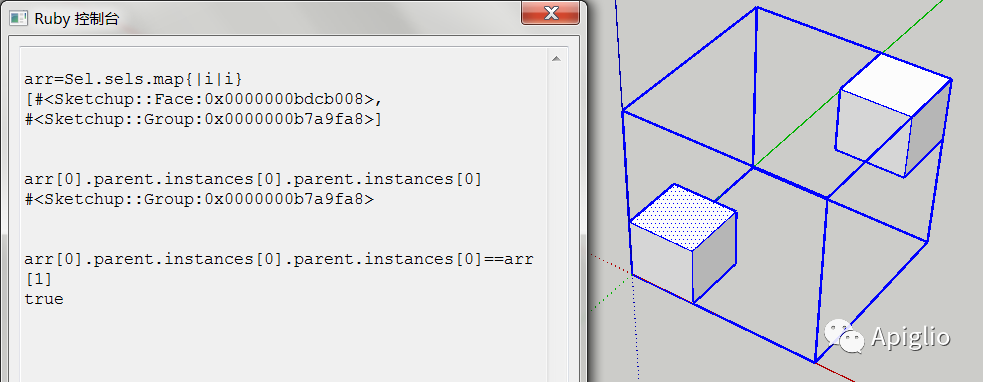
(图中就同时选取了一个群组和其中子群组中的一个平面图元)
上图中的选区情况是通过代码实现的。在大量使用组件并且存在好几层群组定义的时候,就可以设计一种特殊的选区工具来实现这种非同层次的图元选择。
这就要求从模型中选取图元到选区也需要突破层次的限制,因此对于 select 方法,可以根据之前基础迭代部那样提供两个层次选取方法,分别使用 .each 和 .each_group 方法来判断一个图元是否需要加入选区。为了区别于 select 方法,称之为 select_all 和 select_group 方法。
#======基础选区部II======def Sel.select_all(&block)res=0each(ents){|ent|if block.call(ent) thensels.add(ent)res+=1end}return resenddef Sel.select_group(&block)res=0each_group(ents){|ent|if block.call(ent) thensels.add(ent)res+=1end}return resend
对于以下情况,使用 select_group 方法可以很轻松的选中分属于不同群组中的特定组件,从而实现一次性的移动:
(05) 类型选择部分
这一部分开始,定义的方法将更加具体,更加有针对性。类型选择部分专门针对图元的类型进行筛选。使用上一部分的 .select 方法也可以完成类似的工作:
### ruby控制台中:Sel.reselect{|i|i.is_a? Sketchup::Face}Sel.reselect{|i|i.typename=="Face"}#以上两种方法都可以选中选区内的所有平面类#但是不如简短地使用这个:Sel*Sketchup::FaceSel*Sel::FSel.f#使用以上三种表示方式就会方便很多
因此,为了避免在控制台中临时输入复杂的块参数,可以根据基础选区部分的迭代器定义一些快捷的方法:
#======类型选择部======#取消选择指定类图元def Sel.-(class_name)deselect{|ent|ent.is_a? class_name}end#只选择指定类图元def Sel.*(class_name)reselect{|ent|ent.is_a? class_name}end#增加选择模型中所有指定类图元def Sel.+(class_name)select{|ent|ent.is_a? class_name}endclass << selfdefine_method(:f){Sel*Sel::F}define_method(:e){Sel*Sel::E}define_method(:g){Sel*Sel::G}define_method(:c){Sel*Sel::C}define_method(:nf){Sel-Sel::F}define_method(:ne){Sel-Sel::E}define_method(:ng){Sel-Sel::G}define_method(:nc){Sel-Sel::C}define_method(:af){Sel+Sel::F}define_method(:ae){Sel+Sel::E}define_method(:ag){Sel+Sel::G}define_method(:ac){Sel+Sel::C}end
这一部分中使用了两种新的定义方法,一个是使用运算符重载,另一个是使用了 class << self 和 define_method 来定义类方法。这里简要介绍一下。
运算符重载使得不使用“.”号也可以调用一些特定的方法,不过只有特定的规则可以重载,且参数数量有明确要求。
例如,以下自己定义了一个复数类,并且定义了它的加法、减法和乘法:
### 代码举例:class Complex2attr_accessor :r,:idef initialize(_r,_i)@r,@i=_r,_ienddef +(c)return Complex2.new(self.r+c.r,self.i+c.i)enddef -(c)return Complex2.new(self.r-c.r,self.i-c.i)enddef *(c)return Complex2.new(self.r*c.r-self.i*c.i,self.r*c.i+self.i*c.r)enddef to_s"#{self.r}"+(self.i<0?"-":"+")+"#{self.i.abs}i"endend
在控制台中测试可得:
### ruby控制台中:c1=Complex2.new(1,3)c2=Complex2.new(5,6)puts c2*c1#>> -13+21i
不过与上述复数类 Complex2 不同的是, Sel 模块中的“加减法”定义时使用了 Sel.* 这样的表述,而不是单纯的 *,这意味着这是一个类方法,所以运算符号的左边只能是模块名 Sel。这些方法又被称为“单键方法”(singleton method),除了可以在定义时在方法名前加 类名.,也可以加 self. ,又或者将它包含在 class << self 和 end 之间。因此以下几种都可以定义类方法(模块中只能定义类方法):
### 代码举例:module Apigliodef Apiglio.method_1()return 0enddef self.method_2()return 0endclass << selfdef method_3()return 0enddefine_method(:method_4){return 0}endend
定义完成后,就可以使用多种方式筛选不同类型的图元了。例如下图中,使用 Sel*Sel::E 或者 Sel.e 来选择选区中的边线:
(06) 尺寸选择部分
这一部分用来筛选图元的尺寸,不过只是简单的支持三个坐标轴方向的宽度。为了能够使用比较运算符,使代码更加具有可读性,应该采取 “Height > 300.mm” 这样的代码形式,因此需要在 Sel 模块新增 Depth、 Width 和 Height 模块。同时考虑到这三个模块需要定义的比较方法结构上是相似的,因此可以先构造一个 Size 模块,然后使用 extend 建立它与以上三个模块的关联:
#======尺寸选择部======module Sizedef compare(size,mtd=:<=>)Sel.reselect{|ent|if ent.respond_to? :bounds thenent.bounds.method(key_method).call.method(mtd).call(size)else false end}end[">","<",">=","<=","==","!="].each{|sym|define_method(sym.to_sym){|size|compare(size,sym.to_sym)}}endmodule Depthdef self.key_methodreturn(:depth)endextend Sel::Sizeendmodule Widthdef self.key_methodreturn(:width)endextend Sel::Sizeendmodule Heightdef self.key_methodreturn(:height)endextend Sel::Sizeend
其中, Size 模块中定义了7个方法,分别是 compare 方法和6个运算符重载方法。6个方法都需要通过1个数值参数和1个运算符参数调用 compare 方法,来确定保留选择的图元与数值参数之间的比较关系。
而 .method( key_method) 此段代码则需要模块定义有 key_method 方法,例如 Height 模块中返回的值为 :height,这样此段代码则相当于 .height,用于区分维度。
使用 define_method 定义方法时,块参数中如果包括参数,例如上文中的 |size| ,这时就相当于定义的方法需要一个参数 size。
最后在三个模块中分别用 extend 引入 Size 模块的7个方法,结合各自定义的 self. key_method 方法,就可以使用如下方式,根据尺寸筛选选区图元了:
(07) 显示隐藏部分
这是一个目前还很简易的部分,主要目的在于,能够多次临时隐藏选中的内容,然后在需要恢复时一次性恢复所有以此法隐藏的图元。这就需要在隐藏时记录所有隐藏的图元,为此在模块中定义了一个 @hidden 数组,具体实现如下:
#======显示隐藏部======@hidden=[]def Sel.hide(&block)if block.nil? then block=ProcTrue endsels.each{|ent|ent.hidden=true if block.call(ent)@hidden << ent}return @hidden.lengthenddef Sel.show@hidden.each{|ent|ent.hidden=false}@hidden.clearreturn 0end
功能比较简单,以下是执行效果:
(08) 平面选择部分
这一部分用于选择符合特定条件的平面图元。目前实现了四个功能,分别用于查找岛面、环形面、奇异面和“周长面积比大于或小于给定值”的面。其中“奇异面”与Z值归零的共面成面问题有关,查找这种面的意义详见往期 [SU-2020-04]。
实现方法如下:
#======平面选择部======#返回Loop类对象是否不是“螺烷”型def Sel.loop_simple?(loop)loop.vertices.each{|i|in_loop=0i.edges.each{|j|if loop.edges.index(j)!=nil then in_loop+=1 end}if in_loop!=2 then return false end}return trueendprivate_class_method :loop_simple?#返回Face类对象是否所辖的每一个Loop类对象都不是“螺烷”型def Sel.face_simple?(face)face.loops.each{|i|if not loop_simple?(i) then return false end}return trueendprivate_class_method :face_simple?#只选择奇异的面def Sel.oddfaceSel.reselect{|ent|if ent.is_a? Sketchup::Face thennot face_simple?(ent)else false end}end#只选择有岛的面def Sel.loopfaceSel.reselect{|ent|if ent.is_a? Sketchup::Face thenent.loops.length>1else false end}end#只选择岛面def Sel.islandSel.reselect{|ent|if ent.is_a? Sketchup::Face then(ent.loops[0].edges.map(&:faces).flatten.uniq-[ent]).length==1else false end}end#形状指数选择module SIdef self.>(si=1.2732395447351628)Sel.reselect{|ent|if ent.is_a? Sketchup::Face then(Object.method_defined?(:instance_exec) ? \ent.instance_exec(&ProcSI) : \ProcSI.call(ent))>sielse false end}enddef self.<(si=1.2732395447351628)Sel.reselect{|ent|if ent.is_a? Sketchup::Face then(Object.method_defined?(:instance_exec) ? \ent.instance_exec(&ProcSI) : \ProcSI.call(ent))<sielse false end}endend
需要注意,上文中使用了 private_class_method 方法来隐藏一部分不需要外部调用的方法,这些方法仅限于模块其他方法调用,不推荐模块外部调用。这种保护很有必要,可以减少不必要的麻烦和误解。
查找岛面的实现效果:

查找环形面的效果:
查找奇异面的效果(图中上方为一个“奇异面”),下方为三个正常的平面):

关于形状指数筛选,需要额外说明一下,此处使用了一种特殊的实现方法,最初是为了简洁,采用了 Proc 常量作为匿名方法的处理方式(原理详见往期 [SU-2021-03])。但是后来考虑到要兼容SketchUp7,这种处理方法就显得十分复杂(这是由于 SU7 中使用的是 Ruby1.8,而这个版本的 ruby 中的 Object 类没有 instance_exec 方法)。
因此在 SI 模块中,才会用 Object. method_defined?( :instance_exec) 来判断是否可以使用 instance_exec 方法。如果不行,则需要给 ProcCircum 和 ProcSI 赋予一个参数来指代调用 instance_exec 方法时的 self。
(不过很显然 1.8 的方法 1.9 一样可以使用,所以这里的兼容确实没有什么必要,本来直接使用 1.8 的方法就行了。)
ProcCircum=Proc.new{|instance|res=0faceobj = instance.nil? ? self : instancefaceobj.loops.each{|loop|res+=loop.edges.map{|i|i.length}.inject{|a,b|a+=b}}res}ProcSI=Proc.new{|instance|faceobj = instance.nil? ? self : instanceProcCircum.call(faceobj)**2 / faceobj.area / Math::PI / 4}
以下是形状指数筛选的效果(如果是理想的圆形,结果应为1,正方形约为1.273):
(09) 边线选择部分
这一部分用于选择符合特定条件的边线图元。目前也是实现了四个功能,分别用于查找线头、垂直面、曲线和推测外边界。其中查找线头与查找奇异面一样,是解决难以共面成面的问题,详见往期 [SU-2020-03]。推测外边界是一个尝试性的功能,通过给定的一条边线,按照次次最大交角的规则选择出一系列边线。
以下是实现方法:
#======边线选择部======#只选择线头def Sel.thrumSel.reselect{|ent|if ent.is_a? Sketchup::Edge thenent.faces.length == 0else false end}end#只选择垂直线def Sel.vertSel.reselect{|ent|if ent.is_a? Sketchup::Edge thenent.line[1].parallel? [0,0,1]else false end}end#只选择弧线def Sel.curveSel.reselect{|ent|if ent.is_a? Sketchup::Edge thennot ent.curve.nil?else false end}end#共用点交角def Sel.angle_between(a,b)if a.start==b.start or a.end==b.end thenreturn a.line[1].angle_between(b.line[1])elsereturn a.line[1].angle_between(b.line[1].reverse)endendprivate_class_method :angle_between#选择最大轮廓(最大轮廓段数)def Sel.bound(max=50)unless sels.length==1 then return nil endinit=sels[0]unless init.is_a?(Sketchup::Edge) then return nil endedges_mightbe=[]edge_now=initvertex_now=init.startwhile true doedge_new=(vertex_now.edges - [edge_now]).sort{|a,b|angle_between(a,edge_now)<=>angle_between(b,edge_now)}[-1]vertex_now=(edge_new.vertices-edge_now.vertices)[0]edges_mightbe << edge_newedge_now=edge_newif vertex_now==init.end or vertex_now.edges.length<2 or edges_mightbe.length>max then break endendsels.add edges_mightbeend
此部分前三个方法功能简单,后一个还在实验阶段,因此都不作过多解释;有兴趣的可以在后台获取代码后自行测试和修改。
推测外边界的效果:

查找曲线段效果:
查找线头(未参与成面边线)效果:
查找垂直线段效果:
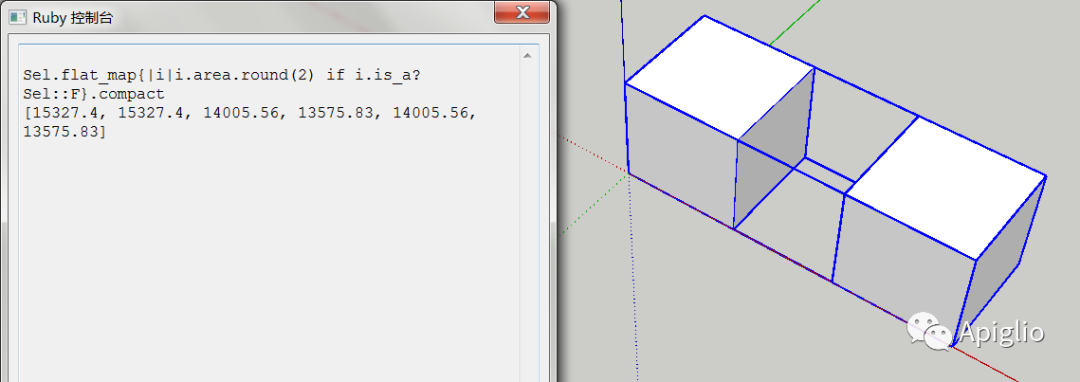
(10) 线面综合部分
由于 SketchUp 中边线与平面高度关联,所以经常需要同时顾及边线和平面两种类型的图元,因此这一部分通过线面关联关系进行选区的修饰。
实现方法如下:
#======线面综合部======#拓展到线面一致def Sel.extendedges=sels.grep(Sketchup::Edge)faces=sels.grep(Sketchup::Face)faces_mightbe=edges.collect{|e|e.faces}.flatten.uniq.reject{|f|f.edges.collect{|e|edges.include?(e)}.uniq.include?(false)}edges_mightbe=faces.collect{|f|f.edges}.flatten.uniqreturn(sels.add(faces_mightbe)+sels.add(edges_mightbe))end#缩减到线面一致def Sel.compactedges=sels.grep(Sketchup::Edge)faces_mightnotbe=sels.grep(Sketchup::Face).select{|f|f.edges.collect{|e|edges.include?(e)}.uniq.include?(false)}nf=sels.remove(faces_mightnotbe)edges_mightnotbe=edges - sels.grep(Sketchup::Face).collect(&:edges).flattenreturn(sels.remove(edges_mightnotbe)+nf)enddef Sel.extcptreturn [Sel.extend,Sel.compact]end
extend 方法,在选区中追加以下两类图元:
①其所有边线都在选区内的平面图元;
②在选区内的平面图元的所有边线。
compact 方法,分为以下两个步骤:
①剔除其有至少一个边线不在选区内的平面图元;
②剔除不属于选区内平面图元的边线。
extcpt 方法,是先后执行 extend 和 compact 的方法。

(11) 群组选择部分
这一部分与群组和组件的选择有关,可以根据群组或组件是否是原有尺寸进行选择,也可以根据定义名、实例名或者自定义属性进行选择。
实现方法如下:
#======群组选择部======def Sel.deform(tolerance=0.0000003)Sel.reselect{|ent|if ent.is_a? Sketchup::ComponentInstance or ent.is_a? Sketchup::Group thent=ent.transformation(t.xscale-1.0).abs+(t.yscale-1.0).abs+(t.zscale-1.0).abs > toleranceelse false end}enddef Sel.name=(namestr)Sel.reselect{|ent|if ent.respond_to? :name thenent.name==namestrelse false end}enddef Sel.defname=(defnamestr)Sel.reselect{|ent|if ent.respond_to? :definition thenent.definition.name==defnamestrelse false end}enddef Sel.[]=(attr,key,value)Sel.reselect{|ent|if ent.respond_to? :get_attribute thenent.get_attribute(attr,key)==valueelse false end}enddef Sel.name_eql!(namestr) Sel.name=namestr enddef Sel.defname_eql!(defnamestr) Sel.defname=defnamestr enddef Sel.attribute_eql!(attr,key,value) Sel[attr,key]=value end
使用 deform 方法可以快速查找变形的群组或组件:

(12) 属性修改部分
属性修改与群组组件的关联也非常密切,但是因为这部分功能不是仅仅选择和取消选择,涉及对图元属性的修改,因此需要通过 Edit 模块提醒用户,以保证不在用户不知情且不可察觉的情况下使用。
以下是实现方法:
#======属性修改部======module Editdef self.layer=(lyr)unless lyr.class==Sketchup::Layer thenlyr=Sketchup.active_model.layers[lyr.to_s]endsels.each{|ent|ent.layer=lyr}enddef self.name=(value)Sel.reselect{|ent|if ent.respond_to? :name= thenent.name=valueelse false end}enddef self.[]=(attr,key,value)Sel.reselect{|ent|if ent.respond_to? :get_attribute thenent.set_attribute(attr,key,value)else false end}endend
组件实例名的修改与查找:
根据自定义属性选择组件或群组:

修改群组和组件的自定义属性:
(13) 视角场景部分
这一部分只是计划部分,目前仅仅有一个简易的 zoom 方法,用于缩放到所选图元:
#======视角场景部======def Sel.zoomself.model.active_view.zoom self.selsend
(14) 统计报表部分
这是一个很有趣的分析功能,用于查看选区内图元的各类属性,并进行统计。其原理在往期文章 [SU-2020-08],[SU-2020-11],[SU-2021-02] 中多次提及。这个部分包含三个类型的方法:① analyse 方法、② ProcHashReport 方法和 ③ report 方法;其中第2个为匿名方法。
代码如下:
#======统计报表部======def Sel.analyse(&block)res=Hash.newsels.each{|ent|beginitem=block.call(ent)rescueitem=Errorendif res.has_key?(item) thenres[item]+=1elseres[item]=1end}return resenddef Sel.analyse_all(&block)res=Hash.neweach{|ent|beginitem=block.call(ent)rescueitem=Errorendif res.has_key?(item) thenres[item]+=1elseres[item]=1end}return resenddef Sel.analyse_group(&block)res=Hash.neweach_group{|ent|beginitem=block.call(ent)rescueitem=Errorendif res.has_key?(item) thenres[item]+=1elseres[item]=1end}return resenddef Sel.report(reg=//,&block)if block.nil? then block=Sel::ProcTypename endha=analyse(&block)if Object.method_defined? :instance_exec thenha.instance_exec(reg,&ProcHashReport)elseProcHashReport.call(reg,ha) #倒霉催的1.8没有instance_execendenddef Sel.report_all(reg=//,&block)if block.nil? then block=Sel::ProcTypename endha=analyse_all(&block)if Object.method_defined? :instance_exec thenha.instance_exec(reg,&ProcHashReport)elseProcHashReport.call(reg,ha) #倒霉催的1.8没有instance_execendenddef Sel.report_group(reg=//,&block)if block.nil? then block=Sel::ProcTypename endha=analyse_group(&block)if Object.method_defined? :instance_exec thenha.instance_exec(reg,&ProcHashReport)elseProcHashReport.call(reg,ha) #倒霉催的1.8没有instance_execendend
匿名方法 ProcHashReport 的定义如下:
ProcHashReport=Proc.new{|reg,instance|shown=0total=0if Float.constants.include?(:INFINITY) thenmax=-Float::INFINITYmin=Float::INFINITYelsemax=-Float::MAXmin=Float::MAXendsum=0if instance.nil? thenhashobj=selfelsehashobj=instanceendhashobj.each{|k,v|if k.to_s=~reg or reg==// thenputs "#{k}".ljust(18)+"|#{v}"shown+=vunless max.nil? thenif k.is_a?(Numeric) thenmax=k if k>maxmin=k if k<minelsemax=nilmin=nilendendunless sum.nil? thenif k.is_a?(Numeric) thensum+=k*velsesum=nilendendendtotal+=v}puts "------------------+----"unless shown==0 thenputs "Max :".ljust(18)+"|#{max}" unless max.nil?puts "Min :".ljust(18)+"|#{min}" unless min.nil?puts "Mean :".ljust(18)+"|#{sum/shown}" unless sum.nil?puts "------------------+----" unless max.nil? and min.nil? and sum.nil?endputs "Shown:".ljust(18)+"|#{shown}" if shown!=totalputs "Total:".ljust(18)+"|#{total}"}
以上的定义中, analyse 方法枚举选区中的图元,分别计算块参数的结果,并统计汇总到一个哈希结构,并返回这个哈希结构。 analyse 方法不会深入各个层次枚举图元,因此如果需要深入各个层次需要调用 analyse_all 和 analyse_group方法。其中 analyse_all 方法对应基础迭代器部分中的 each 方法;而 analyse_group 方法对应基础迭代器部分中的 each_group 方法。
ProcHashReport 方法作为匿名方法,用于将哈希结构按照特定的格式打印在控制台:
### ruby控制台中:ha1={"aaa"=>12,"bbb"=>23,"fff"=>99}ha1.instance_exec(//,&Sel::ProcHashReport)#>> aaa |12#>> bbb |23#>> fff |99#>> ------------------+----#>> Total: |134ha2={12.3=>2,15.5=>56,9.0=>36}ha2.instance_exec(//,&Sel::ProcHashReport)#>> 12.3 |2#>> 15.5 |56#>> 9.0 |36#>> ------------------+----#>> Max : |15.5#>> Min : |9.0#>> Mean : |12.942553191489361#>> ------------------+----#>> Total: |94
对于ruby 1.8,没有 instance_exec 方法,也可以通过如下方法调用:
### ruby控制台中:ha3={"aaa"=>12,"bbb"=>23,"fff"=>99}Sel::ProcHashReport.call(//,ha3)#>> aaa |12#>> bbb |23#>> fff |99#>> ------------------+----#>> Total: |134
report 方法则将 analyse 方法和 ProcHashReport 方法结合起来,用于更方便地调用统计报表。以下为报表的查看效果:
report_all 和 report_group 方法,可以参照 each 和 each_group 方法理解,这里就不额外展示,可以下载代码后自行测试。
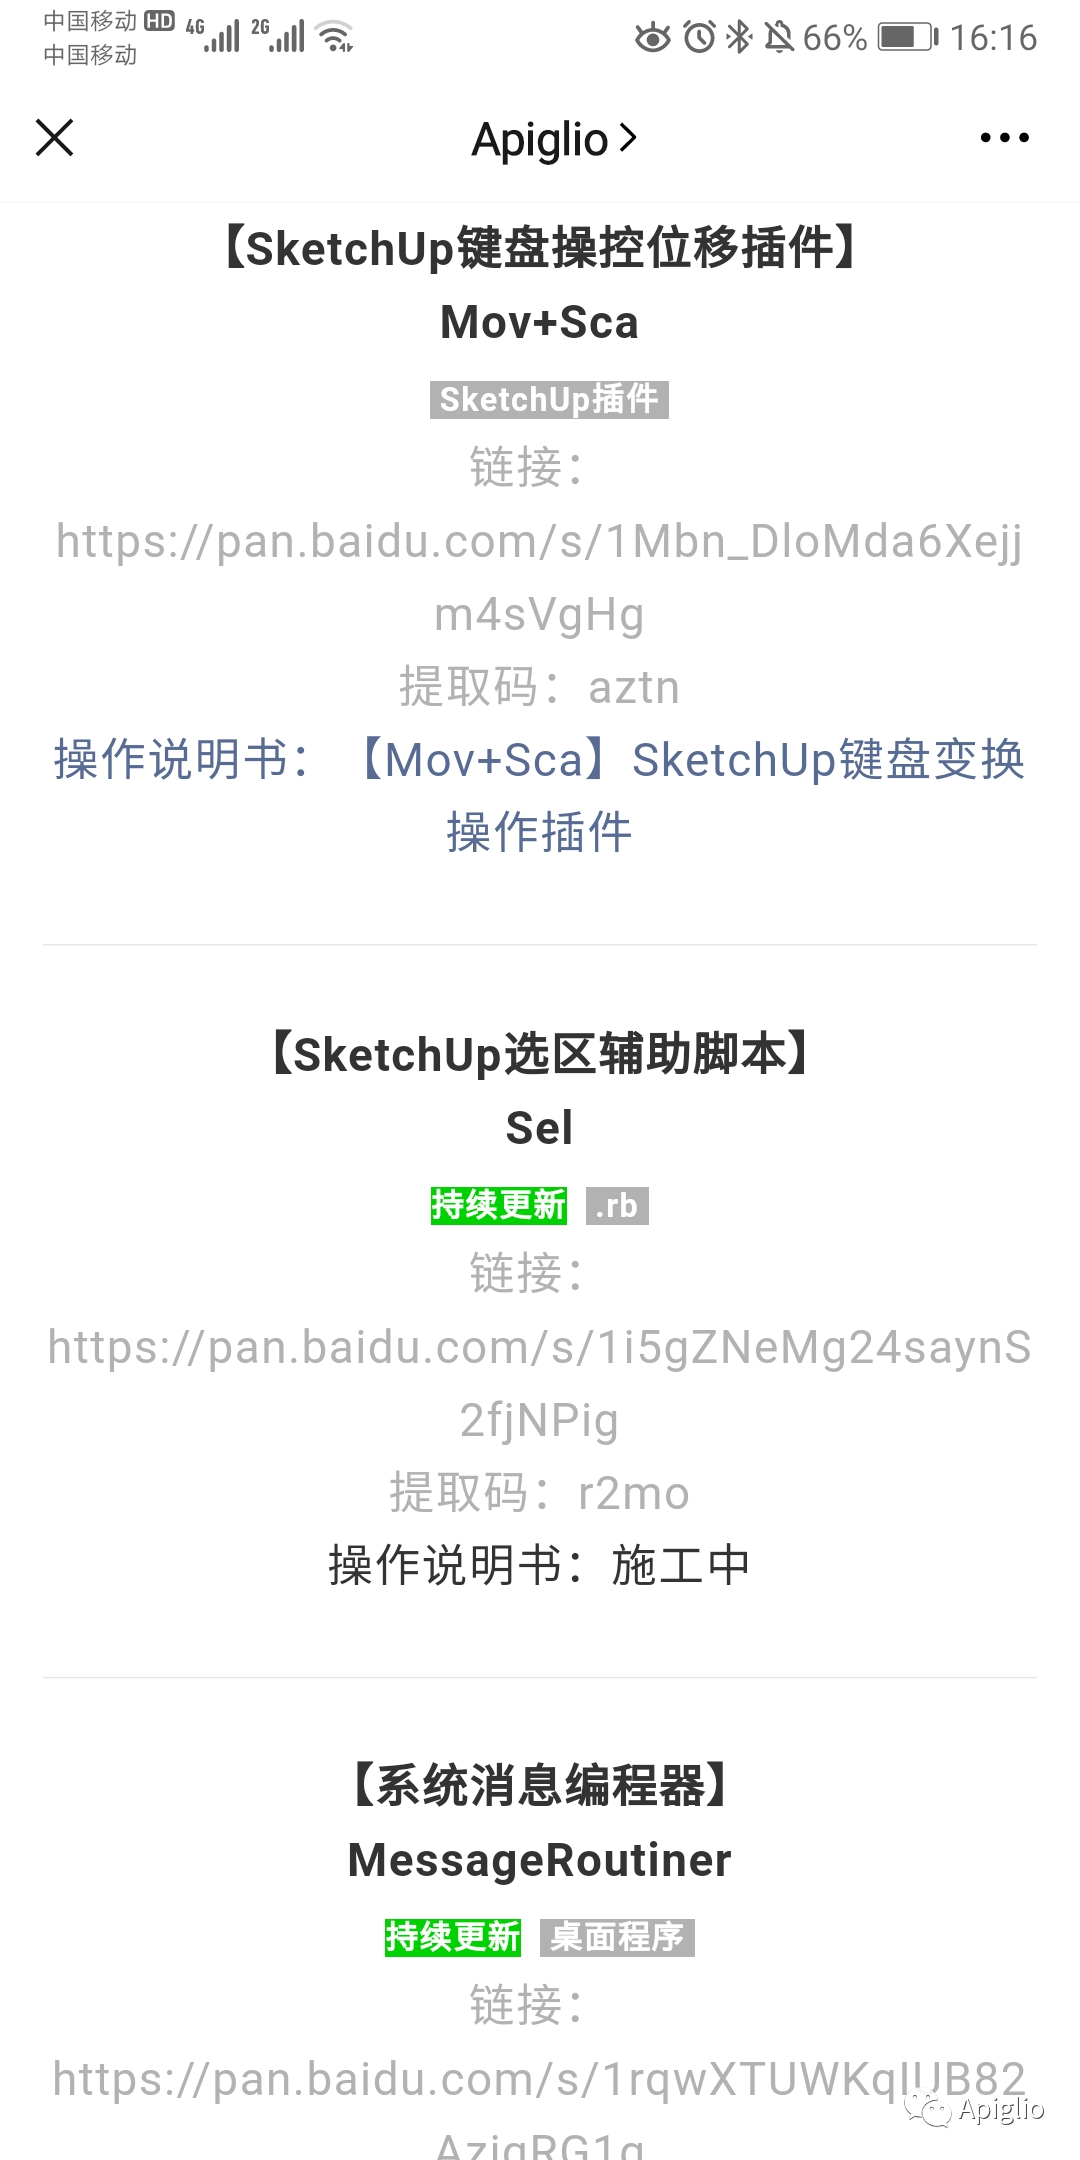
三、选区辅助的获取方式
关于这个脚本,我后续还可能继续补充一些新功能,所以会在网盘分享中有专门一个文件夹保存历史版本,如果更关注这个脚本的使用价值,可以直接下载最新的一个版本。
本人所有自制的软件工具和 ruby 脚本的分享统一在公众号菜单中的“资源获取”选项中:
|
|
下载后,可以在 ruby 控制台中通过 load 指令调用,或者是直接粗暴地复制整个文件内容到控制台中(较早的版本可能不行)。
(完)
本文编号:SU-2021-05