如何在C++20中实现Coroutine及相关任务调度器?(实例教学)

导语 | 本篇文章循序渐进地介绍C++20协程的方方面面,先从语言机制说起,再来介绍如何基于C++20的设施实现一个对比C++17来说更简单易用,约束性更好的一个任务调度器,最后结合一个简单的实例来讲述如何在开发中使用这些基础设施。
Vue框架通过数据双向绑定和虚拟DOM技术,帮我们处理了前端开发中最脏最累的DOM操作部分,我们不再需要去考虑如何操作DOM以及如何最高效地操作DOM,但是我们仍然需要去关注Vue在跨平台项目性能方面的优化,使项目具有更高效的性能、更好的用户体验。
一、C++20 Coroutine机制简介
要理解C++20的coroutine,首先我们需要了解coroutine这个概念。协程本身不是什么新鲜概念,在打孔计算机时代就已经存在。一个coroutine与一个function十分相似,都可以被调用,并且可以返回具体的结果。区别在于,普通函数只能一次调用一次返回,而coroutine是可以多次调用并且多次返回的,并且coroutine本身具有状态,多次返回的值可以不一样。
我们主要也是利用协程的这个特性,利用协程可以挂起(yield)->执行(resume)->挂起->执行的这个特点,来组织我们的任务调度器。这个特性也是我们通常所说的软中断(soft trap),软中断是操作系统进行各类调用的基础,我们使用协程特性来实现业务层的任务调度器,本身也是一个很自然的事情。
通过软中断去理解协程,就比较直观了,中断肯定就意味着有执行上下文的保存和恢复,所以整个协程的执行过程,其实就是多次的上下文保存跳出(yield),上下文恢复重入(resume),直至协程最终执行完成。而yield时候的返回值,和resume时的传入值,就变成了我们与一个既定协程交换数据的手段了。
注意coroutine这种多次调用返回不同值的特性也常被用于generator或者iterator,不过我们本篇的重点是如何基于coroutine来实现任务调度器,这部分暂且搁置,感兴趣的朋友可以自行查阅资料尝试,这部分比较简单,这里不再详细叙述了。
(一)C++20 coroutine理解的难点
C++20 coroutine大致的概览图如下:
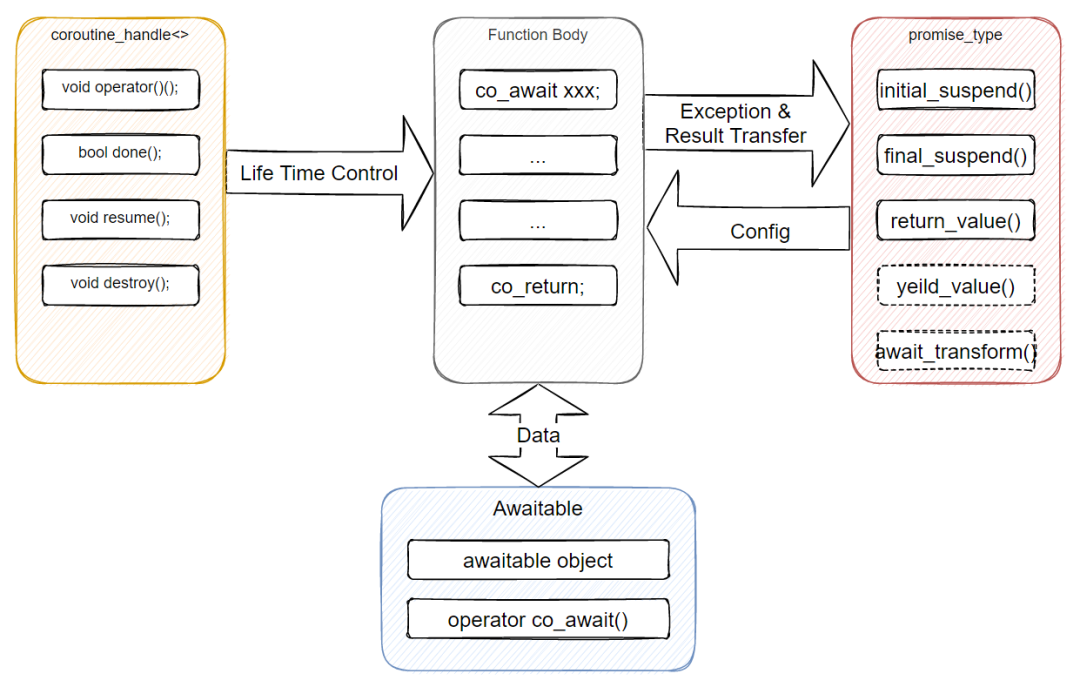
从上图可以看出C++ coroutine20实现的几个特点:
依赖coroutine_handle<>对象管理协程本身的生命周期。
依赖promise_type对象对协程的一些行为(如启动挂起,执行结束前挂起等)进行配置, 传递返回值。
co_await机制配合Awaitable对象完全协程的挂起点定义以及协程与外界的数据交换。
对比Lua等语言的协程实现,C++20的协程实现会显得比较别扭,作为一个无VM的强类型语言,C++20是通过Compiler代码生成与语法糖配合的模式来实现的相关机制,而前者其实是直接在VM级别提供的相关设施,对比之下,C++20协程使用的直观度,便利性都会存在一些折扣,但我们通过一定的包装,会发现其实C++20协程提供的特性已经很强大了,我们可以实现业务侧使用负担尽可能低的任务调度器。
(二)结合代码片段理解C++协程
网上讲C++协程关键字和相关类型的文章比较多,此处不做搬运了,在文章参考处也会给出一些笔者觉得写得比较好的文章的链接供大家参考。我们主要通过一个代码片断来理解任务管理器部分重点使用的co_awiat的运行机制和co_return的运行机制。
using namespace std;struct resumable_thing{struct promise_type{resumable_thing get_return_object(){return resumable_thing(coroutine_handle<promise_type>::from_promise(*this));}auto initial_suspend() { return suspend_never{}; }auto final_suspend() { return suspend_never{}; }void return_void() {}};coroutine_handle<promise_type> _coroutine = nullptr;resumable_thing() = default;resumable_thing(resumable_thing const&) = delete;resumable_thing& operator=(resumable_thing const&) = delete;resumable_thing(resumable_thing&& other): _coroutine(other._coroutine) {other._coroutine = nullptr;}resumable_thing& operator = (resumable_thing&& other) {if (&other != this) {_coroutine = other._coroutine;other._coroutine = nullptr;}}explicit resumable_thing(coroutine_handle<promise_type> coroutine) : _coroutine(coroutine){}~resumable_thing(){if (_coroutine) { _coroutine.destroy(); }}void resume() { _coroutine.resume(); }};resumable_thing counter() {cout << "counter: called\n";for (unsigned i = 1; ; i++){co_await std::suspend_always{};cout << "counter:: resumed (#" << i << ")\n";}}int main(){cout << "main: calling counter\n";resumable_thing the_counter = counter();cout << "main: resuming counter\n";the_counter.resume();the_counter.resume();the_counter.resume();the_counter.resume();the_counter.resume();cout << "main: done\n";return 0;}上面代码的输出如下:main: calling countercounter: calledmain: resuming countercounter:: resumed (counter:: resumed (counter:: resumed (counter:: resumed (counter:: resumed (main: done
由Compiler展开的代码
上面的示例代码中,我们注意到counter()是一个协程函数,可以多次被挂起和重入。我们也来看一下Compiler对协程函数进行加工后,大概的counter的定义。
注意:此处Compiler还有进一步的代码生成过程和调整,我们只关注到当前这一层。
我们要在C++20中定义一个coroutine,对函数的返回值是有要求的,这个返回值的类型必须有一个嵌套的子类型promise_type。因为我们更多的是利用coroutine特性来完成一个调度器的包装,先忽略用不上特殊的函数模板coroutine_traits<>这种特性。
resumable_thing counter() {__counter_context* __context = new __counter_context{};__return = __context->_promise.get_return_object();co_await __context->_promise.initial_suspend();cout << "counter: called\n";for (unsigned i = 1; ; i++){co_await std::suspend_always{};cout << "counter:: resumed (#" << i << ")\n";}__final_suspend_label:co_await __context->_promise.final_suspend();}
理解promise_type
struct resumable_thing{struct promise_type{resumable_thing get_return_object();auto initial_suspend() { return suspend_never{}; }auto final_suspend() { return suspend_never{}; }void return_void() {}};
我们注意到上一节生成的代码里,promise_type中定义的get_return_object(), initial_suspend(),final_suspend()等函数都被插入到编译器调整之后的counter()代码中了。我们先从最开始的counter_context看起。__counter_context是编译器生成的一个上下文,用于保存coroutine挂起还原时所需要的动态空间(如果不需要这个空间,编译器会把这个分配操作优化掉)。counter()的返回值类型是resumable_thing,但实际上,该返回类型是通过以下代码:
__return = __context->promise.get_return_object();来创建的__return对象。
在正式执行coroutine之前,会先执行前面定义的promise对象的initial_suspend(),以些来判断是否需要一开始就需要挂起协程,上面的示例代码返回的suspend_never{},相关的代码:
co_await __context->_promise.initial_suspend();不会执行挂起的操作,会继续往下执行。相反,如果我们返回suspend_always{},那么counter() 则会马上挂起。
同样,在coroutine执行结束之前,则会执行前面定义的promise对象的final_suspend(),看是否需要结束前挂起,机制与执行前的挂起一致。
同样,对于co_return来说,会被compiler改写为下列代码,其实就是一个简单的语法糖,先调用promise对象的return_void()或者return_value(),最后直接goto到协程结束处:
__context->_promise->return_void(); goto final_suspend_label;对于co_yield,也有类似co_return的代码替换处理过程。比如 co_yield“hello”,会被compiler改写为下面的代码,可以看到co_yield其实只是co_await的语法糖,会先调用promise对象的yield_value()方法,所以如果对应的promise对象没有实现相应类型的yield_value()重载,编译器会直接报错:
co_await __context->_promise->yield_value("hello");C++框架的实现主要是利用co_await来实现挂起语义,并没有使用co_yield,避免业务向的相关实现大量集中到promise处,导致过强的代码依赖。
通过上面的描述,不难发现,C++20的协程机制中,promise对象起到的作用是“从内部控制协程,将异常和结果传递给外部系统”这样的一个桥梁作用。
理解coroutine_handle
上一节说到Promise对象的作用是“从内部控制协程,将异常和结果传递给业务系统”,那么相对应的,coroutine_handle<>其实就是外部系统对协程生命周期进行控制的对象,我们也很容易看到在前面我们定义的resumable_thing类中,关于coroutine_handle<>的使用, 我们可以利用coroutine_handle<>对象来对协程进行resume()和destroy()等操作。
struct resumable_thing{coroutine_handle<promise_type> _coroutine = nullptr;~resumable_thing(){if (_coroutine) { _coroutine.destroy(); }}void resume() { _coroutine.resume(); }};
coroutine_handle也是一个模板,coroutine_handle定义如下:
template <> struct coroutine_handle<void>{constexpr coroutine_handle() noexcept;constexpr coroutine_handle(nullptr_t) noexcept;coroutine_handle& operator=(nullptr_t) noexcept;constexpr void* address() const noexcept;constexpr static coroutine_handle from_address(void* addr);constexpr explicit operator bool() const noexcept;bool done() const;void operator()();void resume();void destroy();private:void* ptr;// exposition only};
通常针对每种promise_type,会从coroutine_handle<>派生出相应的针对此种promise_type的特化版的coroutine_handle,如上例中使用的coroutine_handle< resumable_thing::promise_type >:
template <typename Promise>struct coroutine_handle: coroutine_handle<void>{Promise& promise() const noexcept;static coroutine_handle from_promise(Promise&) noexcept;};
coroutine_handle用于控制coroutine的生命周期。比如,coroutine_handle的resume()用来恢复coroutine的执行;destroy()用来释放用于保存coroutine状态而分配额动态内存;done()用于告知一个coroutine是否已经destoy;operator()()用于coroutine的初次执行。
有两个条件能让coroutine释放,一个是显示调用destroy();另一个是coroutine执行完final_suspend之后自动释放。这里需要注意的是,不能让coroutine释放两次,否则跟free内存两次额效果类似。
现在让我们回到promise_type的get_return_object(),可以看到它传了一个coroutine_handle给resumable_thing的构造函数。随后resumable_thing可以通过这个传入的coroutine_handle来控制coroutine的执行,示例代码中也是通过这种方式来实现的协程的resume():
resumable_thing get_return_object(){return resumable_thing(coroutine_handle<promise_type>::from_promise(*this));}
co_await与awaitable对象
前面我们也简单介绍了C++20的协程通过co_await与awaitable对象来完成协程执行的挂起,以及协程与外界的数据交换。具体是怎么做到的呢?我们可以先来看看编译器遇到:
co_await awaitable;时的处理, 这个操作会被编译器改写成:
if (not awaitable.await_ready()) {// suspend point;awaitable.await_suspend(coroutine_handle);// return to the caller// resume point;}awaitable.await_resume();
对于一个awaitable的定义来说,主要由三个函数组成:
await_ready(): 用于判断是否需要挂起,如果返回false,则协程会继续执行,不会执行挂起操作。
await_suspend(): 协程挂起后需要执行的操作可以添加在此处,一般此处填充的是一个异步操作,以及对当前协程状态的记录和设置的操作。
await_resume(): 协程恢复执行的时候调用的操作。同时如果对应的异步操作需要外部返回值到协程处,我们会在此处操作。
综合来看, 通过这样的设置,C++20 coroutine给使用者提供了一个对挂起和恢复进行定制的机制,有了这样的机制,我们就可以通过实现不同的awaitable来实现各种异步操作的协程化,这也是下文中的Scheduler实际使用的方法。
除了上面介绍的awaitable对象外,C++20还提供了其他形式的awaitable,按编译器默认处理的优先次序列出如下:
promise_type::await_transform(): 在promise_type上重载不同类型参数的await_transform()。
operator co_await(): 为co_await调用的对象重载operator co_await()操作符。
awaitable对象:上面重点介绍的实现了await_ready(),await_suspend(),await_resume()的awaitable对象,也是我们最终实现调度器采用的方式。
小结
至此我们已经基本介绍完了C++20 coroutine相关的特性了。coroutine机制出现的时间其实还挺早的,其他语言中也都存在,比如:
Dart1.9:
Future<int> getPage(t) async {var c = new http.Client();try {var r = await c.get('http://url/search?q=$t');print(r);return r.length();} finally {await c.close();}}
Python:
async def abinary(n):if n <= 0:return 1l = await abinary(n - 1)r = await abinary(n - 1)return l + 1 + r
C#:
async Task<string> WaitAsynchronouslyAsync(){await Task.Delay(10000);return "Finished";}
从某种角度看,coroutine可以看成是一个通用化的函数(Generalized Function),区别于传统的单入口单出口的函数(Plain Old Function)之外,增加若干可能性:
Monadic*(await-suspend)
Task(await)
Generator(yield)
Async Generator(await+yield)
二、C++20版的协程调度器
(一)Scheduler实现的动机
有了上面介绍的功能强大的C++20的coroutine,我们可以更好的实现我们的调度器。
(二)Scheduler核心机制
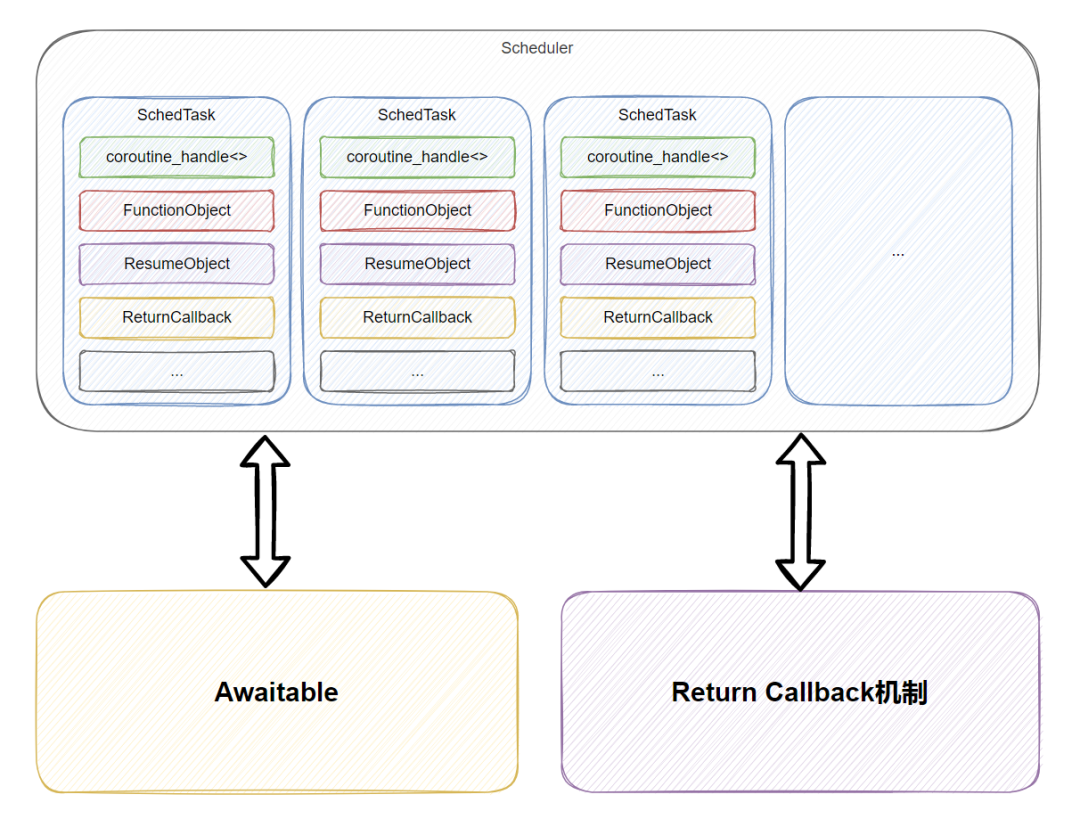
如上图所示,Scheduler主要提供对SchedTask的管理,以及两个基础机制方便协程相关业务机制的实现:
Awaitable机制: 前面也介绍了利用C++20的co_await关键字和awaitable对象,我们可以很好的定义挂起点,以及交换协程和外部系统的数据。
Return Callback机制: 部分协程执行完后需要向外界反馈执行结果(如协程模式执行的Rpc Service)。
(三)Scheduler核心对象
ISchedTask & SchedTaskCpp20
using CoReturnFunction = std::function<void(const CoReturnObject*)>;class ISchedTask{friend class Scheduler;public:ISchedTask() = delete;ISchedTask(const SchedTaskCpp17&) = delete;ISchedTask(uint64_t taskId, Scheduler* manager);virtual ~ISchedTask();uint64_t GetId() const;virtual int Run() = 0;virtual bool IsDone() const = 0;virtual CO_TASK_STATE GetCoState() const = 0;void BindSleepHandle(uint64_t handle);AwaitMode GetAwaitMode() const;int GetAwaitTimeout() const;template<typename AwaitEventType>auto BindResumeObject(AwaitEventType&& awaitEvent)->std::enable_if_t<std::is_base_of<ResumeObject, AwaitEventType>::value>;template<typename AwaitEventType>auto GetResumeObjectAsType()->std::enable_if_t<std::is_base_of<ResumeObject, AwaitEventType>::value, AwaitEventType*>;bool HasResumeObject() const noexcept;void ClearResumeObject();bool IsLastInvokeSuc() const noexcept;bool IsLastInvokeTimeOut() const noexcept;bool IsLastInvokeFailed() const noexcept;void AddChildTask(uint64_t tid);void AddWaitNofityTask(uint64_t tid);const auto& GetChildTaskArray() const;const auto& GetWaitNotifyArray() const;void Terminate();Scheduler* GetManager() const;static ISchedTask* CurrentTask();void DoYield(AwaitMode mode, int awaitTimeMs = 0);void SetReturnFunction(CoReturnFunction&& func);void DoReturn(const CoReturnObject& obj);void DoReturn();protected:uint64_t mTaskId;Scheduler* mManager;std::vector<uint64_t> mChildArray;std::vector<uint64_t> mWaitNotifyArray;//value used to return from coroutineAwaitMode mAwaitMode = AwaitMode::AwaitDoNothing;int mAwaitTimeout = 0;//value used to send to coroutine(now as a AwaitEvent)reflection::UserObject mResumeObject;uint64_t mSleepHandle = 0;bool mIsTerminate = false;CoReturnFunction mCoReturnFunc;};class SchedTaskCpp20: public ISchedTask{public:SchedTaskCpp20(uint64_t taskId, CoTaskFunction&& taskFunc, Scheduler* manager);~SchedTaskCpp20();int Run() override;bool IsDone() const override;CO_TASK_STATE GetCoState() const override;void BindSelfToCoTask();const CoResumingTaskCpp20& GetResumingTask() const;protected:CoResumingTaskCpp20 mCoResumingTask;CoTaskFunction mTaskFuncion;};
C++20的SchedTaskCpp20主要完成对协程对象的封装,CoTaskFunction用于存储相关的函数对象,而CoResumingTaskCpp20则如同前面示例中的resumable_thing对象,内部有需要的promise_type实现,我们对协程的访问也是通过它来完成的。
此处需要注意的是我们保存了协程对象外,还额外保存了相关的函数对象,这是因为如果协程本身是一个lambda,compiler并不会帮我们正确维护lambda的生命周期以及lambda所捕获的函数,尚未清楚是实现缺陷还是功能就是如此,所以此处需要一个额外存在的std::function<>对象,来保证对应lambda的生命周期是正确的。
我们的SchedTask对象中主要保留了:reflection::UserObject mResumeObject: 主要用于异步等待的执行,当一个异步等待成功执行的时候,向协程传递值。
原来利用事件去处理最终返回值的机制也替换成了Return回调的方式,相对来说更简单直接,利用lambda本身也能很方便的保存需要最终回传的临时值了。
Scheduler
Scheduler的代码比较多,主要就是SchedTask的管理器,另外也完成对前面提到的三种机制的支持,文章重点分析一下三种机制的实现代码。
Yield处理
void Scheduler::Update(){RSTUDIO_PROFILER_METHOD_INFO(sUpdate, "Scheduler::Update()", rstudio::ProfilerGroupType::kLogicJob);RSTUDIO_PROFILER_AUTO_SCOPE(sUpdate);//Handle need kill task firstwhile(!mNeedKillArray.empty()){auto tid = mNeedKillArray.front();mNeedKillArray.pop();auto* tmpTask = GetTaskById(tid);if (tmpTask != nullptr){DestroyTask(tmpTask);}}//Keep a temp queue for not excute next frame task right nowdecltype(mFrameStartTasks) tmpFrameTasks;mFrameStartTasks.swap(tmpFrameTasks);while (!tmpFrameTasks.empty()){auto task_id = tmpFrameTasks.front();tmpFrameTasks.pop();auto* task = GetTaskById(task_id);LOG_CHECK_ERROR(task);if (task){AddToImmRun(task);}}}void Scheduler::AddToImmRun(ISchedTask* schedTask){LOG_PROCESS_ERROR(schedTask);schedTask->Run();if (schedTask->IsDone()){DestroyTask(schedTask);return;}{auto awaitMode = schedTask->GetAwaitMode();auto awaitTimeoutMs = schedTask->GetAwaitTimeout();switch (schedTask->GetAwaitMode()){case rstudio::logic::AwaitMode::AwaitNever:AddToImmRun(schedTask);break;case rstudio::logic::AwaitMode::AwaitNextframe:AddToNextFrameRun(schedTask);break;case rstudio::logic::AwaitMode::AwaitForNotifyNoTimeout:case rstudio::logic::AwaitMode::AwaitForNotifyWithTimeout:{HandleTaskAwaitForNotify(schedTask, awaitMode, awaitTimeoutMs);}break;case rstudio::logic::AwaitMode::AwaitDoNothing:break;default:RSTUDIO_ERROR(CanNotRunToHereError());break;}}Exit0:return;}
上面是Scheduler的Update()以及Update用到的核心函数AddToImmRun()的实现代码,在每个task->Run()后,到达下一个挂起点,返回外部代码的时候,外部代码会根据Task当前的AwaitMode对协程后续行为进行控制,主要是以下几种模式:
rstudio::logic::AwaitMode::AwaitNever:立即将协程加入回mReadyTask队列,对应协程会被马上唤醒执行。
rstudio::logic::AwaitMode::AwaitNextframe:将协程加入到下一帧执行的队列,协程将会在下一帧被唤醒执行。
rstudio::logic::AwaitMode::AwaitForNotifyNoTimeout:等待外界通知后再唤醒执行(无超时模式),注意该模式下如果一直没收到通知,相关协程会一直在队列中存在。
rstudio::logic::AwaitMode::AwaitForNotifyWithTimeout:同3,差别是存在一个超时时间,超时时间到了也会唤醒协程,业务方可以通过ResumeObject判断协程是被超时唤醒的。
rstudio::logic::AwaitMode::AwaitDoNothing:特殊的AwaitHandle实现会使用该模式,比如删除Task的实现,都要删除Task了,我们肯定不需要再将Task加入任何可唤醒队列了。
Resume处理
Resume机制主要是通过唤醒在Await队列中的协程的时候向关联的Task对象传递ResumeObject实现的:
//Not a real event notify here, just do need thingstemplate <typename E>auto ResumeTaskByAwaitObject(E&& awaitObj) -> std::enable_if_t<std::is_base_of<ResumeObject, E>::value>{auto tid = awaitObj.taskId;if (IsTaskInAwaitSet(tid)){//Only in await set task can be resumeauto* task = GetTaskById(tid);if (RSTUDIO_LIKELY(task != nullptr)){task->BindResumeObject(std::forward<E>(awaitObj));AddToImmRun(task);}OnTaskAwaitNotifyFinish(tid);}}
然后再通过rco_get_resume_object()宏在协程代码中获取对应的ResumeObject.宏的声明代码如下:
本身就是一个简单的传值取值的过程。注意传递ResumeObject后,我们也会马上将协程加入到mReadTasks队列中以方便在接下来的Update中唤醒它。
一个Awaitable实现的范例
我们以Rpc的协程化Caller实现为例,看看一个awaitable对象应该如何构造:
class RSTUDIO_APP_SERVICE_API RpcRequest{public:RpcRequest() = delete;////RpcRequest(const RpcRequest&) = delete;~RpcRequest() = default;RpcRequest(const logic::GameServiceCallerPtr& proxy, const std::string_view funcName, reflection::Args&& arg, int timeoutMs) :mProxy(proxy), mFuncName(funcName), mArgs(std::forward<reflection::Args>(arg)), mTimeoutMs(timeoutMs){}bool await_ready(){return false;}void await_suspend(coroutine_handle<>) const noexcept{auto* task = rco_self_task();auto context = std::make_shared<ServiceContext>();context->TaskId = task->GetId();context->Timeout = mTimeoutMs;auto args = mArgs;mProxy->DoDynamicCall(mFuncName, std::move(args), context);task->DoYield(AwaitMode::AwaitForNotifyNoTimeout);}::rstudio::logic::RpcResumeObject* await_resume() const noexcept{return rco_get_resume_object(logic::RpcResumeObject);}private:logic::GameServiceCallerPtr mProxy;std::string mFuncName;reflection::Args mArgs;int mTimeoutMs;};
重点是前面说到的await_ready(),await_suspend(),await_resume()函数的实现。
ReturnCallback机制
有一些特殊的场合,可能需要协程执行完成后向业务系统发起通知并传递返回值,比如Rpc Service的协程支持实现,这里直接以RpcService的协程支持为例来说明好了。
首先是业务侧,在创建完协程后,需要给协程绑定后续协程执行完成后做进一步操作需要的数据:
task->SetReturnFunction([this, server, entity, cmdHead, routerAddr, reqHead, context](const CoReturnObject* obj) {const auto* returnObj = dynamic_cast<const CoRpcReturnObject*>(obj);if (RSTUDIO_LIKELY(returnObj)){DoRpcResponse(server, entity.get(), routerAddr, &cmdHead,reqHead, const_cast<ServiceContext&>(context),returnObj->rpcResultType, returnObj->totalRet, returnObj->retValue);}});
这里将Connection id等信息通过lambda的capture功能直接绑定到SchedTask的返回函数,然后业务代码会利用co_return本身的功能向promise_type传递返回值:
CoTaskInfo HeartBeatService::DoHeartBeat(logic::Scheduler& scheduler, int testVal){return scheduler.CreateTask20([testVal]() -> logic::CoResumingTaskCpp20 {co_await logic::cotasks::Sleep(1000);printf("service yield call finish!\n");co_return CoRpcReturnObject(reflection::Value(testVal + 1));});}
最终我们利用promise_type的return_value()来完成对设置的回调的调用:
void CoResumingTaskCpp20::promise_type::return_value(const CoReturnObject& obj){auto* task = rco_self_task();task->DoReturn(obj);}
注意这个地方task上存储的ExtraFinishObject会作为event的一部分直接传递给业务系统,并在发起事件后调用删除协程任务的方法。
通过Return Callback的方式来对一些特殊的返回进行处理,这种机制是容易使用的。
(四)示例代码
//C++ 20 coroutineauto clientProxy = mRpcClient->CreateServiceProxy("mmo.HeartBeat");mScheduler.CreateTask20([clientProxy]() -> rstudio::logic::CoResumingTaskCpp20 {auto* task = rco_self_task();printf("step1: task is %llu\n", task->GetId());co_await rstudio::logic::cotasks::NextFrame{};printf("step2 after yield!\n");int c = 0;while (c < 5){printf("in while loop c=%d\n", c);co_await rstudio::logic::cotasks::Sleep(1000);c++;}for (c = 0; c < 5; c++){printf("in for loop c=%d\n", c);co_await rstudio::logic::cotasks::NextFrame{};}////rco_kill_self();////LOG_INFO(0, "step3 %d", c);printf("step3 %d\n", c);auto newTaskId = co_await rstudio::logic::cotasks::CreateTask(false, []()-> logic::CoResumingTaskCpp20 {printf("from child coroutine!\n");co_await rstudio::logic::cotasks::Sleep(2000);printf("after child coroutine sleep\n");});printf("new task create in coroutine: %llu\n", newTaskId);printf("Begin wait for task!\n");co_await rstudio::logic::cotasks::WaitTaskFinish{ newTaskId, 10000 };printf("After wait for task!\n");rstudio::logic::cotasks::RpcRequest rpcReq{clientProxy, "DoHeartBeat", rstudio::reflection::Args{ 3 }, 5000};auto* rpcret = co_await rpcReq;if (rpcret->rpcResultType == rstudio::network::RpcResponseResultType::RequestSuc){assert(rpcret->totalRet == 1);auto retval = rpcret->retValue.to<int>();assert(retval == 4);printf("rpc coroutine run suc, val = %d!\n", retval);}else{printf("rpc coroutine run failed! result = %d \n", (int)rpcret->rpcResultType);}co_await rstudio::logic::cotasks::Sleep(5000);printf("step4, after 5s sleep\n");co_return rstudio::logic::CoNil;} );
执行结果:
step1: task is 1step2 after yield!in while loop c=0in while loop c=1in while loop c=2in while loop c=3in while loop c=4in for loop c=0in for loop c=1in for loop c=2in for loop c=3in for loop c=4step3 5new task create in coroutine: 2Begin wait for task!from child coroutine!after child coroutine sleepAfter wait for task!service yield call finish!rpc coroutine run suc, val = 4!step4, after 5s sleep
对比原先版本,主要的好处是:
代码更精简了。
Stack变量可以被Compiler自动处理,正常使用了。
co_await可以直接返回值,并有强制的类型约束了。
一个协程函数就是一个返回值为logic::CoResumingTaskCpp20类型的lambda,可以充分利用lambda本身的特性还实现正确的逻辑了。
三、业务向实例
(一)一个Python实现的技能示例
我们以一个原来在python中利用包装的协程调度器实现的技能系统为例,先来看看相关的实现效果和核心代码。
实现效果
以下是相关实现的示例效果,主要是一个火球技能和实现和一个闪电链技能的实现:

技能主流程代码
我们先来看一下技能的主流程代码,可以发现使用协程方式实现,整个代码更函数式,区别于面向对象构造不同对象存储中间态数据的设计。
# handle one skill instance createdef skill_instance_run_func(instance, user, skill_data, target, target_pos, finish_func):# set return callback hereyield TaskSetExitCallback(finish_func)# some code ignore here# ...from common.gametime import GameTimeinit_time = GameTime.now_timefor skill_step in step_list:step_start_time = GameTime.now_time# some code ignore here# ...### 1. period task handleif skill_step.cast_type == CastSkillStep.CAST_TYPE_PERIOD:if len(skill_step.cast_action_group_list) > 0:action_group = skill_step.cast_action_group_list[0]for i in range(skill_step.cast_count):# yield for sleepyield TaskSleep(skill_step.cast_period)ret_val = do_skill_spend(skill_data, user, instance)if not ret_val:returnskill_step, action_group, user, instance, target_id, target_pos)### 2. missle skillelif skill_step.cast_type == CastSkillStep.CAST_TYPE_MISSLE_TO_TARGET:if len(skill_step.cast_action_group_list) > 0:action_group = skill_step.cast_action_group_list[0]for i in range(skill_step.cast_count):# yield for sleepyield TaskSleep(skill_step.cast_period)ret_val = do_skill_spend(skill_data, user, instance)if not ret_val:return# sub coroutine(missle_handle_func)task_id = yield TaskNew(missle_handle_func(skill_data, instance, user, skill_step, action_group, target_id, target_pos))instance.add_child_task_id(task_id)### 3. guide skillelif skill_step.cast_type == CastSkillStep.CAST_TYPE_GUIDE_TO_TARGET:if len(skill_step.cast_action_group_list) > 0:# some code ignore here# ...for i in range(skill_step.cast_count):# yield sleepyield TaskSleep(skill_step.cast_period)ret_val = do_skill_spend(skill_data, user, instance)if not ret_val:returnskill_step, action_group, user, instance, first_target.obj_id, first_target.get_position())start_pos = skill_step.guide_info.get_target_position(user, start_id, start_pos)[0]end_pos = skill_step.guide_info.get_target_position(user, first_target.obj_id, first_target.get_position())[0]end_id = first_target.obj_id# sub coroutine(guide_handle_func)task_id = yield TaskNew(guide_handle_func(skill_data, instance, user, skill_step, start_pos, end_id, end_pos))start_pos = end_posstart_id = end_idinstance.add_child_task_id(task_id)first_target = Noneif guide_target_list:pop_index = random.randrange(0, len(guide_target_list))first_target = guide_target_list.pop(pop_index)if not first_target:breaknow_time = GameTime.now_timestep_pass_time = now_time - step_start_timeneed_sleep_time = skill_step.step_total_time - step_pass_timeif need_sleep_time > 0:yield TaskSleep(need_sleep_time)instance.on_one_step_finish(skill_step)if skill_data.delay_end_time > 0:yield TaskSleep(skill_data.delay_end_time)# wait for child finish~~for task_id in instance.child_task_list:yield TaskWait(task_id)= 0
整体实现比较简单,整个技能是由多个SkillStep来配置的,整体技能的流程就是for循环执行所有SkillStep,然后提供了多种SkillStep类型的处理,主要是以下几类:
CastSkillStep.CAST_TYPE_PERIOD:周期性触发的技能,主要使用yield TaskSleep()
CastSkillStep.CAST_TYPE_MISSLE_TO_TARGET:导弹类技能,使用子协程功能。
CastSkillStep.CAST_TYPE_GUIDE_TO_TARGET:引导类技能,使用子协程功能
最后所有step应用完毕会进入配置的休眠和等待子任务的阶段。
子任务-导弹类技能相关代码
对于上面介绍的导弹类技能(火球),核心实现也比较简单,实现了一个飞行物按固定速度逼近目标的效果,具体代码如下,利用yield我们可以实现在飞行物未达到目标点的时候每帧执行一次的效果:
### 1. handle for missle skill(etc: fire ball)def missle_handle_func(skill_data, instance, user, skill_step, action_group, target_id, target_pos):effect = instance.create_effect(skill_step.missle_info.missle_fx_path)effect.set_scale(skill_step.missle_info.missle_scale)cur_target_pos, is_target_valid = skill_step.missle_info.get_target_position(user, target_id, target_pos)start_pos = skill_step.missle_info.get_start_position(user, target_id, target_pos)is_reach_target = Falsefrom common.gametime import GameTimeinit_time = GameTime.now_timewhile True:# some code ignore here# ...fly_distance = skill_step.missle_info.fly_speed*GameTime.elapse_timeif fly_distance < total_distance:start_pos += fly_direction*math3d.vector(fly_distance, fly_distance, fly_distance)effect.set_position(start_pos)else:is_reach_target = Truebreak# do yield util next frameyieldeffect.destroy()if is_reach_target:target_list = skill_data.get_target_list(user.caster, target_id, target_pos)for target in target_list:action_group.do(user.caster, target)
子任务-引导类技能代码
对于上面介绍的引导类技能(闪电链),依托框架本身的guide effect实现,我们利用yield TaskSleep()就能很好的完成相关的功能了:
### 2. handle for guide skill(etc: lighting chain)def guide_handle_func(skill_data, instance, user, skill_step, start_pos, target_id, target_pos):effect = instance.create_effect(skill_step.guide_info.guide_fx_path)effect.set_scale(skill_step.guide_info.guide_scale)effect.set_position(start_pos)effect.set_guide_end_pos(target_pos - start_pos)# yield for sleepyield TaskSleep(skill_step.guide_info.guide_time)effect.destroy()
(二)对应的C++实现
前面的python实现只是个引子,抛开具体的画面和细节,我们来尝试用我们构建的C++20版协程调度器来实现相似的代码(抛开显示相关的内容,纯粹过程模拟):
//C++ 20 skill test coroutinemScheduler.CreateTask20([instance]() -> rstudio::logic::CoResumingTaskCpp20 {rstudio::logic::ISchedTask* task = rco_self_task();task->SetReturnFunction([](const rstudio::logic::CoReturnObject*) {//ToDo: return handle code add here});for (auto& skill_step : step_list){auto step_start_time = GGame->GetTimeManager().GetTimeHardwareMS();switch (skill_step.cast_type){case CastSkillStep::CAST_TYPE_PERIOD:{if (skill_step.cast_action_group_list.size() > 0){auto& action_group = skill_step.cast_action_group_list[0];for (int i = 0; i < skill_step.cast_count; i++){co_await rstudio::logic::cotasks::Sleep(skill_step.cast_period);bool ret_val = do_skill_spend(skill_data, user, instance);if (!ret_val){co_return rstudio::logic::CoNil;}do_one_skill_cast(skill_data, skill_step, action_group, user, instance, target_id, target_pos);}}}break;case CastSkillStep::CAST_TYPE_MISSLE_TO_TARGET:{if (skill_step.cast_action_group_list.size() > 0){auto& action_group = skill_step.cast_action_group_list[0];for (int i = 0; i < skill_step.cast_count; i++){co_await rstudio::logic::cotasks::Sleep(skill_step.cast_period);bool ret_val = do_skill_spend(skill_data, user, instance);if (!ret_val){co_return rstudio::logic::CoNil;}auto task_id = co_await rstudio::logic::cotasks::CreateTask(true, [&skill_step]()->rstudio::logic::CoResumingTaskCpp20 {auto cur_target_pos = skill_step.missle_info.get_target_position(user, target_id, target_pos);auto start_pos = skill_step.missle_info.get_start_position(user, target_id, target_pos);bool is_reach_target = false;auto init_time = GGame->GetTimeManager().GetTimeHardwareMS();auto last_time = init_time;do{auto now_time = GGame->GetTimeManager().GetTimeHardwareMS();auto elapse_time = now_time - last_time;last_time = now_time;if (now_time - init_time >= skill_step.missle_info.long_fly_time){break;}auto cur_target_pos = skill_step.missle_info.get_target_position(user, target_id, target_pos);rstudio::math::Vector3 fly_direction = cur_target_pos - start_pos;auto total_distance = fly_direction.Normalise();auto fly_distance = skill_step.missle_info.fly_speed * elapse_time;if (fly_distance < total_distance){start_pos += fly_direction * fly_distance;}else{is_reach_target = true;break;}co_await rstudio::logic::cotasks::NextFrame{};} while (true);if (is_reach_target){//ToDo: add damage calculate here~~}});instance.add_child_task_id(task_id);}}}break;case CastSkillStep::CAST_TYPE_GUIDE_TO_TARGET:{//ignore here}break;default:break;}auto now_time = GGame->GetTimeManager().GetTimeHardwareMS();auto step_pass_time = now_time - step_start_time;auto need_sleep_time = skill_step.step_total_time - step_pass_time;if (need_sleep_time > 0){co_await rstudio::logic::cotasks::Sleep(need_sleep_time);}instance.on_one_step_finish(skill_step);}if (skill_data.delay_end_time > 0){co_await rstudio::logic::cotasks::Sleep(skill_data.delay_end_time);}for (auto tid :instance.child_task_list){co_await rstudio::logic::cotasks::WaitTaskFinish(tid, 10000);}});
我们可以看到, 依赖C++20的新特性和我们自己封装的调度器, 我们已经可以很自然很顺畅的用比较低的心智负担来表达原来在python中实现的功能了, 这应该算是一个非常明显的进步了。
(三)小结
通过上面的例子我们可以看到协程化实现相关功能的好处:
不会形成大量的对象抽象,基于过程本身实现主体功能即可。
更容易写出数据驱动向的实现。
避免过多的Callback干扰主体逻辑实现。
四、结语
综合来看,C++20提供了一套理解上稍显复杂,但不碍使用的一套协程方案,20版的移除了诸多限制,尤其是自动栈变量的处理,让业务侧可以用更低的心智负担来使用协程,从某种程度已经接近如上例中python这种脚本能够提供的编程体验了,也算是一种不错的进步吧。
抛开机制本身的复杂度,以前文介绍的RpcRequest的协程化举例,相关的awaitable的实现比较套路化,也比较简单,所以形成了体系化的框架层后,实际的扩展和迭代并不复杂。对于异步操作比较多的场合,特别是多个异步操作混合,还是很值得实装的。
作者简介
沈芳
腾讯光子R工作室后台开发工程师
光子R工作室后台开发工程师,毕业于华中科技大学。目前负责SNGame项目后台主程工作。主要对GamePlay技术比较感兴趣。
推荐阅读
为什么WebAssembly不是JavaScript的终结者,而是它的“助推器”?