
Spring 实操 : PostProcessor 流程及能做什么
一 . 前言
BeanPostProcessor 是 Spring 的核心组件之一 , Bean 实现 BeanPostProcessor 可以实现很多复杂的功能
二 . PostProcessor 的结构
2.1 接口方法
该接口中主要提供了2种 , 其中提供了前置调用和后置调用 . 还可以看到 , 这里通过 default 修饰 , 所以并不是强制重写的
public interface BeanPostProcessor {
default Object postProcessBeforeInitialization(Object bean, String beanName) throws BeansException {
return bean;
}
default Object postProcessAfterInitialization(Object bean, String beanName) throws BeansException {
return bean;
}
}
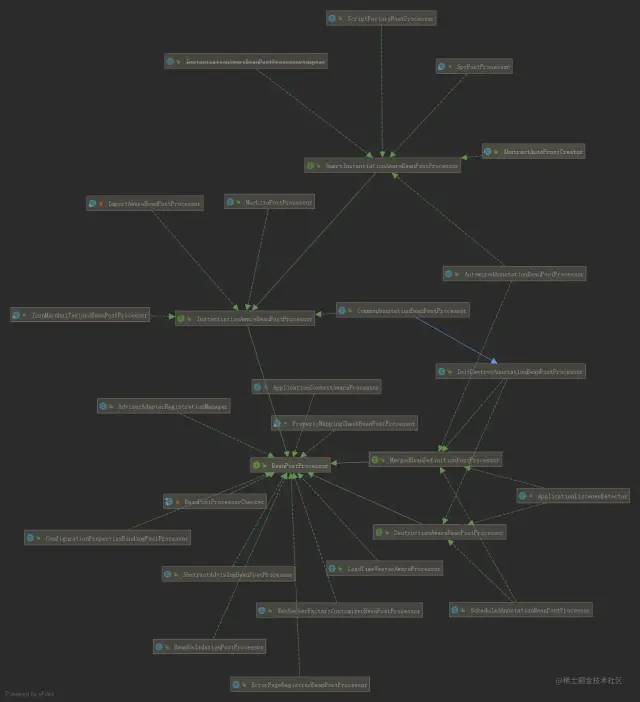
复制代码2.2 常见实现类
这里可以看到 , AOP , 定时 , 配置等都实现了相关的集成
三 . Spring 源码深入分析
3.1 使用案例
这一部分来看一下 Spring 内部是如何使用 PostProcessor 特性的 , 这一部分以 ScheduledAnnotationBeanPostProcessor 为例.
@Override
public Object postProcessBeforeInitialization(Object bean, String beanName) {
   // 可以看到 , 前置处理并没有太多处理 , 直接返回
   return bean;
}

@Override
public Object postProcessAfterInitialization(Object bean, String beanName) {

   if (bean instanceof AopInfrastructureBean || bean instanceof TaskScheduler ||
         bean instanceof ScheduledExecutorService) {
      // Ignore AOP infrastructure such as scoped proxies.
      return bean;
   }

   // Step 1 : 开始特殊处理
   Class targetClass = AopProxyUtils.ultimateTargetClass(bean);
   if (!this.nonAnnotatedClasses.contains(targetClass) &&
         AnnotationUtils.isCandidateClass(targetClass, Arrays.asList(Scheduled.class, Schedules.class))) {
      // Step 2 : 获取 Method 对应 Scheduled 的集合
      Map> annotatedMethods = MethodIntrospector.selectMethods(targetClass,
            (MethodIntrospector.MetadataLookup>) method -> {
               Set scheduledAnnotations = AnnotatedElementUtils.getMergedRepeatableAnnotations(
                     method, Scheduled.class, Schedules.class);
               return (!scheduledAnnotations.isEmpty() ? scheduledAnnotations : null);
            });
      if (annotatedMethods.isEmpty()) {
         this.nonAnnotatedClasses.add(targetClass);
      }
      else {
         // Step 3 : 方法不为空 , 执行 Process
         annotatedMethods.forEach((method, scheduledAnnotations) ->
               scheduledAnnotations.forEach(scheduled -> processScheduled(scheduled, method, bean)));
      }
   }
   return bean;
}
复制代码
PS : 后面就不看了 , 主要就是通过一个 ScheduledTask 运行 Runable 对象
从具体的使用上 , 不难看出 , 他是在创建Bean的时候去做补充的操作 , 那么下面来看一下具体的处理流程
这个流程在Bean 初始化流程 中进行了全面的跟踪 , 这里更关注其中的一些细节
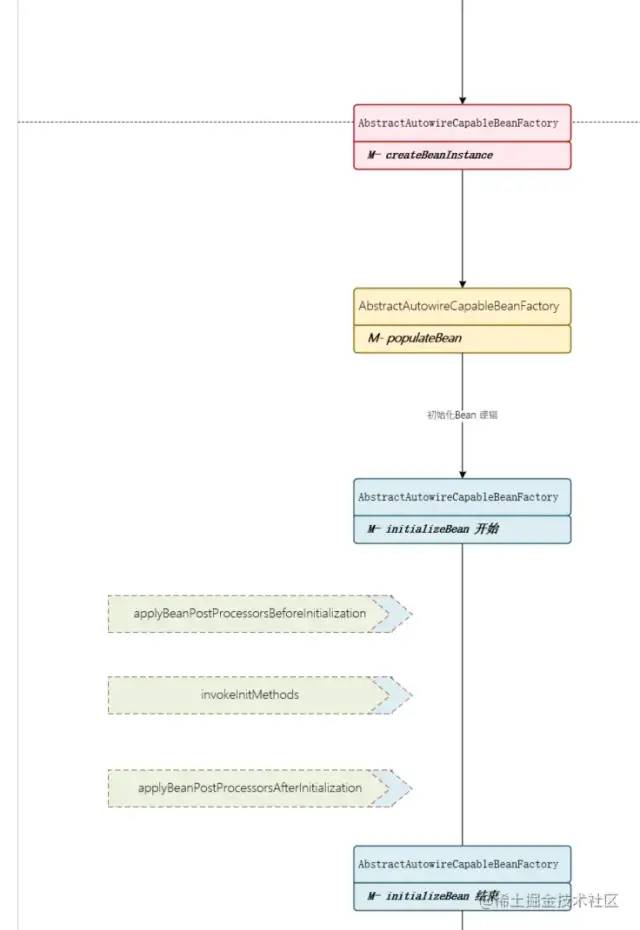
3.2 Before/After 调用流程
入口一 : AbstractAutowireCapableBeanFactory # initializeBean 调用
applyBeanPostProcessorsBeforeInitialization
applyBeanPostProcessorsAfterInitialization
其中流程也比较简单 , for 循环所有的 BeanPostProcessors 进行处理
3.3 BeanPostProcessors 的管理
// 在 AbstractBeanFactory 中有一个集合用于管理 BeanPostProcessor
private final List beanPostProcessors = new BeanPostProcessorCacheAwareList();

// 不论是哪种类型 ,都会通过以下2种方式进行调用 , 先删除, 后添加
public void addBeanPostProcessors(Collection beanPostProcessors) {
   this.beanPostProcessors.removeAll(beanPostProcessors);
   this.beanPostProcessors.addAll(beanPostProcessors);
}

public void addBeanPostProcessor(BeanPostProcessor beanPostProcessor) {
   this.beanPostProcessors.remove(beanPostProcessor);
   this.beanPostProcessors.add(beanPostProcessor);
}

复制代码
类型一 : 手动添加的流程
可以通过手动添加的方式 ,实现 BeanPostProcessor 的添加 , 参考对象 AbstractApplicationContext
protected void prepareBeanFactory(ConfigurableListableBeanFactory beanFactory) {
   // .............
   // Configure the bean factory with context callbacks.
   beanFactory.addBeanPostProcessor(new ApplicationContextAwareProcessor(this));
   // .............
}

复制代码
类型二 : Refresh 环节添加
哈哈 , 又到了这个地方 , 之前看 Refresh 代码的时候就注意到了这个地方 , 会注册相关的 BeanPostProcessors
protected void registerBeanPostProcessors(ConfigurableListableBeanFactory beanFactory) {
   // Step 1 : 调用  PostProcessorRegistrationDelegate 进行注册
   PostProcessorRegistrationDelegate.registerBeanPostProcessors(beanFactory, this);
}
复制代码
源码注释非常清晰 ,这里就是简单翻译了一下
public static void registerBeanPostProcessors(
      ConfigurableListableBeanFactory beanFactory, AbstractApplicationContext applicationContext) {

   // postProcessor 数组列表
   String[] postProcessorNames = beanFactory.getBeanNamesForType(BeanPostProcessor.class, true, false);

   // processor 计数
   int beanProcessorTargetCount = beanFactory.getBeanPostProcessorCount() + 1 + postProcessorNames.length;
   //注册BeanPostProcessorChecker,当bean在BeanPostProcessor实例化期间创建时,即当bean不符合所有BeanPostProcessors处理的条件时,该checker会记录信息消息
   beanFactory.addBeanPostProcessor(new BeanPostProcessorChecker(beanFactory, beanProcessorTargetCount));

   // 区别 PriorityOrdered, internalPostProcessor
   List priorityOrderedPostProcessors = new ArrayList<>();
   List internalPostProcessors = new ArrayList<>();

   // 有序化
   List orderedPostProcessorNames = new ArrayList<>();
   List nonOrderedPostProcessorNames = new ArrayList<>();

   for (String ppName : postProcessorNames) {
      if (beanFactory.isTypeMatch(ppName, PriorityOrdered.class)) {
         BeanPostProcessor pp = beanFactory.getBean(ppName, BeanPostProcessor.class);
         priorityOrderedPostProcessors.add(pp);
         // 运行时用于合并bean定义的后处理器回调接口
         if (pp instanceof MergedBeanDefinitionPostProcessor) {
            internalPostProcessors.add(pp);
         }
      }
      // 如果实现了 Ordered 接口 , 则需要有序处理
      else if (beanFactory.isTypeMatch(ppName, Ordered.class)) {
         orderedPostProcessorNames.add(ppName);
      }
      else {
         nonOrderedPostProcessorNames.add(ppName);
      }
   }

   // 首先,注册实现prioritordered的BeanPostProcessors
   sortPostProcessors(priorityOrderedPostProcessors, beanFactory);
   registerBeanPostProcessors(beanFactory, priorityOrderedPostProcessors);

   // 接下来,注册实现Ordered的BeanPostProcessors
   List orderedPostProcessors = new ArrayList<>(orderedPostProcessorNames.size());
   for (String ppName : orderedPostProcessorNames) {
      BeanPostProcessor pp = beanFactory.getBean(ppName, BeanPostProcessor.class);
      orderedPostProcessors.add(pp);
      if (pp instanceof MergedBeanDefinitionPostProcessor) {
         internalPostProcessors.add(pp);
      }
   }
   sortPostProcessors(orderedPostProcessors, beanFactory);
   registerBeanPostProcessors(beanFactory, orderedPostProcessors);

   // 现在,注册所有常规的BeanPostProcessors
   List nonOrderedPostProcessors = new ArrayList<>(nonOrderedPostProcessorNames.size());
   for (String ppName : nonOrderedPostProcessorNames) {
      BeanPostProcessor pp = beanFactory.getBean(ppName, BeanPostProcessor.class);
      nonOrderedPostProcessors.add(pp);
      if (pp instanceof MergedBeanDefinitionPostProcessor) {
         internalPostProcessors.add(pp);
      }
   }
   registerBeanPostProcessors(beanFactory, nonOrderedPostProcessors);

   // 最后,重新注册所有内部BeanPostProcessors
   sortPostProcessors(internalPostProcessors, beanFactory);
   registerBeanPostProcessors(beanFactory, internalPostProcessors);

   // 将用于检测内部bean的后处理器重新注册为ApplicationListeners,将其移动到处理器链的末端
   beanFactory.addBeanPostProcessor(new ApplicationListenerDetector(applicationContext));
}
复制代码
四 . 深入定制
4.1 添加 BeanPostProcessor
方法一 : 手动添加
PS : 当然 , 这种方式过于复杂 , 适用场景不多
@Autowired
private DefaultListableBeanFactory beanFactory;

@Bean(initMethod = "initMethod")
public CommonService getCommonService() {
    // 通过 BeanFactory 进行添加
    beanFactory.addBeanPostProcessor(new CustomizePostProcessor());
    return new CommonService();
}
复制代码
方法二 : 直接继承接口
上面分析的时候也看到 , 实现了接口就自动添加了
五 .问题补充
5.1 与四种常见的初始化方式有什么区别 ?
回顾一下四种初始化运行的方式 :
实现 InitializingBean 接口方法 afterPropertiesSet
实现 ApplicationRunner 接口方法 run(ApplicationArguments args)
方法标注注解 @PostConstruct
@Bean(initMethod = "initMethod") 通过注解指定
调用的区别
: ------> this is @PostConstruct <-------
: ------> this is InitializingBean  <-------
: ------> this is in @Bean(initMethod = "initMethod")  <-------
: ------> this is postProcessBeforeInitialization <-------
: ------> this is postProcessAfterInitialization <-------
: ------> this is postProcessBeforeInitialization <-------
: ------> this is postProcessAfterInitialization <-------
: ------> this is postProcessBeforeInitialization <-------
: ------> this is postProcessAfterInitialization <-------
: Started DemoApplication in 0.822 seconds (JVM running for 2.597)
: ------> this is ApplicationRunner :getCommonService <-------
复制代码
调用次数 : 四种方法只会调用一次 ,而 postProcessBeforeInitialization 和 postProcessAfterInitialization 会在每个Bean创建的时候调用
调用时机 : 集中在每个 Bean initializeBean 环节调用
六. 我们能用它干什么 ?
这里不讨论是否真的有场景会使用 ,只是发散思维 , 去思考如何利用他的特点去做点什么
6.1 结合设计模式
代理是 postProcess 最合适的使用之一 , AOP 即使用了他的特性进行的代理 , 我们可以模拟 AOP , 去做一个更偏向于业务的静态代理模式 .
同时也可以实现装饰器模式 , 对 Bean 的处理进行加强 .
Step 1 : 准备接口和实现类
// 统一接口
public interface Sourceable {
    void method();
}


// 对应实现类 (实际业务类)
@Service
public class Source implements Sourceable {

    @Override
    public void method() {
        System.out.println("the original method!");
    }
}

复制代码
Step 2 : 准备中间类
public class AopProxyImpl implements Sourceable {

    private Sourceable source;

    public AopProxyImpl(Sourceable source) {
        super();
        // 注意 ,代理模式是在代理类中创建一个对象
        // this.source = new Source();

        // 修饰模式是传入对应的对象
        this.source = source;
    }

    @Override
    public void method() {
        before();
        source.method();
        atfer();
    }

    private void atfer() {
        System.out.println("after proxy!");
    }

    private void before() {
        System.out.println("before proxy!");
    }
}
复制代码
Step 3 : BeanPostProcessor 进行处理
@Service
public class AopPostProcessor implements BeanPostProcessor {

    private Logger logger = LoggerFactory.getLogger(this.getClass());

    @Override
    public Object postProcessBeforeInitialization(Object bean, String beanName) throws BeansException {
        logger.info("------> AopPostProcessor postProcessBeforeInitialization <-------");
        return bean;
    }

    @Override
    public Object postProcessAfterInitialization(Object bean, String beanName) throws BeansException {
        logger.info("------> AopPostProcessor postProcessAfterInitialization <-------");

        if (bean instanceof Sourceable) {
            logger.info("------> AopPostProcessor build Aop <-------");
            AopProxyImpl proxy = new AopProxyImpl((Sourceable)bean);
            return proxy;
        }

        return bean;
    }
}
复制代码
补充 :
这里如果没有 , 则一定会抛出 BeanNotOfRequiredTypeException , 因为 Spring 会去坚持类是否匹配
这里我们属于静态代理 , 其实还可以更活用的使用 cglib 动态代理
还有很多种整合设计模式的方式可以灵活使用
6.2 Manager 管理指定类型对象
这种方式是在 postProcessor 中对指定的Bean 进行一个管理记录
大概的使用方式是准备一个BeanManager , 然后在 postProcessor 中进行管理
@Component
public class BeanManager {

    // 对特殊的Bean 进行分组
    private static Map typeOne = new ConcurrentHashMap();
    private static Map typeTwo = new ConcurrentHashMap();

    // PS : 这种方式适合处理更复杂的场景 , 简单场景可以考虑通过 ApplicationContext.getBean 获取对应的类
}


public Object postProcessAfterInitialization(Object bean, String beanName) throws BeansException {
    logger.info("------> ManagerPostProcessor postProcessAfterInitialization <-------");

    if (bean instanceof TypeBean) {
        logger.info("------> AopPostProcessor build Aop <-------");
        beanManager.getTypeOne().put(beanName, (TypeBean) bean);
    }

    return bean;
}

// PS : 实际上和注入的是同一个对象
------> typeOne.get("typeBeanImpl") == (typeBean) :true <-------

复制代码
补充 :
这是最简单的使用方式 , 相对更复杂的还可以整合注解 , 整合接口或者父类 , 或者仅记录class信息等方式 ,达到自己的业务效果
6.3 注入特殊属性
从图片中我们可以看到 , BeanPostProcessor 是在 PopulateBean 环节之后进行处理的 , 那么我们可以通过这个环节 , 对 Bean 中的属性进行修饰 , 常见的使用想法包括 :
为特定属性设置动态代理
从 Remote 端获取属性 , 并且设置
这个就比较好理解了 , 实际上这个时候包括RestTemplate 都已经加载完成 , JDBC 也可以使用 , 在这个时候完全可以从远端获取配置信息
// 作用一 :
使用 JDBC (JPA 应该也已经加载可用) , 从数据库获取配置 , 判断当前类是否有特定注解 , 刷新注解的配置

// 作用二 :
调用远端配置中心 , 自定义刷新配置

// 作用三 :
刷新特殊的属性或者对象等等
复制代码
**特殊对象的刷新有多种任意的使用 , 可以根据自己的业务灵活运用 **
6.4 其他思路
这里只是抛砖引玉 , 欢迎大佬们提出自己的想法
重构属性
定制化过程中对类进行覆盖
总结
注意点 :
applyBeanPostProcessorsBeforeInitialization 主要在 initializeBean 环节调用
applyBeanPostProcessorsAfterInitialization 除了initializeBean外还在多个环节被调用 , 包括 getSingletonFactoryBeanForTypeCheck 等等几个 Factory 去实例化的过程中
避免循环 , ManagerPostProcessor 不会处理自己
BeanPostProcessor 在每个 bean 创建时都会调用 , 过多会影响启动效率
BeanPostProcessor 主要在populateBean 之后 , 注意前后顺序
作者:AntBlack
链接:https://juejin.cn/post/7016160419093938207
来源:稀土掘金
著作权归作者所有。商业转载请联系作者获得授权,非商业转载请注明出处。