
Java多线程?一篇就够了
点击上方蓝色字体,选择“标星公众号”
优质文章,第一时间送达
一.认识线程及线程的创建
1.线程的概念
2.线程的特性
3.线程的创建方式
<1>继承Thread类
class MyThread extends Thread{
    @Override
    public void run() {
        System.out.println("继承Thread类创建线程");
    }
}
 public static void main(String[] args) {
        //1.继承Thread类创建线程
        MyThread t=new MyThread();
        t.start();
        }
<2>实现Runnable接口
class MyRunnable implements Runnable{
    @Override
    public void run() {
        System.out.println("继承Runnable接口,创建描述任务对象,实现多线程");
    }
}
  public static void main(String[] args) {

        //2.实现Runnable接口
        Thread t1=new Thread(new MyRunnable());
        t1.start();
        }
 Thread t2=new Thread(new Runnable() {
            @Override
            public void run() {
                System.out.println("使用Runnable接口,创建匿名内部类实现");
            }
        });
        t2.start();
<3>实现Callable接口
class MyCallable implements Callable<String> {
    //允许抛出异常,允许带有返回值,返回数据类型为接口上的泛型
    @Override
    public String call() throws Exception {
        System.out.println("实现了Callable接口");
        return "这不是一个线程类,而是一个任务类";
    }
}
public static void main(String[] args) throws ExecutionException, InterruptedException {
        //方法三:实现Callable接口,是一个任务类
        //FutureTask底层也实现了Runnable接口
        FutureTask<String> task=new FutureTask<>(new MyCallable());
        new Thread(task).start();
        System.out.println(task.get());
    }
二.线程的常用方法
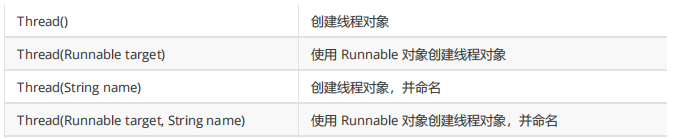
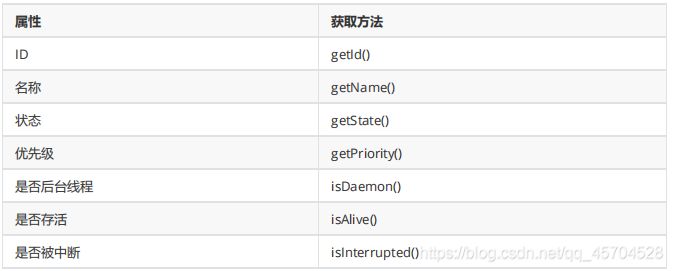
1.构造方法和属性的获取方法
2.常用方法
<1>run()和start()
public class Thread_Run_VS_Start {
    public static void main(String[] args) {
        new Thread(new Runnable() {
            @Override
            public void run() {
                while (true){

                }
            }
        }).run();
        /**
         * main线程直接调用Thread对象的run方法会直接在main线程
         * 运行Thread对象的run()方法---->传入的runnable对象.run()
         * 结果,main线程直接运行while(true)
         *
         * start()是启动一个线程,调用新线程的while(true)方法
         * 对比通过start()调用的结果区别
         */

        new Thread(new Runnable() {
            @Override
            public void run() {
                while (true){

                }
            }
        }).start();
    }
}
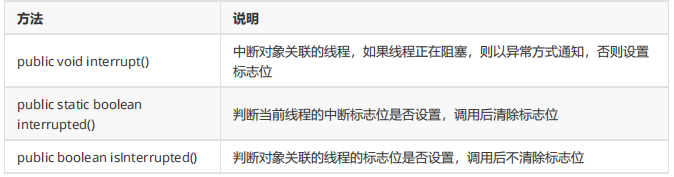
<2>interrupt()方法
public class Interrupt {
    public static void main(String[] args) throws InterruptedException {
        Thread t=new Thread(new Runnable() {
            @Override
            public void run() {

                //...执行任务,执行时间可能比较长
               //运行到这里,在t的构造方法中不能引用t使用Thread.currentThread()方法,获取当前代码行所在线程的引用
                for (int i = 0; i <10000&&!Thread.currentThread().isInterrupted() ; i++) {
                    System.out.println(i);
                    //模拟中断线程
                    try {
                        Thread.sleep(1000);
                        //通过标志位自行实现,无法解决线程阻塞导致无法中断
                        //Thread,sleep(100000)
                    } catch (InterruptedException e) {
                        e.printStackTrace();
                    }
                }
            }
        });
        t.start();//线程启动,中断标志位=false
        System.out.println("t start");
        //模拟,t执行了5秒,进程没有结束,要中断,停止t线程
        Thread.sleep(5000);

        //未设置时,isInterrupt为false

        //如果t线程处于阻塞状态(休眠等),会抛出InterruptedException异常
        //并且会重置isInterrupt中断标志位位false
        t.interrupt();//告诉t线程,要中断(设置t线程的中断标志位为true),由t的代码自行决定是否要中断
        //isInterrupt设置为true
        //t.isInterrupted();  Interrupted是线程中的标志位
        System.out.println("t stop");


        //注:Thread.interrupted(); 返回当前线程的中断标志位,然后重置中断标志位

    }
}
<3>join方法


//join方法:实例方法:
// 1.无参:t.join:当前线程无条件等待,直到t线程运行完毕
//  2.有参:t.join(1000)等待1秒,或者t线程结束,哪个条件满足,当前线程继续往下执行
public class Join {
    public static void main(String[] args) throws InterruptedException {
        Thread t=new Thread(new Runnable() {
            @Override
            public void run() {
                System.out.println("1");
            }
        });
        t.start();

        t.join();//当前线程main线程无条件等待,直到t线程执行完毕,当前线程再往后执行
       // t.join(1000);当前线程等到1秒,或者等t线程执行完毕
        System.out.println("ok");

    }
}
<4>获取当前线程的引用currentThread();方法

public class ThreadDemo {
public static void main(String[] args) {
Thread thread = Thread.currentThread();
System.out.println(thread.getName());
}
}
<5>休眠当前线程sleep();方法

Thread.sleep(1000);
<6>线程让步yield();方法
public class Yield {
    public static void main(String[] args) {
        for(int i=0;i<20;i++){
            final int n=i;
            Thread t=new Thread(new Runnable() {
                @Override
                public void run() {
                    System.out.println(n);
                }
            });
            t.start();
        }
        //判断:如果活跃的线程数量大于1,main线程让步
        while (Thread.activeCount()>1){//记录活跃线程的数量
            Thread.yield();
        }//注意:要用debug方式,因为run方式,idea后台还会启动一个线程
        //实现ok在1到二十之后打印
        System.out.println("ok");
    }
}
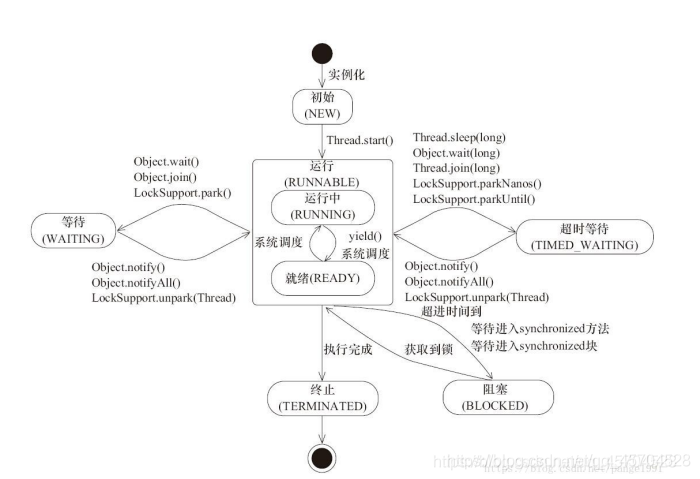
三.线程的生命周期和状态转换
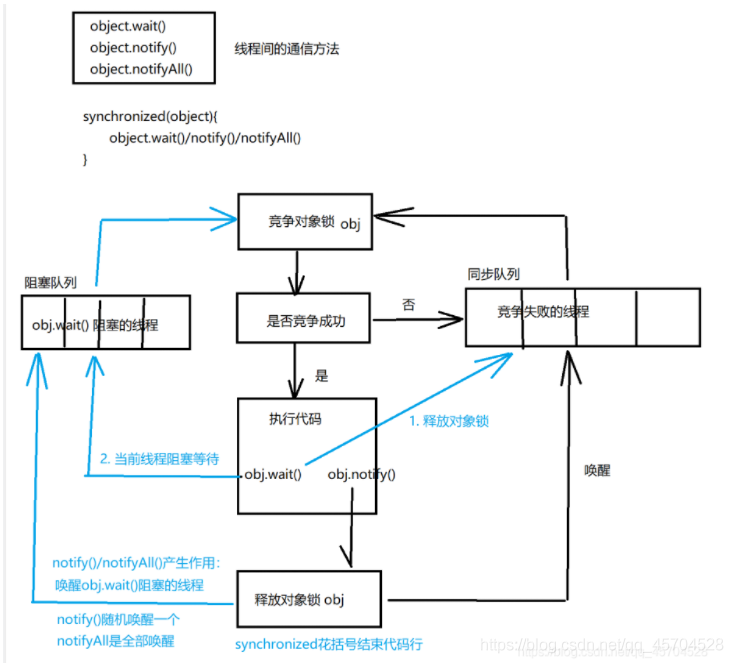
四.线程间的通信
public class SequencePrintHomeWork {
    //有三个线程,每个线程只能打印A,B或C
    //要求:同时执行三个线程,按ABC顺序打印,依次打印十次
    //ABC换行 ABC换行。。。。
    //考察知识点:代码设计,多线程通信

    public static void main(String[] args) {
        Thread a = new Thread(new Task("A"));
        Thread b = new Thread(new Task("B"));
        Thread c = new Thread(new Task("C"));
        c.start();
        b.start();
        a.start();
    }

    private static class Task implements Runnable{

        private String content;
        //顺序打印的内容:可以循环打印
        private static String[] ARR = {"A", "B", "C"};
        private static int INDEX;//从数组哪个索引打印

        public Task(String content) {
            this.content = content;
        }

        @Override
        public void run() {
            try {
                for(int i=0; i<10; i++){
                    synchronized (ARR){//三个线程使用同一把锁
                        //从数组索引位置打印,如果当前线程要打印的内容不一致,释放对象锁等待
                        while(!content.equals(ARR[INDEX])){
                            ARR.wait();
                        }
                        //如果数组要打印的内容和当前线程要打印的一致,
                        // 就打印,并把数组索引切换到一个位置,通知其他线程
                        System.out.print(content);
                        if(INDEX==ARR.length-1){
                            System.out.println();
                        }
                        INDEX = (INDEX+1)%ARR.length;
                        ARR.notifyAll();
                    }
                }
            } catch (InterruptedException e) {
                e.printStackTrace();
            }
        }
    }
}
五.多线程的安全及解决
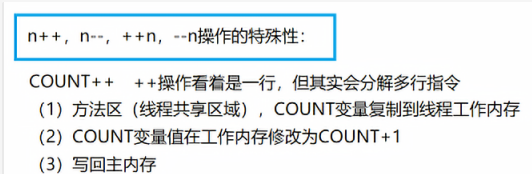
1.原子性
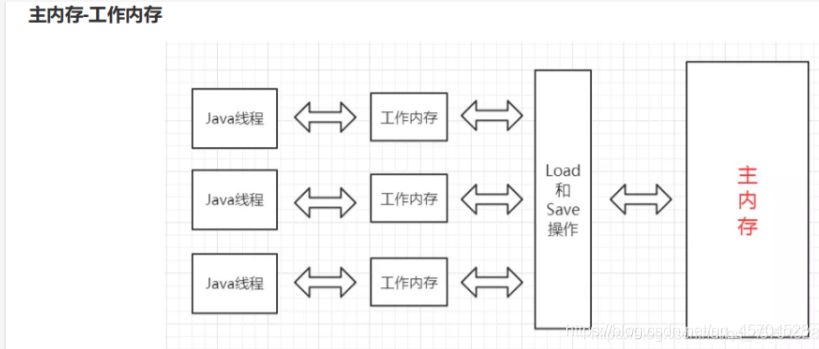
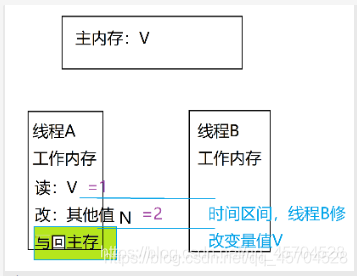
2.可见性
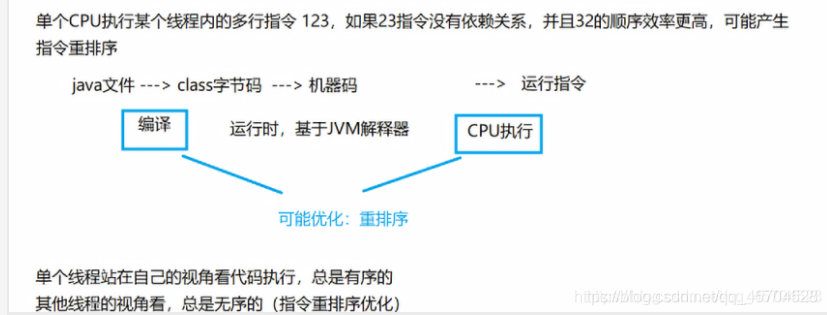
3.代码的顺序性
4.线程不安全问题的解决
<1>synchronized 关键字
<2>volatile 关键字
public class Test {
    private static boolean flag = true;
    public static void main(String[] args) {
        //创建一个线程并启动
        new Thread(new Runnable() {
            int i=0;
            @Override
            public void run() {
                while(flag){
                    //这个语句底层使用了synchronized,保证了可见性
                    //System.out.println("=============");

                    i++;
                }
            }
        }).start();
        try {
            Thread.sleep(1000);
        } catch (InterruptedException e) {
            e.printStackTrace();
        }
        //即使改了,上面的线程flag也不会改,会一直循环
        flag = false;
    }
}
六.锁体系
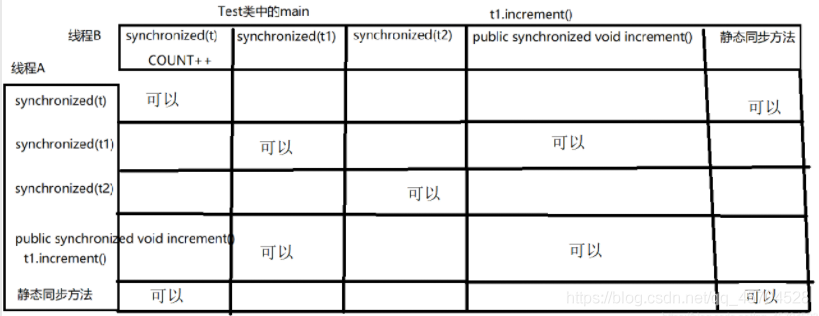
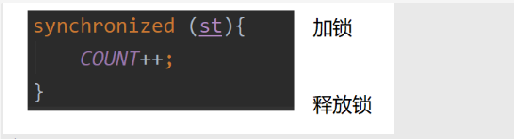
1.Synchronized加锁方式
<1>Synchronized的加锁方式及语法基础
public class SafeThread {
    //有一个遍历COUNT=0;同时启动20个线程,每个线程循环1000次,每次循环把COUNT++
    //等待二十个子线程执行完毕之后,再main中打印COUNT的值
    //(预期)count=20000
    private static int COUNT=0;

    //对当前类对象进行加锁,线程间同步互斥
//    public synchronized static void increment(){
//        COUNT++;
//    }


    //使用不同的对象加锁,没有同步互斥的效果,并发并行
//    public static void increment(){
//        synchronized (new SafeThread()){
//            COUNT++;
//        }
//    }
    public static void main(String[] args) throws InterruptedException {
        //尽量同时启动,不让new线程操作影响
        Class clazz=SafeThread.class;
      Thread[]threads=new Thread[20];
        for (int i = 0; i <20 ; i++) {
            threads[i]=new Thread(new Runnable() {
                @Override
                public void run() {
                    for (int j = 0; j <1000 ; j++) {
                        //给SafeThread对象加一把锁
                        synchronized (clazz){
                            COUNT++;
                        }
                    }
                }
            });
        }
        for (int i = 0; i <20 ; i++) {
            threads[i].start();
        }

        //让main线程等待20个子线程运行完毕
        for (int i = 0; i <20 ; i++) {
            threads[i].join();
        }

        System.out.println(COUNT);
    }
}
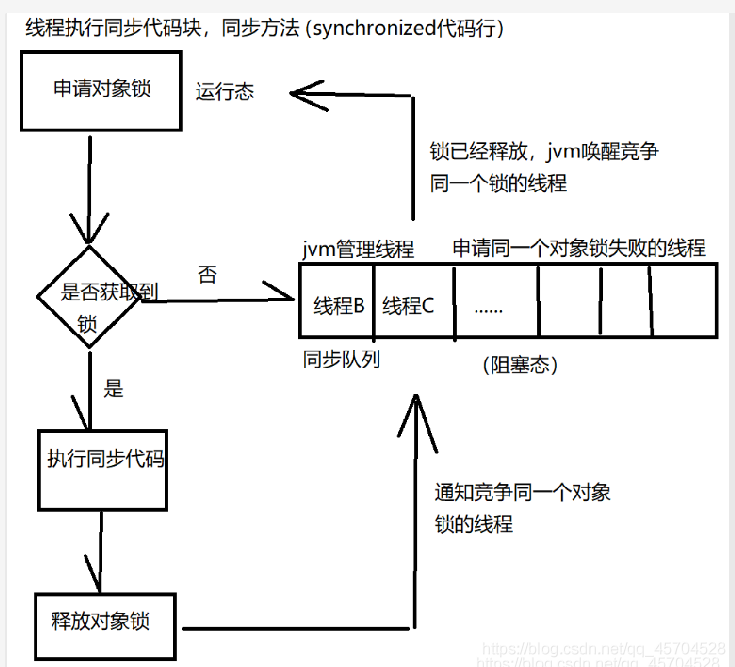
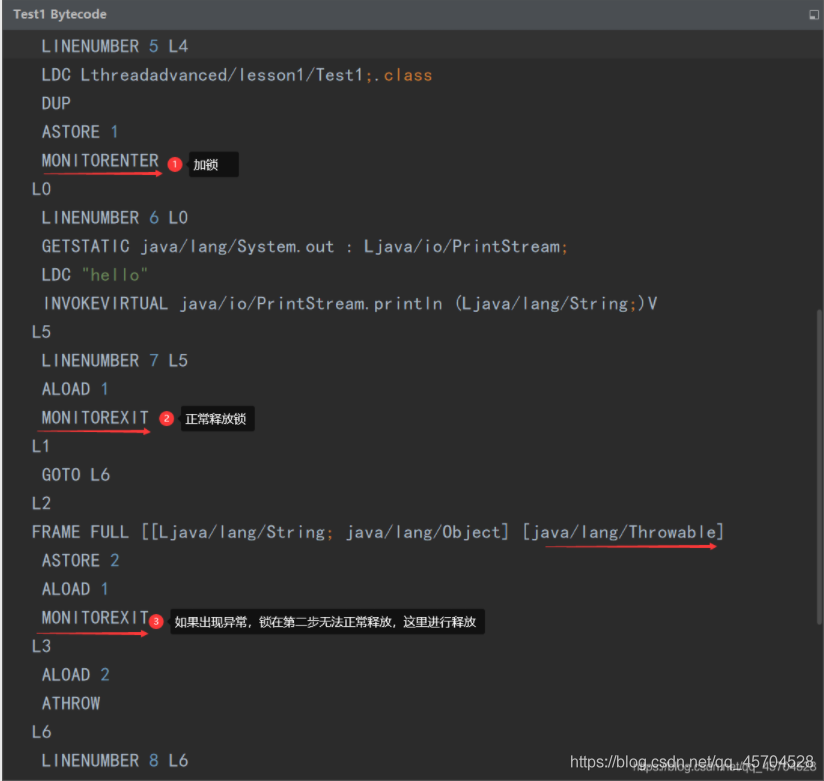
<2>Synchronized的原理及实现
public class Test1 {
    public Test1() {
    }

    public static void main(String[] args) {
        Class var1 = Test1.class;
        synchronized(Test1.class) {
            System.out.println("hello");
        }
    }
}
<3>JVM对Synchronized的优化
(1).对锁的优化
(2).锁粗话
public class Test {
    private static StringBuffer sb;
    public static void main(String[] args) {
        sb.append("1").append("2").append("3");
    }
}
(3).锁消除
public class Test {
    public static void main(String[] args) {
        StringBuffer sb=new StringBuffer();
        sb.append("1");
        sb.append("2");
        sb.append("3");
    }
}
2.常见的锁策略及CAS
<1>.乐观锁和悲观锁
<2>自旋锁
while(抢锁(lock)==失败{}
<3>可重入锁
public class Test2 {
    public static synchronized void t1(){
        t2();
    }
    public static synchronized void t2(){

    }
    public static void main(String[] args) {
        t1();
    }
}
3.Lock体系
<1>Lock接口
(1)使用Lock锁实现线程同步
public class AccountRunnable implements  Runnable {
    private Account account = new Account();
    //买一把锁
    Lock lock = new ReentrantLock(); //Re-entrant-Lock  可重入锁
    @Override
    public void run() {
        //此处省略300句
        try{
//上锁
            lock.lock();
            //判断余额是否足够,够,取之;不够,不取之;
            if(account.getBalance()>=400){
                try {
                    Thread.sleep(1);
                } catch (InterruptedException e) {
                    e.printStackTrace();
                }
                method1();
                //取之
                account.withDraw(400);
                //输出信息
                System.out.println(Thread.currentThread().getName()+
                   "取款成功,现在的余额是"+account.getBalance());
            }else{
                 System.out.println("余额不足,"+Thread.currentThread().getName()
                 +"取款失败,现在的余额是"   +account.getBalance());
            }
        }finally {
            //解锁
            lock.unlock();
        }
        //此处省略100句
    }
}
(2)Lock加锁的四种方式
<2>AQS简单认识

<3>ReentrantLock
(1)ReentrantLock基本概念
(2)自己实现一个简单的ReentrantLock
public class Test2 {
    volatile int status=0;
    Queue parkQueue;//集合 数组  list
    void lock(){
        while(!compareAndSet(0,1)){
            //这里不能用sleep或yield实现
            //sleep无法确定睡眠的时间
            //yield只能用于两个线程竞争,当有多个线程之后,t1抢不到锁,yield会让出cpu,但是可能下一次cpu还是调t1
            park();
        }
        unlock();
    }
    void unlock(){
        lock_notify();
    }
    void park(){
        //将当期线程加入到等待队列
        parkQueue.add(currentThread);
        //将当期线程释放cpu  阻塞   睡眠
        releaseCpu();
    }
    void lock_notify(){
        //status=0
        //得到要唤醒的线程头部线程
        Thread t=parkQueue.header();
        //唤醒等待线程
        unpark(t);
    }
}
(3)ReentrantLock部分源码分析
//非公平锁
 public ReentrantLock() {
        sync = new NonfairSync();
    }
//公平锁
 public ReentrantLock(boolean fair) {
        sync = fair ? new FairSync() : new NonfairSync();
    }
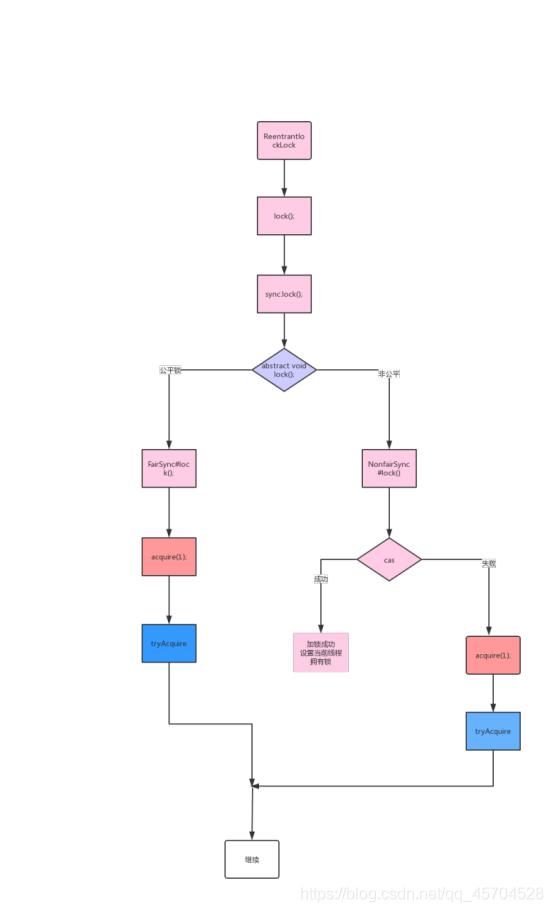
final void lock() {
    if (compareAndSetState(0, 1))//首先用一个CAS操作,判断state是否是0(表示当前锁未被占用)
        setExclusiveOwnerThread(Thread.currentThread());//设置当前占有锁的线程为该线程
    else
        acquire(1);
}
public final void acquire(int arg) {
    //首先看看自己要不要排队,如果不用排队,获取锁,要排队,加入AQS队列
    if (!tryAcquire(arg) &&
        acquireQueued(addWaiter(Node.EXCLUSIVE), arg))
        selfInterrupt();
}
tryAcquire(arg)
final boolean nonfairTryAcquire(int acquires) {
    //获取当前线程
    final Thread current = Thread.currentThread();
    //获取state变量值
    int c = getState();
    if (c == 0) { //没有线程占用锁
        if (compareAndSetState(0, acquires)) {
            //占用锁成功,设置独占线程为当前线程
            setExclusiveOwnerThread(current);
            return true;
        }
    } else if (current == getExclusiveOwnerThread()) { //当前线程已经占用该锁 重入锁
        int nextc = c + acquires;
        if (nextc < 0) // overflow
            throw new Error("Maximum lock count exceeded");
        // 更新state值为新的重入次数
        setState(nextc);
        return true;
    }
    //获取锁失败
    return false;
}
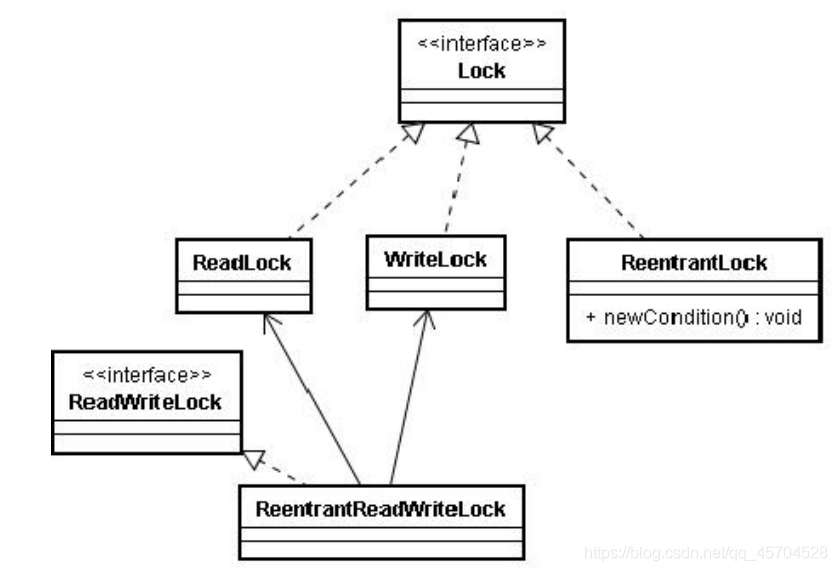
<4>ReadWriteLock锁
public   interface   ReadWriteLock {
      Lock readLock();
      Lock writeLock();
}
public class TestLock {
    public static void main(String[] args) {
//默认也是非公平锁  也是可重入锁
        ReadWriteLock rwl = new ReentrantReadWriteLock();
        //多次返回的都是同一把读锁 同一把写锁
        Lock readLock = rwl.readLock();
        Lock readLock2 = rwl.readLock();
        Lock writeLock = rwl.writeLock();
        readLock.lock();
        readLock.unlock();
        System.out.println(readLock==readLock2);
    }
}
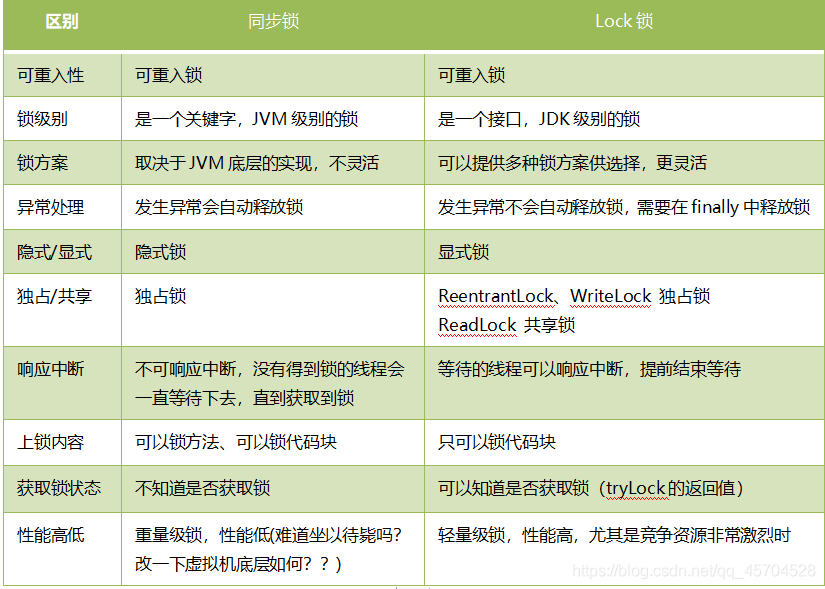
4.Lock锁和同步锁(synchronized)的区别
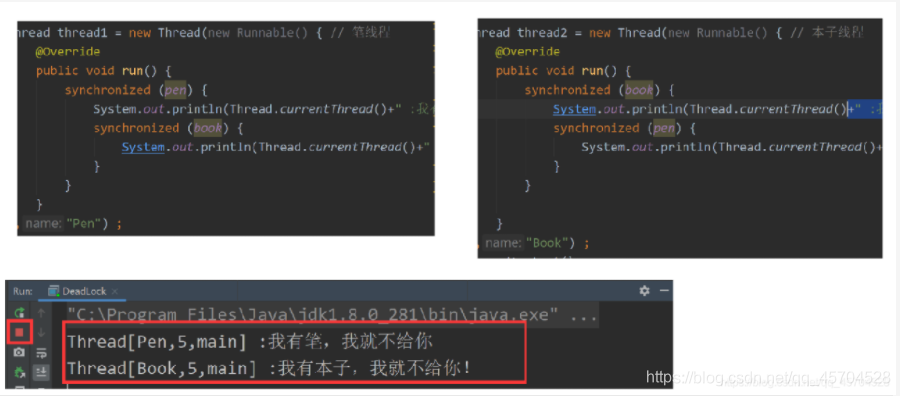
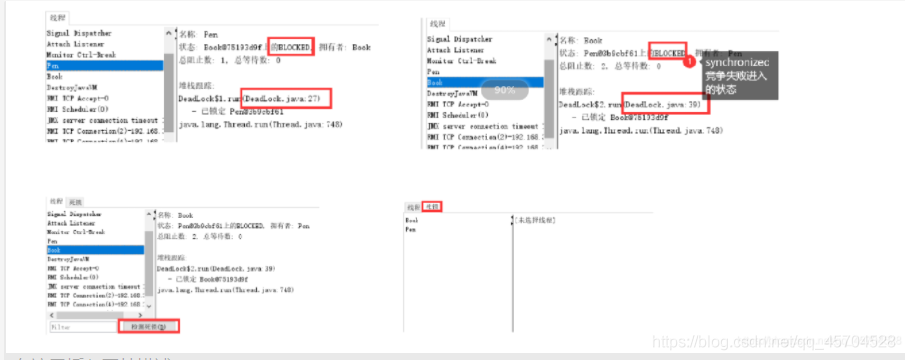
5.死锁
package threadadvanced.lesson1;

class Pen {
 private String pen = "笔" ;
 public String getPen() {
  return pen;
 }
}
class Book {
 private String book = "本" ;
 public String getBook() {
  return book;
 }
}
public class DeadLock {
 private static Pen pen = new Pen() ;
 private static Book book = new Book() ;
 public static void main(String[] args) {
  new DeadLock().deadLock();
 }
 public void deadLock() {
  Thread thread1 = new Thread(new Runnable() { // 笔线程
   @Override
   public void run() {
    synchronized (pen) {
     try {
      Thread.sleep(1000);
     } catch (InterruptedException e) {
      e.printStackTrace();
     }
     System.out.println(Thread.currentThread()+" :我有笔,我就不给你");
     synchronized (book) {
      System.out.println(Thread.currentThread()+" :把你的本给我!");
     }
    }
   }
  },"Pen") ;

  Thread thread2 = new Thread(new Runnable() { // 本子线程
   @Override
   public void run() {
    synchronized (book) {
     System.out.println(Thread.currentThread()+" :我有本子,我就不给你!");
     synchronized (pen) {
      System.out.println(Thread.currentThread()+" :把你的笔给我!");
     }
    }

   }
  },"Book") ;
  thread1.start();
  thread2.start();
 }
}
七.多线程案例
1.生产者消费者问题
/**
* 面包店
* 10个生产者,每个每次生产3个
* 20个消费者,每个每次消费一个
*
* 进阶版需求
* 面包师傅每个最多生产30次,面包店每天生产10*30*3=900个面包
* 消费者也不是一直消费。把900个面包消费完结束
*
* 隐藏信息:面包店每天生产面包的最大数量为900个
* 消费者把900个面包消费完结束
*/
public class AdvancedBreadShop {
//面包店库存数
private static int COUNT;
//面包店生产面包的总数,不会消费的
private static int PRODUCE_NUMBER;
public static class Consumer implements Runnable{
private String name;
public Consumer(String name) {
this.name = name;
}
@Override
public void run() {
try {
while (true){
synchronized (AdvancedBreadShop.class){
if(PRODUCE_NUMBER==900&&COUNT==0){
System.out.println("今天面包已经卖完了");
break;
}else {
if(COUNT==0){
AdvancedBreadShop.class.wait();
}else {
System.out.printf("%s消费了一个面包\n",this.name);
COUNT--;
AdvancedBreadShop.class.notifyAll();
Thread.sleep(100);
}
}
}
Thread.sleep(100);
}
} catch (InterruptedException e) {
e.printStackTrace();
}
}
}
private static class Producer implements Runnable{
private String name;
public Producer(String name) {
this.name = name;
}
@Override
public void run() {
try {
//生产者生产30次,结束循环
for(int i=0;i<=30;i++) {
synchronized (AdvancedBreadShop.class){
if(i==30){
System.out.println("今天面包生产完了");
break;
}else {
if(COUNT>97){
AdvancedBreadShop.class.wait();
}else {
COUNT=COUNT+3;
PRODUCE_NUMBER=PRODUCE_NUMBER+3;
System.out.printf("%s生产了三个面包\n",this.name);
AdvancedBreadShop.class.notifyAll();
Thread.sleep(100);
}
}
}
Thread.sleep(100);
}
} catch (InterruptedException e) {
e.printStackTrace();
}
}
}
public static void main(String[] args) {
Thread[] Consumers=new Thread[20];
Thread[] Producers=new Thread[10];
for (int i = 0; i <20 ; i++) {
Consumers[i]=new Thread(new Consumer(String.valueOf(i)));
}
for (int i = 0; i <10 ; i++) {
Producers[i]=new Thread(new Producer(String.valueOf(i)));
}
for (int i = 0; i <20 ; i++) {
Consumers[i].start();
}
for (int i = 0; i <10 ; i++) {
Producers[i].start();
}
}
}2.单例模式
public class Singleton {
    //volatile关键字修饰,保证的可见性和代码的顺序性
    private static volatile Singleton instance = null;

    private Singleton() {
    }

    public static Singleton getInstance() {
        //判断instance是否为空,竞争锁的条件
        if (instance == null) {
            //保证线程安全,为Singleton.class加锁
            synchronized (Singleton.class) {
                //再次判断instance是否为空,防止多个线程进入第一个if后
                //对synchronized锁竞争失败进入阻塞状态后,再次进入运行态时
                //new了多个Singleton,不符合单例模式
                //保证线程安全
                if (instance == null) {
                    instance = new Singleton();
                }
            }
        }
        return instance;
        }
        }
3.阻塞式队列
/**
 * 实现阻塞队列
 * 1.线程安全问题:在多线程情况下,put,take不具有原子性,4个属性,不具有可见性
 * 2.put操作:如果存满了,需要阻塞等待。take操作:如果是空,阻塞等待
 * @param <T>
 */
public class MyBlockingQueue <T>{
    //使用数组实现循环队列
    private Object[] queue;

    //存放元素的索引
    private int putIndex ;

    //取元素的索引
    private int takeIndex;

    //当前存放元素的数量
    private int size;
    public MyBlockingQueue(int len){
        queue=new Object[len];
    }

    //存放元素,需要考虑:
    //1.putIndex超过数组长度
    //2.size达到数组最大长度
    public synchronized void put(T e) throws InterruptedException {
        //不满足执行条件时,一直阻塞等待
        //当阻塞等待都被唤醒并再次竞争成功对象锁,回复往下执行时,条件可能被其他线程修改
        while (size==queue.length){
            this.wait();
        }
        //存放到数组中放元素的索引位置
        queue[putIndex]=e;
        putIndex=(putIndex+1)%queue.length;
        size++;
        notifyAll();
    }

    //取元素
    public synchronized T take() throws InterruptedException {
       while (size==0){
            this.wait();
        }
        T t= (T) queue[takeIndex];
        queue[takeIndex]=null;
        takeIndex=(takeIndex+1)%queue.length;
        size--;
        notifyAll();
        return t;
    }

    public int size(){
        return size;
    }

    public static void main(String[] args) {
        MyBlockingQueue<Integer>queue=new MyBlockingQueue<>(10);
        //多线程的调试方式:1.写打印语句 2.jconsole
        for (int i = 0; i <3 ; i++) {
            new Thread(new Runnable() {
                @Override
                public void run() {
                    try {
                        for (int j = 0; j <100 ; j++) {
                            queue.put(j);
                        }
                    } catch (InterruptedException e) {
                        e.printStackTrace();
                    }
                }
            }).start();
        }

        for (int i = 0; i <3 ; i++) {
            new Thread(new Runnable() {
                @Override
                public void run() {
                    try {
                       while (true){
                          int t= queue.take();
                           System.out.println(Thread.currentThread().getName()+":"+t);
                       }
                    } catch (InterruptedException e) {
                        e.printStackTrace();
                    }
                }
            }).start();
        }
    }
}
4.线程池
import java.util.concurrent.*;

public class ThreadPoolExecutorTest {
    public static void main(String[] args) {
        //以快递公司,快递员,快递业务为模型
        ThreadPoolExecutor pool=new ThreadPoolExecutor(
                5,//核心线程数---->正式员工数
                10,//最大线程数-->正式员工+临时员工
                60,//临时工的最大等待时间
                TimeUnit.SECONDS,//idle线程的空闲时间-->临时工最大的存活时间,超过就解雇
                new LinkedBlockingQueue<>(),//阻塞队列,任务存放的地方--->快递仓库
                new ThreadFactory() {
                    @Override
                    public Thread newThread(Runnable r) {
                        return new Thread(new Runnable() {
                            @Override
                            public void run() {
                                //r对象是线程池内部封装过的工作任务类(Worker),会一直循环等待的方式从阻塞队列中拿取任务并执行
                                //所以不能调用r.run();方法
                                System.out.println(Thread.currentThread().getName()+"开始执行了");
                            }
                        });
                    }
                },//创建线程的工厂类  线程池创建线程时,调用该工厂类的方法创建线程(满足该工厂创建线程的要求)
                   //---->对应招聘员工的标准

                /**
                 * 拒绝策略:达到最大线程数且阻塞队列已满,采取拒绝策略
                 * AbortPolicy:直接抛出RejectedExecutionException(不提供handler时的默认策略)
                 * CallerRunsPolicy:谁(某个线程)交给我(线程池)的任务,我拒绝执行,由谁自己去执行
                 * DiscardPolicy:交给我的任务直接丢弃掉
                 * DiscardOldestPolicy:阻塞队列中最旧的任务丢弃
                 */
                new ThreadPoolExecutor.AbortPolicy()//拒绝策略-->达到最大线程数,且阻塞队列已满,采取的拒绝策略
        );//线程池创建以后,只要有任务们就会自动执行

        for (int i = 0; i <20 ; i++) {
            //线程池执行任务:execute方法,submit方法--->提交执行一个任务
            //区别:返回值不同
            pool.execute(new Runnable() {
                @Override
                public void run() {
                    try {
                        Thread.sleep(1000);
                    } catch (InterruptedException e) {
                        e.printStackTrace();
                    }
                }
            });
        }
        //线程池有4个快捷的创建方式(实际工作不使用,作为面试了解)
        //实际工作需要使用ThreadPoolExecutor,构造参数是我们自己指定,比较灵活
        ExecutorService pool2=Executors.newSingleThreadExecutor();//创建单线程池
        ExecutorService pool3=Executors.newCachedThreadPool();//缓存的线程池
        ExecutorService pool5=Executors.newFixedThreadPool(4);//固定大小线程池
        ScheduledExecutorService pool4=Executors.newScheduledThreadPool(4);//计划任务线程池

        //两秒中之后执行这个任务
        pool4.schedule(new Runnable() {
            @Override
            public void run() {
                System.out.println("hello");
            }
        }, 2, TimeUnit.SECONDS);

        //一直执行任务
        pool4.scheduleAtFixedRate(new Runnable() {
            @Override
            public void run() {
                System.out.println("hello");
            }
        }, 2, 1,TimeUnit.SECONDS);//比如一个脑子,两秒后开始叫我,然后每隔一秒叫我一次
    }
}
————————————————
版权声明:本文为CSDN博主「Serendipity  sn」的原创文章,遵循CC 4.0 BY-SA版权协议,转载请附上原文出处链接及本声明。
原文链接:https://blog.csdn.net/qq_45704528/article/details/117353110
版权声明:本文为博主原创文章,遵循 CC 4.0 BY-SA 版权协议,转载请附上原文出处链接和本声明。
本文链接:
https://blog.csdn.net/qq_45704528/article/details/117353110


评论