#VS# VS连接到linux远程编译C++
“ 文章所涉及内容更多来自网络,在此声明,并感谢知识的贡献者!”
情景说明
—
日常在 Windows 平台上开发程序,但是项目中涉及到了 Linux 的服务器,所以需要编译 Linux 代码。Visual Studio 提供了远程编译的功能,配置完成后编译非常方便。
配置Linux
—
Linux虚拟机配置
安装C/C++编译程序模块
yum -y install gcc gcc-c++ kernel-devel
参考资料: https://blog.csdn.net/GENGXINGGUANG/article/details/126231518
查看c++编译环境
which gcc
which g++
编辑 main.cpp 测试文件
#include
int main()
{
std::cout<<"Hello"<
}
生成linux下可执行文件
g++ -o test main.cpp
运行可执行文件
./test
参考资料:https://blog.csdn.net/qq_44878985/article/details/129890941
升级 g++
#由于红帽将已编译好的高版本 GCC 放在了 scl,因此需要安装 scl
yum install -y centos-release-scl
#列出 GCC 所有可安装的版本
yum list | grep devtoolset | grep gcc.x86_64
#安装更高版本的GCC/G++
yum -y install devtoolset-11-gcc devtoolset-11-gcc-c++
#将gcc改为想要启用的 GCC 版本,例如 x=11(这条指令的执行只能在当前终端生效,下一次打开终端必须重新执行这条指令)
source /opt/rh/devtoolset-11/enable
#将gcc最新版本设置为自动启动
vi ~/.bashrc
#添加启动最新gcc命令
source /opt/rh/devtoolset-11/enable
常见问题:Centos编译显示:错误:‘put_time’不是‘std’的成员
原因很简单,g++编译器版本低,升级高版本就行了
参考资料:
https://blog.csdn.net/weixin_43272766/article/details/97825811
https://blog.csdn.net/m0_62171658/article/details/128701231
https://blog.csdn.net/qq_40430360/article/details/128675250
安装rsync
1.安装
yum -y install rsync
2.启动服务
systemctl start rsyncd.service
3.加入开机启动
systemctl enable rsyncd.service
4.查看服务状态
systemctl status rsyncd.service
5.从启动服务
systemctl restart rsyncd.service
参考资料:
https://blog.51cto.com/u_64214/5586481
https://blog.csdn.net/weixin_65690979/article/details/128950478
安装gdb
yum -y install gdb
查看是否有gdb
参考资料:
https://blog.csdn.net/weixin_64647426/article/details/129452823
安装git
yum -y install git
安装wget
yum -y install wget
安装cmake
Cmake下载地址:
https://cmake.org/download/
https://cmake.org/files/
#下载
wget https://cmake.org/files/v3.6/cmake-3.6.2.tar.gz
#解压缩
tar -zxvf cmake-3.6.2.tar.gz
#进入目录
cd cmake-3.6.2
#编译安装
./bootstrap && make -j4 && sudo make install
#查看版本号
cmake --version
参考资料:
https://blog.csdn.net/qq_19734597/article/details/104200371
https://blog.csdn.net/lxystar2003/article/details/129057293
https://www.fke6.com/html/73379.html
https://cloud.tencent.com/developer/article/2234223
其实,centos 环境下仅需要安装gcc,g++,gdb,gdb-sever
gcc(用于编译和链接C程序)
g++(用于编译和链接C++程序,g++的安装依赖gcc)
gdb(用于本地调试C/C++代码)
gdbserver(用于远程调试C/C++代码)
在线安装:
yum install gcc(在线安装gcc)
yum install g++(在线安装g++)
yum install gdb(在线安装gdb)
yum install gdb-gdbserver(在线安装gdbserver)
配置Visual Studio
—
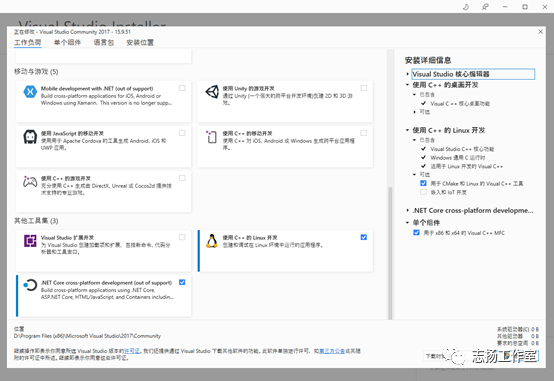
Visual studio 安装
Visual studio 工具扩展
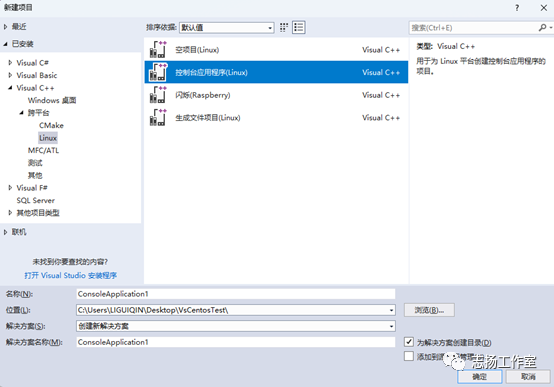
创建项目
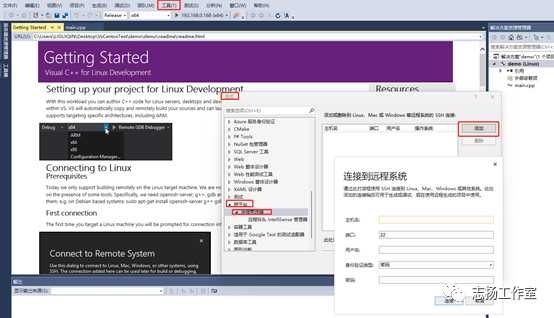
vs 配置 linux虚拟机登录信息
工具》选项》跨平台》连接管理器》添加
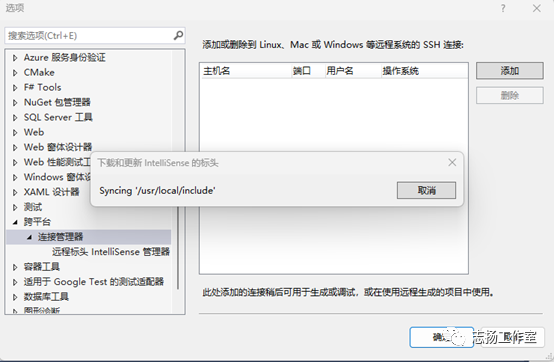
添加完成后,点击连接
进行项目的初期编译测试
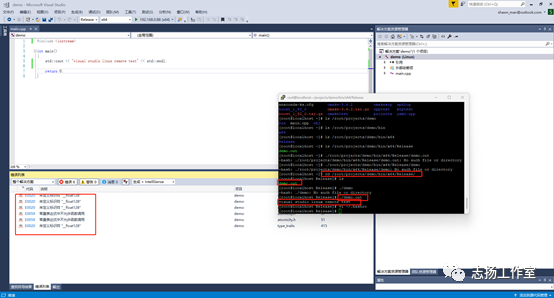
Linux系统默认的生成目录: /root/projects
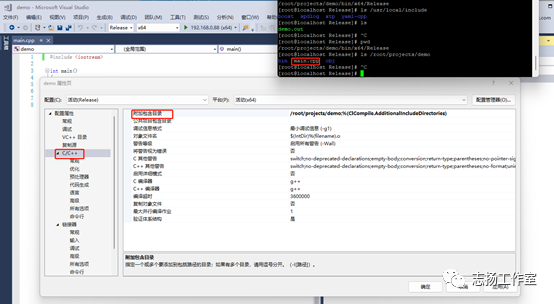
添加项目源代码文件所在目录
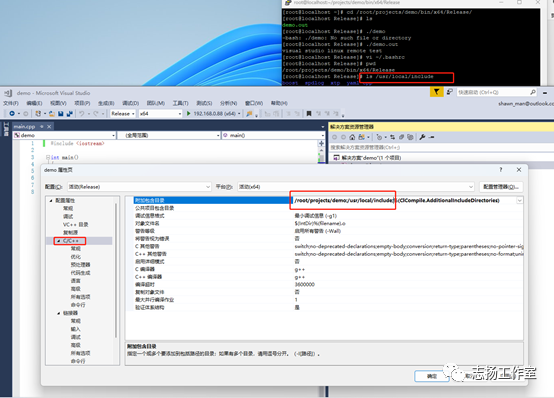
添加第三方的头文件所在目录
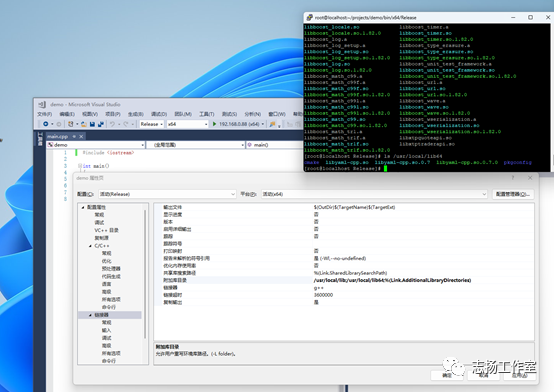
添加共享库所在目录,即so文件所在目录
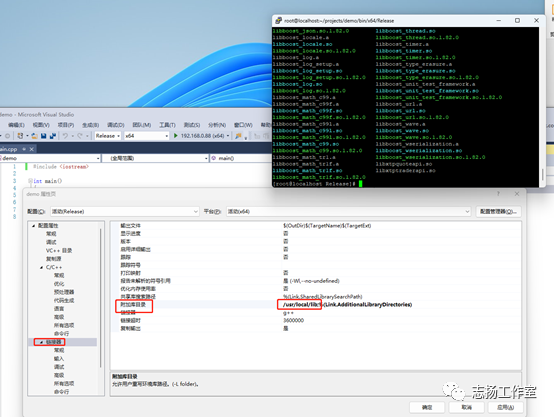
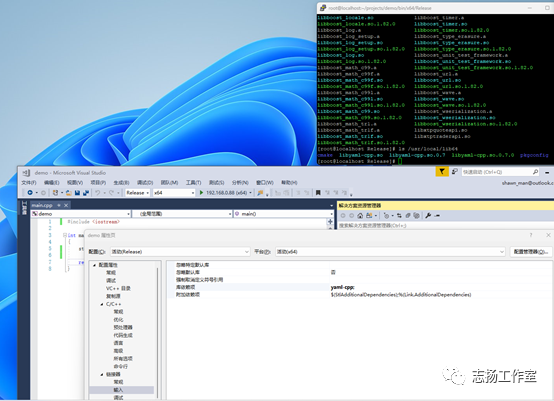
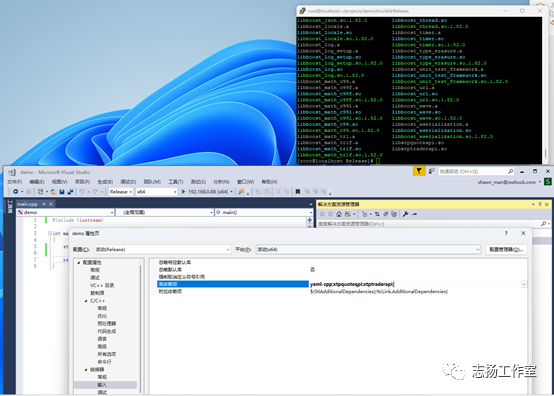
添加共享库具体的文件名
名称需要去除前缀“lib”和后缀“.so”
编辑代码
—
编辑测试代码
#include "xtp/xtp_quote_api.h"
#include "xtp/xtp_trader_api.h"
#include "spdlog/spdlog.h"
#include "spdlog/sinks/daily_file_sink.h"
#include
#include
#include
#include
using std::cout;
using std::endl;
#include
using namespace std;
using namespace boost::placeholders;
int fun(int x, int y) {return x+y;}
int main()
{
int m=1, n=2;
cout << boost::bind(fun, _1, _2)(m, n) << endl;
cout << "boost test" << endl; //控制台输出
// 创建文件名类似于:daily_log_2020_05-28.txt,如果程序不退出的话,就是每天2:30 am创建新的文件
auto logger = spdlog::daily_logger_mt("spdlog", "daily_log.txt", 2, 20);
// 设置日志级别,默认是info
spdlog::set_level(spdlog::level::trace);
// 写入log文件
string s="success";
logger->info("test s ={}",s); //{}可以表示变量,跟printf的语法类似
logger->trace("this is trace log");
logger->debug("this is debug log");
logger->info("this is info log");
logger->warn("this is warning log");
logger->error("this is a error log");
logger->critical("this is critical log");
cout << "spdlog success" << endl; //控制台输出
YAML::Node config = YAML::LoadFile("/home/zhqb_trader/build/bin/config.yaml");
if (config["lastLogin"]) {
std::cout << "Last logged in: " << config["lastLogin"].as
}
const std::string username = config["username"].as
const std::string password = config["password"].as
config["lastLogin"] = "2020-09-19 11:17:40";
std::ofstream fout("config.yaml");
fout << config;
std::cout << "Yaml-cpp test" << std::endl;
//行情请求对象
XTP::API::QuoteApi* m_quote_api;
int m_client = 1;
std::string m_file="/home/zhqb_trader";
m_quote_api = XTP::API::QuoteApi::CreateQuoteApi(m_client, m_file.c_str(), XTP_LOG_LEVEL_DEBUG);
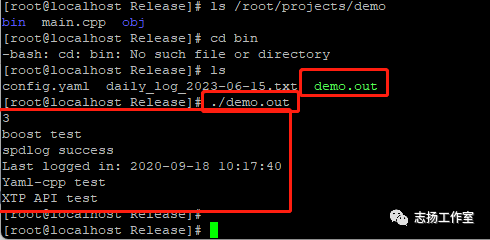
std::cout << "XTP API test" << std::endl;
return 0;
}
Visual studio 点击编译运行
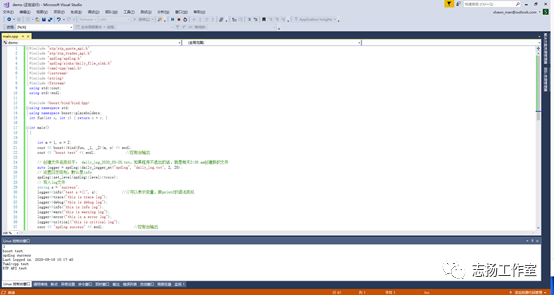
在linux环境下运行生成的可执行文件
参考资料
—
参考资料:
https://blog.csdn.net/qq_42067550/article/details/126542804
https://blog.csdn.net/endurehero/article/details/81206398?spm=1001.2101.3001.6661.1&utm_medium=distribute.pc_relevant_t0.none-task-blog-2%7Edefault%7ECTRLIST%7ERate-1-81206398-blog-126542804.235%5Ev38%5Epc_relevant_sort_base1&depth_1-utm_source=distribute.pc_relevant_t0.none-task-blog-2%7Edefault%7ECTRLIST%7ERate-1-81206398-blog-126542804.235%5Ev38%5Epc_relevant_sort_base1&utm_relevant_index=1
https://www.jianshu.com/p/df3d6971b8dd
