
Android 子线程 UI 操作真的不可以?(建议收藏)
大家好,我是皇叔,最近开了一个安卓进阶涨薪训练营,可以帮助大家突破技术&职场瓶颈,从而度过难关,进入心仪的公司。
详情见文章:没错!皇叔开了个训练营
作者:vivo 互联网大前端团队- Zhang Xichen
一、背景及问题
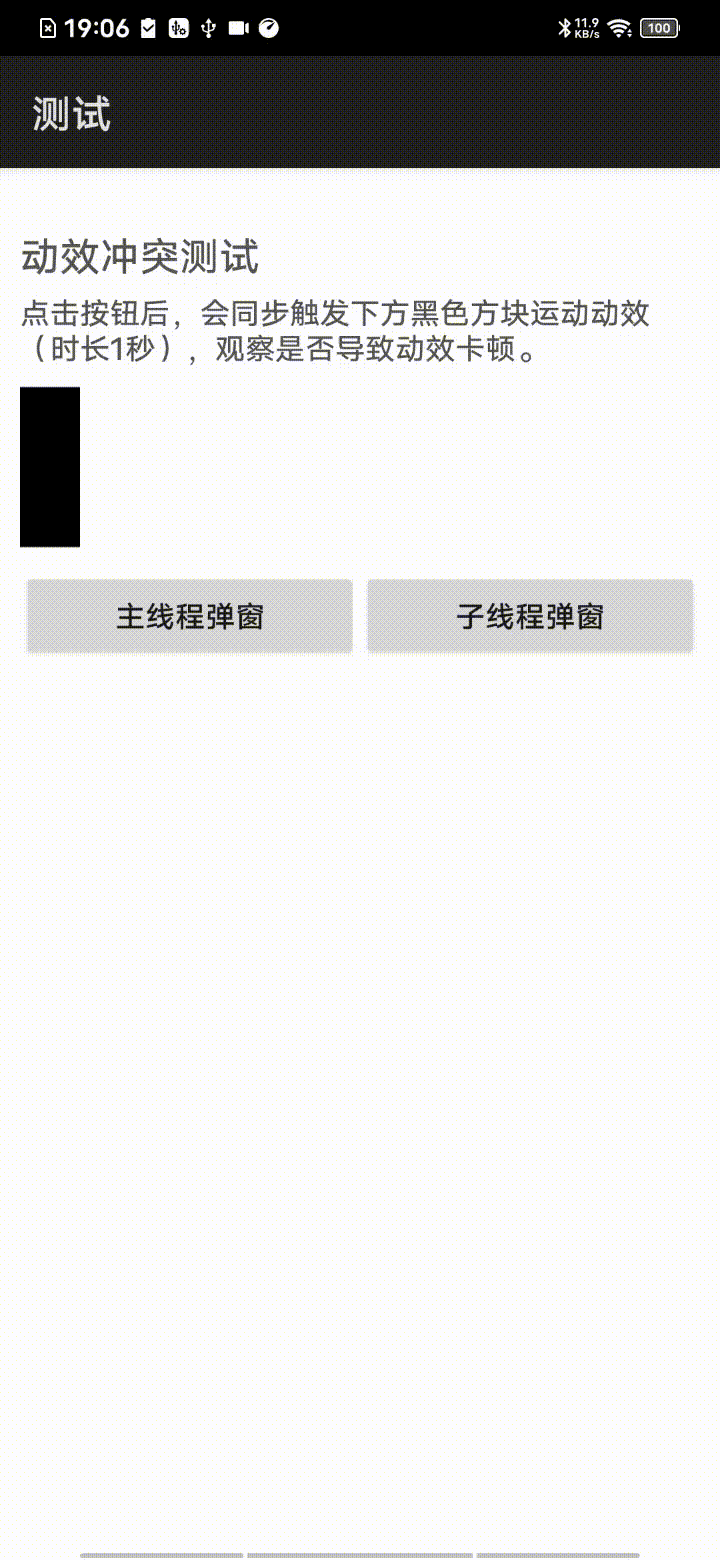
某 SDK 有 PopupWindow 弹窗及动效,由于业务场景要求,对于 App 而言,SDK 的弹窗弹出时机具有随机性。
在弹窗弹出时,若 App 恰好也有动效执行,则可能出现主线程同时绘制两个动效,进而导致的卡顿,如下图。
我们以水平移动的方块模拟App正在进行的动效(如:页面切换);可以看出,在Snackabr 弹窗弹出时,方块动效有明显的卡顿(移动至约1/3处)。
这个问题的根本原因可以简述为:不可控的动效冲突(业务随机性) + 无从安置的主线程耗时方法(弹窗实例化、视图infalte)。
因此我们要寻求一个方案来解决动效冲突导致的卡顿问题。我们知道Android编码规范在要求子线程不能操作UI,但一定是这样吗?
通过我们的优化,我们可以达到最终达成完美的效果,动效流畅,互不干涉:

二、优化措施
【优化方式一】:
动态设置弹窗的延迟实例化及展示时间,躲避业务动效。
结论:可行,但不够优雅。用于作为兜底方案。
【优化方式二】:
能否将弹窗的耗时操作(如实例化、infalte)移至子线程运行,仅在展示阶段(调用show方法)在主线程执行?
结论:可以。attach前的view操作,严格意义上讲,并不是UI操作,只是简单的属性赋值。
【优化方式三】:
能否将整个Snackbar的实例化、展示、交互全部放置子线程执行?
结论:可以,但有些约束场景,「UI线程」虽然大部分时候可以等同理解为「主线程」,但严格意义上,Android源码中从未限定「UI线程」必须是「主线程」。
三、原理分析
下面我们分析一下方案二、三的可行性原理
3.1 概念辨析
【主线程】:实例化ActivityThread的线程,各Activity实例化线程。
【UI线程】:实例化ViewRootImpl的线程,最终执行View的onMeasure/onLayout/onDraw等涉及UI操作的线程。
【子线程】:相对概念,相对于主线程,任何其他线程均为子线程。相对于UI线程同理。
3.2 CalledFromWrongThreadException来自哪里
众所周知,我们在更新界面元素时,若不在主线程执行,系统会抛出
CalledFromWrongThreadException,观察异常堆栈,不难发现,该异常的抛出是从
ViewRootImpl#checkThread方法中抛出。
// ViewRootImpl.javavoid checkThread() {if (mThread != Thread.currentThread()) {throw new CalledFromWrongThreadException("Only the original thread that created a view hierarchy can touch its views.");}}
通过方法引用可以看到,
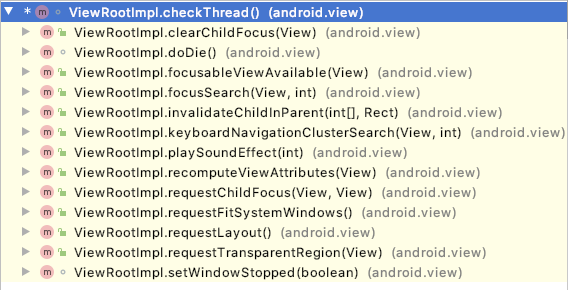
ViewRootImpl#checkThread方法会在几乎所有的view更新方法中调用,用以防止多线程的UI操作。
为了便于深入分析,我们以TextView#setText方法为例,进一步观察触发异常前,究竟都做了些什么。
通过查看方法调用链(Android Studio: alt + ctrl + H)我们可以看到UI更新的操作,走到了VIew这个公共父类的invalidate方法。
其实该方法是触发UI更新的一个必经方法,View#invalidate调用后,会在后续的操作中逐步执行View的重新绘制。
ViewRootImpl.checkThread() (android.view)ViewRootImpl.invalidateChildInParent(int[], Rect) (android.view)ViewGroup.invalidateChild(View, Rect) (android.view)ViewRootImpl.invalidateChild(View, Rect) (android.view)View.invalidateInternal(int, int, int, int, boolean, boolean) (android.view)View.invalidate(boolean) (android.view)View.invalidate() (android.view)TextView.checkForRelayout()(2 usages) (android.widget)TextView.setText(CharSequence, BufferType, boolean, int) (android.widget)
3.3 理解 View#invalidate 方法
深入看一下该方法的源码,我们忽略不重要的代码,invalidate方法其实是在标记dirty区域,并继续向父View传递,并最终由最顶部的那个View执行真正的invalidate操作。
可以看到,若要让代码开始递归执行,几个必要条件需要满足:
父View不为空:该条件显而易见,父view为空时,是无法调用ParentView#invalidateChild方法的。
Dirty区域坐标合法:同样显而易见。
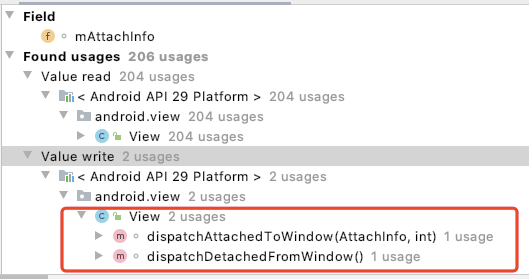
AttachInfo不为空:目前唯一的变量,该方法为空时,不会真正执行invalidate。
那么,在条件1、2都显而易见的情况下,为何多判断一次AttachInfo对象?这个AttachInfo对象中都有什么信息?
void invalidateInternal(int l, int t, int r, int b, boolean invalidateCache,boolean fullInvalidate) {// ...// Propagate the damage rectangle to the parent view.final AttachInfo ai = mAttachInfo; // 此处何时赋值final ViewParent p = mParent;if (p != null && ai != null && l < r && t < b) { // 此处逻辑若不通过,实际也不会触发invalidatefinal Rect damage = ai.mTmpInvalRect;damage.set(l, t, r, b);p.invalidateChild(this, damage);}// ...}
mAttachInfo 里有什么?
注释描述:attachInfo 是一个view在attach至其父window被赋值的一系列信息。
其中可以看到有一些关键内容:
窗口(Window)相关的类、信息及IPC类。
ViewRootImpl对象:这个类就是会触发CalledFromWrongThreadException的来源。
其他信息。
其实通过上面TextView#setText方法调用链的信息,我们已经知道,所有的成功执行的view#invalidate方法,最终都会走到ViewRootImpl中的方法,并在ViewRootImpl中检查尝试更新UI的线程。
也就是说当一个View由于其关联的ViewRootImpl对象时,才有可能触发
CalledFromWrongThreadException异常,因此attachInfo是View继续有效执行invalidate方法的必要对象。
// android.view.view/*** A set of information given to a view when it is attached to its parent* window.*/final static class AttachInfo {// ...final IBinder mWindowToken;/*** The view root impl.*/final ViewRootImpl mViewRootImpl;// ...AttachInfo(IWindowSession session, IWindow window, Display display,ViewRootImpl viewRootImpl, Handler handler, Callbacks effectPlayer,Context context) {// ...mViewRootImpl = viewRootImpl;// ...}}
正如注释描述,结合源码观察,mAttachInfo赋值时刻确实只有view的attach与detach两个时刻。
所以我们进一步推测:view在attach前的UI更新操作是不会触发异常的。我们是不是可以在attach前把实例化等耗时操作在子线程执行完成呢?
那一个view是何时与window进行attach的?
正如我们编写布局文件,视图树的构建,是通过一个个VIewGroup通过addView方法构建出来的,观察ViewGroup#addViewInner方法,可以看到子view与attachInfo进行关系绑定的代码。
ViewGroup#addView →
ViewGroup#addViewInner
// android.view.ViewGroupprivate void addViewInner(View child, int index, LayoutParams params,boolean preventRequestLayout) {// ...AttachInfo ai = mAttachInfo;if (ai != null && (mGroupFlags & FLAG_PREVENT_DISPATCH_ATTACHED_TO_WINDOW) == 0) {// ...child.dispatchAttachedToWindow(mAttachInfo, (mViewFlags&VISIBILITY_MASK));// ...}// ...}
在我们的背景案例中,弹窗的布局inflate操作是耗时的,那这个操作执行时是否已经完成了attachWindow操作呢?
实际上infalte时,可以由开发者自由控制是否执行attach操作,所有的infalte重载方法最终都会执行到LayoutInfaltor#tryInflatePrecompiled。
也就是说,我们可以将inflate操作与addView操作分两步执行,而前者可以在子线程完成。
(事实上google提供的Androidx包中的AsyncLayoutInflater也是这样操作的)。
private View tryInflatePrecompiled(@LayoutRes int resource, Resources res, @Nullable ViewGroup root,boolean attachToRoot) {// ...if (attachToRoot) {root.addView(view, params);} else {view.setLayoutParams(params);}// ...}
到此为止,看来一切都比较清晰了,一切都与ViewRootImpl有关,那么我们仔细观察一下它:
首先ViewRootImpl从哪里来?—— 在WindowManager#addView
当我们可以通过WindowManager#addView方式新增一个窗口,该方法的实现WindowManagerGlobal#addView中会对ViewRootImpl进行实例化,并将新实例化的ViewRootImpl设置为被添加View的Parent,同时该View也被认定为rootView。
// android.view.WindowManagerGlobalpublic void addView(View view, ViewGroup.LayoutParams params,Display display, Window parentWindow) {// ...root = new ViewRootImpl(view.getContext(), display);// ...try {root.setView(view, wparams, panelParentView);} catch (RuntimeException e) {// ...}}// android.view.RootViewImplpublic void setView(View view, WindowManager.LayoutParams attrs, View panelParentView) {// ...mView = view;// ...mAttachInfo.mRootView = view;// ...view.assignParent(this);// ...}
我们再观察一下
WindowManagerGlobal#addView方法的调用关系,可以看到很多熟悉类的调用时刻:
WindowManagerGlobal.addView(View, LayoutParams, Display, Window) (android.view)WindowManagerImpl.addView(View, LayoutParams) (android.view)Dialog.show() (android.app) // Dialog的显示方法PopupWindow.invokePopup(LayoutParams) (android.widget)PopupWindow.showAtLocation(IBinder, int, int, int) (android.widget) // PopupWindow的显示方法TN in Toast.handleShow(IBinder) (android.widget) // Toast的展示方法
从调用关系我们看到,如Dialog、PopupWindow、Toast等,均是在调用展示方法时才attach窗口并与RootViewImpl关联,因而理论上,我们仅需要保障show方法在主线程调用即可。
另外的,对于弹窗场景,Androidx的material包也同样会提供Snackbar,我们观察一下material包中Snackbar的attach时机及逻辑:
可以发现这个弹窗其实是在业务传入的View中直接通过addView方法绑定到现有视图树上的,并非通过WindowManager新增窗口的方式展示。其attach的时机,同样是在调用show的时刻。
// com.google.android.material.snackbar.BaseTransientBottomBarfinal void showView() {// ...if (this.view.getParent() == null) {ViewGroup.LayoutParams lp = this.view.getLayoutParams();if (lp instanceof CoordinatorLayout.LayoutParams) {setUpBehavior((CoordinatorLayout.LayoutParams) lp);}extraBottomMarginAnchorView = calculateBottomMarginForAnchorView();updateMargins();// Set view to INVISIBLE so it doesn't flash on the screen before the inset adjustment is// handled and the enter animation is startedview.setVisibility(View.INVISIBLE);targetParent.addView(this.view);}// ...}
至此,我们可以得出第一个结论:一个未被attach的View的实例化及其中属性的操作,由于其顶层parent是不存在viewRootImpl对象的,无论调用什么方法,都不会触发到checkThread,因此是完全可以放在子线程中进行的。
仅在view被attach至window时,它才会作为UI的一部分(挂载至ViewTree),需要被固定线程进行控制、更新等管理操作。
而一个view若想attach至window,有两种途径:
由一个已attachWindow的父View调用其addView方法,将子view也attach至同一个window,从而拥有viewRootImpl。(material Snackbar方式)
通过WindowManager#addView,自建一个Window及ViewRootImpl,完成view与window的attach操作。(PopupWindow方式)
如何理解Window和View以及ViewRootImpl呢?
Window是一个抽象的概念,每一个Window都对应着一个View和一个ViewRootImpl,Window和View通过ViewRootImpl来建立联系。——《Android开发艺术探索》
// 理解:每个Window对应一个ViewTree,其根节点是ViewRootImpl,ViewRootImpl自上而下地控制着ViewTree的一切(事件 & 绘制 & 更新)
问题来了:那么,这个控制View的固定线程一定要是主线程吗?
/*** Invalidate the whole view. If the view is visible,* {@link #onDraw(android.graphics.Canvas)} will be called at some point in* the future.* <p>* This must be called from a UI thread. To call from a non-UI thread, call* {@link #postInvalidate()}.*/// 咬文嚼字:「from a UI thread」,不是「from the UI thread」public void invalidate() {invalidate(true);}
3.4 深入观察ViewRootImpl及Android屏幕刷新机制
我们不妨将问题换一个表述:是否可以安全地不在主线程中更新View?我们能否有多个UI线程?
要回到这个问题,我们还是要回归
CalledFromWrongThreadException的由来。
// ViewRootImpl.javavoid checkThread() {if (mThread != Thread.currentThread()) {throw new CalledFromWrongThreadException("Only the original thread that created a view hierarchy can touch its views.");}}
再次观察代码我们可以看到checkThread方法的判断条件,是对mThread对象与当前代码的Thread对象是否一致进行判断,那么ViewRootImpl.mThread成员变量,就一定是mainThread吗?
其实不然,纵观ViewRootImpl类,mThread成员变量的赋值仅有一处,即在ViewRootImpl对象构造函数中,实例化时获取当前的线程对象。
// ViewRootImpl.javapublic ViewRootImpl(Context context, Display display) {// ...mThread = Thread.currentThread();// ...mChoreographer = Choreographer.getInstance();}
因此我们可以做出推论,checkThread方法判定的是ViewRootImpl实例化时的线程,与UI更新操作的线程是否一致。而不强约束是应用主进程。
前文中,我们已经说明,ViewRootImpl对象的实例化是由WindowManager#addView → WindowManagerGlobal#addView → new ViewRootImpl调用过来的,这些方法都是可以在子线程中触发的。
为了验证我们的推论,我们先从源码层面做一步分析。
首先我们观察一下ViewRootImpl的注释说明:
The top of a view hierarchy, implementing the needed protocol between View and the WindowManager. This is for the most part an internal implementation detail of WindowManagerGlobal.
文档中指出ViewRootImpl是视图树的最顶部对象,实现了View与WindowManager中必要的协议。作为WindowManagerGlobal中大部分的内部实现。也即WindowManagerGlobal中的大多重要方法,最终都走到了ViewRootImpl的实现中。
ViewRootImpl对象中有几个非常重要的成员变量和方法,控制着视图树的测绘操作。
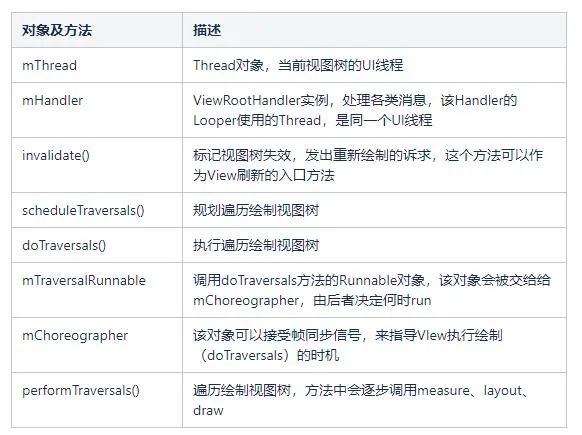
在这里我们,简单介绍一下Android屏幕刷新的机制,以及其如何与上述几个核心对象和方法交互,以便于我们更好地进一步分析。
理解Android屏幕刷新机制
我们知道,View绘制时由invalidate方法触发,最终会走到其onMeasure、onLayout、onDraw方法,完成绘制,这期间的过程,对我们理解UI线程管理有很重要的作用。
我们通过源码,查看一下Andriod绘制流程:
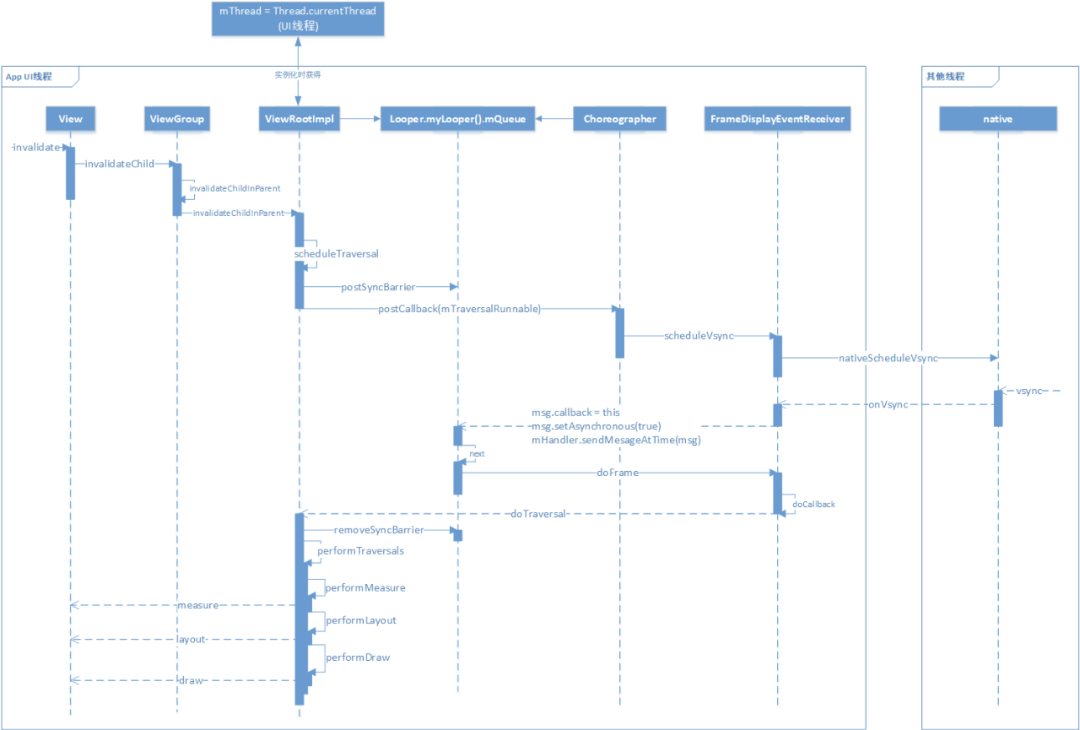
首先View#invalidate方法触发,逐级向父级View传递,并最终传递至视图树顶层ViewRootImpl对象,完成dirty区域的标记。
// ViewRootImpl.javapublic ViewParent invalidateChildInParent(int[] location, Rect dirty) {// ...invalidateRectOnScreen(dirty);return null;}private void invalidateRectOnScreen(Rect dirty) {// ...if (!mWillDrawSoon && (intersected || mIsAnimating)) {scheduleTraversals();}}
ViewRootImpl紧接着会执行scheduleTraversal方法,规划UI视图树绘制任务:
首先会在UI线程的消息队列中添加同步消息屏障,保障后续的绘制异步消息的优先执行;
之后会向Choreographer注册一个Runnable对象,由前者决定何时调用Runnable的run方法;
而该Runnable对象就是doTraversal方法,即真正执行视图树遍历绘制的方法。
// ViewRootImpl.javafinal class TraversalRunnable implements Runnable {public void run() {doTraversal();}}final TraversalRunnable mTraversalRunnable = new TraversalRunnable();void scheduleTraversals() {// ...mTraversalBarrier = mHandler.getLooper().getQueue().postSyncBarrier();mChoreographer.postCallback(Choreographer.CALLBACK_TRAVERSAL, mTraversalRunnable, null);// ...}
Choreographer被调用后,会先后经过以下方法,最终调用到DisplayEventReceiver#scheduleVsync,最终调用到nativeScheduleVsync方法,注册接受一次系统底层的垂直同步信号。
Choreographer#postCallback →
postCallbackDelayed →
postCallbackDelayedInternal→mHandler#sendMessage →
MSG_DO_SCHEDULE_CALLBACK
MessageQueue#next→ mHandler#handleMessage →
MSG_DO_SCHEDULE_CALLBACK→ doScheduleCallback→scheduleFrameLocked → scheduleVsyncLocked→
DisplayEventReceiver#scheduleVsync
// android.view.DisplayEventReceiver/*** Schedules a single vertical sync pulse to be delivered when the next* display frame begins.*/@UnsupportedAppUsagepublic void scheduleVsync() {if (mReceiverPtr == 0) {Log.w(TAG, "Attempted to schedule a vertical sync pulse but the display event "+ "receiver has already been disposed.");} else {nativeScheduleVsync(mReceiverPtr);}}
系统底层会固定每16.6ms生成一次Vsync(垂直同步)信号,以保障屏幕刷新稳定,信号生成后,会回调DisplayEventReceiver#onVsync方法。
Choreographer的内部实现类
FrameDisplayEventReceiver收到onSync回调后,会在UI线程的消息队列中发出异步消息,调用Choreographer#doFrame方法。
// android.view.Choreographerprivate final class FrameDisplayEventReceiver extends DisplayEventReceiverimplements Runnable {// ...public void onVsync(long timestampNanos, long physicalDisplayId, int frame) {// ...// Post the vsync event to the Handler.Message msg = Message.obtain(mHandler, this);msg.setAsynchronous(true);mHandler.sendMessageAtTime(msg, timestampNanos / TimeUtils.NANOS_PER_MS);}public void run() {mHavePendingVsync = false;doFrame(mTimestampNanos, mFrame);}}
Choreographer#doFrame方法执行时会接着调用到doCallbacks
(Choreographer.CALLBACK_TRAVERSAL, ...)方法执行ViewRootImpl注册的mTraversalRunnable,
也即ViewRootImpl#doTraversal方法。
// android.view.Choreographervoid doFrame(long frameTimeNanos, int frame) {// ...try {// ...doCallbacks(Choreographer.CALLBACK_TRAVERSAL, frameTimeNanos);// ...} finally {// ...}}
ViewRootImpl#doTraversal继而移除同步信号屏障,继续执行ViewRootImpl#performTraversals方法,最终调用到View#measure、View#layout、View#draw方法,执行绘制。
// ViewRootImpl.javavoid doTraversal() {// ...mHandler.getLooper().getQueue().removeSyncBarrier(mTraversalBarrier);// ...performTraversals();// ...}private void performTraversals() {// ...performMeasure(childWidthMeasureSpec, childHeightMeasureSpec);// ...performLayout(lp, desiredWindowWidth, desiredWindowHeight);// ...performDraw();}
那么整个绘制流程中的UI线程是否一致呢?绘制过程中是否有强行取用主线程(mainThread)的情况?
纵观整个绘制流程,期间涉ViewRootImpl、Choreographer均使用了Handler对象,我们观察一下他们的Handler及其中的Looper都是怎样来的:
首先ViewRootImpl中的Handler是其内部继承自Handler对象实现的,并未重载Handler的构造函数,或明示传入的Looper。
// ViewRootImpl.javafinal class ViewRootHandler extends Handler {public String getMessageName(Message message) {// ...}public boolean sendMessageAtTime(Message msg, long uptimeMillis) {// ...}public void handleMessage(Message msg) {// ...}}final ViewRootHandler mHandler = new ViewRootHandler();
我们观察一下Handler对象的构造函数,在未明示Looper的情况下,默认使用的是Looper.myLooper(),myLooper是从ThreadLocal中获取当前线程的looper对象使用。
结合我们之前讨论的ViewRootImpl对象的mThread是其实例化时所在的线程,由此,我们知道ViewRootImpl的mHandler线程与实例化线程是同一个线程。
// andriod.os.Handlerpublic Handler(@Nullable Callback callback, boolean async) {// ...mLooper = Looper.myLooper();// ...mQueue = mLooper.mQueue;// ...}// andriod.os.Looper/*** Return the Looper object associated with the current thread. Returns* null if the calling thread is not associated with a Looper.*/public static @Nullable Looper myLooper() {return sThreadLocal.get();}
我们再观察一下ViewRootImpl内部持有的mChoreographer对象中的Handler线程是哪一个线程。
mChoreographer实例化是在ViewRootImpl对象实例化时,通过Choreographer#getInstance方法获得。
// ViewRootImpl.javapublic ViewRootImpl(Context context, Display display) {// ...mThread = Thread.currentThread();// ...mChoreographer = Choreographer.getInstance();}
观察Choreographer代码,可以看出,getInsatance方法返回的也是通过ThreadLocal获取到的当前线程实例;
当前线程实例同样使用的是当前线程的looper(Looper#myLooper),而非强制指定主线程Looper(Looper#getMainLooper)。
由此,我们得出结论,整个绘制过程中,
自View#invalidate方法触发,至注册垂直同步信号监听(DisplayEventReceiver
#nativeScheduleVsync),以及垂直同步信号回调(DisplayEventReceiver#onVsync)至View的measue/layout/draw方法调用,均在同一个线程(UI线程),而系统并未限制该现场必须为主线程。
// andriod.view.Choreographer// Thread local storage for the choreographer.private static final ThreadLocal<Choreographer> sThreadInstance =new ThreadLocal<Choreographer>() {protected Choreographer initialValue() {Looper looper = Looper.myLooper();// ...Choreographer choreographer = new Choreographer(looper, VSYNC_SOURCE_APP);if (looper == Looper.getMainLooper()) {mMainInstance = choreographer;}return choreographer;}};/*** Gets the choreographer for the calling thread. Must be called from* a thread that already has a {@link android.os.Looper} associated with it.** @return The choreographer for this thread.* @throws IllegalStateException if the thread does not have a looper.*/public static Choreographer getInstance() {return sThreadInstance.get();}
上文分析的Android绘制流程和UI线程控制,可以总结为下图:
至此我们可以得到一个推论:拥有窗口(Window)展示的View,其UI线程可以独立于App主线程。
下面我们编码实践验证一下。
四、编码验证与实践
其实实际中屏幕内容的绘制从来都不是完全在一个线程中完成的,最常见的场景比如:
视频播放时,视频画面的绘制并不是App的主线程及UI线程。
系统Toast的弹出等绘制,是由系统层面统一控制,也并非App自身的主线程或UI线程绘制。
结合工作案例,我们尝试将SDK的整个PopupWindow弹窗整体置于子线程,即为SDK的PopupWindow指定一个独立的UI线程。
我们使用PopupWindow实现一个定制的可交互的Snackbar弹窗,在弹窗的管理类中,定义并实例化好自定义的UI线程及Handler;
注意PopupWindow的showAtLocation方法执行,会抛至自定义UI线程中(dismiss同理)。理论上,弹窗的UI线程会变为我们的自定义线程。
// Snackbar弹窗管理类public class SnackBarPopWinManager {private static SnackBarPopWinManager instance;private final Handler h; // 弹窗的UI线程Handler// ...private SnackBarPopWinManager() {// 弹窗的UI线程HandlerThread ht = new HandlerThread("snackbar-ui-thread");ht.start();h = new Handler(ht.getLooper());}public Handler getSnackbarWorkHandler() {return h;}public void presentPopWin(final SnackBarPopWin snackBarPopWin) {// UI操作抛至自定义的UI线程h.postDelayed(new SafeRunnable() {public void safeRun() {// ..// 展示弹窗snackBarPopWin.getPopWin().showAtLocation(dependentView, Gravity.BOTTOM | Gravity.CENTER_HORIZONTAL, 0, y);// 定时自动关闭snackBarPopWin.dismissAfter(5000);// ...});}public void dismissPopWin(final SnackBarPopWin snackBarPopWin) {// UI操作抛至自定义的UI线程h.postDelayed(new SafeRunnable() {public void safeRun() {// ...// dismiss弹窗snackBarPopWin.getPopWin().dismiss();// ...});}// ...}
之后,我们定义好弹窗本身,其弹出、消失等方法均通过管理类实现执行。
// Snackbar弹窗本身(通过PopupWindow实现)public class SnackBarPopWin extends PointSnackBar implements View.OnClickListener {private PopupWindow mPopWin;public static SnackBarPopWin make(String alertText, long points, String actionId) {SnackBarPopWin instance = new SnackBarPopWin();init(instance, alertText, actionId, points);return instance;}private SnackBarPopWin() {// infalte等耗时操作// ...View popView = LayoutInflater.from(context).inflate(R.layout.popwin_layout, null);// ...mPopWin = new PopupWindow(popView, ...);// ...}// 用户的UI操作,回调应该也在UI线程public void onClick(View v) {int id = v.getId();if (id == R.id.tv_popwin_action_btn) {onAction();} else if (id == R.id.btn_popwin_cross) {onClose();}}public void show(int delay) {// ...SnackBarPopWinManager.getInstance().presentPopWin(SnackBarPopWin.this);}public void dismissAfter(long delay) {// ...SnackBarPopWinManager.getInstance().dismissPopWin(SnackBarPopWin.this);}// ...}
此时,我们在子线程中实例化弹窗,并在2s后,同样在子线程中改变TextView内容。
// MainActivity.javapublic void snackBarSubShowSubMod(View view) {WorkThreadHandler.getInstance().post(new SafeRunnable() {public void safeRun() {String htmlMsg = "已读新闻<font color=#ff1e02>5</font>篇,剩余<font color=#00af57>10</font>次,延迟0.3s";final PointSnackBar snackbar = PointSnackBar.make(htmlMsg, 20, "");if (null != snackbar) {snackbar.snackBarBackgroundColor(mToastColor).buttonBackgroundColor(mButtonColor).callback(new PointSnackBar.Callback() {public void onActionClick() {snackbar.onCollectSuccess();}}).show();}// 在自定义UI线程中更新视图SnackBarPopWinManager.getInstance().getSnackbarWorkHandler().postDelayed(new SafeRunnable() {public void safeRun() {try {snackbar.alertText("恭喜完成<font color='#ff00ff'>“UI更新”</font>任务,请领取积分");} catch (Exception e) {DemoLogUtils.e(TAG, "error: ", e);}}}, 2000);}});}
展示效果,UI正常展示交互,并在由于在不同的线程中绘制UI,也并不会影响到App主线程操作及动效:

观察点击事件的响应线程为自定义UI线程,而非主线程:
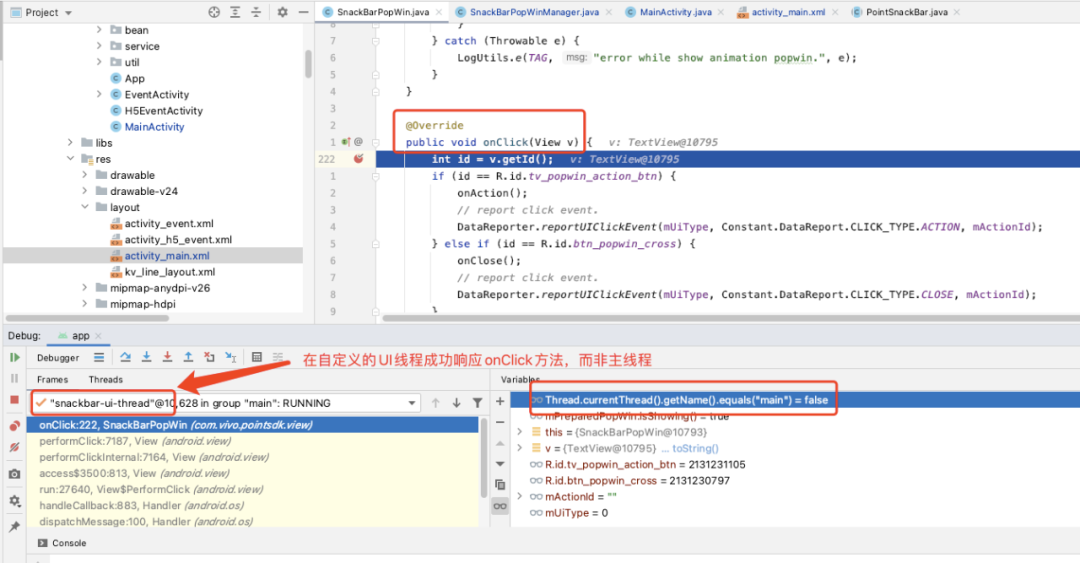
(注:实践中的代码并未真实上线。SDK线上版本中PopupWindow的UI线程仍然与App一致,使用主线程)。
五、总结
对于Android子线程不能操作UI的更深入理解:控制View绘制的线程和通知View更新的线程必须是同一线程,也即UI线程一致。
对于弹窗等与App其他业务相对独立的场景,可以考虑多UI线程优化。
后续工作中,清晰辨析UI线程、主线程、子线程的概念,尽量不要混用。
当然,多UI线程也有一些不适用的场景,如以下逻辑:
Webview的所有方法调用必须在主线程,因为其代码中强制做了主线程校验,如PopupWindow中内置Webview,则不适用多UI线程。
Activity的使用必须在主线程,因为其创建等操作中使用的Handler也被强制指定为mainThreadHandler。
参考:
Android 屏幕刷新机制
为什么Android必须在主线程更新UI
为了防止失联,欢迎关注我防备的小号


微信改了推送机制,真爱请星标本公号👇