Three.js实现3D推箱子小游戏
最近一直在学 Three.js ,看到别人做出那么多炫酷的效果,觉得太厉害了,于是决定从一些简单的效果开始做。所以打算借这个 小游戏[1] 来认真学习一下 Three.js 。
在线预览
https://liamwu50.github.io/three-sokoban-live/
游戏介绍
"推箱子" 游戏最早是由日本游戏开发者Hiroyuki Imabayashi 于1982年开发和发布的。这款游戏的日本名为 "Sokoban"(倉庫番),意为 "仓库管理员"。"推箱子" 游戏的目标是在游戏区域内将箱子移动到指定的位置,通常通过推箱子来完成。游戏逻辑并不复杂,正好可以用来练练手。
代码实现
基础场景
初始化场景
游戏场景主要分为四个部分:场景底部面板、仓库边界、箱子、推箱子的人。首先肯定是初始化场景,需要完成场景、相机、灯光、控制器的创建。场景、渲染器都是常规创建就行,相机的话因为我们游戏场景的范围是 10*10 ,所以相机需要稍微调整一下。
          const fov = 60
    const aspect = this.sizes.width / this.sizes.height
    this.camera = new PerspectiveCamera(fov, aspect, 0.1)
    this.camera.position.copy(
      new Vector3(
        this.gridSize.x / 2 - 2,
        this.gridSize.x / 2 + 4.5,
        this.gridSize.y + 1.7
      )
    )
gridSize 表示游戏场景的范围,暂时设置为 10*10 的网格,后面随着游戏关数不同,复杂度的变化,整体游戏范围肯定会越来越大。灯光我们需要创建两个灯光,一个平行光,一个环境光,光的颜色都设置为白色就行,平行光需要添加一些阴影的参数。
      const ambLight = new AmbientLight(0xffffff, 0.6)
const dirLight = new DirectionalLight(0xffffff, 0.7)

dirLight.position.set(20, 20, 20)
dirLight.target.position.set(this.gridSize.x / 2, 0, this.gridSize.y / 2)
dirLight.shadow.mapSize.set(1024, 1024)
dirLight.shadow.radius = 7
dirLight.shadow.blurSamples = 20
dirLight.shadow.camera.top = 30
dirLight.shadow.camera.bottom = -30
dirLight.shadow.camera.left = -30
dirLight.shadow.camera.right = 30

dirLight.castShadow = true

this.scene.add(ambLight, dirLight)
底部平面
Three.js 的场景初始完之后,接着需要创建游戏场景的底部平面。
游戏场景平面我们用 PlaneGeometry 来创建,接着将平面沿着x轴旋转90度,调整为水平方向,并且给平面添加网格辅助 AxesHelper ,方便我们在游戏移动的过程中找准位置。
      private createScenePlane() {
    const { x, y } = this.gridSize
    const planeGeometry = new PlaneGeometry(x * 50, y * 50)
    planeGeometry.rotateX(-Math.PI * 0.5)
    const planMaterial = new MeshStandardMaterial({ color: theme.groundColor })
    const plane = new Mesh(planeGeometry, planMaterial)
    plane.position.x = x / 2 - 0.5
    plane.position.z = y / 2 - 0.5
    plane.position.y = -0.5
    plane.receiveShadow = true
    this.scene.add(plane)
  }

  private createGridHelper() {
    const gridHelper = new GridHelper(
      this.gridSize.x,
      this.gridSize.y,
      0xffffff,
      0xffffff
    )
    gridHelper.position.set(
      this.gridSize.x / 2 - 0.5,
      -0.49,
      this.gridSize.y / 2 - 0.5
    )
    gridHelper.material.transparent = true
    gridHelper.material.opacity = 0.3
    this.scene.add(gridHelper)
  }
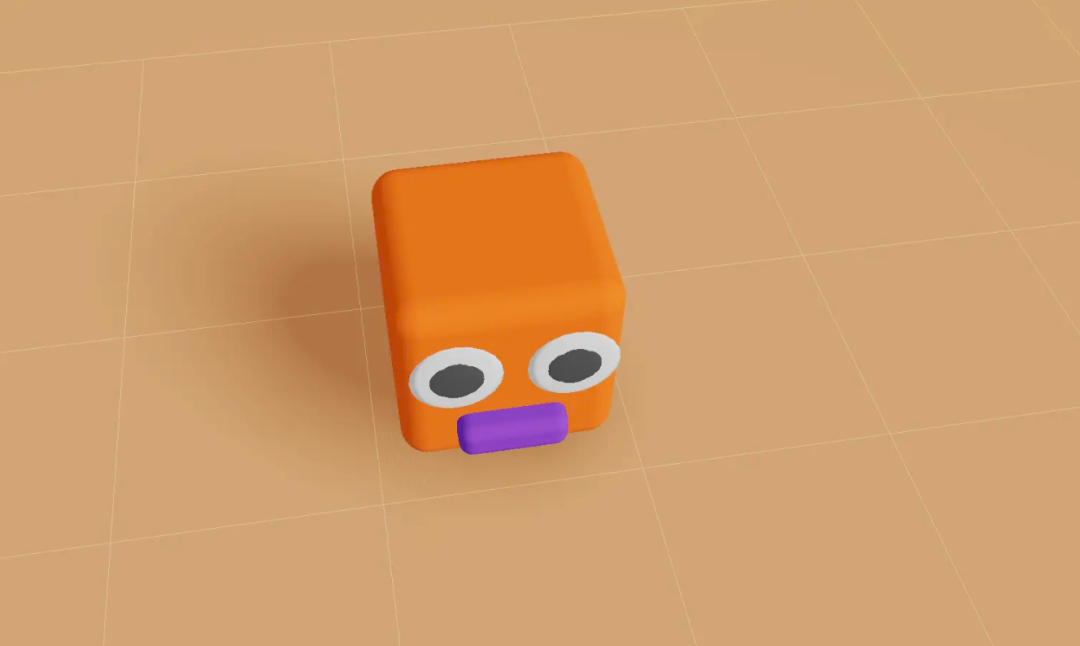
人物
接着我们创建一个可以推动箱子的人物,我们用 RoundedBoxGeometry 来创建身体,再创建两个 SphereGeometry 当做眼睛,最后再用 RoundedBoxGeometry 创建一个嘴巴,就简单的完成了一个人物。
      export default class PlayerGraphic extends Graphic {
  constructor() {
    const NODE_GEOMETRY = new RoundedBoxGeometry(0.8, 0.8, 0.8, 5, 0.1)
    const NODE_MATERIAL = new MeshStandardMaterial({
      color: theme.player
    })
    const headMesh = new Mesh(NODE_GEOMETRY, NODE_MATERIAL)
    headMesh.name = PLAYER

    const leftEye = new Mesh(
      new SphereGeometry(0.16, 10, 10),
      new MeshStandardMaterial({
        color: 0xffffff
      })
    )
    leftEye.scale.z = 0.1
    leftEye.position.x = 0.2
    leftEye.position.y = 0.16
    leftEye.position.z = 0.46

    const leftEyeHole = new Mesh(
      new SphereGeometry(0.1, 100, 100),
      new MeshStandardMaterial({ color: 0x333333 })
    )

    leftEyeHole.position.z += 0.08
    leftEye.add(leftEyeHole)

    const rightEye = leftEye.clone()
    rightEye.position.x = -0.2

    const mouthMesh = new Mesh(
      new RoundedBoxGeometry(0.4, 0.15, 0.2, 5, 0.05),
      new MeshStandardMaterial({
        color: '#5f27cd'
      })
    )
    mouthMesh.position.x = 0.0
    mouthMesh.position.z = 0.4
    mouthMesh.position.y = -0.2

    headMesh.add(leftEye, rightEye, mouthMesh)
    headMesh.lookAt(headMesh.position.clone().add(new Vector3(0, 0, 1)))

    super(headMesh)
  }
}
创建出来的人物长这样:
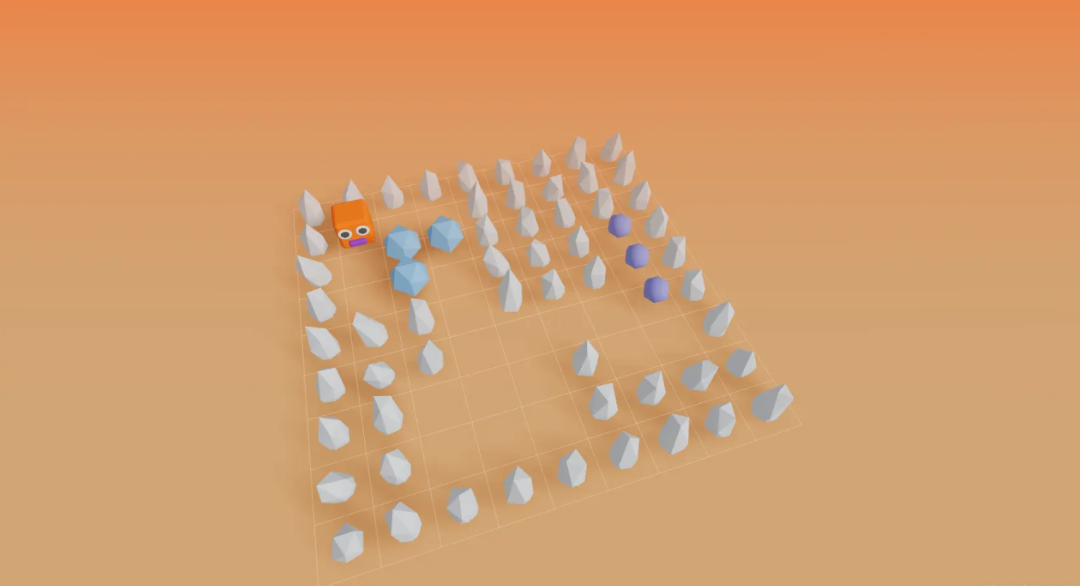
游戏场景
搭建场景
游戏的所有内容都是通过 Three.js 的立体几何来创建的,整个场景分为了游戏区域以及环境区域,游戏区域一共有五种类型:人物、围墙、箱子、目标点、空白区域。首先定义五种类型:
      export const EMPTY = 'empty'
export const WALL = 'wall'
export const TARGET = 'TARGET'
export const BOX = 'box'
export const PLAYER = 'player'
类型定义好之后,我们需要定义整个游戏关卡的布局,推箱子的游戏掘金上也有很多,我看了设置布局的方式多种多样,我选择一种比较容易理解也比较简单的数据结构,就是用双层数组结构来表示每一种元素对应所在的位置。并且我把目标点的位置没有放在整个游戏的布局数据里面,而是单独存起来,这样做是因为player移动之后我们需要实时的去维护这个布局数据,所以少一种类型的话我们会简化很多判断逻辑。
      export const firstLevelDataSource: LevelDataSource = {
  layout: [
    [WALL, WALL, WALL, WALL, WALL, WALL, WALL, WALL, WALL],
    [WALL, PLAYER, EMPTY, EMPTY, WALL, WALL, WALL, WALL, WALL],
    [WALL, EMPTY, BOX, BOX, WALL, WALL, WALL, WALL, WALL],
    [WALL, EMPTY, BOX, EMPTY, WALL, WALL, WALL, EMPTY, WALL],
    [WALL, WALL, WALL, EMPTY, WALL, WALL, WALL, EMPTY, WALL],
    [WALL, WALL, WALL, EMPTY, EMPTY, EMPTY, EMPTY, EMPTY, WALL],
    [WALL, WALL, EMPTY, EMPTY, EMPTY, WALL, EMPTY, EMPTY, WALL],
    [WALL, WALL, EMPTY, EMPTY, EMPTY, WALL, WALL, WALL, WALL],
    [WALL, WALL, WALL, WALL, WALL, WALL, WALL, WALL, WALL]
  ],
  targets: [
    [3, 7],
    [4, 7],
    [5, 7]
  ]
}
layout就表示游戏的布局数据,后面我们循环加载的时候按照类型来对应加载就行了。接着我们开始加载游戏的基本数据。
      /**
 * 创建类型网格
 */
private createTypeMesh(cell: CellType, x: number, y: number) {
  if (cell === WALL) {
    this.createWallMesh(x, y)
  } else if (cell === BOX) {
    this.createBoxMesh(x, y)
  } else if (cell === PLAYER) {
    this.createPlayerMesh(x, y)
  }
}
这里的x,y实际就对应当前几何体所在的位置,需要注意的就是在加载箱子的时候,需要判断一下,当前箱子的位置是不是在目标点上,如果在目标点上的话就需要把箱子的颜色设置为激活的颜色。
      private createBoxMesh(x: number, y: number) {
  const isTarget = this.elementManager.isTargetPosition(x, y)
  const color = isTarget ? theme.coincide : theme.box
  const boxGraphic = new BoxGraphic(color)
  boxGraphic.mesh.position.x = x
  boxGraphic.mesh.position.z = y
  this.entities.push(boxGraphic)
  this.scene.add(boxGraphic.mesh)
}
这里我还创建了一个 elementManager 管理工具,专门用来存当前关卡的布局数据以及用来移动几何体的位置。创建出来的基础游戏场景就是这样。
基础布局创建完之后,添加上键盘事件,主要用来控制人物和箱子的移动。
      private bindKeyboardEvent() {
  window.addEventListener('keyup', (e: KeyboardEvent) => {
    if (!this.isPlaying) return

    const keyCode = e.code
    const playerPos = this.elementManager.playerPos

    const nextPos = this.getNextPositon(playerPos, keyCode) as Vector3
    const nextTwoPos = this.getNextPositon(nextPos, keyCode) as Vector3
    const nextElement = this.elementManager.layout[nextPos.z][nextPos.x]

    const nextTwoElement =
      this.elementManager.layout[nextTwoPos.z][nextTwoPos.x]

    if (nextElement === EMPTY) {
      this.elementManager.movePlayer(nextPos)
    } else if (nextElement === BOX) {
      if (nextTwoElement === WALL || nextTwoElement === BOX) return
      this.elementManager.moveBox(nextPos, nextTwoPos)
      this.elementManager.movePlayer(nextPos)
    }
  })
}
这里主要做了两件事,首先把下个和下下个的位置和位置所在的 mesh 类型查找出来,计算位置很简单,用当前 player 所在的位置加上键盘按下的方向计算出来就行。
      if (newDirection) {
   const mesh = this.sceneRenderManager.playerMesh
   mesh.lookAt(mesh.position.clone().add(newDirection))
   return position.clone().add(newDirection)
 }
查找坐标所在的 mesh 直接用当前位置所在的坐标x,y,就能在 elementManager 上获取到。
const nextElement = this.elementManager.layout[nextPos.z][nextPos.x]
然后我们接着判断下个坐标以及下下个坐标的类型,来决定 player 和箱子是否可以移动。
      if (nextElement === EMPTY) {
  this.elementManager.movePlayer(nextPos)
} else if (nextElement === BOX) {
  if (nextTwoElement === WALL || nextTwoElement === BOX) return
  this.elementManager.moveBox(nextPos, nextTwoPos)
  this.elementManager.movePlayer(nextPos)
}
在 elementManager 里面更新 mesh 的位置,首先是根据坐标把对应的mesh查找出来,然后把 mesh 坐标设置为下一个坐标,并且还需要维护 this.levelDataSource.layout 布局数据,因为这个数据是随着玩家的操作实时更新的。
      /**
 * 更新实体位置
 */
private updateEntityPosotion(curPos: Vector3, nextPos: Vector3) {
  const entity = this.scene.children.find(
    (mesh) =>
      mesh.position.x === curPos.x &&
      mesh.position.y === curPos.y &&
      mesh.position.z === curPos.z &&
      mesh.name !== TARGET
  ) as Mesh

  if (entity) {
    const position = new Vector3(nextPos.x, entity.position.y, nextPos.z)
    entity.position.copy(position)
  }
  // 如果实体是箱子,需要判断是否是目标位置
  if (entity?.name === BOX) this.updateBoxMaterial(nextPos, entity)
}
最后在每一步键盘操作之后都需要判断当前游戏是否结束,只需要判断所有的box所在的位置是否全部都在目标点的位置上就行。
      /**
* 判断游戏是否结束
*/
public isGameOver() {
 // 第一步找出所有箱子的位置,然后判断箱子的位置是否全部在目标点上
 const boxPositions: Vector3[] = []
 this.layout.forEach((row, y) => {
   row.forEach((cell, x) => {
     if (cell === BOX) boxPositions.push(new Vector3(x, 0, y))
   })
 })
 return boxPositions.every((position) =>
   this.isTargetPosition(position.x, position.z)
 )
}
源码: https://github.com/LiamWu50/three-sokoban-live
作者:Liam_wu
链接:https://juejin.cn/post/7296658371214016553
感谢您的阅读
在看点赞 好文不断