自学鸿蒙应用开发(35)- 计算UI组件相对于客户区的坐标
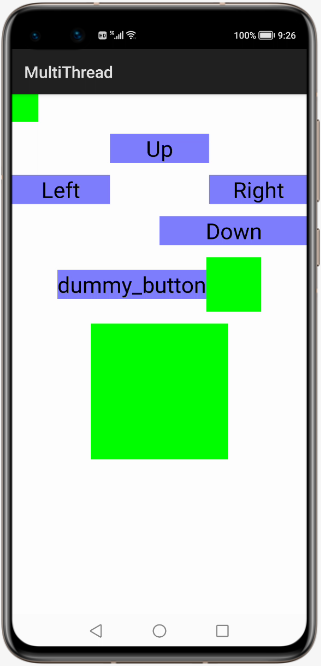
自定义UI组件需要处理触控操作时,需要接受触控操作的位置坐标并判断这个坐标和UI组件的位置关系。例如下图中的三个绿色正方形组件:

如果使用对应组件的getLeft和getTop方法得到的坐标时该组件相对于上一级布局的坐标。而响应的触控事件的坐标则是相对整个客户区:
public boolean onTouchEvent(Component component, TouchEvent touchEvent) {switch (touchEvent.getAction()) {case TouchEvent.PRIMARY_POINT_DOWN: {MmiPoint point = touchEvent.getPointerPosition(touchEvent.getIndex());HiLog.warn(Label, "point=%{public}f,%{public}f", point.getX(), point.getY());return true;}
为了可以正确处理触控事件,我们需要对通知和组件的坐标系进行统一。以下是将组件坐标转换为客户区坐标的方法:
private Rect getScreenBoundRect(){HiLog.warn(Label, "----------getScreenBoundRect----------------");Rect bound = new Rect(getLeft(), getTop(), getRight(), getBottom());HiLog.warn(Label, "Class:%{public}s Rect:%{public}s",getClass().toString(),bound.toString());Component parent = (Component)getComponentParent();while(parent != null){bound.translate(parent.getLeft(), parent.getTop());HiLog.warn(Label, "Class:%{public}s Rect:%{public}s",parent.getClass().toString(), bound.toString());parent = (Component)parent.getComponentParent();}return bound;}
代码的思路是从当前组件开始,获取所有的上级组件并根据它们相对于更上级组件的位置信息调整当前组件的坐标信息。
当然,可以使用相似的方法将触控坐标转换为组件坐标。
这段代码的执行结构如下:
03-24 21:05:45.899 21064-21064/com.components.multithread W 00101/Gameboard: ----------getScreenBoundRect----------------03-24 21:05:45.899 21064-21064/com.components.multithread W 00101/Gameboard: Class:class gameboard.Gameboard Rect:(0,0,100,100)03-24 21:05:45.900 21064-21064/com.components.multithread W 00101/Gameboard: Class:class ohos.agp.components.DirectionalLayout Rect:(0,0,100,100)03-24 21:05:45.900 21064-21064/com.components.multithread W 00101/Gameboard: Class:class ohos.agp.components.RootContainerView Rect:(0,0,100,100)03-24 21:05:45.900 21064-21064/com.components.multithread W 00101/Gameboard: ----------getScreenBoundRect----------------03-24 21:05:45.900 21064-21064/com.components.multithread W 00101/Gameboard: Class:class gameboard.Gameboard Rect:(541,0,741,200)03-24 21:05:45.901 21064-21064/com.components.multithread W 00101/Gameboard: Class:class ohos.agp.components.DirectionalLayout Rect:(710,501,910,701)03-24 21:05:45.901 21064-21064/com.components.multithread W 00101/Gameboard: Class:class ohos.agp.components.DirectionalLayout Rect:(710,601,910,801)03-24 21:05:45.901 21064-21064/com.components.multithread W 00101/Gameboard: Class:class ohos.agp.components.DirectionalLayout Rect:(710,601,910,801)03-24 21:05:45.901 21064-21064/com.components.multithread W 00101/Gameboard: Class:class ohos.agp.components.RootContainerView Rect:(710,601,910,801)03-24 21:05:45.901 21064-21064/com.components.multithread W 00101/Gameboard: ----------getScreenBoundRect----------------03-24 21:05:45.901 21064-21064/com.components.multithread W 00101/Gameboard: Class:class gameboard.Gameboard Rect:(290,846,790,1346)03-24 21:05:45.902 21064-21064/com.components.multithread W 00101/Gameboard: Class:class ohos.agp.components.DirectionalLayout Rect:(290,846,790,1346)03-24 21:05:45.902 21064-21064/com.components.multithread W 00101/Gameboard: Class:class ohos.agp.components.RootContainerView Rect:(290,846,790,1346)
作者著作介绍
《实战Python设计模式》是作者去年3月份出版的技术书籍,该书利用Python 的标准GUI 工具包tkinter,通过可执行的示例对23 个设计模式逐个进行说明。这样一方面可以使读者了解真实的软件开发工作中每个设计模式的运用场景和想要解决的问题;另一方面通过对这些问题的解决过程进行说明,让读者明白在编写代码时如何判断使用设计模式的利弊,并合理运用设计模式。

对设计模式感兴趣而且希望随学随用的读者通过本书可以快速跨越从理解到运用的门槛;希望学习Python GUI 编程的读者可以将本书中的示例作为设计和开发的参考;使用Python 语言进行图像分析、数据处理工作的读者可以直接以本书中的示例为基础,迅速构建自己的系统架构。
觉得本文有帮助?请分享给更多人。
关注微信公众号【面向对象思考】轻松学习每一天!
面向对象开发,面向对象思考!
评论
